
Quick Answer
Start by matching your monitor’s weight, mounting-hole standard, and desk constraints before you compare models. The best monitor arms are the ones that stay put through writing, review, and call transitions without sag or wobble. If you run a 34-inch to 40-inch ultrawide, prioritize heavy-duty gas springs and reinforced joints over cosmetic design cues. Before checkout, confirm current warranty scope plus real parts and support availability on official pages.
Your Desk Isn't a Desk - It's Your Command Center#
If you earn from your desk, treat it as business infrastructure, not decor. A monitor arm is worth judging on three things: will it protect expensive gear, help you stay focused, and keep your setup looking composed on client calls?
| Priority | What to verify | Why it matters |
|---|---|---|
| Protect assets | Monitor size, weight, and mounting compatibility; for ultrawide or large primary-plus-secondary setups, check heavy-duty gas springs and reinforced steel joints | Standard arms can bow under higher weight and longer reach |
| Support focus | Height, tilt, swivel, and depth adjustment | Lets the setup adapt to writing, analysis, and calls without fighting screen position |
| Strengthen credibility | Position hold and stability on calls | Reduces wobble and constant readjustment and helps calls look more composed |
That risk-first lens matters because bad hardware usually fails in ordinary ways, not dramatic ones. A stock stand can leave you hunched forward or craning your neck just to see clearly. An under-specced arm can develop sag, where the screen slowly drops out of alignment. With a 34-inch to 40-inch ultrawide, that risk goes up because the arm is managing more weight and more forward reach, not just more screen area.
- Protect assets
Start with mechanical fit, not aesthetics. Check your monitor's size, weight, and mounting compatibility, then compare that to the arm's intended use. If you run an ultrawide or a large primary-plus-secondary setup, heavy-duty gas springs and reinforced steel joints are a safer checkpoint because standard arms can bow under that load.
- Support focus
Your setup should adapt to the work in front of you. Useful adjustability means control over height, tilt, swivel, and depth so you can move from writing to analysis to calls without fighting the screen position. That is what turns a desk into a working space for concentration and collaboration.
- Strengthen credibility
A stable arm helps the screen stay where you put it, which can make video calls look more composed. Wobble and constant readjustment can read as improvised, even when your work is strong.
Before you buy, verify three things: your monitor specs, your mount compatibility, and your actual workflow needs. The rest of this guide uses that filter to narrow the best monitor arms by outcome: first risk control, then focus, then client-facing presentation.
If you want a deeper dive, read Value-Based Pricing: A Freelancer's Guide.
Part 1: Your Monitor Arm as an Insurance Policy#
Treat this purchase as continuity planning first. If your monitor is where you deliver paid work, the arm is part of uptime and replacement risk control, not just desk aesthetics.
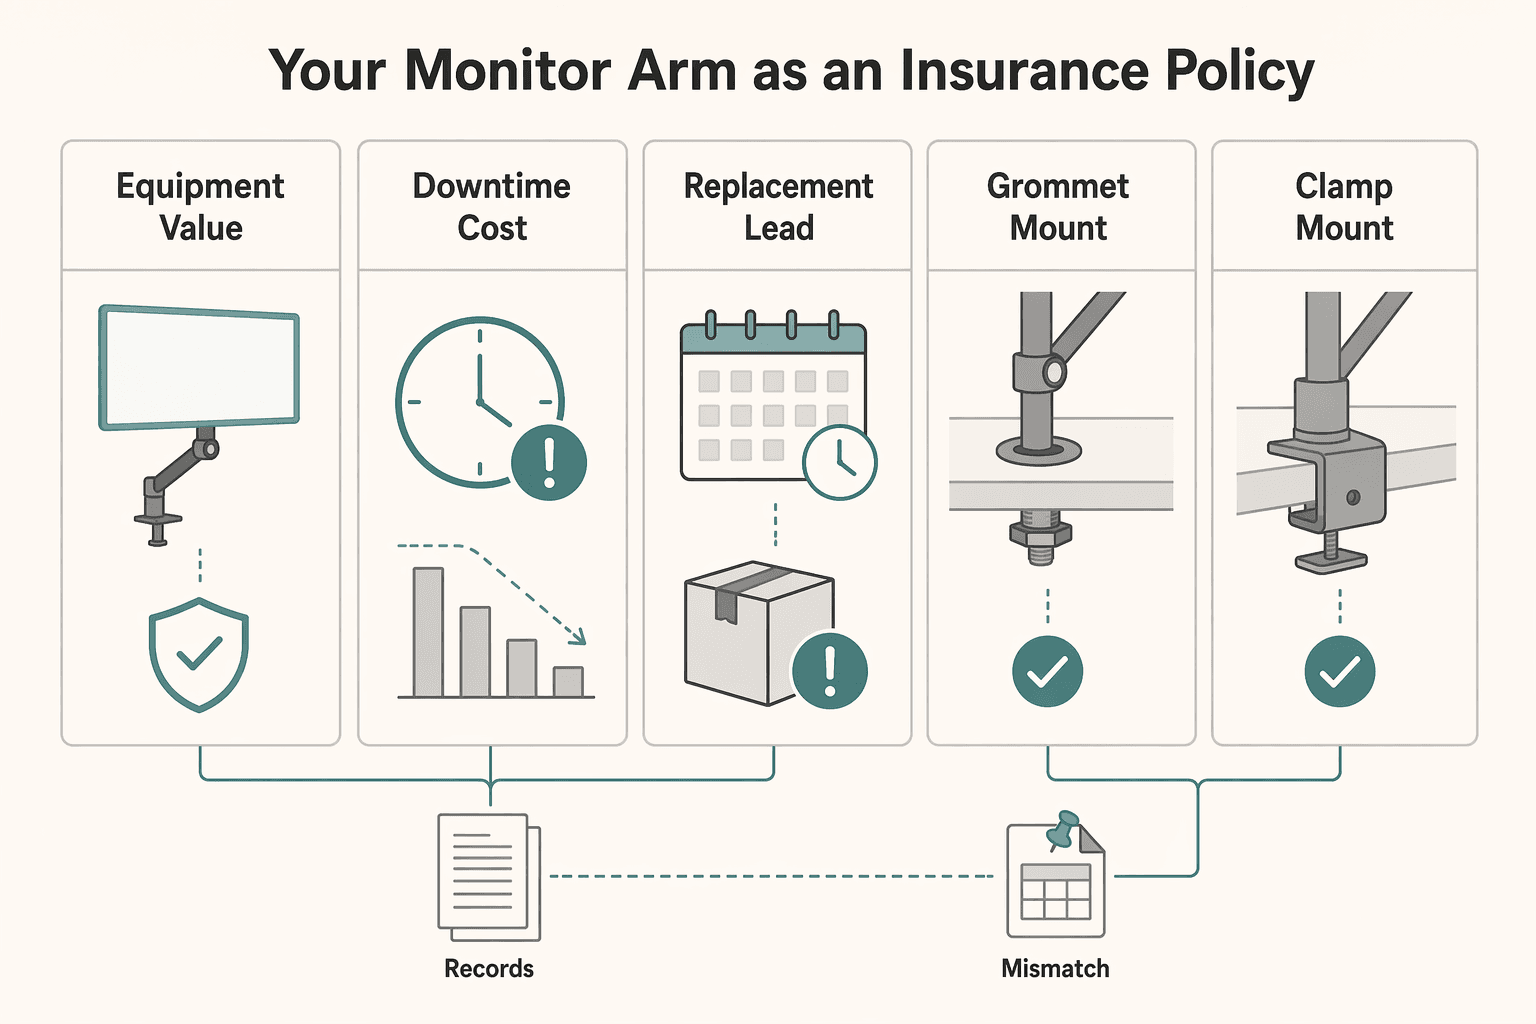
- Price the interruption, not just the hardware.
Start with a simple TCO note before you compare models. Use your own current numbers and avoid fake precision.
| TCO input | What you fill in | Why it matters |
|---|---|---|
| Equipment value | [Primary monitor value] + [attached camera/light/accessory value] | Estimates what one mount failure could damage |
| Downtime cost | Your cost per day or per missed deliverable | Converts "I can work around it" into a real business impact |
| Replacement lead time | [Current retailer/manufacturer estimate] | Shows how long reduced capacity may last |
This reframes the decision quickly: compare failure exposure first, then checkout price.
- Audit the single point of failure with a checklist.
Verify these in order: load-range fit, VESA compatibility, counterbalance quality, joint stability, and mount security. VESA matters because it is the mounting-hole spacing standard on the back of the monitor.
Also compare exact variants, not just brand pages. One captured 80/20 listing shows 3 item types (Adjustable Monitor Mount, Heavy Duty Monitor Mount, Workstation Arm) and SKU-level entries such as 2288 and 2289. Use that same habit: check the exact model, stated fit, and position-holding behavior over repeated adjustments.
- Read warranty and support as an uptime policy.
Warranty length alone is not enough. Check coverage scope, exclusions, support responsiveness, and parts availability. Fill in the current policy details only after you verify them.
Keep source quality in view: catalog pages show what exists, not how it performs in your office; government reports can name products without endorsement; and forum posts may be self-promotional. Use those inputs to build a validation checklist, not to skip your own checks.
- Protect the desk as part of the same risk decision.
Choose mount method based on desk reality and setup complexity, then confirm clearance before buying.
| Mount path | When to prioritize | What to verify |
|---|---|---|
| Grommet mount | You already have a suitable hole and want a centered install | Hole position, underside access, hardware fit |
| Clamp mount | No usable grommet path | Edge thickness, underside clearance, clamp contact area |
| Reinforcement plate (with clamp) | Surface or load profile suggests higher stress | Plate compatibility, load spread, clearance with frame rails/trays |
For higher-complexity setups, such as heavier or multi-monitor arrangements, be more conservative about load distribution and mount security.
- Use this as your handoff to Part 2.
First verify monitor specs, VESA pattern, desk material/thickness, and mount location. Then shortlist only models that fit those facts. After that, judge motion quality and workflow fit.
This pairs well with our guide on The Best Desk Chairs for Long Hours of Work.
Part 2: Unlocking a "3D Workspace" for Deep Focus#
After you confirm fit and desk safety, the next question is practical: can you reposition your screen quickly as tasks change, or are you stuck with one compromise setup all day? Here, "deep focus support" means you can correct common friction quickly, including glare, viewing distance, neck angle, keyboard-to-screen alignment, and sit/stand repositioning.
Use a function-first standard when you evaluate movement. The 2018 PLOS One record (DOI 10.1371/journal.pone.0200710) covers shoulder and elbow range-of-motion impairment rating scales and a functional approach; it is not a monitor-arm performance comparison. So the useful filter is simple: judge what your setup can repeatedly do in your real workflow.
| Criterion | What to test on your desk | Good sign | Red flag |
|---|---|---|---|
| Range of motion | Move the screen through your 3 common task positions in under 1 minute | You can reach each position you actually use | You hit placement limits before you reach a usable position |
| Adjustment effort | Reposition the display 3 times during normal work | Movement is controlled enough that you keep using it | You avoid adjustments because it feels stiff, awkward, or fussy |
| Position hold | Leave the screen in a new spot for 10 to 15 minutes | It stays where you set it while you work | Drift, sag, wobble, or cable pull shifts it off target |
| Transition smoothness | Go from sitting to standing and back once | You recover a usable position quickly | Each transition forces a partial setup rebuild |
Set up three focus states on purpose#
| Focus state | What to do | What to watch for |
|---|---|---|
| Precision work | Move the screen to your detailed-work position and make small corrections | Glare control or distance tuning is clumsy, or corrections overshoot |
| Review and reading mode | Shift to your long-read/edit position and verify in-between placements hold steady | Slow drift shows up in weaker position hold |
| Collaboration calls and sit/stand transitions | Recenter for camera framing, shared-doc visibility, and standing posture changes | If alignment breaks every time you transition, the movement is not helping |
- Precision work
Move the screen to your detailed-work position, then check whether you can make small corrections without overshooting. If glare control or distance tuning is clumsy, that friction will keep interrupting you.
- Review and reading mode
Shift to your long-read/edit position and verify that in-between placements hold steady. This is where weak position hold often shows up as slow drift.
- Collaboration calls and sit/stand transitions
Recenter for camera framing, shared-doc visibility, and standing posture changes. The key test is recovery speed: if alignment breaks every time you transition, the movement is not helping.
Run these three states in one normal workday, take a quick photo of each position, and note cable pull or recurring drift. Keep the same failure lens from Part 1: not just collapse risk, but sag, wobble, and enough setup hassle that you stop using adjustment at all. When you compare options, that practical reliability filter matters most. For broader setup context, see The Best Ergonomic Gear for Your Remote Work Setup.
Part 3: Projecting Unquestionable Competence on Every Client Call#
Your goal on calls is simple: get to one steady, repeatable setup without last-minute adjustments. Treat your monitor, camera, microphone, and light as one system, then use the same positioning order every time.
Use this positioning order every time#
| Step | Action | Target result |
|---|---|---|
| Stability first | Set your call position, switch between your notes and camera preview, then return to your call view | The view comes back the same way each time |
| Eye-line alignment second | Place the screen so looking at people and checking notes does not force constant gaze drops | A natural conversation view |
| Framing consistency third | Lock one default call view and reuse it | A familiar frame you can rebuild quickly after focused work |
- Stability first
Set your call position, switch between your notes and camera preview, then return to your call view. If the view comes back the same way each time, keep that baseline.
- Eye-line alignment second
After the setup feels stable, place the screen so looking at people and checking notes does not force constant gaze drops. You are aiming for a natural conversation view, not a studio-perfect angle.
- Framing consistency third
Lock one default call view and reuse it. The target is a familiar frame you can rebuild quickly after focused work.
| Real call moment | If setup is stable | If setup is unstable |
|---|---|---|
| Typing while listening | Frame stays usable when you return to camera view | You need a quick re-center before speaking |
| Posture change | View still feels consistent | Framing drifts enough to distract you |
| Switching tasks mid-call | You return to call position in one move | You repeat small resets |
Cable management should support repeatability, not just a tidy look. Choose one routing path and keep it the same: run monitor and camera cables together, then route microphone and light cables on a separate path so they do not cross your background. Keep loose loops, dangling adapters, and visible cross-frame cables out of view.
Use one quick check before each call:
- Open camera preview.
- Scan frame edges for distractions.
- Read one line of notes, then return to the lens.
- If the move feels awkward, adjust screen position.
- Keep one reference photo of your default call view.
That is the practical test: can you return to the same camera-ready setup on demand. For another step-by-step home-office buying walkthrough, see The Best Tea Kettles for a Home Office.
The Recommendations: The Gruv Endorsed Arsenal#
Use this shortlist as a fast filter by job-to-be-done, not as a fixed ranking by brand. Your goal is to find the arm that fits your display, desk, and call workflow with the fewest workarounds.
Recommendation lists age quickly. A 2016-style component roundup is still a good format reference, but your purchase decision should come from current product pages, current written support terms, and current accessory requirements.
| Reader intent label | Candidate to evaluate | Where it usually fits | Main quibble | Upgrade path | Verify before purchase |
|---|---|---|---|---|---|
| Single-monitor reliability | Ergotron LX | One main display with frequent repositioning | Can become a poor fit if your monitor sits near the top end of supported load | Move to a heavier-duty class if screen size/depth increases | Verify current capacity, then confirm VESA pattern, mount option, and current support/warranty page |
| Ultrawide load | Ergotron HX | Large/heavy/curved ultrawide setups | Some panels may require extra tilt support or another compatibility part | Stay in heavy-duty class as panel size/weight grows | Verify current capacity, then confirm accessory compatibility and return terms |
| Dual-monitor flexibility | AVLT Dual Monitor Arm | Two displays that need independent movement | Desk constraints often fail first (clearance, underside obstructions) | Keep independent-arm approach if each screen may change later | Verify per-arm support, then confirm reach, clamp footprint, and desk clearance |
| Design-forward calls | Herman Miller Ollin | Camera-visible setups where hardware appearance matters | Visual polish does not fix poor fit for screen/desk/mount | Upgrade only if daily on-camera presentation is a core priority | Confirm cable-path details, mount choices, and current support docs |
| Value-focused setups | Vari Monitor Arm | Cost-aware single-display setups | Can be expensive later if your setup outgrows it quickly | Move up only when monitor class or setup complexity changes | Verify current capacity, then confirm install method and upgrade limits |
- Single-monitor reliability candidate: Ergotron LX
Choose this when your priority is stable, repeatable positioning for focused work and calls. Evaluate it with one framework: load fit, motion quality, mount options, cable management, desk-surface compatibility, and support confidence. If your display lands near the limit after verification, move up a class.
- Ultrawide-load candidate: Ergotron HX
Start here if your display class makes lighter arms a risk. Verify panel fit on current documentation and confirm whether your exact setup needs an added tilt part or another accessory. Most failures here come from skipping one compatibility check before checkout.
- Dual-monitor flexibility candidate: AVLT Dual Monitor Arm
Use this path when each screen needs independent positioning. Confirm physical desk fit early: depth, underside clearance, and any rails/trays/lips that can interfere with mounting. Weight alone is not enough for this decision.
- Design-forward calls candidate: Herman Miller Ollin
Review this first if your desk and hardware are regularly visible on client calls. Keep the same framework, but give extra attention to cable routing and install documentation so visual cleanliness is repeatable, not one-time styling. Ask for evidence in product photos and setup docs.
- Value-focused setup candidate: Vari Monitor Arm
This is for a practical upgrade when you want better positioning without paying for capacity you will not use soon. The key tradeoff is future growth: if you expect a larger display, second screen, or heavier on-monitor setup, confirm whether this class still fits next year.
Choose in minutes#
- One standard single monitor and repeatable call framing are top priority: start with the single-monitor candidate and choose the option where your verified load sits comfortably mid-range.
- Large/heavy/curved ultrawide: start with the heavy-duty candidate and verify accessory needs before purchase.
- Two monitors or frequent layout changes: prioritize independent movement first, then confirm your desk can physically accept the mount.
- Desk visible on calls: prioritize cable path and framing repeatability, not just appearance.
- Tight budget: buy for the setup you expect to run next year, not only today.
You might also find this useful: The Best Gear for a Portable Home Office.
Conclusion: Invest in Your Infrastructure, Invest in Yourself#
A monitor arm earns its keep when it fits your setup and holds up in day-to-day use. Keep the decision simple. Verify requirements in current manufacturer materials, confirm your installation constraints, and read the latest warranty and support terms from official sources.
A good closing rule is the same one you would use anywhere else: do not trust stale information. An archived State Department page explicitly warns that archived content is not updated and that links may not function. Treat old marketplace screenshots, copied spec tables, and years-old Q&A the same way. If you cannot confirm current documentation, you do not have enough to buy confidently.
- Asset protection
Start with documented compatibility from current official materials. If key fit details are missing or inconsistent across pages, pause and verify before buying. The avoidable risk is committing to hardware before you have a complete, current fit check.
- Productivity optimization
Prioritize repeatable positioning and clear adjustment guidance. The real test is whether normal daily movement and setup are clearly supported in current product documentation, not how polished a product image looks.
- Professional presence
On calls, consistency matters more than flash. Aim for a setup you can reproduce reliably, with clean sightlines and controlled cable routing. Verify current manuals and support pages directly rather than assuming any listing equals endorsement or long-term help.
| Option | Tradeoff you accept | Likely failure mode if you skip checks | Best for |
|---|---|---|---|
| Fully verified option (current docs + support pages) | More upfront review time | Fewer surprises at setup | Buyers who want predictable outcomes |
| Partially verified option (some details still unclear) | Faster decision | Installation or usability gaps discovered late | Shortlisting, not final purchase |
| Unverified or archived-information option | Minimal effort now | Rework risk after purchase | Not recommended for final selection |
Use your shortlist, then run freshness and verification checks one more time. That is how you choose the right arm for your workflow, desk constraints, and client-facing setup.
We covered related desk-buying tradeoffs in The Best Coffee Makers for a Home Office. If you want to confirm what's supported for your specific setup, Talk to Gruv.
Frequently Asked Questions
Are pricier arms actually worth it?
Usually, yes if you reposition your screen often. Articulated arms generally cost more because they give you horizontal and vertical movement, often with a gas spring or mechanical tension system, while a fixed arm is mostly adjusted during assembly and then left in place. Decide whether you need frequent movement or a mostly set position, then avoid cheap knockoffs that can collapse and damage both desk and monitor.
Should you use a C-clamp or a grommet mount?
For most people, a desk clamp is the easiest and most versatile option. A grommet mount is a good fit when you already have a desk hole, since it secures through the desk with a plate underneath. Before you buy, check your desk edge and underside for anything that could block the clamp or grommet plate. | Option | Best when | Tradeoff you accept | | --- | --- | --- | | Fixed arm | You set the monitor once and rarely move it | Lower flexibility after install | | Articulated arm | You switch positions during the day | Higher cost | | C-clamp | You want the simplest install at the desk edge | Requires a compatible desk edge and underside access | | Grommet | You have a usable desk hole | Placement depends on hole location |
What specs matter most before you buy?
Start with monitor count first: single, dual, or triple. Then confirm VESA compatibility between the monitor and arm, and choose a mounting method that fits your desk: clamp, grommet, or wall. A quick fit sheet with [monitor count], [VESA compatibility], and [mount method] can prevent checkout guesswork.
Can a monitor arm actually help your work and on-camera setup?
It can, especially for ergonomics and desk space. Eye level is the target, and an articulated arm is usually the better fit if you need to move the monitor between positions. Set your preferred positions first, then choose an arm style that can reliably hold them.
Try a related tool
Researched and edited by the Gruv editorial team. Gruv builds cross-border billing, payouts, and finance-operations software for global businesses.
Sources
- 2021-2025.state.gov/briefings-foreign-press-centers/investments-...trusted
- acf.gov/sites/default/files/documents/opre/pagitask7...trusted
- dhs.gov/sites/default/files/2024-09/24_0924_st_weapo...trusted
- dmv.virginia.gov/sites/default/files/forms/dmv39.pdftrusted
- ethics.house.gov/wp-content/uploads/2023/12/Dec-2022-House-Et...trusted
- exhibits.si.edu/wp-content/uploads/2021/09/SI-Guide-to-Inter...trusted
- fhwa.dot.gov/engineering/hydraulics/pubs/09111/09111.pdftrusted
- home.wvlegislature.gov/committee/house-government-organizationtrusted
Educational content only. Not legal, tax, or financial advice.
Related Posts

Value-Based Pricing for Freelancers Under Real Payment Risk
Value-based pricing works when you and the client can name the business result before kickoff and agree on how progress will be judged. If that link is weak, use a tighter model first. This is not about defending one pricing philosophy over another. It is about avoiding surprises by keeping pricing, scope, delivery, and payment aligned from day one.

The Best Ergonomic Gear for Your Remote Work Setup
**Treat your ergonomic remote work setup as operating infrastructure, not a comfort splurge.** When posture breaks down, delivery quality and scheduling usually break down right after. Start by setting a baseline that protects your body and your business before you compare products.

The Best Gear for a Portable Home Office
The evidence here does not directly test portable-office gear decisions, so use this as a practical framework rather than a proven standard.