
Quick Answer
Submit through App Store Connect using a role-based nomination workflow, then run disciplined follow-up instead of waiting passively. To get app featured on app store, verify access first, choose the safest submission mode for your QA maturity, and anchor claims to shipped or near-ship updates. After sending, track App Review changes, respond to messages quickly, and keep stakeholder updates factual because selection is considered, not guaranteed.
Get Featured Without Guesswork Using a Role Based Nomination Playbook#
If you want to get an app featured, stop treating it like a mystery or a copywriting contest. Start by verifying the current route in your platform docs or account screens, documenting what you actually know, and assigning clear ownership so the work does not depend on memory, urgency, or whoever is loudest in Slack. This section intentionally treats platform-specific eligibility rules, timelines, and decision criteria as unknown unless you can verify them directly.
That structure matters for a simple reason. Formal recognition programs are built to remove guesswork and make participation less dependent on the most visible contributors. The same logic applies here. You are not trying to crack a hidden formula. You are running a clean process where facts, owners, and evidence stay visible from start to finish.
| Confirmed guidance you have in hand | Common assumption | Your operating action |
|---|---|---|
| A current platform doc, help article, or account screen indicates the route you should use. | "We know where to submit because we did this once before." | Save the URL or screenshot, note the date checked, and use that as your source of truth. |
| A named person has working account access today. | "The founder or marketer can probably submit." | Test access before drafting. If access fails, fix that first. |
| Current timing guidance, if any, is documented. | "We can submit whenever the build is ready." | Mark current timing guidance as pending platform verification in your tracker. Do not plan off hearsay. |
| Your evidence pack shows what is already shipped or firmly scheduled. | "A strong story can cover for a thin release." | Tie every claim to release notes, build status, screenshots, or a dated launch plan. |
| Stakeholders understand that outcomes are uncertain unless current docs say otherwise. | "Submitting means a placement is likely." | Forecast possibilities, not promises, and document that expectation early. |
Step 1 Anchor facts before you draft#
Start with a one page facts note. Keep it short: the verified route you found, verified account access, published timing guidance if any, and a short list of unknowns you will not guess at. Even if you are working solo, this keeps you from polishing a nomination for a path you never confirmed.
| Facts note item | What to keep | Handling note |
|---|---|---|
| Verified route | Saved URL or screenshot | Note the date checked |
| Verified account access | Account owner name | Test access before drafting |
| Published timing guidance, if any | Date checked | Do not plan off hearsay |
| Unknowns you will not guess at | Short list of unknowns | Treat the item as unconfirmed |
Use a simple test. Another person, or future you tomorrow morning, should be able to open the note and see the proof behind each operating decision. A saved URL, screenshot, date checked, and account owner name are enough. If you cannot point to evidence, treat the item as unconfirmed.
The common failure mode is speed. Teams often jump into narrative and design assets first, then discover the route, permissions, or dates have changed. That can lead to last minute access requests, mixed messages to stakeholders, and a rushed submission built on assumptions.
Step 2 Assign ownership with a light RACI#
Make ownership explicit even if your team is tiny. You need four roles:
| Role | Responsibility |
|---|---|
| Submitter | Enters or uploads the nomination and owns the final send |
| Reviewer | Checks claims, links, dates, and asset accuracy |
| Approver | Signs off on what the business is promising externally |
| Backup | Can take over if the submitter is out or locked out |
If you work alone, you can still assign all four roles to yourself, but separate them in time. Draft as submitter, review the next day as reviewer, then do a final approval pass before sending. That small pause catches weak claims and missing proof more often than most teams expect.
The verification point is straightforward: one person per role, a live deadline, and one shared tracker or doc. If two people both think they own submission, nobody really does.
Step 3 Build the story from shipped or near ship work#
Your narrative should follow the product, not the other way around. Lead with what users can already experience or what is firmly about to ship. Then support it with evidence: release notes, screenshots, short demo clips, QA signoff, launch date, and any regional or device availability notes that affect what can actually be shown.
| Claim pattern | Edit decision |
|---|---|
| A sentence that cannot be backed by something in your evidence folder | Cut it or soften it |
| Claims about future impact | Cut it or soften it |
| Claims about broad market demand | Cut it or soften it |
| 'Major' updates without proof | Cut it or soften it |
A useful test is whether each sentence in the nomination can be backed by something in your evidence folder. If not, cut it or soften it. Claims about future impact, broad market demand, or "major" updates without proof are where credibility breaks.
Keep parallel support work moving, including metadata and creative cleanup in your A Guide to App Store Optimization (ASO) for Mobile Apps, but do not confuse that with the nomination itself. Your process still depends on a verified path, clear ownership, and a story that is true on the day you submit.
You might also find this useful: How to Get Featured in the Press as a Freelance Expert.
What Should You Prepare Before You Nominate?#
Lock your preflight before anyone drafts: scope, access, submission mode, and timing. This keeps the nomination factual and prevents last-minute rework.
| What to lock | How to verify | Failure risk if skipped |
|---|---|---|
| Scope | Write one line: Apple App Store via Featuring Nominations in App Store Connect. Save the URL or screenshot and date checked. | The team mixes in other channels, and the draft no longer matches the real submission path. |
| Role access | Confirm the submitter has one of these roles: Account Holder, Admin, App Manager, or Marketing. Test access now. | Copy is ready, but the person assigned cannot submit. |
| Submission mode | Choose individual nomination or CSV import. Individual starts as a draft; CSV auto-submits and cannot be saved as draft first. | You lose the pre-submit edit checkpoint when you needed it most. |
| Timing | Track current lead-time guidance as pending App Store Connect verification. Use Apple's current guidance: minimum two weeks notice, and up to three months in advance for wider consideration. | You plan too close to launch and force rushed review decisions. |
Set ownership fields before writing starts so handoffs are explicit, not implied.
| Field | Name | Status |
|---|---|---|
| Owner | ||
| Reviewer | ||
| Backup | ||
| Go/no-go |
Build a prep packet with evidence only, not pitch language.
- Shipped or near-ship updates: include what is live now or firmly scheduled.
- Placement intent by surface: state where you want consideration; for In-App Events, that can include Today, Games, Apps, plus discovery in search and on the product page.
- Claims-to-proof map: for each nomination claim, attach the supporting artifact so unverified statements do not enter the form.
Make a short known vs unknown note a required artifact before submission. Keep it brief so anyone can quickly separate confirmed facts from open questions, especially around timing or regional assumptions, since featured selections are localized and regionally curated.
After this preflight is complete, you can optionally tighten your store presentation with A Guide to App Store Optimization (ASO) for Mobile Apps.
Step 1 How Do You Confirm the Official Path and Decision Rights?#
Do not draft nomination copy until governance is verified. Your first checkpoint is to confirm the current featuring route in Apple's live materials and then lock decision rights in one tracker entry.
| task | single accountable owner | required reviewer | go/no-go condition | escalation owner |
|---|---|---|---|---|
| Verify current featuring route | Owner | Reviewer | Same-day documentation and in-product checks confirm Featuring Nominations in App Store Connect as the route you will use | Backup |
| Verify role eligibility and access | Owner | Reviewer | Actual submitter can open the nominations area now; current role list is pending App Store Connect verification | Account Holder or internal admin |
| Approve drafting start | Owner | Reviewer | One tracker entry includes owner, reviewer, backup, route proof, access check date, and explicit go/no-go | Backup |
Step 1: Verify the route with evidence, not memory. Check Apple's current documentation and App Store Connect in the same session, then save dated proof in your tracker. If the evidence is unclear or inconsistent, pause and escalate before writing anything.
Step 2: Run access verification before drafting. Have the named submitter log in and open the nominations area, then record the outcome and add a backup who can take over. Keep the role-policy line marked as pending App Store Connect verification until the current role list is rechecked.
Step 3: Enforce the drafting gate. No nomination copy starts until the tracker entry is complete with ownership, reviewer coverage, backup coverage, route proof, and go/no-go status. This keeps route validation, access, and accountability in one auditable handoff.
For adjacent launch-readiness work, use How to Perform User Acceptance Testing (UAT) for a Mobile App. Once this checkpoint is complete, move to Step 2 and choose your submission mode.
Step 2 Should You Submit a Single Nomination or CSV Batch?#
Choose the mode that gives you the safest execution: use a single nomination for control and recovery, and use CSV only after you revalidate that CSV upload is available in your current FEATURING > Nominations flow and your process is already reliable.
Before mode selection, run this pass/fail gate. If any item fails, use single nomination.
- Field completeness: every required field is filled.
- Formatting consistency: dates, naming, and terminology are consistent across entries.
- Reviewer signoff: the assigned reviewer approved the final content.
- Rollback plan: one owner is named to revert to single-flow handling if the first attempt breaks.
Verification point: your tracker records pass/fail for all four checks.
Use this operator table to make the call:
| Decision criterion | Single nomination signal | CSV signal | Risk if wrong choice |
|---|---|---|---|
| Recovery need | You expect edits after review feedback | Entries are final before upload | Rework during a time-sensitive window |
| Process stability | First run or recently changed workflow | Repeated clean runs with no field corrections | Avoidable validation errors |
| Volume and limits | One or a few submissions | Many submissions, within the current batch limit pending App Store Connect verification | Speed prioritized over submission quality |
Before submitting in either mode, run one reusable validation block: final app name, current dates, consistent terminology, approved positioning, and platform field constraints pending App Store Connect verification.
Pilot before you scale: run one nomination first, document why that mode was chosen, and switch to CSV only after a clean cycle with no field corrections, no reviewer reversals, and a tested fallback path.
Verification point: your decision note states what had to be true before CSV was allowed. Need the full breakdown? Read The Best Tools for Mobile App Prototyping.
Step 3 How Do You Build a Submission Packet That Looks Professional?#
Your packet looks professional when it reads like an operating brief tied to what is actually shipped, not promotional copy. If a line cannot be traced to your selected build, release notes, or approved internal records, remove it.
In App Store Connect, keep your packet consistent from start to finish: nomination name, information type (for example, New Content or App Enhancements), and app details should all reflect the same shipped change and the same rationale. Build one shared fact base first, then draft from that.
Use this shared fact base before writing either variant:
| Field | What you lock before drafting |
|---|---|
| Nomination name | Memorable, final naming used across reviewers |
| Information type | The selected type in App Store Connect |
| Shipped change | Exact change tied to the selected build |
| Why it matters now | Clear user-facing reason, grounded in internal records |
| Scheduling note | Current planning window pending App Store Connect verification |
Verification point: In the Build section, confirm the app icon, build string, and upload date/time match what you describe. Only one build can be associated with each app version, so do not describe a different build.
Use a simple surface strategy matrix so framing changes, but facts do not:
| Placement surface | Reader intent | Message angle | Proof assets required |
|---|---|---|---|
| Story-led version | Understand why this release matters | User impact and why now | Selected build details, approved change summary, owner signoff |
| Utility-led version | Understand what improved and how | Specific capability update and outcome | Selected build details, feature record, QA/reviewer confirmation |
| Any surface | Check credibility and consistency | Same facts, different framing only | Shared fact base, metadata consistency check, reviewer signoff |
Draft both variants from that same source sheet. If one variant includes a claim the other cannot support from shared evidence, either add proof or cut the claim.
Then run claim discipline on every non-trivial statement:
| Claim | Internal proof source | Owner signoff | Remove if unverified |
|---|---|---|---|
| Claim to verify | Relevant build, release, or product record | Named reviewer and role | Yes |
Finish with readiness checks: keep ASO as support work here, so naming and feature terms in your packet do not conflict with store metadata, then handle broader metadata cleanup in A Guide to App Store Optimization (ASO) for Mobile Apps. Do not state fixed timing until the current planning window is verified in App Store Connect, do not treat "added for review" as final submission, and clear export-compliance questions before review submission.
Step 4 What Happens After Submission and How Do You Operate While Waiting?#
After you submit, run a weekly operating loop instead of passively waiting. Use the App Review section in App Store Connect as your source of truth, triage new review content, assign clear owners, and keep your ASO track moving while featuring is still only consideration, not a guarantee.
Start with one lightweight tracker per platform: current status, latest message, owner, next action, and next check time. Keep platforms separate because status on one platform does not influence another, and do not assume queue order because submissions may not be reviewed in submission order.
| Signal | What it means | Your immediate action | Owner | Escalation trigger | Proof of completion |
|---|---|---|---|---|---|
| Status change in App Review | A real review event happened | Log the change, set the next action, set next check time | Submitter or release owner | New blocker or unclear status | Tracker row shows platform, timestamp, owner, next action |
| New App Review Message | A review message that is not tied to a specific submission | Classify it, route it, and respond in the correct place | Review coordinator | Message needs cross-functional input | Response recorded and owner acknowledged |
| Platform statuses diverge | Review is progressing independently by platform | Update the plan and stakeholder view per platform | Release manager | Team plan still treats all platforms as one timeline | Platform-specific update sent |
| Need to submit more items while a version is under review | You may use the second lane if capacity exists | Confirm whether this is the items lane and check platform capacity | App Store Connect admin | Platform is already at the maximum 2 submissions under review | Capacity check and submission choice documented |
Triage review content by type every cycle. The App Review section may show four content types, so classify first, then act; at minimum, separate App Review Messages, submission-specific status, and App Review information on the latest approved platform version so context stays clean.
For stakeholder updates, keep it tight: confirmed facts, open questions, and the next checkpoint. Use review-window guidance pending App Store Connect verification instead of promising timing, and keep A Guide to App Store Optimization (ASO) for Mobile Apps as your parallel growth track while featuring is pending.
Operational checkpoint list:
- App Review section checked on schedule
- Platform-by-platform tracker updated with owner and next action
- New review content classified and routed correctly
- Stakeholder update sent with facts, unknowns, and next checkpoint
- ASO work still moving in parallel
For a step-by-step walkthrough, see A Guide to App Store Submission for iOS.
Common Mistakes That Kill Momentum and How to Recover Fast#
Most momentum loss comes from repeatable process errors, not randomness. Treat each one as an incident: contain it, assign a single owner, verify the fix, then restart.
| Mistake | Failure signal | Root cause | Immediate containment (what you do now) | Durable fix (who owns it) | Proof of closure |
|---|---|---|---|---|---|
| Access and role errors | You cannot access the nomination workflow, or the wrong person is editing | Role and access assumptions were never verified | Pause submissions. Have your account owner recheck current permissions in official platform documentation and log the current approved-role list with source URL and check date. | Maintain an access register with primary owner, backup owner, last check date, and source URL. Owner: submission lead. | Working-access screenshot plus a dated permissions log entry. |
| Premature CSV use | Batch intake creates field errors, missing assets, or inconsistent copy | You scaled input format before QA was stable | Revert to single-entry review for the next cycle and assign one final checker. | Reuse batch intake only after clean cycles with no preventable formatting/content errors. Owner: QA lead. | Completed QA checklist attached to each nomination entry. |
| Unverified policy assumptions | Team guidance comes from chat threads, community posts, or cached pages | Unverified guidance was treated as policy | Mark uncertain rules as open and recheck live sources before acting. | Track source URL, checked-on date, and recency marker; if a page shows recent changes, treat old notes as provisional. Owner: policy reviewer. | Tracker shows each rule as confirmed or provisional with source and date. |
| Overpromised outcomes | Stakeholder updates read like placement is guaranteed | Editorial consideration was communicated as a committed result | Correct the update the same day: keep only what is submitted, pending, and unknown. | Use a fixed status format: confirmed facts, open questions, next checkpoint. Owner: communications lead. | Latest update contains no certainty language about outcome or timing. |
| Apple/Google process mixing | One combined checklist is used for both platforms | Platform workflows were treated as interchangeable | Split workstreams immediately by platform. | Keep separate checklists, assets, timelines, and verification notes for each platform. Owner: release manager. | Two distinct trackers with separate owners and dates. |
Before each new nomination cycle, run this checklist:
- Confirm owner and backup owner access.
- Verify live platform guidance and log what is still unverified.
- Use the simplest submission format your QA can reliably control.
- Keep Apple and Google materials and trackers separate.
- Send stakeholder updates only after facts and access checks are confirmed.
Move fast once checks are complete, not before. Related reading: How to Price a Mobile App Development Project.
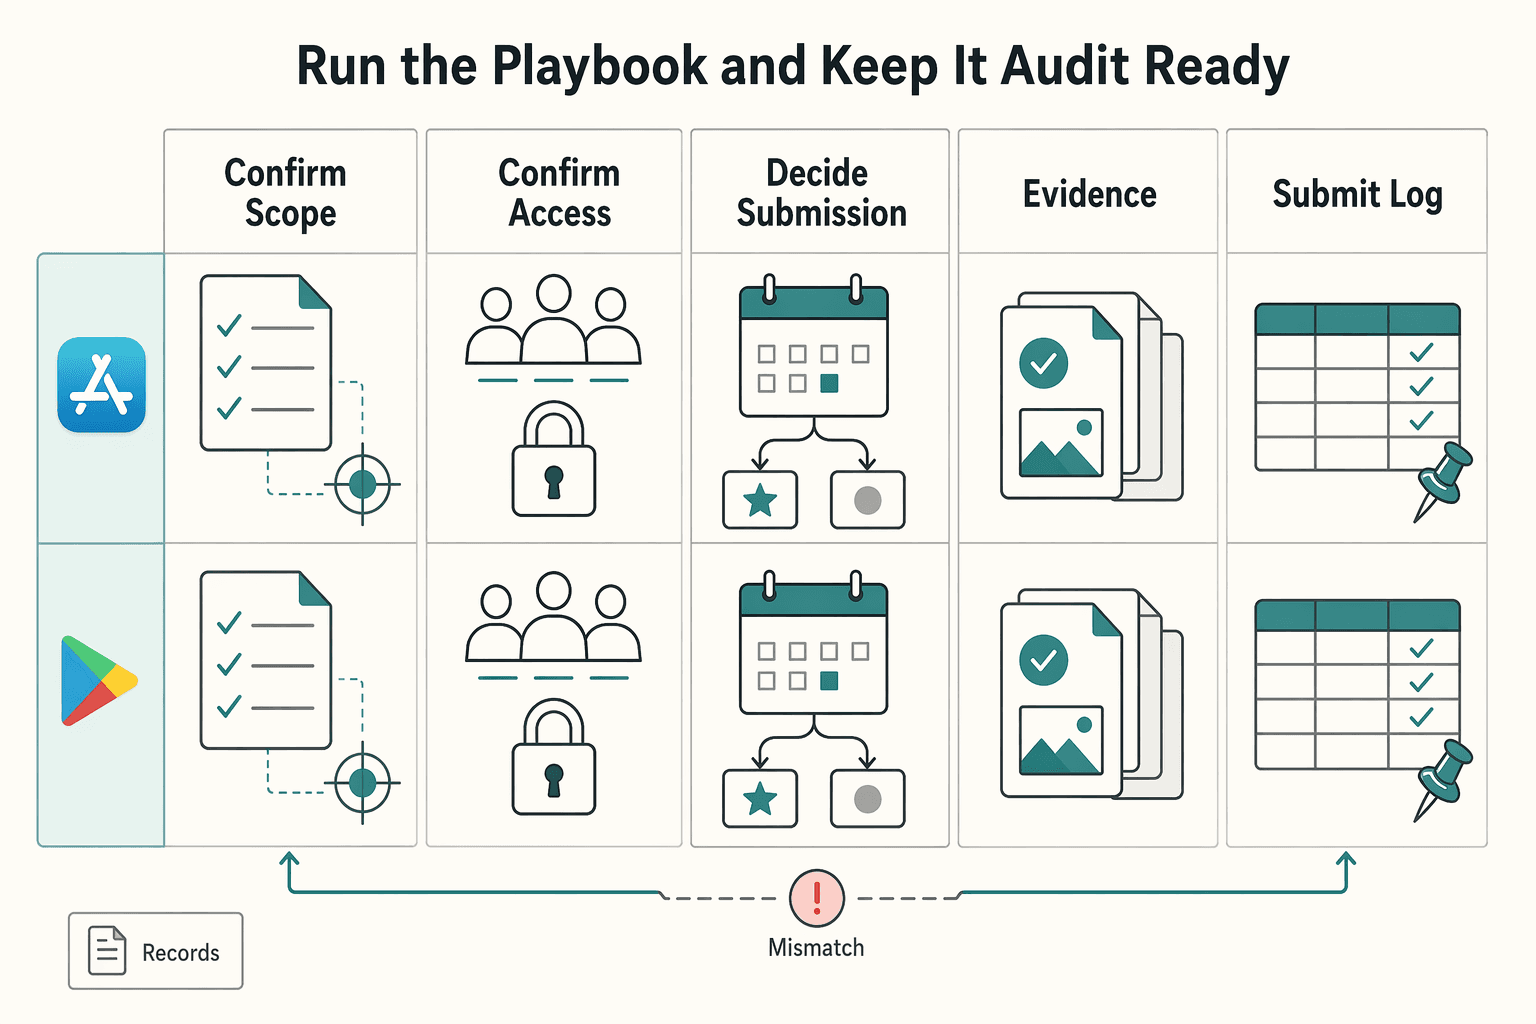
Run the Playbook and Keep It Audit Ready#
You keep this process audit-ready by running the same checklist every release and logging evidence as you go. Keep Apple App Store and Google Play as separate operating tracks so ownership, records, and status do not get mixed.
Use one release table each cycle, and do one action plus one artifact at each step.
| Stage | Required owner | Required evidence | Common failure | Recovery action |
|---|---|---|---|---|
| Step 1 Confirm scope | Release owner | Tracker row with platform, app version, release objective, and current lead-time guidance pending App Store Connect verification | One shared timeline blurs platform work | Split into separate platform rows and reset owners/dates |
| Step 2 Confirm access and decision rights | Access approver | Dated record of who submits, who reviews, and who signs off | Drafting starts before access is verified | Pause, verify live access, and assign a backup submitter |
| Step 3 Decide submission mode | Submission owner | Mode decision log with what is currently available and when checked | Team builds on stale assumptions | Recheck live options and update the decision log |
| Step 4 Prepare evidence packet | Product lead and reviewer | Final packet with shipped feature summary, approved assets, fact/assumption labels, feature-flag audit, production-default check, and production-endpoint check | Future promises or config mistakes slip in | Remove unshipped claims, rerun checks, and reapprove |
| Step 5 Submit and log | Submitter | Timestamped submission record with platform, version, packet link, and status | No proof of what was sent | Reconstruct same-day from confirmations/screenshots and attach to tracker |
| Step 6 Follow up while waiting | Platform owner | Follow-up log of inbox checks, responses, schedule changes, and current lead-time guidance pending App Store Connect verification | Silence is treated as approval | Send corrections quickly, update logs, and reset expectations |
| Step 7 Update stakeholders | Stakeholder owner | Brief update separating facts, assumptions, risks, and next check date | Internal updates imply guaranteed placement | Use verified status only: drafted, submitted, awaiting reply, or additional info sent |
Your evidence packet should prove the release is real and operationally ready. At minimum, review all flags that affect user behavior, confirm production defaults, and verify production API endpoints instead of staging/UAT endpoints. These checks matter because a single configuration mistake can break user experience.
For iOS readiness, record launch behavior separately from resume behavior. Launch and resume are different states, resume is generally faster, and testing in varied conditions is important because warm and cold behavior sits on a spectrum. Slow launch on iOS can trigger watchdog termination, so keep those results in your packet.
Before any nomination, run a hard gate:
- Every concrete claim is marked as confirmed fact or clearly labeled assumption.
- User-impacting flags, production defaults, and production endpoints are verified and recorded.
- The table is complete for the correct platform: owner, mode decision, submission log, follow-up record, and stakeholder update.
If any gate fails, do not submit yet. For both Apple App Store and Google Play, treat nomination as consideration and avoid promise language until platform outcomes are confirmed. If you want a deeper dive, read The Best Tools for App Store Optimization (ASO).
Frequently Asked Questions
How do you actually get featured on the Apple App Store?
Use Featuring Nominations in App Store Connect. Apple describes that as the official place to share a new app, app enhancement, app launch, event, or story with its team. Submit there, manage follow-up cleanly, and treat any outcome as editorial consideration, not a booked placement.
Who can nominate an app for featuring in App Store Connect?
The excerpts here do not specify exact role requirements for nominations. Confirm current access in App Store Connect before anyone drafts copy, and record who is submitting, who is reviewing, and when you verified it. If access is unclear, stop there first so handoffs do not stall the submission.
What is the difference between a single nomination and a CSV upload?
Treat this as a verification point, not a default process choice. App Store Connect is the official channel, but you should confirm the live submission format before building around any CSV method, because old notes and team assumptions go stale fast. If the only verified path available to you is a single entry, use that and do a manual QA pass before submitting.
Can submitting a nomination guarantee featuring placement?
No. A nomination gives Apple material to consider, but it does not guarantee featuring in any market or surface. That matters even more because selections are localized and regionally curated, so stakeholder updates should stick to confirmed facts only: submitted, pending, requested info, or closed.
How long does featuring review take after submission?
Do not promise a fixed decision date. Apple asks for a minimum of two weeks notice and recommends submitting up to three months in advance for broader consideration, so plan in ranges, not certainty. Mark the current review-window guidance as pending platform verification in your internal notes, then set stakeholder language around checkpoints instead of deadlines.
What are the acceptance criteria used by Apple’s Editorial Team?
Apple says it looks for new apps, games, significant updates, In-App Events, great stories, and more, but it does not publish a weighted score or fixed checklist. Your job is to separate fact from assumption before you submit: shipped feature, real release date, supported market relevance, and evidence you can show now. If a claim depends on a future launch, internal hope, or an unapproved asset, label it as an assumption or leave it out.
What should you prepare before submitting a nomination?
Run a short readiness check before you send anything. Confirm the official App Store Connect path, verify account access, lock the submission owner, and make sure your update story is tied to real shipped or near-ship work. Then check App Review Information for any required settings, account credentials, or special instructions, because missing details there can delay review or cause failure. While you wait on any featuring outcome, keep discovery moving with A Guide to App Store Optimization (ASO) for Mobile Apps so momentum does not depend on featuring alone.
Try a related tool
Researched and edited by the Gruv editorial team. Gruv builds cross-border billing, payouts, and finance-operations software for global businesses.
Sources
Includes 1 external source outside the trusted-domain allowlist.
- dot.ca.gov/-/media/dot-media/programs/design/documents/...trusted
- ecfr.gov/current/title-28/chapter-I/part-35trusted
- federalregister.gov/documents/2025/01/06/2024-30983/hipaa-securi...trusted
- fema.gov/sites/default/files/documents/fema_eoc-quick...trusted
- govinfo.gov/content/pkg/FR-2021-06-02/pdf/FR-2021-06-02.pdftrusted
- texasattorneygeneral.gov/sites/default/files/files/divisions/open-gov...trusted
- ustr.gov/sites/default/files/files/Press/Reports/2025...trusted
- adapty.io/blog/how-to-pass-app-store-reviewexternal
Educational content only. Not legal, tax, or financial advice.
Related Posts

Run App Store Optimization Like an Operator for Mobile Apps
ASO works when you treat it like a recurring operating practice, not a burst of edits when installs dip. If you are working solo or with one helper, keep it to four controls you can actually manage: metadata, creative, experimentation, and risk. Think of this as a practical four-part ASO stack with a simple report card for execution.

The Best Tools for App Store Optimization (ASO)
The right ASO tools help you make one change, ship it, review the result, and log the next move across the App Store and Google Play. Treat tool choice as an operating decision, not a shopping exercise. If a platform cannot support that loop with less friction than your current method, it should not be your primary tool.

The Best Personal Finance Apps for Freelancers
If you are choosing among the best personal finance apps freelancers can use, start with payment risk, not popularity. The goal is simple: keep cash flow visible enough to act early when income slows or bills stay fixed.