
Quick Answer
For a solopreneur service business, a journey map should be a client operating tool, not just a picture of how someone feels. It should show how work moves from early contact to follow-up, with clear ownership, written approvals, proof of completion, and likely blockers at each stage so onboarding, delivery, payment, handoff, and retention stay controlled.
You're Not Mapping Clicks, You're Mapping Cash Flow#
If you work solo, a client journey map should do more than describe how a client feels. It should help you control how work starts, moves, gets approved, and gets paid. In standard UX, a journey map shows the steps a person takes to reach a goal. In a service business, that same structure can become an operating tool for spotting where payment timing, scope clarity, handoff friction, and admin steps break down.
That shift matters because service businesses often break in different places than apps do. A typical UX map looks for pain points like confusing navigation or slow checkout. Your version should look for places where work stalls: unclear approvals, vague next steps, missing documents, or a final handover that happens before the admin side is settled.
Use a simple checkpoint at each touchpoint. Note who owns the next action, what evidence closes the step, and what can block it.
| Aspect | Typical UX Journey Map | Client Engagement Blueprint |
|---|---|---|
| Goal | Help a user complete a task | Help a client engagement move cleanly from inquiry to payment and handoff |
| Main focus | Behavior, emotions, usability pain points | Decisions, approvals, documents, responsibilities, and timing |
| Common friction | Confusing navigation, slow checkout | Scope ambiguity, delayed signoff, payment timing issues, messy asset transfer |
| Output | Design improvement ideas | Improvement opportunities, internal ownership, and stage-by-stage checkpoints |
If your map does not assign ownership and define what "done" means at each stage, it is probably too soft to protect the business. That is the tradeoff. A looser map may feel friendlier, but it leaves more room for misunderstandings and late-stage disputes. Build it in three layers: onboarding controls, delivery controls, and offboarding controls.
You might also find this useful: How to create a User 'Persona' document for a design project.
What is a Client Journey Map (And Why Most Solopreneurs Get It Wrong)#
A client journey map is a practical operating view of how someone moves through your service from early contact to follow-up, not just a prettier sales diagram. Solopreneurs usually get it wrong in predictable ways: they do not map the journey at all, they map from assumptions instead of real client input, they focus on company convenience over client clarity, or they skip pre- and post-project stages where friction often appears.
Old model versus working model#
If you come from product UX, keep the mapping habit but adjust what you track.
| Element | Softer map | Working client map |
|---|---|---|
| Objective | General improvement goal | A specific, measurable, time-bound objective for this map |
| Persona | Generic audience label | Defined client persona you revisit regularly (quarterly if your mix shifts) |
| Touchpoints | Mostly on-screen moments | Full interaction path, including offline and follow-up steps |
| Perspective | Company-first process view | Client-centered flow that still keeps your operations clear |
| Stage coverage | Mid-project only | Pre-project, in-project, and post-project stages |
A useful map should make each stage easy to run: who acts next, what "done" looks like, and what usually blocks progress. Keep it concrete enough to use on real projects, not just to discuss in theory.
As you build it, keep onboarding tight and verifiable rather than broad and abstract. The exact labels can vary, but the rule is simple: avoid assumptions, and confirm key details in writing so the next step is clear for both sides.
If your map cannot show objective, stage, touchpoint, owner, evidence, and likely blocker, it is still too soft to run the engagement.
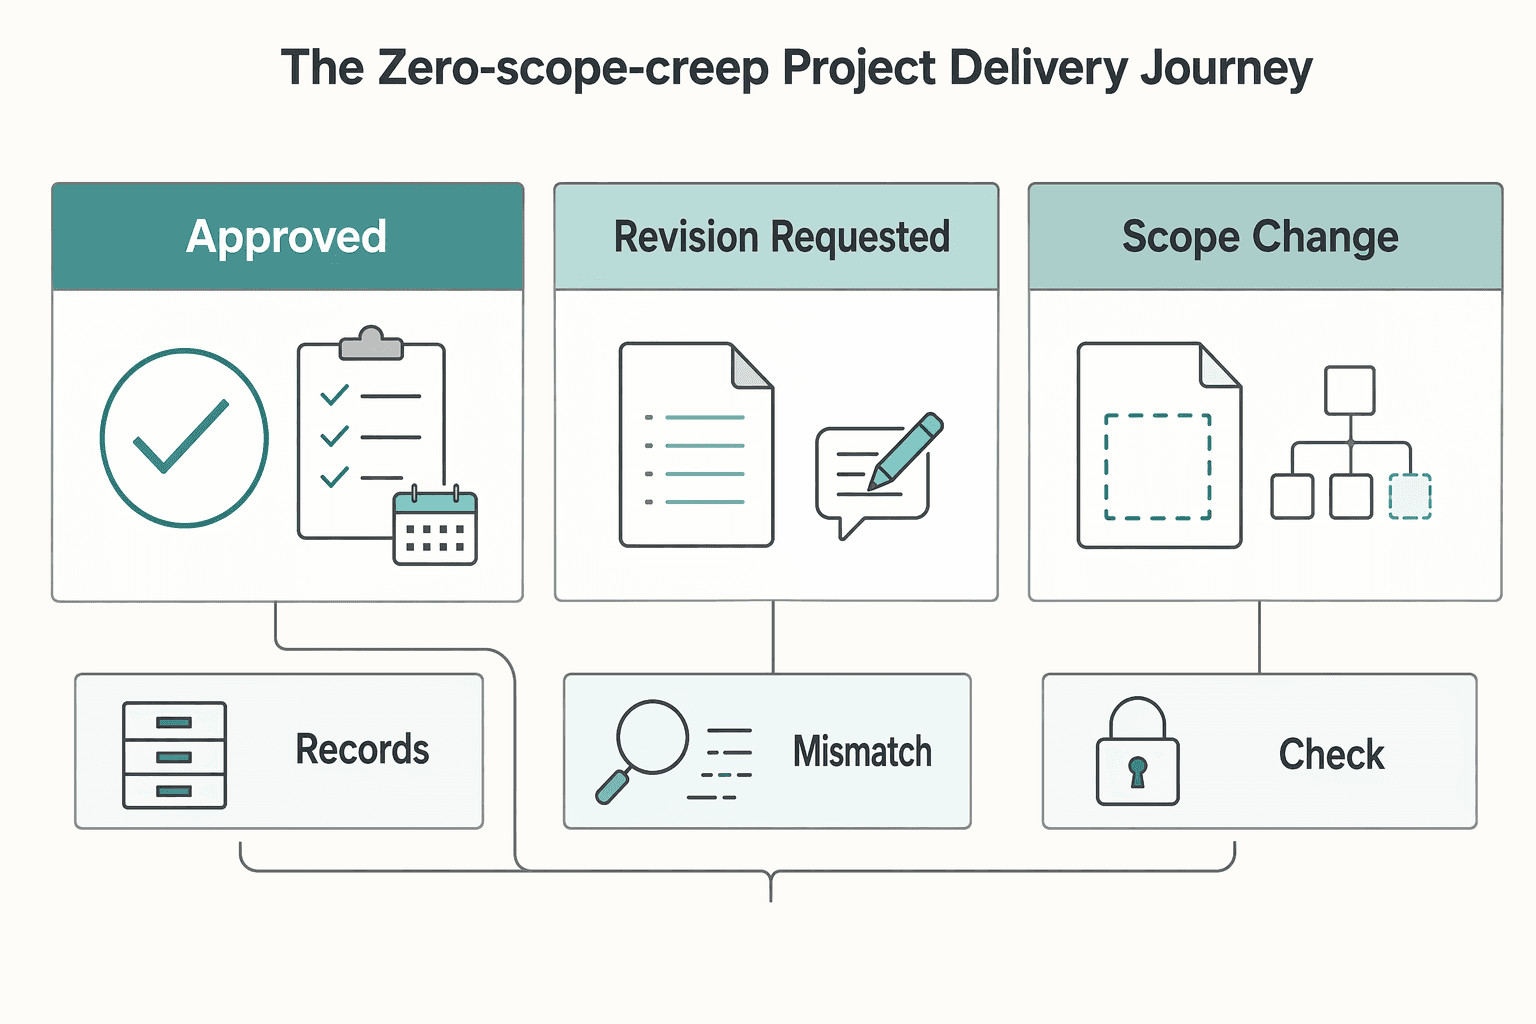
Stage 2: The 'Zero-Scope-Creep' Project Delivery Journey#
Once onboarding is locked, control delivery through written milestone decisions. If you want scope discipline without constant friction, put each meaningful work chunk behind a decision gate. Do not start the next chunk until the current one is closed.
| Decision path | Trigger | Next step |
|---|---|---|
| Approved | Client accepts the milestone in writing, with the version or date clearly named | Do not start the next chunk until the current one is closed |
| Revision requested | Changes stay within agreed scope | Log them against that milestone before more work starts |
| Scope change requested | Request expands deliverables, stakeholders, rounds, or timing | Route it to change control first, then pause new work until that decision is made |
Use three decision paths for every milestone: approved, revision requested, and scope change requested.
This structure protects schedule and budget because scope definition directly affects time and cost, and scope creep is a known project risk. For each checkpoint, keep proof: milestone name, version reviewed, decision, approver, and next action. If that record is split across calls and chat, the gate is not closed.
Make feedback boring on purpose#
Clear documentation is a delivery control, not admin overhead. Without a clear timeline and accessible documentation, teams lose direction and miscommunication derails work. Atlassian's 2025 reporting also notes that 25% of teams and executives spend a quarter of their week finding information, which is exactly the kind of drag that creates rework.
Use one feedback protocol on every project:
- Keep one source of truth for comments and approvals.
- Require a consistent feedback format: item, requested change, reason, and priority.
- Name one client-side owner to consolidate input before it reaches you.
- When stakeholders disagree, pause that item and request one consolidated decision from the owner.
| Delivery failure signal | Operational response |
|---|---|
| Feedback arrives in email, chat, and calls | Reply once with the single-source link and ask for all comments to be reposted there before review continues. |
| Client misses a review date | Confirm the miss in writing, show the blocked dependency, and issue a revised timeline after verification. |
| Feedback is vague or contradictory | Ask the named client owner for one consolidated decision and pause that item until it is returned. |
| New request appears after milestone review | Classify it as approve, revision, or scope change. If out of scope, route it to change control before scheduling work. |
Use status updates to track dependencies, not just activity#
A useful status update shows what is done, what is next, what is blocked, and what the client needs to do. Keep that structure consistent every time, then list dependencies explicitly: what cannot move until approval, content, access, or consolidated feedback is received, and who owns the next step.
| Update element | What to include |
|---|---|
| What is done | Completed work or decisions closed |
| What is next | The next planned step |
| What is blocked | Current blockers |
| What the client needs to do | The action the client owns next |
| Dependencies | What cannot move until approval, content, access, or consolidated feedback is received, and who owns the next step |
That cadence keeps delivery legible while the project is live and gives you a cleaner record for handoff in Stage 3.
For a step-by-step walkthrough, see A guide to 'Affinity Mapping' for synthesizing user research.
Stage 3: The 'Seamless Offboarding & Retention' Journey#
Offboarding is where you close the project on purpose, confirm the record is complete, and decide the next stage: retention, referral, or a clean stop. Keep the same split you used earlier: lifecycle is the stage-level view, and the journey is the touchpoint-level view inside that stage. You need both if you want fewer loose ends.
The previous stage created your delivery evidence trail. Now use that same trail to close in a fixed order.
Close the project with a written release sequence#
Use one consistent closeout sequence every time so nothing important is left to memory.
| Step | Action | Details |
|---|---|---|
| 1 | Confirm final scope status in writing and send the final invoice | Written scope status and final invoice |
| 2 | Prepare the final handover package | Clear version names and file list |
| 3 | Apply your agreed release policy consistently | Complete any access-transfer notes |
| 4 | Send a short closure note | List what was delivered, what access changed, and what support (if any) remains |
Keep the closeout evidence together in one place. A single folder for the final invoice, written confirmations, final file index, and access notes is usually enough to avoid "he said, she said" cleanup later.
Pick the right retention path#
Do not use one generic ask for every client. Match the next step to the engagement signal.
| Next step | Context signals | Best ask |
|---|---|---|
| Retainer fit | Ongoing updates, recurring maintenance, repeated advisory questions, or known monthly needs | Offer a defined monthly scope, response rules, and review cadence |
| Project extension fit | A clear next phase exists, but work is still discrete and time bounded | Propose a separately scoped phase with new deliverables and approvals |
| Referral fit | Work is complete, no obvious next phase exists, and the client is satisfied | Ask for one targeted introduction (specific peer, team, or partner type) |
After handover, run one follow-up and track closeout signals the same way you tracked delivery: invoice status, package release status, access-transfer status, testimonial request status, and next-step outcome.
Feed what you learned back into the map#
Treat the map as a living document, not a one-time artifact. Do a short post-project review: what worked cleanly, where friction appeared, and what you should standardize next. If the same issue keeps showing up in offboarding, move the fix upstream into onboarding or milestone delivery.
We covered this in detail in The best tools for creating 'User Journey Maps'.
From Map to Mandate: Taking Control of Your Business#
A journey map becomes an operating tool only when it ends in clear decisions, named owners, and checks you can verify later. If those pieces are missing, you still have research, not control.
Most breakdowns are ordinary: a vague stage, an unowned touchpoint, feedback spread across channels, or a handoff that exists only in an ideal flow. A useful map shows both positive and negative moments from the client's point of view. Quick test: can you point to one recent real project that shows each stage happened as mapped, including the friction?
| Common failure point | Control mechanism you implement |
|---|---|
| Onboarding stages mix client actions with your internal tasks | Separate customer-facing touchpoints from internal actions, then assign internal ownership for each fix |
| Delivery moves forward on assumptions | Add a stage-by-stage approval point and define what evidence counts as acceptance |
| Feedback is scattered across email, chat, and calls | Choose one channel of record and attach feedback notes to the relevant touchpoint |
| Offboarding is treated as a hand wave | Define exact handover steps, a confirmation point, and who verifies completion |
| The map goes stale after one project | Add a conclusion area with improvement opportunities, an owner, and the project that triggered the change |
Mandate checklist#
- Write one rule for each lifecycle stage: onboarding, delivery, offboarding.
- Name the owner for every rule, even if that owner is you.
- Define one proof item per stage: approval note, feedback record, handover confirmation.
- Review the map after the next live engagement, not six months later.
Next step: take your current map, add internal ownership at each weak step, and document the exact rules you will enforce on the next project. Related: How to Create a Customer Journey Map for Your Freelance Services.
Frequently Asked Questions
How do I create a journey map for my service-based business?
You don’t need complex software. Begin with the three core stages: Onboarding, Project Delivery, and Offboarding. For each stage, list every client touchpoint. Then, for each touchpoint, define three things: Client's Goal, Your Goal (to de-risk the project), and Potential Friction. This framework moves journey mapping from a vague concept to a concrete risk-management tool.
What are the most critical stages in a B2B client onboarding journey?
While every step matters, the first 48 hours are paramount. The most critical stages are the handoff from your sales process to project kickoff, the contract signing, and the first payment. A clunky, disorganized experience in these initial moments signals a lack of professionalism and can create payment friction and doubt that poisons the entire engagement. Your journey map must engineer these touchpoints to be seamless, professional, and confidence-inspiring.
Is journey mapping practical for a solo consultant?
It is not just practical; it is essential. For a large agency, one difficult client or one late payment is a manageable problem. For a Business-of-One, it can be a catastrophic event. You don’t have an accounts department to chase invoices or a legal team to handle disputes. Your journey map is your automated defense system. It’s the structure that protects your time, your cash flow, and your sanity, allowing you to focus on the expert work you’re paid to do.
How can a journey map help me get paid faster?
A journey map helps you get paid faster by proactively eliminating the friction that causes delays. By mapping the process, you identify and solve payment obstacles before they occur. This includes building a compliance checkpoint in onboarding to collect correct billing info, engineering a payment-first handover for final deliverables, and specifying clear payment terms in the contract.
What are the biggest business risks a journey map helps me mitigate?
Your Client Engagement Blueprint is fundamentally a risk mitigation tool. It directly confronts the most damaging risks independent professionals face: Scope Creep (mitigated by formal milestone approvals), Payment Disputes & Delays (mitigated by compliance checks and payment-leveraged handovers), Client Mismanagement (mitigated by proactive communication), and Legal & Compliance Errors (mitigated by data collection checkpoints).
Can I use a simple tool like a spreadsheet for journey mapping?
Absolutely. The power of journey mapping is in the thinking, not the software. While tools like Miro or Figma are excellent for visualization, a simple spreadsheet or text document is perfectly sufficient. Create columns for 'Stage,' 'Touchpoint,' 'Client Goal,' 'Your Goal,' and 'Risk/Friction.' The goal is to architect a clear, repeatable process, and the best tool is the one you will actually use.
Researched and edited by the Gruv editorial team. Gruv builds cross-border billing, payouts, and finance-operations software for global businesses.
Sources
Includes 5 external sources outside the trusted-domain allowlist.
- clame.nyu.edu/fetch.php/E08BJ0/312399/RunningACustomerJour...trusted
- ecfr.gov/current/title-40/chapter-I/subchapter-J/part...trusted
- pmc.ncbi.nlm.nih.gov/articles/PMC9486782trusted
- atlassian.com/work-management/project-management/project-l...external
- esgsuccess.com/5-questions-to-ask-when-making-the-choice-cu...external
- gainsight.com/essential-guide/the-customer-journey-and-lif...external
- getthematic.com/insights/customer-journey-insightsexternal
- justinmind.com/ux-design/user-journey-mapexternal
Educational content only. Not legal, tax, or financial advice.
Related Posts

Thailand's Long-Term Resident (LTR) Visa for Professionals
For a long stay in Thailand, the biggest avoidable risk is doing the right steps in the wrong order. Pick the LTR track first, build the evidence pack that matches it second, and verify live official checkpoints right before every submission or payment. That extra day of discipline usually saves far more time than it costs.

Build a Freelance Customer Journey Map You Can Run Every Week
Maps often fail when they stay as a visual after the first draft instead of guiding day-to-day decisions. A freelance customer journey map should help you decide what to do next when a lead is unclear, scope shifts, approvals stall, or payment is late.

How to Create a User Persona Document for Client Qualification and Proposals
If you sell services on your own, a traditional persona helps you understand users, but it may be incomplete. It may not tell you whether a prospect is a strong fit once money, approvals, and delivery risk enter the picture.