
Quick Answer
A digital nomad pre-travel checklist for a long-stay move should center on departure timing, entry status, documents, money access, insurance, housing proof, and client continuity before you pack. Set a firm departure date and backup date, assign an owner and proof for each task, verify border-critical files offline, test backup payments and connectivity, and delay departure if key legal or operational gaps remain.
Start Here and Set Your Departure Decision Date#
Set your departure dates first. Long-term travel planning breaks down when timing stays vague. Vague timing usually turns into rushed paperwork, rushed bookings, or unresolved home obligations.
This checklist is for relocations and long stays, not short vacation trips. Start with finances, documents, housing, and money-access setup before you spend time on gear. Readiness is broader than packing alone.
Lock two dates now, then map every task to a deadline, owner, and proof:
- Set one firm departure date.
- Set one backup date in case a key dependency slips.
- Assign an owner for each task.
- Define one proof artifact per task so completion is verifiable.
| Task area | Deadline rule | Owner | Proof artifact |
|---|---|---|---|
| Housing and home obligations | Complete before final bookings | You | Lease/notice status record |
| Documents | Complete before final travel purchases | You | Organized document folder |
| Money access | Complete before departure week | You | Tested account access record |
| Work continuity | Complete before departure week | You | Sent handoff or notice records |
Use the tracker as a decision tool, not a reminder list. If a task has no proof, treat it as open even if you believe it is done. That rule protects you from last-minute confusion when you need to confirm details quickly during travel week.
Review the tracker weekly and keep tasks marked in progress until proof exists in one easy-to-find place. That avoids a common failure mode: booking first, then discovering your notice period or lease exit terms still block departure. Job notice is often two to four weeks; some lease exits still require written notice, and early breaks can involve fees. Use your backup date when those constraints collide with unresolved prep.
Use the Timeline That Matches Real Lead Times#
Use phase gates instead of one long to-do list. Long stays usually go off track on planning and admin timing, not packing.
| Phase | Main check | Key detail |
|---|---|---|
| Early planning | Confirm your exit date, then check job and rental terms early | Notice periods are often two to four weeks, so this step can shift your actual departure window |
| Submission and confirmation | Complete applications and admin tasks with lead times | Store confirmations in one place |
| Final pre-departure check | If a key dependency is still unresolved | Adjust your departure timing instead of compressing the remaining tasks |
| Final access check | Verify access to critical files | Check access to critical files, not just file existence |
| On arrival | Close immediate operational tasks first | Include payments and active client commitments |
Move in sequence and run a go-or-no-go check at each phase:
- Early planning: Confirm your exit date, then check job and rental terms early. Notice periods are often
two to four weeks, so this step can shift your actual departure window. - Submission and confirmation: Complete applications and admin tasks with lead times, then store confirmations in one place.
- Final pre-departure check: If a key dependency is still unresolved, adjust your departure timing instead of compressing the remaining tasks.
- Final access check: Verify access to critical files, not just file existence.
- On arrival: Close immediate operational tasks first, including payments and active client commitments.
When a phase fails, stop downstream tasks and fix the blocker before moving on. That helps you avoid spending money on flights or housing while key documentation is still uncertain.
Track completion with evidence, not memory. Keep one owner and one proof artifact per task, and treat missing proof as incomplete. A practical set includes confirmations and backup copies of key travel and work documents.
Packing-focused prep can feel productive while higher-risk dependencies stay open. Keep one rule: finish core approvals and documents before you spend money or attention on extra gear.
Pick the Right Entry Path Before You Book Anything#
Choose your entry route before you pay for flights or long-stay housing. Clear rules on stay length and remote-work permission are usually worth more than a cheaper option with ambiguous terms.
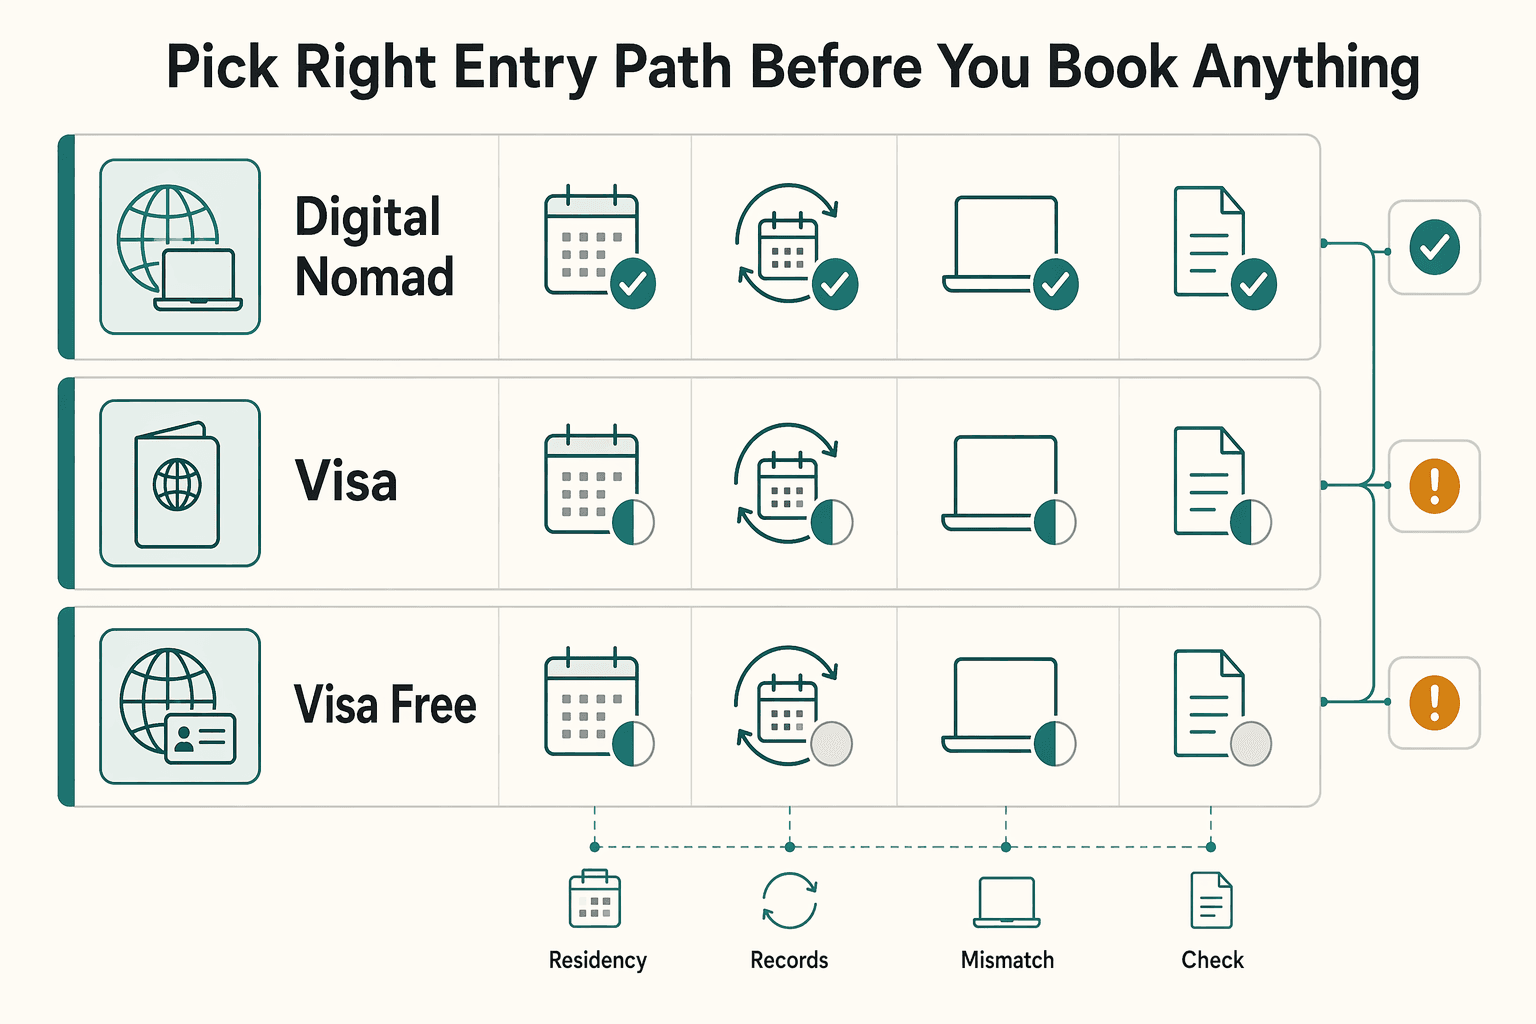
Compare Digital Nomad Visa, Visa-free entry, and E-visa against your intended duration, renewal needs, and whether remote work is explicitly allowed. If official language is unclear, treat that as unresolved and choose a clearer jurisdiction.
| Entry path | Best use case | What to verify before payment | Common failure mode |
|---|---|---|---|
Digital Nomad Visa | Longer stays where you want stated remote-work terms | Stated stay length, renewal path, proof requirements, and where you must apply | Assuming one country's nomad-visa structure applies everywhere |
E-visa | Destinations where this route is available | Current processing status, document format rules, and whether phone copies are accepted | Applying too late, then forcing travel with unresolved status |
Visa-free entry | Shorter stays with simple entry terms | Stay counting rules, extension limits, and remote-work ambiguity | Assuming entry permission automatically covers your work pattern |
Use shortlist tools to compare destinations, then make final decisions through official government channels before you book.
Run this gate before booking:
- If remote-work legality is not explicit in official language, pick a clearer destination even at higher cost.
- If stay counting is confusing, pause and resolve it first because mistakes can create overstay risk and border-entry issues.
- If you may need to apply from a third country, confirm that route is allowed first, since this can be difficult or impossible in some cases.
- If proof format is unclear, confirm whether documents must be printed or can be shown on a phone.
- Check
Passportvalidity early, since some destinations may deny entry inside a six-month expiry buffer.
A useful way to compare options is to keep one note per destination with four fields: entry path, allowed activity, required proof format, and unresolved questions. If unresolved questions are still open close to booking, that is your signal to pause, not to assume flexibility at the airport.
Complete entry-path verification first, then book. If key terms remain ambiguous, use your backup date or choose a clearer jurisdiction instead of relying on airport interpretation. If you want a deeper comparison before deciding, read The 2026 Global Digital Nomad Visa Index: 50+ Countries Compared.
Build a Border-Ready Document Pack You Can Prove in Seconds#
Once your entry path is clear, assemble one document pack you can produce in seconds. The goal is simple: prove identity, entry status, and immediate travel details without searching across apps.
Use it as a baseline, then confirm final requirements on official government pages for your destination. Checks can vary by country, carrier, and route. For Thailand, use the official travel information page and review the latest security alerts.
| Pack layer | What to include | Why it matters at Border control |
|---|---|---|
| Core identity and entry | Passport, any entry-approval file (for example, a visa document if relevant), and your latest itinerary | Confirms identity and current entry status |
| Travel intent and stay details | An itinerary and first-address details you can show quickly if asked | Helps you answer immediate stay and travel-plan questions |
| Financial backup | Optional financial documents you can access quickly if requested | Helps if financial capacity questions come up |
| Official references and emergency contacts | Saved copy of the country travel information page, visa guidance link, and consular contact numbers | Gives you a reliable reference if guidance changes or issues arise at check-in |
Consider a multi-copy storage setup for reliability: a secure cloud folder, an offline phone copy, and a printed mini-pack. This is a resilience tactic, not a legal requirement.
Make your folder structure practical. Keep your most-requested files at the top level so you do not need to browse deeply under pressure. Name files clearly so you can identify passport, entry approval, itinerary, and address details at a glance.
Run this checkpoint before departure:
- Match name spelling exactly across
Passport, visa file, flights, and accommodation records. - Confirm your
Passport expiry dateagainst the official rule page for your destination. - Open key files in airplane mode to verify offline access.
- Print only pages that prove identity, entry approval, itinerary, and first address.
- Save an emergency note with official help contacts. For Thailand travel information, listed 24/7 Task Force numbers are
+1-202-501-4444from abroad and1-888-407-4747from the U.S. and Canada.
Add one final retrieval test before you leave for the airport: open each border-critical file on phone and laptop in the same order you would present it. If any file is slow, mislabeled, or missing, fix it immediately rather than expecting to troubleshoot under time pressure.
If any border-critical file is missing, mismatched, or inaccessible offline, treat that as a no-go and fix it before leaving for the airport.
Set Up Money Access So You Can Work and Get Paid on Day One#
Treat money access as a go-or-no-go gate. If your backup setup cannot cover core costs, delay departure.
| Area | What to confirm | Proof or rule |
|---|---|---|
| Two independent rails | Keep a primary account or card and a backup at a different institution; run one outbound test and one inbound test | Save proof that each transaction settled |
| Client payout path | Trace the path from invoice to funds landing in the account you actually spend from | Keep one payment confirmation and one statement or payout export |
| FBAR timing | If your setup is U.S.-linked, confirm whether you have an FBAR filing obligation | April 15, 2026 remains the due date for all other individuals; certain previously extended signature-authority filers run to April 15, 2027 |
| FBAR record details | Record amounts in U.S. dollars and round up to the next whole dollar | If a computed value is negative, enter 0; if no Treasury exchange rate is available, use another verifiable rate and record its source |
- Build two independent rails and test both with real transactions. Keep a primary account or card and a backup at a different institution. Run one outbound test and one inbound test, then save proof that each transaction settled.
- Confirm client payout end to end before travel day. Trace the path from invoice to funds landing in the account you actually spend from. Keep one payment confirmation and one statement or payout export in a folder you can open on phone and laptop.
- Pre-check U.S.-linked FBAR exposure before long travel periods. If your setup is U.S.-linked, confirm whether you have an FBAR filing obligation. For FBAR timing, FinCEN states April 15, 2026 remains the due date for all other individuals with an FBAR filing obligation, while certain previously extended signature-authority filers run to April 15, 2027.
- Capture the record details that prevent avoidable FBAR errors. For maximum account value entries, FinCEN says to record amounts in U.S. dollars and round up to the next whole dollar. If a computed value is negative, enter
0; if no Treasury exchange rate is available, use another verifiable rate and record its source.
Do not stop at account access screenshots. Verify that money can move through the exact path you use for client work and daily spending. A setup that receives funds but cannot cover local expenses quickly can still interrupt delivery and create avoidable stress in your first days.
Keep your money proof pack tight: settled test transaction proof, active card proof, payout trail from invoice to settlement, and FBAR reminders relevant to your structure. Put all of it in the same document folder as your travel records so you can verify status quickly before boarding.
Use one departure rule for money: simulate a loss of your primary bank and confirm rent, food, transport, and client-related expenses still clear on time. If not, finish testing and documentation before you leave.
Lock Insurance and Health Protection Before Departure#
Treat insurance as a go-or-no-go check: confirm your travel insurance covers the full trip, then set a simple fallback plan for disruptions.
- Confirm full-trip coverage dates first. Review your policy dates against your actual departure and travel window. Make sure travel insurance covers your entire trip.
- Clarify scope before departure. Review what your policy says is and is not covered before you go. If anything is unclear, resolve it before departure and keep your policy details organized.
- Keep insurance and ID files easy to retrieve. Store your insurance files with your core travel documents so you can access them quickly. Also keep scanned copies of passport, ID, and cards in the cloud, separate from originals.
- Set a Plan B for immediate expenses. Carry debit and credit cards plus some local currency for emergencies. This does not replace coverage, but it gives you a practical buffer if plans change suddenly.
If coverage details are unclear, resolve them before departure. Keep your policy details organized, and make sure your fallback spending plan is realistic for a disruption scenario.
Treat retrieval speed as part of readiness. You should be able to explain your coverage window and open your key files quickly in transit.
Use one departure rule: if you cannot quickly confirm your coverage window, find your key files, and explain your fallback steps, pause departure and close those gaps first.
Confirm Housing and Entry Proofs That Survive Border Scrutiny#
For a smoother arrival, make sure your first address and your entry path align. If they do not, pause departure and fix the mismatch before you fly. Use this four-part check before boarding:
| Proof item | What it should show | Handling note |
|---|---|---|
| Entry status and stay plan | If you are using visa-free Schengen access as a U.S. traveler, plan within the 90 days in any 180-day period limit | If your stay is longer, or your permission is unclear for your purpose, finalize the right visa path before committing to long non-refundable bookings |
| Accommodation booking confirmation | Full address, check-in and check-out dates, and a working host or property contact | Keep this record current and easy to open |
| Onward travel proof | Store it with your first-stay booking so both are easy to show at Border control if requested | If your status is short-term or uncertain, flexible accommodation and refundable onward transport can reduce disruption if plans change |
| Arrival brief | Include your first address, arrival transit plan, host contact, emergency contact, and booking references | Save one offline copy and one cloud copy with your passport and visa files |
- Lock entry status first, then book housing to match it. If you are using visa-free Schengen access as a U.S. traveler, plan within the 90 days in any 180-day period limit. If your stay is longer, or your permission is unclear for your purpose, finalize the right visa path before committing to long non-refundable bookings. Short-term travel permission does not automatically grant work or residency rights. If you are entering the UK, verify current visa and ETA requirements on GOV.UK before departure.
- Make your first address usable at first contact. Your
Accommodation booking confirmationshould include the full address, check-in and check-out dates, and a working host or property contact. Keep this record current and easy to open. - Pair housing proof with exit-intent proof. Store
Onward travel proofwith your first-stay booking so both are easy to show atBorder controlif requested. This is destination-specific risk control, not a universal requirement. If your status is short-term or uncertain, flexible accommodation and refundable onward transport can reduce disruption if plans change. - Keep a one-page arrival brief for low-battery moments. Include your first address, arrival transit plan, host contact, emergency contact, and booking references. Save one offline copy and one cloud copy with your passport and visa files. It is not an immigration requirement, but it helps you respond quickly when tired or offline.
Misalignment can show up in small details. Watch for accommodation dates outside your stated entry window, a host contact that does not respond, or onward proof stored in a different folder than your booking record. Treat these as fix-now issues, not small admin noise.
Keep your evidence chain simple. Entry path, first address, onward plan, and dates should tell one coherent story from check-in through arrival. When those records align, check-in and border conversations are often easier.
Before boarding, use one rule. If your destination or carrier may request these details and you cannot show a valid first address, match it to your stay window, and produce onward proof quickly, delay departure and fix the evidence chain first.
Protect Client Delivery Before You Move#
Treat delivery continuity as a departure gate: if clients cannot reach you or you cannot deliver in your first 72 hours after arrival, consider delaying travel. Build your move plan around a mobile office mindset and test your setup in real conditions, not assumptions.
- Send a coverage notice clients can use. Share your new timezone, response windows, and a clear urgent-contact path. Ask active clients to confirm they received it, then keep the notice and confirmations in your travel folder.
- Set up two connectivity paths and test both before departure. Keep one primary data path and one backup. If you plan to use eSIM or a local SIM, verify destination-specific compatibility first, then run a real backup test with a message, file upload, and short call.
- Validate power continuity before departure. Pack backup charging gear, run a full charge cycle with the exact setup you will carry, and keep only what passes your test.
- Schedule the pre-departure tasks that affect delivery. Put client notice, backup-internet testing, and calendar-window checks on your departure timeline. If backup connectivity fails, move noncritical meetings before departure.
- Choose your first-stop setup by delivery model, not headline cost. If you run frequent live calls, prioritize stable connectivity and a quiet backup workspace for your first days. If your work is mostly asynchronous, you can accept more variance.
Keep delivery records next to travel records. If a client asks for confirmation while you are in transit, you should be able to show your coverage notice and response window, plus your backup contact path, without digging.
Think in failure modes before departure: card issue, weak internet, failed charger, or delayed check-in. The goal is not perfect travel. The goal is keeping client obligations moving even when one dependency fails.
Before boarding, do one fallback rehearsal: send a client update, join a short call, and share a file from your backup setup. If anything breaks, fix it before you move.
Pack Only After Legal and Operational Items Are Closed#
Pack last. If entry documents or other pre-trip logistics are still open, pause packing and close those items first. Use this closeout checklist before anything goes into luggage:
- Confirm non-packing gates are complete. Make sure your entry documents are in order, your
Passporthas at least six months of validity, and your critical files are easy to open. - Build a lean work kit from proven use. Pack only what you already use in real client delivery. If an item is untested or just in case, leave it out unless it clearly covers a known risk.
- Keep critical records in your carry-on. Carry essential documents in both digital and physical formats, and keep them with you rather than in checked luggage. Include your
Passport, required entry documents, core work documents, chargers, and medications. - Run function checks, not quantity checks. Boot your laptop and test your charging setup end to end so critical items are ready if checked luggage is delayed.
A lighter bag is useful, but predictability is the real benefit. Tested gear, known document access, and carry-on control reduce the chance that a delayed bag or dead battery turns into a work interruption.
Run a 48-Hour Pre-Boarding Verification#
Use the final 48 hours as a hard go-or-no-go check, not a casual review. If any entry-critical file is missing, inconsistent, or unreadable offline, do not board until it is fixed. Use these three checks:
- Reconfirm entry status. Verify your
Visaor validVisa-free entrypath. Recheck current requirements through the official consular or immigration channel right before departure, since rules can change. - Reconfirm your evidence bundle. Make sure your key entry documents and
Accommodation booking confirmationare ready in digital offline form, with paper backups where useful. Keep them organized so you can produce them quickly at check-in or border control. - Reconfirm operational continuity. Verify backup payment access and document your
Local SIM/eSIMactivation path so you can get connected on arrival.
Treat this window as execution time, not planning time. You are validating what already exists, correcting any mismatch, and freezing nonessential changes so your records stay aligned through boarding.
Do one complete dry run from the devices you will carry. Open your entry files, open payment backup details, and confirm each item loads offline where required.
Apply one decision rule before check-in: if an entry-critical item is incomplete or contradictory, pause travel and correct it first.
Run Sanity Checks Before You Commit#
Run one final consistency check before you commit to departure. If your core records conflict, pause and fix the mismatch before you board.
This is about narrative consistency, not file volume. Your documents should tell the same story at e-visa upload, airline check-in, and arrival.
- Run the red-flag match test across identity and dates. Compare your passport, visa file, flight booking, and accommodation record side by side. Confirm key details and dates match across the documents you plan to show.
- Check your stay plan before you lock travel. Put entry date, exit date, and buffer days on one timeline. Make sure that timeline stays consistent with your chosen entry route and with the documents you will show.
- Validate proof logic, not just file presence. A fully paid outbound ticket is not always required, but verifiable
Proof of travel intentmay still be expected. Your onward-travel evidence and key dates should align as one coherent plan. - Assign an owner and fallback for each critical dependency. Confirm who owns each item and what the backup is if the primary option fails: documents, money access, internet, and client communications.
- Recheck freshness, then run a 30-second explanation drill. Revalidate visa and entry requirement pages close to departure. Then practice a short entry explanation and confirm you can open supporting files quickly, including offline copies.
If you are traveling while managing active client commitments, this check can reduce border-side confusion and lower the chance that a preventable admin miss spills into missed delivery.
Once the story is coherent, stop editing and commit to the plan. Late changes can introduce new inconsistencies faster than they solve old ones. For client-side communication during the move, How to Handle Cross-Cultural Communication with International Clients is a useful companion read.
Wrap-Up and Next Steps#
Treat departure as a date-anchored sequence, not a packing task. The benefit is moving phase by phase with clear checks and proof before you advance.
- Set your departure date and map backward. Use it as the anchor for every remaining task, from long-range prep through the final week.
- Lock the plan before execution week. Finalize your itinerary details first, then run end-stage tasks against that final plan.
- Build one document pack you can access fast. Keep digital copies of your key records in one place and confirm you can open them when needed.
- Use the last week for verification, not redesign. If paperwork feels scattered, stop and run a recap checklist; if critical health admin is still pending, handle it before departure.
Your next move is straightforward: pick the date, clear the earliest tasks, and keep every decision tied to proof. That is how you reduce last-minute scrambling and keep key travel paperwork on track.
Next action: pick your date, complete the earliest-phase tasks first, then clear each phase only after verification.
Frequently Asked Questions
What is a digital nomad pre-travel checklist, and what should it include?
It is a departure sequence for long-stay travel, not a vacation packing note. It should cover core travel documents, admin tasks, overseas banking readiness, connectivity, and a backup plan for disruptions. Each item should also have a proof, owner, and timing so you know whether to use a backup or fix a gap before moving on.
How far in advance should I start planning a digital nomad move?
Start as soon as you have a target departure window. Long-term travel usually needs more lead time than a short trip, and job notice is often in the two to four weeks range. Lease exits may also require written notice and can include fees, so sequence those constraints early.
What documents should I prepare before leaving for a long stay?
Prepare one set for travel checks and one for life admin, and make both easy to access quickly online and offline. Keep your core travel and booking records, key admin details, emergency contacts, and banking access that works overseas. Use this checklist for operational prep, then verify official entry-document requirements separately for your route.
What are the most common pre-travel mistakes digital nomads make?
A common mistake is treating a long-stay move like vacation prep instead of long-stay planning. Others skip backups for internet outages, locked cards, or lost items, or confuse adapters and converters. Another pattern is fragmented prep across multiple notes instead of one clear sequence with fallback steps.
What must be confirmed before boarding an international flight?
Confirm that your core travel records are consistent and easy to retrieve at check-in and arrival. Recheck that key details match across the documents you expect to show, and fix any conflict before check-in. Also confirm backup payment access, connectivity on arrival, and your fallback plan for disruptions.
Is packing or paperwork more important for a digital nomad relocation?
Paperwork and admin readiness come first. Packing still matters, but it should follow the major admin gates so your work and travel setup is actually ready. The better sequence is to lock your departure plan, clear high-risk legal and financial items, and then pack a lean, tested kit.
Try a related tool
Researched and edited by the Gruv editorial team. Gruv builds cross-border billing, payouts, and finance-operations software for global businesses.
Sources
Includes 1 external source outside the trusted-domain allowlist.
- bsaefiling.fincen.gov/docs/XMLUserGuide_FinCENFBAR.pdftrusted
- fincen.gov/reporting-maximum-account-valuetrusted
- meredith.edu/wp-content/uploads/2025/03/StudyAbroadPredep...trusted
- travel.state.gov/content/travel/en/international-travel/Inter...trusted
- exploretraveler.com/essential-digital-nomad-packing-list-for-eff...external
Educational content only. Not legal, tax, or financial advice.
Related Posts

The 2026 Global Digital Nomad Visa Index for 50+ Countries
Start with legal fit, not lifestyle filters. The practical order is simple: choose a route you can actually document, then decide where you want to live. That single change cuts a lot of wasted comparison work and stops you from falling in love with places that were never a real filing option.

Beneficial Ownership Reporting in 2026 for FinCEN BOI Decisions
Use this as an execution guide, not a legal memo. Your job is to make a current BOI decision, document why you made it, and avoid cleanup later. The outcome is straightforward: confirm whether your entity is in scope, prepare what you need if it is, and keep dated proof of the basis you used.

How to Handle Cross-Cultural Communication with International Clients
Freelance cross-cultural communication is less about polite phrasing and more about shared meaning before work starts. Cross-cultural communication is how people from different cultural backgrounds adjust interactions to improve mutual understanding.