
Quick Answer
Start before the contract is signed: your client onboarding blueprint should verify legal entity data, approver ownership, tax-form requirements such as Form W-9 or the correct W-8, payment setup, and communication ownership in advance. After signature, issue the first invoice only when records match, run kickoff to confirm execution rules, and route any added work through written change approval.
Why Your Onboarding Process Must Start Before the Contract is Signed#
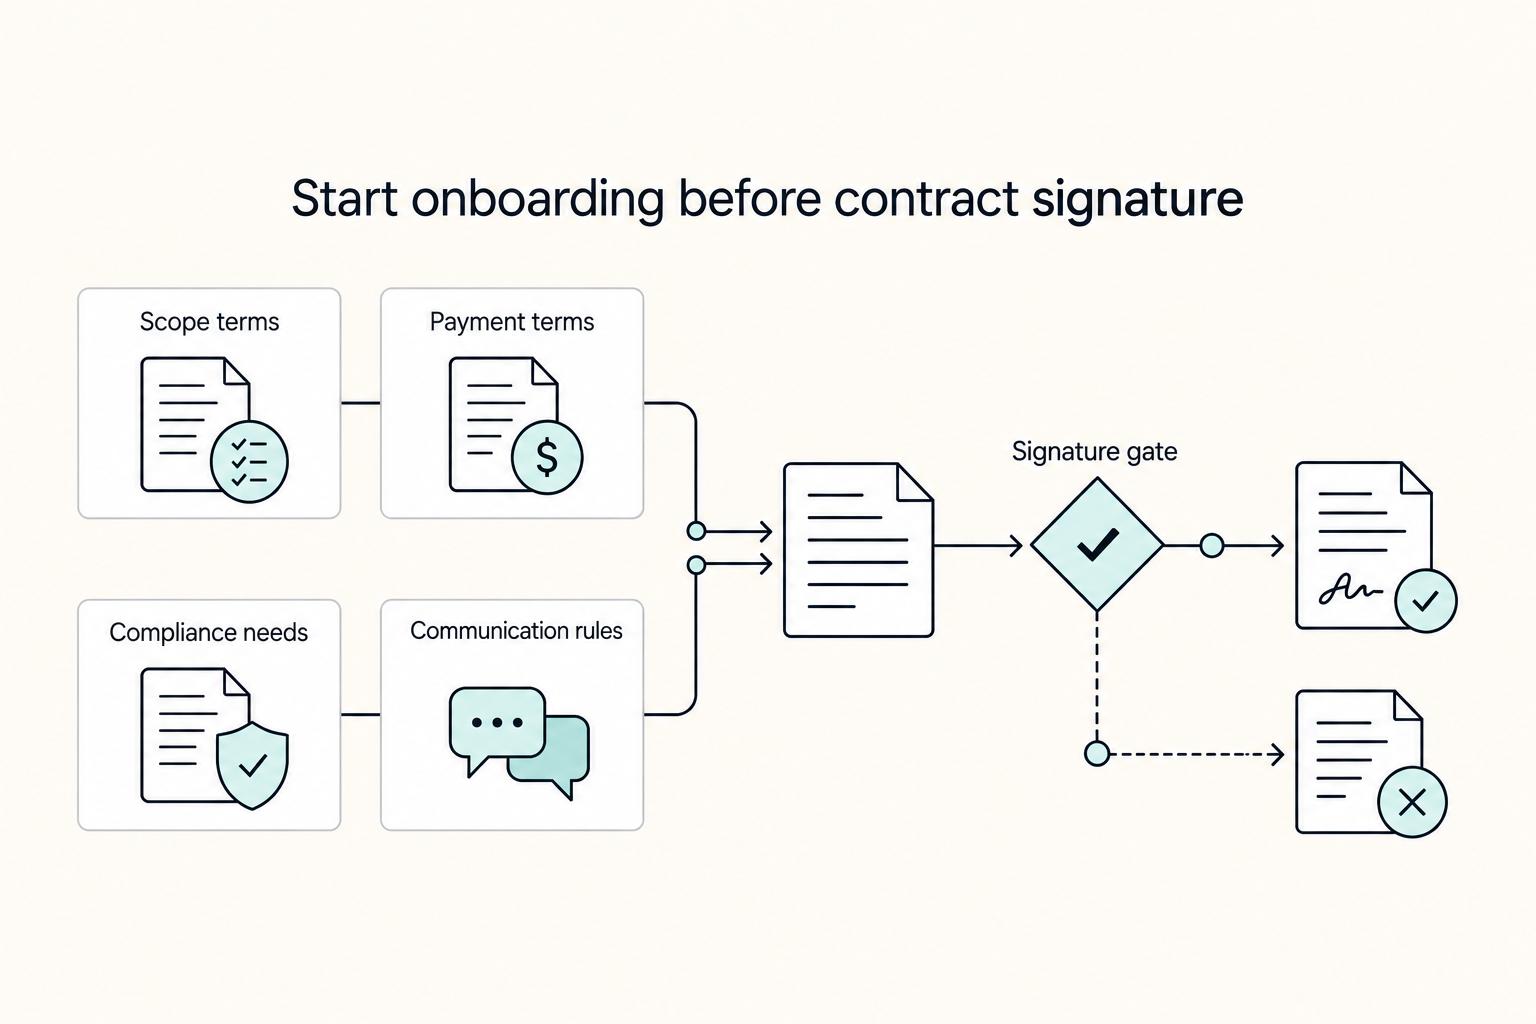
Start onboarding before signature so you can set terms before problems get expensive. If you wait until after signing, you are usually shifting from prevention to dispute management on scope, payment, compliance, and communication.
Run the same pre-contract gate on every deal. It keeps the process professional, surfaces gaps early, and cuts avoidable rework. That matters because PMI reports 52% of projects in the cited period faced scope creep or uncontrolled scope changes.
| Area | Reactive after signature | Early before signature |
|---|---|---|
| Scope control | You debate what was "included" after work starts | You define deliverables, revision limits, and change handling before approval |
| Payment readiness | Invoices stall while finance requests missing details | You confirm billing entity, AP contact, invoice route, and required tax forms first |
| Compliance readiness | Tax or withholding issues surface mid-project | You prepare Form W-9 or Form W-8BEN when requested and verify details up front |
| Communication boundaries | Requests come from anyone in any channel | You confirm the decision-maker, approver, and primary communication path early |
Use the same checks every time:
- Confirm legal entity details so the business name, billing name, and signer align.
- Confirm tax-document readiness. If a U.S. payer requests Form W-9 in a 1099-reportable context, furnish your TIN in writing, certify it as correct, and make sure the name and TIN match to reduce backup-withholding risk, including 24% withholding in specified IRS cases. If you are a foreign individual working with a U.S. payer, be ready to provide Form W-8BEN when requested.
- Confirm the billing path, including the invoice recipient and approval flow.
- Confirm who actually has authority to sign and approve the engagement, not just who joined the call.
Treat observable friction as a process signal. Missing business details, unclear approver ownership, or resistance to basic process does not prove bad intent, but it is a reason to slow down and verify in writing before final agreement. If those answers keep changing, pause the deal instead of guessing.
This is the first operational step in your client onboarding blueprint. From there, Phase 1 turns the proposal into a tool you can actually use to control scope, payment terms, and communication rules.
Phase 1: The Fortification Phase - Building Your Pre-Contract Defense#
Use Phase 1 to make the deal executable before signature, not just agreeable. If a term cannot be checked, measured, or tied to a current authority, treat it as incomplete.
Rewrite vague language before it becomes a dispute#
If a line can be read two ways, rewrite it now. Your proposal should let a third party understand scope, change control, and communication rules without relying on memory.
| Vague wording | Enforceable wording |
|---|---|
| "Ongoing support" | "Support applies to the agreed deliverables, during the agreed period, through the agreed communication channel." |
| "Revisions included" | "Revisions apply to approved scope. Requests outside scope move through the change request process before work starts." |
| "Launch assistance" | "Launch support covers only the listed launch tasks. Unlisted tasks need written approval first." |
| "Client feedback" | "Feedback must come from the named approver in the agreed channel. Conflicting direction pauses work until the client confirms one decision." |
| "Payment on completion" | "Payment is triggered by the defined milestone or acceptance event in this proposal." |
Run identity verification as a repeatable checklist#
Treat identity checks as standard operating work, not something you save for risky clients. Do this before you issue the contract every time, and save what you checked.
| Context | Verification step |
|---|---|
| Any client | Confirm the live authoritative source for rules that affect this contract |
| Any client | Confirm who is currently authorized to approve and sign |
| Regulated or licensed client | Confirm the live agency source and whether existing credentials remain valid during any transition |
| Tax and payment items | Mark current requirements as pending until verified |
In practice, a simple pattern works: check the current authority page, confirm whether prior credentials remain valid, and record the verification date and result. If details change between proposal and contract, pause and reconcile before signing.
Gate tax and signing requirements before signature#
Do not hard-code old assumptions into your onboarding checklist. Mark each requirement as pending until you verify the current rules.
- Confirm the current form requirement with the relevant tax authority
- Confirm the current withholding rule with the relevant tax authority or tax counsel
Do the same for approvals. Document the real signing path. Multi-approval models can reduce single-point-of-failure risk, but the workflow can still fail if approval steps are misrouted or authority is unclear.
Lock payment operations in writing#
If payment operations are vague, the deal is not ready to run. Mark tax and payment details as pending until current requirements are verified, then lock the operational terms in writing.
Lock these items before signature:
- contract and invoice currency
- fee responsibility, including processing or conversion
- approved payment rails
- exact due trigger for invoice or payment
- first-stop dispute path and escalation owner
If you want a fuller pre-sign checklist, see A Checklist for Onboarding a New Freelance Client. Before you send the contract, draft a clear scope baseline with the SOW Generator.
Phase 2: The Activation Phase - Invoice, Intake, Communication, and Kickoff#
Once the contract is signed, do not rush into delivery. Pause and lock four things in order: first invoice, intake, communication model, and kickoff. This is where your process prevents avoidable payment, scope, and execution friction.
Send the first invoice only after a final check#
Your first invoice is not just a bill. It is your last verification pass against the signed contract and client file. Use it to confirm:
| Check area | What to confirm | Notes |
|---|---|---|
| Legal entity details | Use the exact legal names and billing addresses for the client and payee on record | For U.S. payer workflows using Form W-9, ensure taxpayer name and TIN match |
| Tax treatment note by jurisdiction | Add tax treatment only after checking current rules for the jurisdictions involved | Confirm the current jurisdiction rule with the relevant tax authority or tax counsel |
| Payment instructions | Confirm the agreed currency, payment rail, due trigger, due date, and remittance reference instructions | If included in your agreement or finance process |
| Required compliance fields | Add only the fields you have confirmed are required by the relevant authority or the client's finance process | Under UK invoicing rules, this includes a unique invoice identifier, your company name, address, and contact details, and the customer company name and address |
Before sending, confirm tax paperwork status. If a U.S. payer requires written TIN certification and it is missing, backup withholding can apply at 24%. If you are a foreign person, provide Form W-8BEN to the withholding agent or payer when requested. Save the sent invoice copy, tax form or forms, and sent date in the client file.
Gather everything through one intake point#
One intake point is the cleanest way to keep work moving. Collect inputs through one form or one portal as your single source of truth so everyone works from the same information. Scattered email and chat uploads make missing inputs hard to track and decisions hard to verify. Define required input categories and assign an owner for each:
| Owner | Inputs |
|---|---|
| Client lead | Goals, timeline constraints, named approver or approvers |
| Brand or marketing owner | Logos, brand guidelines, current messaging |
| Technical owner | Platform access, domains, hosting, integrations, credentials |
| Finance contact | Billing references confirmed as required |
Set a kickoff-readiness gate. Do not start work until all of these are true:
- signed contract artifacts are finalized and filed
- first invoice is issued on the agreed basis
- required tax documentation is exchanged if requested
- intake form or portal is complete
- essential assets or access are uploaded
- one final approver is named
Choose a communication setup on purpose#
Communication setup affects execution more than most teams expect. Email-only coordination can work, but information tends to fragment. A centralized workspace plus a shared channel can make retrieval easier and create a cleaner record.
| Model | Response clarity | Version control | Auditability |
|---|---|---|---|
| Email thread model | Can work for simple scope, but replies can fork | Weak unless final files are stored in one separate location | Limited, because decisions are harder to reconstruct |
| Centralized PM + channel model | Clearer when tasks, comments, and decisions live with the work | Stronger when files stay in shared docs with version history | Better trace of who changed what and when |
If you stay on email, enforce one subject-line convention and one final-file location. If you centralize, keep comments and approvals there instead of splitting them across inboxes and chat. If you use Asana org audit events, remember retention is 90 days.
Run kickoff as contract confirmation#
Kickoff should confirm execution, not replace the contract with new verbal assumptions. Run it after the core contract artifacts are finalized and the project is ready to start. Use this agenda template tied to the signed contract:
- Confirm scope and deliverables exactly as written.
- Confirm decision rights, including who can approve, reject, or pause work.
- Confirm communication cadence and channel or channels.
- Confirm the feedback path, including how out-of-scope requests enter change control.
- Confirm success criteria for acceptance.
- Confirm next actions with owner, due date, and storage location.
Send a written recap the same day so decisions and next steps are explicit. For a step-by-step walkthrough, see How to Automate Client Onboarding with Notion and Zapier.
Phase 3: The Mastery Phase - Maintaining Control and Professional Leverage#
After kickoff, the work shifts from setup to control. Your job is to keep decisions visible and changes intentional. That means treating requests, updates, and closeout as part of one documented process, not as side conversations.
Your control comes from continuity across the proposal, contract terms and conditions, kickoff recap, and live project record. There is no one-size-fits-all proposal, so your post-kickoff process should match the project context and the documentation it needs.
Handle change requests with a simple decision flow#
A common failure mode is not the request itself. It is letting the request change delivery before the paperwork catches up. When something new comes in, check the signed proposal, contract, and kickoff recap first. If coverage is unclear, treat the request as out of scope until it is clarified in writing.
- Identify what changes: deliverables, timeline, revision rounds, channels, or responsibilities.
- Acknowledge the request and confirm what is being asked.
- Reference the current boundary in plain language.
- Offer a documented next step, such as a scoped add-on, revised estimate, or addendum.
- Hold delivery changes until written approval is on file.
Instead of relying on a rigid script, reuse three response components: acknowledgment, boundary reference, and next-step option. That keeps your tone natural while preserving scope control.
For each approved change, keep one record with the request, your response, the updated scope document, approval, and timeline impact. That file becomes your operating memory if scope or dates are questioned later.
Choose one primary update format#
Pick one primary update format and stick to it. Other channels can handle quick clarifications, but final decisions need one recoverable home.
| Primary format | Best when | Stakeholder complexity | Documentation needs | Main tradeoff |
|---|---|---|---|---|
| Written status email | Scope is straightforward and one contact drives approvals | Lower | Good if each update captures decisions and next actions | Threads can split when feedback branches |
| Standing check-in call | Work has moving parts and needs rapid alignment | Medium | Moderate unless you send written recaps | Faster alignment, weaker record without recap |
| Shared project board with comments | Tasks, files, and approvals must stay tied together | Higher | Strong, especially with version history | Requires clear workspace habits and setup |
If you use a shared workspace, set account structure and permissions early. Clear sub-account and staff-permission setup helps keep approvals and edits in the right hands.
Offboarding is part of continuity, not an afterthought#
A clean closeout protects the current engagement and makes the next one easier to scope. Offboarding should be as structured as onboarding.
- Confirm final-deliverable acceptance in writing.
- Transfer agreed assets and confirm where final versions live.
- Send a closeout summary with delivered items, remaining client-owned actions, and any permission or account changes.
- Document follow-on needs that should be scoped separately.
- Offer one structured prompt for next-phase planning, such as the next priority, bottleneck, or phase to scope.
This keeps boundaries clear on the current contract while creating a clean path into future work. For related process checks, see The Best Tools for Performing a Background Check on a New Client.
Turn the onboarding checklist into a repeatable sequence you reuse#
A clear onboarding checklist gives you a repeatable way to run the same intake checks each time. Keep it focused on what your form explicitly requires.
In practice, keep it active across the same three phases:
- Pre-contract checks: confirm required fields are complete (fields marked with an asterisk) and request a business/company email address only.
- Activation setup: collect intake through your defined form, include a clear warning not to submit sensitive information, and confirm reCAPTCHA verification is completed.
- Ongoing control: keep the same checklist and kickoff workflow in one written record so you can reuse it consistently.
Formalize your onboarding checklist and kickoff sequence now, then use that same sequence on your next client. Related: How to Create a Client Welcome Packet That Wows. When you are ready to turn this checklist into a repeatable system, choose your next template in Tools.
Frequently Asked Questions
What should you verify before you send the contract?
Before you move from proposal to contract, confirm the client's legal business name, signing authority, billing contact, payer entity, and tax-document path. This matters because the contract creates binding performance and payment obligations, and mismatched entity details can cause signature and invoicing delays. If you skip this step, you risk the wrong party signing, the wrong entity paying, or records that do not match later tax reporting.
When should you collect tax forms like Form W-9 or the right W-8 form?
Collect tax forms after proposal acceptance and before kickoff or reportable payment setup. Form W-9 provides the TIN for information returns, and backup withholding can apply to independent-contractor payments at 24% when TIN requirements are not met in the required manner. For cross-border work, verify the correct W-8 form type before proceeding. Form W-8BEN-E is for foreign entities, so verify the current withholding rule from official or counsel-approved records before using it. Store forms in a protected portal, encrypted request flow, or secure e-sign packet so sensitive data is not stranded in open email threads.
How should you choose a payment method?
Choose the payment rail before contract signature, then define the exact rule in both the contract and invoice instructions. The right choice depends on invoice size, dispute workflow, and fraud or recovery risk. | Payment method | Best use case | Operational risk | What to define in contract | |---|---|---|---| | Card or payment link | Smaller invoices, deposits, recurring billing | Disputes and investigations can interrupt cash flow | Due date, fee allocation, deposit rule, and when work starts | | ACH or bank transfer | Lower-fee domestic payments | Account-change fraud risk; return handling depends on bank or provider rules | Approved account details, fee allocation, and whether funds must clear before kickoff | | Wire transfer | Large or urgent domestic or cross-border payments | Bank-detail fraud risk; some rails such as Fedwire are final once processed | Currency, sender or beneficiary fees, exact beneficiary name, and out-of-band verification for account changes | If bank details change mid-project, verify through a second channel with a known contact instead of relying on the email request alone.
What is the cleanest way to collect intake information?
Use one intake form or one client portal tied to the signed contract and SOW, and collect only what you need for kickoff. This keeps files, deadlines, approvals, and access details in one recoverable record while following a data-minimization approach. If intake is spread across email threads, it is easier to miss assets, over-collect sensitive data, and lose time reconciling conflicting instructions.
What should happen at kickoff?
At kickoff, confirm the SOW, timeline, decision-makers, communication channel, and approval steps, then send a written recap the same day. This keeps the live project record aligned with the signed proposal and contract instead of replacing them with ad hoc agreements. If you skip the recap, verbal decisions drift quickly and later change requests become harder to resolve.
How do you prevent scope creep without sounding rigid?
Define the SOW in result-based terms, including deliverables, schedule, performance expectations, and explicit exclusions, then route new asks through a written change request. Federal change-order practice is a useful documentation model even though private freelance contracts are not required to follow FAR procedures. If you do not document changes in writing, small additions turn into unpaid scope expansion that is hard to unwind later.
Try a related tool
Researched and edited by the Gruv editorial team. Gruv builds cross-border billing, payouts, and finance-operations software for global businesses.
Sources
- acquisition.gov/far/subpart-43.2trusted
- acquisition.gov/far/8.405-2trusted
- ecfr.gov/current/title-12/chapter-X/part-1005/subpart...trusted
- fbi.gov/how-we-can-help-you/scams-and-safety/common-...trusted
- federalreserve.gov/paymentsystems/fedfunds_about.htmtrusted
- ftc.gov/news-events/news/press-releases/2025/04/ftc-...trusted
- ftc.gov/legal-library/browse/statutes/fair-credit-bi...trusted
- irs.gov/taxtopics/tc307trusted
Educational content only. Not legal, tax, or financial advice.
Related Posts

Thailand's Long-Term Resident (LTR) Visa for Professionals
For a long stay in Thailand, the biggest avoidable risk is doing the right steps in the wrong order. Pick the LTR track first, build the evidence pack that matches it second, and verify live official checkpoints right before every submission or payment. That extra day of discipline usually saves far more time than it costs.
How to Create a Freelance Client Welcome Packet That Actually Protects You
**A welcome packet is one of the first repeatable documents that shows a client you run this like a real business, and it starts doing that work before the kickoff call even happens.**

The Freelance Payment Penalty: A Modeled Audit of Platform Fees, FX Spreads, and Payout Delays
The money rarely disappears through a single, easy-to-spot fee. The real loss is stacked. A marketplace takes its commission, a processor adds a charge for international cards, a bank or payment company converts the currency at a spread, a platform holds the funds before release, and a wire sheds a little to intermediaries on the way in. Each layer looks defensible on its own, but the worker feels the combined result as a smaller deposit and a later payday.