
Quick Answer
Choose by map type first: Miro fits collaborative drafts, Lucidchart fits cleaner client-facing diagrams, and Visio or BPMN-oriented tools fit compliance-heavy workflows. Then test one real process before committing. Verify that your tool can handle approvals, change requests, export quality, and proof capture without extra manual work. If those checkpoints fail in a pilot map, switch lanes before standardizing.
You Don't Need a Better To-Do List. You Need a Bulletproof Playbook.#
If you run the business alone, your biggest exposure is usually not a messy task list. It is delivery and quality risk. When key steps live only in your head, the same problems show up fast: wasted time searching for information, rework, interruptions, inconsistent output, and preventable mistakes.
A task manager tracks actions. A process map shows decision points, handoffs, and control checks. That difference matters. Your to-do app can remind you to "send invoice," but it does not show what happens if a client record is incomplete, where a human review is required, what evidence you keep, or how you explain an error later. If you want repeatable execution, you need the map, not just the reminder.
Read the rest of this article through one simple operator lens: trigger -> action -> evidence. Trigger is the event that starts the step. Action is what you do next, including any human-in-the-loop checkpoint. Evidence is the proof you keep, such as an approval note, sent file, event log, or scored output. If a step cannot be verified, it is not really controlled. If a claim needs current data, label it as pending verification and name the source you still need.
Use that lens across three maps. Start with the client lifecycle map first, because that is usually where risk and rework begin.
- Client lifecycle map
This shows how a lead becomes a paid, delivered, closed project. It makes handoffs, review points, and scope decisions visible before delivery slips.
- Compliance map
This records how you prepare, check, send, and store financial and admin actions. It forces evidence capture so you are not rebuilding records later.
- Residency and travel map
This tracks travel-related decisions, dates, and supporting records. It turns scattered calendar memory into a documented check process.
We covered this in detail in The best tools for 'Visual Collaboration' with remote teams.
Your First Line of Defense: The Client Lifecycle Map#
Your client lifecycle map is the first control system to lock down, because this is where scope drift, approval delays, and closeout gaps usually start. Map the flow from proposal to closeout, and assign each stage one control point plus one proof artifact so decisions are visible and reviewable.
Keep the format simple enough to run every time. A basic flowchart that shows each step in order is often enough, and a simple notation like UPN helps if you want a clean top-level view with drill-down detail. The goal is usable clarity, not heavyweight documentation.
| Lifecycle stage | Control point | Owner | Proof artifact |
|---|---|---|---|
| Proposal | Problem, deliverables, and approver confirmed before scoping | You | Call notes or recap email |
| Scope lock | Phase gates, approval checkpoints, and change-request path documented in SOW/contract attachments | You + client | Approved SOW, attachment, version date |
| Onboarding | Pre-work checklist complete before production starts | You | Signed agreement, payment record, verification note, access confirmation |
| Delivery | Each phase ends with approval or a documented revision request | You + client approver | Approval email, comment thread, versioned file |
| Closeout | Acceptance captured, final invoicing handed off, transfer pack sent, follow-up tasks created | You | Acceptance record, invoice sent record, handoff log, CRM or task entry |
Put hard boundaries around scope#
Scope control works when the boundary is explicit before work begins. Define phase gates with named outputs, set one approval checkpoint per gate with a named approver, and route out-of-scope requests through a documented change-request path tied to your SOW and contract attachments.
For each change request, record what changed, timeline impact, fee impact, and required approval before work starts. In practice, small verbal add-ons are often the highest-risk gap, because they are easy to miss and hard to verify later.
Use the map to sell certainty#
A mapped lifecycle can strengthen sales conversations because it reduces buyer uncertainty. It shows when stakeholders review work, how approvals happen, and what record exists if questions come up later.
That clarity often improves stakeholder confidence and can make approvals smoother in multi-person buying groups. In pricing discussions, you are not only selling an output, but a managed path to that output. For pricing structure, see Value-Based Pricing: A Freelancer's Guide.
Make onboarding and offboarding non-negotiable#
Treat onboarding readiness as a hard gate before you start production work:
| Onboarding gate | What to confirm | Control |
|---|---|---|
| Agreement status | Countersigned agreement received | No production work before filing is complete |
| Client tax and business details verified | Legal name, billing entity, tax details, and PO/vendor data where needed | Keep a dated verification note and flag any jurisdiction-specific check as pending until the source is confirmed. |
| Payment confirmation | Deposit or first invoice paid if that is your model | Rely on cleared payment records, not payment promises |
| Workspace access | Shared drive, project channel, brand files, logins, and key contacts ready | Keep an invite record, screenshot, or completed access checklist |
Offboarding should follow a fixed closeout sequence: capture acceptance, hand off final invoicing, transfer final documentation, then schedule one testimonial/referral follow-up and one later re-engagement touchpoint. For a related implementation view, see A Guide to Business Process Mapping for a Small Agency.
Your Financial Firewall: The Compliance Map#
Once your client lifecycle is controlled, the next leak is money and evidence. Map how an invoice becomes cleared cash and linked records so compliance becomes a repeatable control system, not last-minute admin.
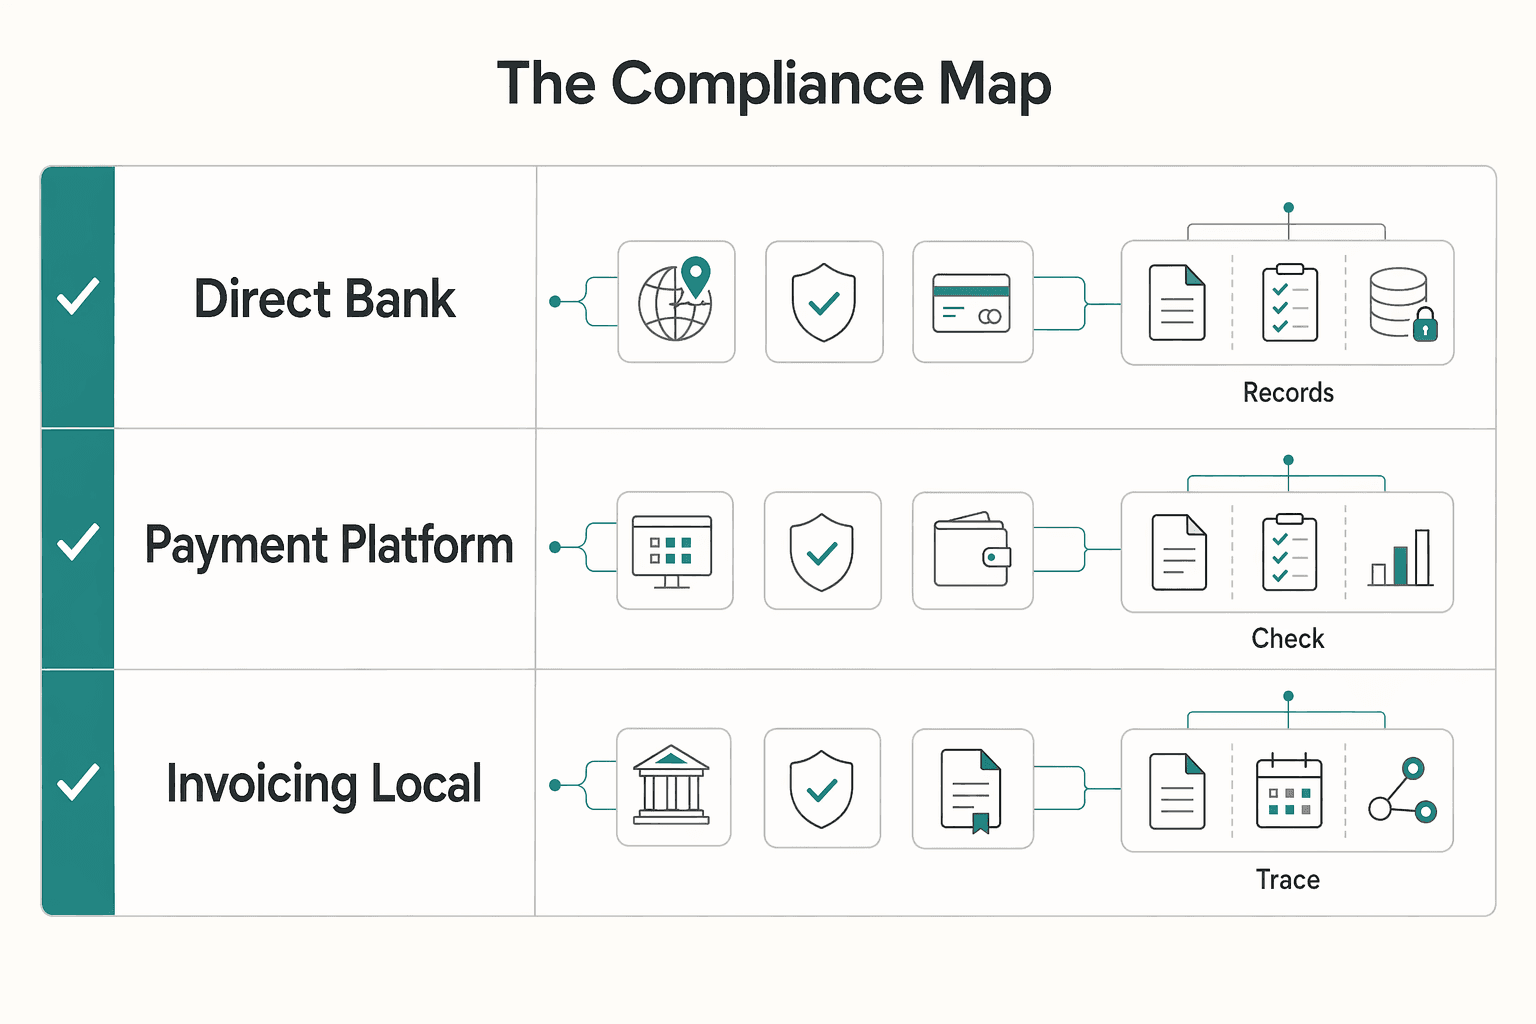
| Order | Document | What to save |
|---|---|---|
| 1 | Invoice | Save the invoice source file |
| 2 | Payment proof | Save payout confirmation |
| 3 | Contract or SOW | Save the signed agreement or SOW |
| 4 | Expense and supporting docs | Save supporting receipts or delivery records |
- Start with jurisdiction, not the invoice template
Make the first branch in your map the client's country, tax status, and billing method. Before sending any invoice, run the same four checkpoints in order: confirm client tax status and save proof, verify required invoice fields for that jurisdiction, select the correct clause from your approved language library, then complete one pre-send review against the client record. For country-specific fields or clause language, mark the field as pending verification until the approved rule or clause is confirmed.
If a client requires e-invoicing, route it separately. True e-invoicing uses structured, machine-readable data, not just a PDF over email. Your map should show when format or transmission changes are required.
- Compare payment routes by net result, not convenience
Fee erosion usually sits between invoice amount, FX conversion, settlement timing, and reconciliation effort. Keep a live comparison table and update it with one real paid invoice per route.
| Payment route | Fees to check | FX handling | Settlement speed | Reconciliation effort | Evidence to save |
|---|---|---|---|---|---|
| Direct bank transfer | Sender, intermediary, receiving fees | Who converts, where rate is set, any markup | Expected days from send to cleared funds | Low to medium, depending on remittance detail | Bank credit advice, remittance reference |
| Payment platform | Platform fee, payout fee, any account transfer fee | Platform conversion method and visible rate | Time to available balance and bank payout | Medium if payouts batch multiple invoices | Payout report, platform transaction ID |
| E-invoicing or local billing provider | Subscription, per-invoice, local rail fee | Local settlement or provider conversion | Time from acceptance to settlement | Low if invoice and payout IDs stay linked | Acceptance log, settlement report |
Choose the route that protects margin and reduces reconciliation drag. If two options are similar on cost, pick the one that leaves cleaner evidence.
- Store one evidence chain per invoice
Keep records in one fixed order: invoice -> payment proof -> contract or SOW -> expense and supporting docs. Use a naming pattern like YYYY-MM_Client_Invoice#_DocType_V1 so files sort cleanly and missing items are easy to spot. Add a short README in the client or year folder that notes the retention rule is pending verification until the current requirement is confirmed.
Keep more than the final PDF. Save the invoice source file, payout confirmation, signed agreement or SOW, and supporting receipts or delivery records. If your finance or compliance tools generate logs, dashboards, or reporting exports, save those too as audit evidence.
Before month-end close, run a quick failure-point check:
- Missing client tax data or no saved verification note
- Wrong invoice language or wrong path for local rules or e-invoicing
- Unreconciled payouts that do not match an invoice and bank entry
- Unlinked documents where payment proof exists but contract, SOW, or support files do not
Static diagrams become outdated quickly. When you add a country, billing method, or payment route, update this map immediately.
With money and records under control, the next question is mobility. That is where a travel map earns its keep. You might also find this useful: The best tools for creating 'Flowcharts' and 'Diagrams'.
Your Freedom Insurance: The Residency & Travel Map#
Your travel map is your mobility system, not a risk memo. Use it to align itinerary choices, jurisdiction checks, filing interactions, and evidence before you book.
| Register field | What to track | Source or note |
|---|---|---|
| Entry limit | Track the entry limit | Pending verification: confirm the current entry limit from the official authority and save the source and date checked. |
| Tax-residency trigger | Track the tax-residency trigger | Pending verification: confirm the current tax-residency trigger from the official authority and save the source and date checked. |
| Home-country filing interaction | Track the home-country filing interaction | Pending verification: confirm the filing interaction from official guidance or professional advice and save the source and date checked. |
| Document source | Track the document source | Use official authority material and store the URL plus the date checked |
Fragmentation is the main failure point. When flights, rule checks, and documentation live in separate places, small misses can cascade into bigger operational problems. Keep one map that connects the trip, the rule check, the document trail, and your fallback plan.
- Build a live jurisdiction register
Start with every jurisdiction that can affect your decisions now, not only your next destination. Include your current location, home-country exposure, places where you work on the ground, and any jurisdiction with active filing or immigration interactions. Track each one in the same order: entry limit, tax-residency trigger, home-country filing interaction, and document source. If a rule is not verified yet, label it as pending verification and keep the source and date fields open until an official source or advisor confirms it.
Prioritize source quality in the register. Use official authority material for hard rules, and store the URL plus the date checked. Secondary explainers can help with planning, but they should not be treated as final rule sources. Working papers can be useful context, but they are still preliminary and not official country positions.
- Test the itinerary before booking
Run a pre-booking workflow every time: draft itinerary, test impact across active jurisdictions, flag conflicts, choose the lowest-friction route, then book. Include dates, cities, planned work activity, and backup exit options in the draft.
Evaluate the trip as one chain, not isolated country checks. A change to one leg can affect filing interactions or other jurisdiction checks later in the year. If outcomes are unclear across overlapping rules, mark the trip as pending and escalate before spending.
- Store one evidence pack per trip
Keep the same proof categories for every trip: travel records, lodging records, work-location context, and official correspondence. Use one naming standard, such as YYYY-MM-DD_Country_City_TripID_DocType, and apply consistent tags (for example jurisdiction, trip ID, and status). Store records in one trip folder and link that folder back to the related jurisdiction entries.
When a rule check changes, add a dated update note and what changed. That gives you a clear planning trail.
- Use a four-point trip decision card
Before final booking, run this checklist inside the map:
- Compliance status: cleared, blocked, or pending verification by jurisdiction
- Documentation status: complete, missing, or waiting on confirmation
- Contingency plan: alternate exit date, alternate destination, or no-work version
- Advisor escalation trigger: overlapping rules, unclear wording, or activity fit is uncertain
If you cannot resolve overlap or ambiguity from the verified sources, pause and escalate. The map should tell you whether to proceed, gather more evidence, or reroute.
For a step-by-step walkthrough, see The best tools for creating 'User Journey Maps'.
How to Choose the Right Tool for the Right Strategic Map#
Choose your tool by map purpose and risk level, not by brand or lowest price. Cost-first selection often creates a poor fit, and that usually shows up when a basic flowchart is no longer enough for step detail, ownership, or controls.
Use this five-point filter, in order:
- Map purpose: Is this for client clarity, internal control, or day-to-day decisions?
- Required rigor: Is a high-level business process map enough, or do you need formal notation, step-level detail, and function ownership?
- Collaboration needs: Will you collect input through surveys, interviews, or workshops, then iterate with others?
- Export and sharing: Do you need reliable exports and share links that fit contracts, compliance folders, or trip evidence packs?
- Governance controls: Do you need verified permissions, version history, and audit history for the risk involved?
Match the lane before you compare brands#
For a client lifecycle map, start with clarity and speed. If your draft can be edited quickly, shared cleanly, and reused in real client work, the tool is enough. Upgrade when controlled sharing, approvals, or stronger change tracking become non-negotiable.
For a compliance map, start with rigor. This is where notation depth, validation depth, function-level assignment, and governance controls matter more than whiteboard flexibility. Upgrade when your current tool cannot represent or control the process at the level your compliance workflow needs.
For a residency and travel map, start with maintainability. You need fast updates, clear structure, and easy links to supporting records so the map stays alive over time. Upgrade only when maintenance is stable and you now need tighter controls or more formal modeling.
| Tool lane | Example contenders | Best-fit scenario | Key limitation | Onboarding friction | Verify current pricing/features before choosing |
|---|---|---|---|---|---|
| Canvas-first | Miro | Living travel maps and early-stage client-flow drafts | Can remain too high-level for control-heavy compliance use | Low | Pending verification: confirm current plan limits on the vendor pricing page before choosing. |
| Diagram-first | Lucidchart | Client-facing maps that need cleaner structure and repeatable layouts | May be insufficient when formal notation/validation and stricter governance are required | Low to medium | Pending verification: confirm current export and share limits in vendor documentation before choosing. |
| Formal modeling | Visio, BPMN-oriented tools | Compliance maps that require formal notation, deeper validation, and stronger controls | More setup and upkeep for frequently changing maps | Medium to high | Pending verification: confirm BPMN support, permission controls, and audit-history details in current vendor documentation before choosing. |
One-sitting checklist#
- Pick one real map you actively use.
- Decide whether you need high-level visibility or formal notation with step-level ownership.
- Run one collaboration cycle (review and revision), then export and store the artifact where it belongs.
- Confirm governance needs now: permissions, version history, audit history, and document-linking requirements.
- Write your upgrade trigger in one sentence: "Current tool is enough until our verified plan limits, BPMN validation needs, or audit-history requirements exceed what it can support."
If you want a deeper dive, read The Best Tools for Virtual Whiteboarding and Brainstorming.
Your Playbook is Designed. What's Next?#
A map only creates value when you run it consistently. Your next step is to operationalize one high-impact workflow, turn it into decision-ready checkpoints, and review it on a cadence you will actually maintain.
- Operationalize one process first
Start with one process where a missed step creates real risk: client lifecycle, compliance, or residency and travel. Use your map to confirm each step has a clear trigger, owner, required evidence, and handoff. Keep this order intact: fix weak steps before you automate, because automation will scale whatever is already in the process.
- Turn the map into working rules
Convert the diagram into execution artifacts: use cases, data models, and quality factors. In your client lifecycle flow, define where approvals happen and how exceptions are handled. In compliance, mark exact review points and flag any evidence source or clause wording as pending until legal details are confirmed. In residency/travel flows, encode day-count and recordkeeping decision points, and clearly flag any threshold details that still need jurisdiction-specific verification.
- Choose a platform by control, not brand
Treat Gruv as one implementation path, not the only one. Evaluate any platform against your mapped rules: can it enforce decision logic, preserve evidence, show who approved what, and stay usable under day-to-day pressure? Keep it user-centered so the process is actually followed; otherwise, automations drift and lose value.
Use this execution checklist now:
- Choose one critical process.
- Encode the core if/then decision logic.
- Test edge cases before wider rollout.
- Document exceptions so updates stay controlled over time.
This pairs well with our guide on The Best Tools for Creating SOPs and Process Documentation.
Frequently Asked Questions
Which tool should you start with?
Start with the map job, not the brand. If integrations and versatility are your priority, Lucidchart is a common pick. Miro is often chosen for collaborative whiteboard mapping, and Visio is typically favored in Microsoft-centric or enterprise environments. The best starting point depends on your team, constraints, and workflow.
Are free plans enough?
Sometimes, for early drafts or a personal travel map. Once export quality, sharing, or formal notation becomes part of the deliverable, you should verify current limits and expect paid plans to make more sense. At least one BPMN practitioner describes Lucidchart as paid rather than free.
When is BPMN worth the overhead?
BPMN is worth it when the map needs to be interpreted consistently by people beyond you. If you update it weekly for yourself, formal notation can be more upkeep than value. Lucidchart offers BPMN 2.0 charting objects, and Visio has long-standing BPMN support.
Why should you map anything if you work alone?
Because you are the whole operation. One cited source says 73% of businesses have some process documentation, but only 5% effectively measure and manage it. The win is not having diagrams. It is having one map you can actually use to check scope, invoices, or travel days before a mistake costs you.
How does a map reduce real business risk?
Use three checkpoints. For financial risk, add a verification step before sending invoices and record the evidence source once it has been reviewed. For legal and contract risk, attach the client map to your SOW and keep exact clause wording marked as pending until legal review confirms it. For operational risk, show who approves what and where the proof file lives.
Is a flowchart enough, or do you need a strategic map?
A plain flowchart is enough when you only need sequence, owner, and a basic handoff. You need a deeper map when the same step has exceptions, approval gates, or supporting evidence such as invoices, tickets, or notices. A simple rule helps: if an error creates money loss, contract friction, or travel trouble, map the checkpoint, not just the step.
Do you really need BPMN as a solo operator?
Not always. Use formal notation when another professional needs to interpret the map accurately without you in the room, or when consistency matters more than speed. Skip the overhead for a living personal map that changes often and stays in your own hands.
What is the most common failure after choosing a tool?
Manual mapping can consume weeks of effort and still produce static diagrams that go stale within months. The software is only part of the decision. Adoption, training, and migration are just as likely to derail value, so test with one real map, one export, and one reviewer before you standardize.
Try a related tool
Researched and edited by the Gruv editorial team. Gruv builds cross-border billing, payouts, and finance-operations software for global businesses.
Sources
Includes 6 external sources outside the trusted-domain allowlist.
- oecd.org/content/dam/oecd/en/publications/reports/202...trusted
- pmc.ncbi.nlm.nih.gov/articles/PMC11047988trusted
- businessmapping.com/bl333-must-have-tools-for-business-process-m...external
- celonis.com/blog/choosing-a-process-mapping-tool-7-featu...external
- indeed.com/career-advice/career-development/process-map...external
- kyp.ai/best-process-mapping-toolsexternal
- sayanchor.com/post/e-invoicing-solutions-guideexternal
- trailhead.salesforce.com/content/learn/modules/business-process-mappi...external
Educational content only. Not legal, tax, or financial advice.
Related Posts

Value-Based Pricing for Freelancers Under Real Payment Risk
Value-based pricing works when you and the client can name the business result before kickoff and agree on how progress will be judged. If that link is weak, use a tighter model first. This is not about defending one pricing philosophy over another. It is about avoiding surprises by keeping pricing, scope, delivery, and payment aligned from day one.

The Best Tools for Virtual Whiteboarding and Brainstorming
If your client struggles to join the board, if the session stalls while you explain basic controls, or if nobody knows who owns the final output, they will not experience that as a software issue. They will experience it as your judgment call. Choosing among the best virtual whiteboarding tools is less about feature bragging rights and more about avoiding visible mistakes you could have screened out before the client ever saw the board.

Business Process Mapping for a Small Agency That Runs Day to Day
If your agency is shipping work but still depends on memory, Slack threads, and founder rescue, the near-term job is straightforward: use the next few weeks to build an **SOP** baseline for the few processes that keep revenue moving and delivery stable. Timelines vary by team, but a short first cycle is often enough to start replacing ad hoc execution with something your team can repeat.