
Quick Answer
Start with a repeatable baseline: one soft key light, one fill option, and fixed placement marks so your look stays consistent. For best lighting for youtube, prioritize clear face visibility and stable color over a complex rig. Then run a short clip check across different days to confirm brightness and shadow shape hold up. Add backlight or other accents only after the baseline is stable and only when a specific visual problem appears.
Why Your Lighting Isn't Just About Looking Good - It's About Building Trust#
The best lighting for YouTube is the setup that helps viewers trust you, not the one that looks perfect. On a client call, a recorded proposal, or a YouTube video, first impressions happen fast. If you are choosing lighting for YouTube, optimize for trust first, not polish. Before you hit record, ask a practical question: does your lighting make you easy to see, or does it make the setup itself noticeable?
Use this as a field guide, not a studio formula.
| Priority | What to focus on | Practical business read |
|---|---|---|
| Trust over perfection | Aim for a clear, reliable on-camera look | Clear beats perfect when you need to publish |
| Start simple | One window and a desk lamp can be enough to begin | You can ship now without a full studio build |
| Avoid delay | Do not wait for a perfect setup before recording | Competitors keep publishing, landing clients, and filling pipeline |
Three things matter more than gear complexity, and they drive the rest of this guide:
- Perception
Optimize for trust, not perfection. A simple check beats studio formulas: if a window and a desk lamp help people see you clearly, that is enough to start.
- Consistency
Trust builds when your setup feels stable from one appearance to the next. Before you record, do a quick frame check against your last client-facing video and keep changes intentional. Do not let talk about three lights at exact angles or one target color temperature keep you from publishing.
- Publishing momentum
Bad lighting will not kill your business, but waiting for perfect lighting can. The bigger risk is delay while competitors keep showing up, building authority, and filling pipeline.
That is why the next step is a repeatable baseline setup, not a gear spiral. If you want a deeper dive, read Value-Based Pricing: A Freelancer's Guide.
The 5-Minute Professional Presence: Your Baseline System for Guaranteed Consistency#
Use one repeatable setup and one repeatable pre-record check. The goal is consistency, not constant tweaking.
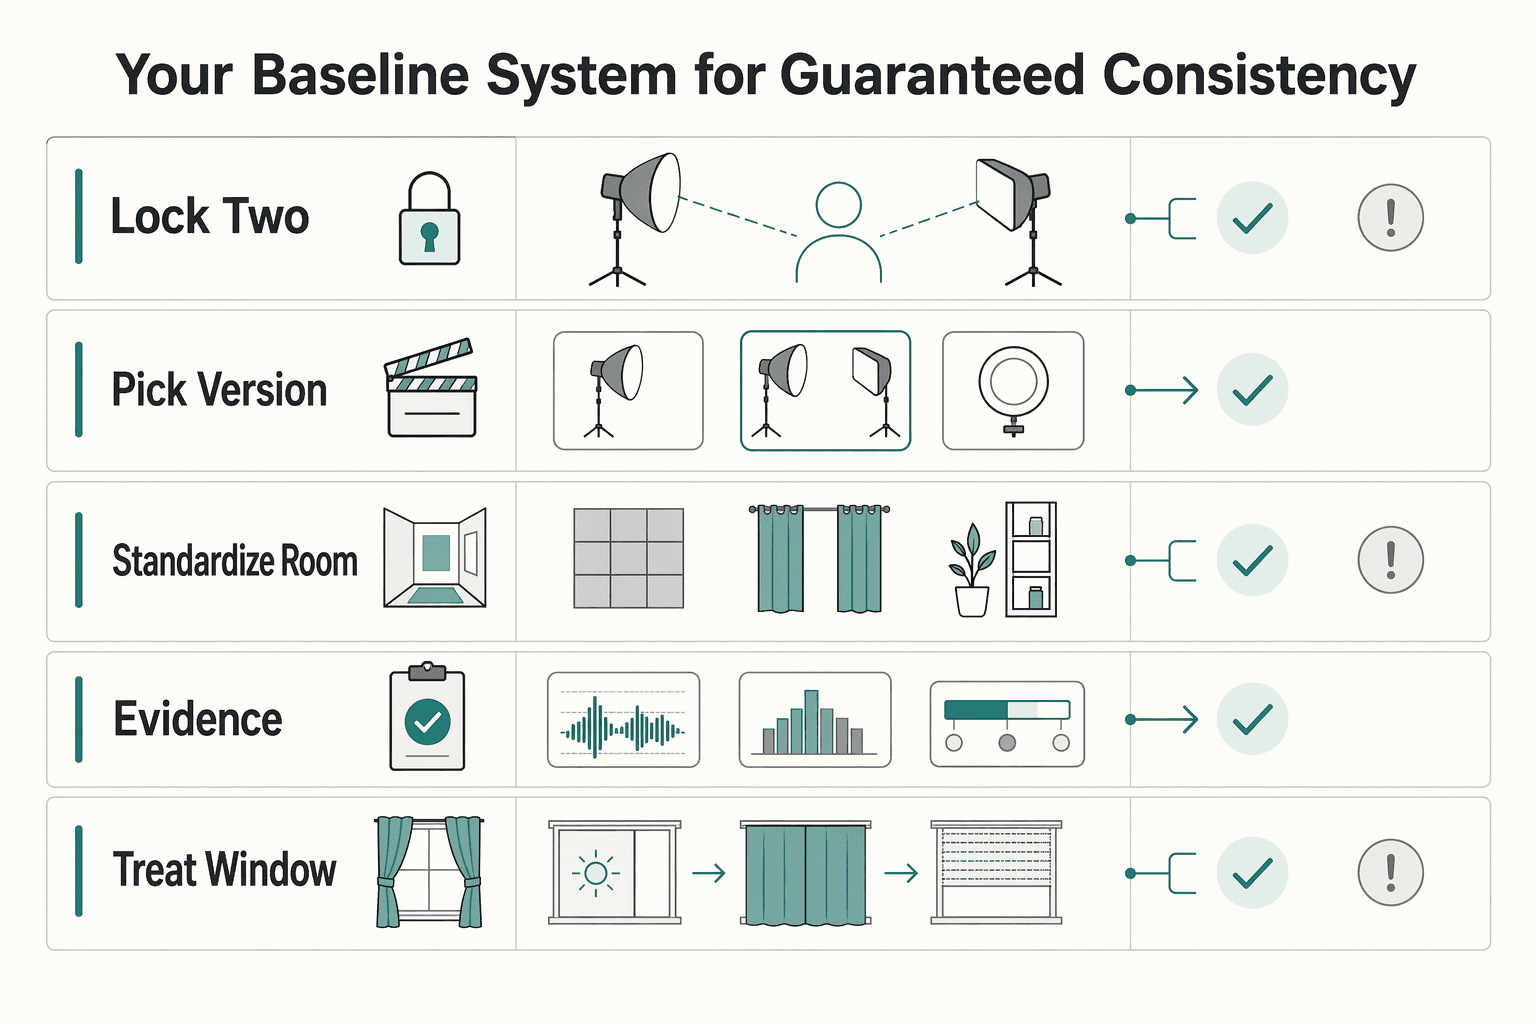
| Step | What to do | What to confirm |
|---|---|---|
| Lock your two-piece baseline | Use one main light and one fill source you can reset the same way every time | In preview, confirm your face is readable, both eyes are visible, and shadows look intentional rather than distracting |
| Pick the version you can keep stable in your space | Choose the setup you can return to reliably in your room | Watch consistency risk, space risk, and look risk |
| Standardize the room and the frame | Mark tripod, light, and chair positions; confirm eye line, headroom, and background before each session | Lighting and composition stay aligned |
| Run a short pre-record verification | Record a quick test clip and check face visibility, reflections, and audio | Keep exposure or white-balance lock consistent for the same setup if your camera or app supports it |
| Treat window light as optional, not foundational | Use window light only when it stays stable for your full recording window | If conditions shift during your test clip or session, reduce window dependence and return to your controllable baseline |
Treat this as an operational checklist for repeatability, not a technical rulebook.
- Lock your two-piece baseline
Use one main light and one fill source you can reset the same way every time. Your fill can be a second light, a reflector, or foam board. In preview, confirm your face is readable, both eyes are visible, and shadows look intentional rather than distracting.
- Pick the version you can keep stable in your space
| Baseline option | Consistency risk to watch | Space risk to watch | Look risk to watch |
|---|---|---|---|
| Softbox panel on stand | Position drifts if the stand is moved between sessions | Needs dedicated floor space | Can look different if distance or height changes |
| Desk-mounted panel | Clamp position shifts during desk changes | Competes with monitors, shelves, and cables | Can creep into frame if arm placement changes |
| Reflector or foam board as fill | Easy to bump unless fixed in place | Needs a repeatable resting or clipping spot | Bounce changes fast if angle shifts |
| Ring light fallback | One light doing multiple jobs can vary shot to shot | Small footprint, but still needs fixed placement | The setup can become visually noticeable |
- Standardize the room and the frame
Mark tripod, light, and chair positions so you can return to the same layout quickly. Then confirm eye line, headroom, and background before each session so lighting and composition stay aligned.
- Run a short pre-record verification
Record a quick test clip, then check face visibility, reflections, and audio. If your camera or app supports exposure or white-balance lock, keep those settings consistent for the same setup.
For powered gear you use regularly, do a basic equipment-hygiene check: look for identifying approval marks where applicable, and make sure the markings are still present and legible.
- Treat window light as optional, not foundational
Use window light only when it stays stable for your full recording window. If conditions shift during your test clip or session, reduce window dependence and return to your controllable baseline.
Also useful: The best tools for 'YouTube Keyword Research'.
Beyond the Baseline: Crafting Authority and Brand Identity#
After your baseline is stable, add accents only when they solve a specific problem on camera. The goal is a clearer, more credible image, not a more complex setup.
Keep one control constant across every accent: color temperature in Kelvin (K). Your lights are the first source of color your camera captures, so if the scene shifts too warm or too cool, that mismatch will distract from your message. After each change, record a short test clip and confirm skin tones still look natural. If they do not, calibrate your lights and camera for color accuracy before you adjust anything else.
- Add backlight when you blend into the background
If your hair, shoulders, or clothing merge into the background, a subtle backlight can restore separation. Keep it restrained so your face stays the focal point. If the rim effect becomes more noticeable than your face, dial it back.
- Add a brand-color accent when consistency of look matters
Use a low-intensity RGB accent in the background when you want your videos to feel visually consistent from one episode to the next. Treat it as a secondary cue, not the main subject. If color starts pulling attention away from your face, reduce it.
- Use negative fill when your face looks too flat for the topic
If your fill light makes your face look overly even, negative fill can bring back shape and a more serious tone. Apply it lightly so facial detail stays readable. Because this setup can drift over time, save a simple lighting plot once it works.
| Authority accent | Visual effect | Best use case | Common mistake | Quick correction |
|---|---|---|---|---|
| Backlight | Subject-background separation | You visually blend into the background | Accent becomes brighter than face exposure | Lower the backlight and re-center exposure on your face |
| Brand-color accent | Subtle visual consistency | You want a repeatable brand look across videos | Color spill shifts skin tone or overall scene color | Reduce intensity and recheck color temperature (K) |
| Negative fill | More facial shape and focus | Your lighting looks too flat for a serious message | Contrast gets too heavy and detail is lost | Ease the effect until both eyes remain clearly readable |
Brand consistency guardrails:
- Keep skin tones natural.
- Keep accent lighting secondary to face exposure.
- Keep the look repeatable across videos by marking placement or using a simple lighting plot.
Poor color handling can turn small styling changes into reshoots or time-consuming correction. Add one accent at a time, verify it on camera, and keep only what improves clarity. For a step-by-step walkthrough, see The best 'Microphones' for voiceovers and podcasting.
The Scalability Roadmap: When and How to Reinvest in Your Visual Brand#
Reinvest only when your current setup is limiting quality, speed, or outcomes you can observe. If your look is consistent, your setup is repeatable, and video is not yet a meaningful revenue lever, keep the baseline and focus on publishing.
Scaling is iterative, not a one-time jump. What works at a lower level can break at a higher level, so treat lighting upgrades the same way: add control only when repeatability starts slipping or production friction starts growing.
| Tier | Trigger to upgrade | Upgrade | Recommended lighting configuration | Operational benefit | Main risk if you upgrade too early | Budget band |
|---|---|---|---|---|---|---|
| 1. Hold and stabilize | Skin tone and exposure are consistent, and setup stays fast and repeatable | Do not add gear yet | One soft key light plus reflector, with marked positions | Lowest complexity and fewer variables | You add cost without removing a bottleneck | Baseline only |
| 2. Add control | Look shifts with background, wardrobe, or day-to-day conditions | Add one independent control point | Baseline setup plus one controlled backlight or one dedicated fill light | Faster corrections and more consistent output | Extra lights can introduce mismatch or drift if you do not document placement | Current threshold pending source-record verification. |
| 3. Standardize for output | Video now supports acquisition or sales, and inconsistency is visible in results | Move to a fixed, documented setup | Repeatable multi-light layout with saved settings and a reference frame | Less setup friction and fewer reshoots | You add complexity before volume or revenue role justifies it | Current threshold pending source-record verification. |
Before you buy more, run a simple two-day check: record the same short script on different days and compare skin tone, shadow shape, and setup time. If those hold steady, stay put. If video is tied to acquisition, also watch business signals after creative changes; clean visuals can raise perceived value, while cheap-looking presentation can weaken brand perception.
Reinvestment checklist#
| Condition | Action |
|---|---|
| Publishing cadence is low and setup repeatability is high | Stay with the baseline |
| Cadence is rising and setup time is slipping | Upgrade for control and speed |
| Video plays a revenue role | Track CPA and lead quality before and after changes |
| You plan to scale demand | Confirm site performance, fulfillment capacity, and customer-service capacity can keep up |
Related: How to Create a YouTube Channel to Showcase Your Freelance Skills.
Conclusion: Your Studio is a Boardroom. Light it Accordingly.#
Treat your lighting like an operating choice, not a style debate. First, lock a baseline that works every time. Then reinvest only when your current setup starts limiting consistency. Keep one short check that tells you whether the look still holds.
| Focus | Key checks | Thresholds or filters |
|---|---|---|
| Build your baseline | Create a clear split between ambient room light and your key light, then record a short clip on different days and compare face brightness, shadow shape, and background distraction | Check lumens, not watts; aim for output strong enough for task use, often 1,200+ lumens |
| Refine the look once the baseline is stable | Adjust color temperature on purpose instead of guessing | 5000 to 6500K reads more task-focused; 2700 to 3000K feels warmer and softer; 3500 to 4100K can be a practical middle ground; check for CRI above 90 |
| Reinvest only when there is a real failure mode | Upgrade when you keep fighting flicker while dimming, inconsistent color, or a setup you have to rebuild every session | Confirm dimmable LEDs use compatible dimmers; use a warranty of at least 3 years as a practical filter |
- Build your baseline
Start with a clear split between ambient room light and your key light so your face is the point of focus, not the room. When you compare fixtures, check lumens, not watts, and aim for output that is strong enough for task use, often 1,200+ lumens. Use a simple verification step: record a short clip on different days and compare face brightness, shadow shape, and background distraction.
- Refine the look once the baseline is stable
Adjust color temperature on purpose instead of guessing. 5000 to 6500K reads more task-focused, while 2700 to 3000K feels warmer and softer. If your room or brand tone sits in the middle, 3500 to 4100K can be a practical middle ground. If skin tone, product color, or client-facing polish matters, check for CRI above 90 so colors do not go flat or dull.
- Reinvest only when there is a real failure mode
Upgrade when you keep fighting the same issue: flicker while dimming, inconsistent color, or a setup you have to rebuild every session. If you buy dimmable LEDs, confirm they use compatible dimmers because mismatches can cause flicker and shorten lifespan. When you add fixtures, a warranty of at least 3 years is a practical filter, not a luxury.
If you want the implementation steps, use A guide to setting up a 'Home Video Studio' on a budget. That is enough to make your setup dependable. You do not need a dramatic studio to get reliable, repeatable light that shows up more consistently every time you press record.
For another home-office setup angle, see The Best Air Purifiers for a Home Office. Want help sorting through the options for your setup? Talk to Gruv.
Frequently Asked Questions
Is a ring light professional enough for YouTube videos?
Yes, if your main constraint is speed and you need simple, even front light. The tradeoff is that a ring light shines straight on, so your face can look flatter than it would under a soft, directional source. If you start seeing a flatter look, move to a soft key light setup for more shape and depth. | Option | Best use | Tradeoff | Practical fix | |---|---|---|---| | Ring light | Fast solo setup, centered front light, limited space | Lower contrast and less facial depth from straight-on light | Keep placement and distance consistent, then test a short clip before recording | | Soft key light | More shape, softer directional shadows, stronger separation | More placement decisions than a single front-on light | Mark stand position and angle so you can recreate the look fast |
How do you get good lighting in a small room?
Keep it simple and control direction first. The most common failure mode is a bright window behind you with not enough light on your face, which leaves you dark while the background pulls attention. In a tight room, use one controllable light in front of you, then record a short test clip to check skin tone, shadow edge, and whether the background is brighter than your face.
What is the fastest lighting setup to use every day?
The fastest setup is the one you do not have to rebuild. You want a light that stays mounted if possible, plus repeatable brightness and color controls so you can return to the same look instead of guessing every session. If a fixture offers adjustable color temperature and dimming, such as 2700K to 6500K and 0 to 100%, that helps you correct for room conditions quickly. The real time saver is documenting your exact settings and placement.
How should you choose between lighting brands without getting distracted by hype?
Start with criteria, not logos. Build your short list around light quality, control, consistency across shoots, mounting options, and how easy it is to replace or expand later. Once those are clear, compare current options in that category and verify candidate models against current vendor information before treating one as the right buy.
Do you really need three-point lighting to start?
No. Three-point lighting is a common studio method, but it is not required for every setup, and it does add complexity because you are managing three roles: key, fill, and background light. Start with one key light placed slightly above eye level. Add a fill light only if shadows are too heavy, or a background light only if you need more separation from the wall behind you.
How do you know your setup is actually working and not just looking okay on one good day?
Use one repeatable checkpoint, not your memory. Record the same short clip on two different days, then compare face brightness, shadow shape, and background separation side by side. If those shift every time you film, the problem is not that you need more gear first. It is that your current setup is not documented well enough to stay consistent.
Try a related tool
Researched and edited by the Gruv editorial team. Gruv builds cross-border billing, payouts, and finance-operations software for global businesses.
Sources
Includes 4 external sources outside the trusted-domain allowlist.
- board.oc.gov/sites/bos.egovoc.com/files/2021-06/rev-sup06...trusted
- documents.fresno.gov/WebLink/DocView.aspxtrusted
- eeoc.gov/wysk/what-you-should-know-about-covid-19-and...trusted
- osha.gov/laws-regs/regulations/standardnumber/1910/19...trusted
- admetrics.io/en/post/how-to-scale-youtube-adsexternal
- adorama.com/alc/best-lighting-for-youtube-videosexternal
- colborlight.com/blogs/articles/best-lighting-for-youtube-videosexternal
- gvmled.com/film-lights-color-science-tonesexternal
Educational content only. Not legal, tax, or financial advice.
Related Posts

Value-Based Pricing for Freelancers Under Real Payment Risk
Value-based pricing works when you and the client can name the business result before kickoff and agree on how progress will be judged. If that link is weak, use a tighter model first. This is not about defending one pricing philosophy over another. It is about avoiding surprises by keeping pricing, scope, delivery, and payment aligned from day one.

How to Create a YouTube Channel to Showcase Your Freelance Skills
Treat this like a business decision, not a creator identity project. Your goal is to publish videos that attract qualified inquiries instead of random attention.

Set Up a Home Video Studio on a Budget That Stays Reliable
Start with the job, not the gear. For most independent professionals, the target is straightforward: produce client-ready content with clear audio and repeatable framing, without rebuilding your setup every time you record.