
Quick Answer
Start with one manual billing cycle in Stripe Invoicing, then automate only after the paid invoice is clear on service period, due date, and line-item wording. Choose recurring invoices for fixed repeat amounts, or use the subscription path when that workflow better fits your retainer operations. Keep one overage method and require written approval before extra charges. Recheck fees against your real card and bank mix, since US examples (2.9% + 30¢) and NZ examples (2.65% + NZ$0.30) differ.
Start here and decide your retainer objective#
Define the retainer objective before you automate anything in Stripe. Use a simple sequence: choose the recurring model, lock scope and payment terms, then configure billing. In practice, that order makes disputes and overages easier to manage.
This guide is for freelancers and small teams who want steadier cash flow, not just cleaner invoices. By the end, you'll have a practical setup sequence, overage rules, recovery actions, and a monthly checklist you can reuse.
Define the retainer objective in one sentence#
Write one plain sentence that states what the monthly fee buys. Examples: fixed monthly support up to agreed scope, priority access plus set deliverables, baseline work with approved overages billed separately. Then use this quick decision check before setup:
- If scope changes often, start with tighter invoice-led control.
- If scope and price are stable, recurring billing can be a better fit.
- If usage changes pricing, define overage approval and billing rules before you automate.
Check fee reality before pricing the retainer#
Do not assume one global Stripe fee. Stripe presents Standard pricing as pay-as-you-go with no setup, monthly, or hidden fees. Published rates are country-specific, and custom pricing is available for businesses with large payments volume or unique business models.
| Pricing signal | Grounded example |
|---|---|
| US domestic cards | 2.9% + 30¢ per successful transaction |
| US add-ons | +0.5% manually entered cards, +1.5% international cards, +1% currency conversion |
| NZ domestic cards | 2.65% + NZ$0.30 |
| Effective-date reminder | NZ page includes a notice: new pricing effective 1 May 2026 |
Before you finalize retainer pricing, check the pricing page for your country, your likely card mix, and any cross-border or currency-conversion exposure.
Flag two unknowns early#
Before you commit, verify two things in your own account:
- your real net after fees, based on how clients actually pay
- which Dashboard options are available for recurring invoices versus subscriptions in your account
Do not pick the tool first and force the retainer into it. Decide what must happen each month, what can change, and what requires approval before billing.
Pick the billing model before you configure anything#
Pick the billing model based on how stable the retainer actually is. Then verify the behavior in your own Stripe account before you commit clients to a recurring pattern. Stripe supports recurring billing, but the detailed setup and workflow fit still need an account-level check.
Your main candidates are invoice-led billing and recurring billing. Use this simple decision rule:
- If scope, price, or included work changes most months, stay invoice-led until terms settle down.
- If fee, scope, and cadence are stable, evaluate a recurring setup.
- If usage and overages are still being defined, keep overage billing explicit and documented before you automate.
| Decision criterion | What to decide now | What to verify before rollout |
|---|---|---|
| Commercial stability | Are monthly terms mostly fixed or still renegotiated? | Confirm the recurring output still matches current agreement language. |
| Client-facing invoice clarity | Can each charge be understood without extra explanation? | Review the client-facing invoice output in your own setup and confirm key terms are clear. |
| Overage handling | Are overages pre-defined or approved case by case? | Confirm your invoice wording and internal records can support each extra charge. |
| Accounts receivable effort | Do you need monthly review control, or repeatability? | Validate your follow-up process before you reduce manual checks. |
Treat the table as a planning tool, not a claim about exact feature behavior. Whatever model you choose, the operating rule is the same: billing language should mirror the current retainer terms.
Fee check before lock-in#
Before you finalize the model, pressure-test margin against your real payment mix. Stripe Standard pricing is pay-as-you-go and states there are no setup, monthly, or hidden fees, but published rates vary by country. Grounded examples from Stripe pricing pages include:
- US:
2.9% + 30¢domestic cards, plus0.5%manually entered cards,1.5%international cards, and1%when currency conversion is required. - US ACH Direct Debit:
0.8%with a$5.00cap. - New Zealand:
2.65% + NZ$0.30domestic cards,3.7% + NZ$0.30international cards, plus2%when currency conversion is required. - NZ pricing page note: new pricing effective
1 May 2026.
If you model retainers on domestic-card assumptions alone, margin can be understated once international card or FX-related fees show up. If your volume is large or the model is unusual, Stripe also offers custom pricing, so check that before you lock long-term client terms.
Lock terms in the retainer agreement before you open Stripe Dashboard#
Lock the commercial terms in writing first, then configure Stripe to match them. If the agreement is vague, invoice wording and recurring setup will be vague too.
Define scope in invoice-ready language#
Write included work so each item maps directly to an invoice line without translation. Use the same labels across the agreement, first invoice, and recurring invoice format.
Keep units of work specific and stable, for example a set monthly deliverable or a defined review cadence, so each charge clearly ties back to the signed terms. Put the agreement next to a draft invoice and confirm every paid line maps to a written deliverable or entitlement.
Set payment terms before the first invoice is sent#
Set due-date behavior, late-payment handling, and any partial up-front requirement in the agreement before billing starts. Keep these terms in one place so invoice language can mirror them exactly.
If you price as a flat monthly retainer and absorb processing costs, base pricing on your actual Stripe pricing page. Stripe lists Standard pricing as pay-as-you-go with no setup, monthly, or hidden fees, and rates vary by country. Grounded examples include 2.9% + 30¢ domestic cards, +1.5% international cards, and +1% when currency conversion is required, plus NZ 2.65% + NZ$0.30 domestic cards and 3.7% + NZ$0.30 international cards, with NZ pricing noted as effective 1 May 2026. Contract due-date language and invoice due-date behavior should match exactly.
Choose one default for out-of-scope work#
Pick one primary method for extra work now: hourly billing, overage blocks, or milestone payments. You can allow exceptions, but the default rule should be obvious before requests arrive.
Document what approval evidence you require for extra charges, for example a signed change note or written approval with deliverable, price, and timing. Store that record with the client file.
Add a written scope-change rule before recurring billing#
State three points in the agreement: what triggers repricing, who approves it, and when the new amount applies. Without those, recurring charges drift away from the signed terms.
Your signed record should answer, in plain language, what changed, who approved it, and which invoice applies the new amount. If you want a related walkthrough, see How to Use Stripe Payment Links for Easy Invoicing.
Step 1 set up the client record and retainer line items in Stripe#
Set the client record and line items before you enable repeat billing. This is where you make the invoice read cleanly against the signed retainer instead of leaving room for interpretation later.
| Setup point | What to check | Grounded detail |
|---|---|---|
| Customer record | Billing entity in the agreement | Use one client naming format that matches the billing entity; invoice structure examples include title, issue date, invoice number, and client information. |
| Line items | Signed scope | Use the same language as the retainer scope; separate included deliverables, support access or service availability, and approved overage items only when they exist in the agreement. |
| Tax behavior | This client context | Decide what tax display applies and document that decision in the client file; Australia guidance shows totals and tax and, when applicable, a 'Tax Invoice' label, plus ABN and GST details. |
| Invoice preview | Signed agreement | Check customer identity, line labels, service wording, totals, and tax display against the signed agreement before enabling recurring billing. |
1. Create the customer record to match the contract.
Start with the billing identity, not the shorthand you use internally. Use one client naming format that matches the billing entity in the agreement and keep it consistent on invoices. If you need a trading name for recognition, add it without replacing the billing entity named in the agreement.
At minimum, confirm the stored client information matches what should appear on the invoice. Stripe's invoice structure examples include core fields such as title, issue date, invoice number, and client information, so align your customer record to that baseline.
2. Build line items from the signed scope.
Line items should read like the agreement, not like internal notes. Use the same language as the retainer scope so each paid item maps back to a written deliverable or entitlement. Use separate entries only when they exist in the agreement:
- included deliverables
- support access or service availability
- approved overage items
If variable work is possible, define the overage label now so later charges have a clear home. Stripe Billing supports multiple billing models, including recurring and usage-based, and Stripe notes there is no single method that fits every business. Keep the setup aligned to the actual retainer model.
3. Set tax behavior explicitly for this invoice pattern.
Make the tax decision before you automate. Decide what tax display applies for this client context, when it applies, and document that decision in the client file.
Stripe's Australia invoicing guidance shows invoice components like totals and tax and, when applicable, a "Tax Invoice" label, plus Australia-specific items such as ABN and GST details. Use that as structure context, not as a universal tax rule.
4. Verify one invoice preview before automation.
Preview one invoice as if it were going out now. Check customer identity, line labels, service wording, totals, and tax display against the signed agreement.
Use a strict checkpoint: if a line item is unclear without extra explanation, rewrite it before enabling recurring billing. Stripe notes that poor billing practices can cost revenue, and this is an early point to fix preventable errors.
Step 2 send a first invoice that is clear enough to pay immediately#
Send one manual invoice before you automate recurring billing. The first cycle is where you confirm wording, totals, and due-date details while everything is still easy to fix.
1. Build the first invoice manually.
Treat Stripe Invoicing as a draft-and-validate step, not just a speed tool. The invoice should stand on its own so the client can read it and pay it without extra explanation. Keep the core fields explicit and plain:
- service period, for example a specific month or date range
- itemized services for that period
- payment terms in one place
Stripe's freelancer guidance points in the same direction: specify dates, itemize services, and state payment terms. For retainers, that means translating contract language into invoice language the client will recognize immediately.
2. Choose payment methods deliberately.
Avoid manually entered card payments when possible, since Stripe lists an extra +0.5% fee for manually entered cards.
Where your account and market support it, offer both card and bank-based methods so clients can choose what fits their process. Stripe lists bank debits and bank transfers among supported local methods, and it also notes country-specific rates, so check your own account pricing before you set expectations. For quick fee context from Stripe's pricing pages:
- standard domestic card example:
2.9% + 30¢ - manually entered card surcharge:
+0.5% - international card surcharge:
+1.5% - currency conversion surcharge:
+1% - ACH Direct Debit example:
0.8%with a$5.00cap
3. Test the invoice like a client.
Before you reuse the format, test the invoice experience as the payer on desktop and mobile. Confirm the service period, amount due, payment options, and due date are obvious without hunting.
Use a hard checkpoint: if you still need a follow-up email to explain what the client is paying for, revise the invoice wording before you turn on automation.
Step 3 automate repeat billing with recurring invoices or subscriptions#
Move to recurring billing once the retainer is stable enough to repeat cleanly. The goal is to reduce manual work without creating avoidable billing errors.
1. Choose the repeat model.
Use recurring invoices when you bill the same amount on a fixed cadence. Stripe describes recurring invoices as automatically generated and sent at consistent intervals, such as weekly, monthly, or annually, and suited to predetermined repeat amounts.
Use Stripe's subscription path when that flow better matches how you run the retainer. Stripe's recurring setup flow includes a Create a subscription step, so both routes are supported.
Make the choice based on how the retainer is actually managed: a straightforward recurring-invoice flow or a subscription flow.
2. Preview the live result before you let it repeat.
Treat Preview and finalize as a control step, not a checkbox. Confirm the next billing date, amount, service period wording, and payment terms still match what the client approved.
Then review the hosted invoice experience again as if you were the payer. If the recurring version is less clear than the paid first invoice, fix it before auto-send.
3. Enable follow-up controls carefully.
If your current setup includes follow-up controls, configure them before the next cycle.
Keep reminder timing aligned with the payment terms already in your invoice and agreement.
4. Pause automation when scope changes mid-cycle.
Use one override rule: if scope changes mid-cycle, do not send the old automated amount unchanged. Review and correct that cycle using the controls available in your current setup, then update the recurring configuration for future cycles.
After any change, follow Stripe's Monitor and manage discipline so updated scope and pricing stay in sync with what gets sent. For a step-by-step walkthrough, see How to Automate Invoicing with Stripe for a Webflow Site.
Step 4 handle overages and scope changes without billing fights#
Once scope starts moving, the safe play is simple: treat the SOW or retainer as the baseline, define what counts as out-of-scope in writing, and confirm mutual agreement before you bill extra work.
1. Define the scope baseline and overage trigger.
Keep one clear baseline so invoices are easier to defend.
| Checkpoint | What to document | Why it matters |
|---|---|---|
| SOW deliverables baseline | The deliverables and revision limits already agreed | Completing SOW-defined deliverables means the original obligation is met |
| Out-of-scope trigger | What request exceeds the agreed scope (for example, revision rounds beyond the agreed limit) | Extra work should be handled as a separate billing decision |
| Retainer overrun trigger | Included monthly hours and what happens when usage exceeds them | Prevents included hours from drifting into unpaid extra work |
Your SOW or retainer scope is the baseline for what is included. If the SOW allowed two revision rounds and the client asks for a seventh, that is outside the original scope and needs a separate billing decision.
2. Follow the approval sequence every time.
Follow the same order every time: mutual agreement first, scope update second, invoice update third.
Material scope changes require mutual agreement and consideration, so avoid unpaid scope expansion and document each change clearly:
- mutual agreement on the added work and payment
- updated scope note in the SOW or retainer terms
- invoice wording that matches the approved change
Before you send an overage invoice, verify that each new line item maps to a specific approved out-of-scope request.
3. Catch the small asks before they eat the retainer.
Overage disputes often start with repeated "quick tweaks" that slip past the agreed scope. That pattern can turn included work into unpaid extra work. A common overrun looks like a 10-hour monthly retainer reaching 40 hours before overage approval is addressed.
Recover quickly: reset scope in writing, confirm what was completed against SOW deliverables, and align the next invoice with the updated agreement.
Step 5 cut late payments and chargeback exposure#
Clear, enforceable terms do more to reduce late payments and disputes than friendly but vague language. Once scope is settled, the next risk is usually mismatched expectations, not bad intent.
1. Write payment terms that remove guesswork.
Do not rely on a loose label like net 30 without plain operating detail. Put the full rule set in writing so both sides interpret terms the same way.
At minimum, cover deadlines, payment methods, fees, refunds, late charges, service suspension, receipts, recordkeeping, dispute process, and governing law. Specific written rules usually get paid faster than implied ones.
Before sending each recurring invoice, make sure it matches your written agreement terms. Confirm the due rule, accepted payment methods, and late-payment wording align.
2. Plan for operational payment failures early.
Late payment is often operational, not malicious. Cards fail, ACH can be returned, renewals can surprise teams, and invoices can sit in AP queues. Set terms that define what happens next when these issues occur, including late-charge, dispute, and service-suspension rules.
3. Tie each invoice to a clean evidence trail.
If a dispute happens, the paper trail is what protects you. Keep records easy to follow and hard to misunderstand. For each invoice, keep these items aligned to the invoice record:
- service period covered
- deliverables included
- current retainer agreement or SOW version
- written approval for scope changes
- delivery or approval confirmation
Avoid vague lines like "monthly services" without period or output detail. You want a clean chain from terms to invoice to delivered work.
4. Set and enforce a repeated-late-payment rule.
Use a predefined escalation rule for repeated lateness, then apply it consistently. Follow the escalation steps in your written terms instead of making ad hoc exceptions.
Only promise consequences you will enforce. If your terms include service suspension, be prepared to pause new work when invoices stay unpaid.
Step 6 run month-end reconciliation on accounts receivable#
Run month-end receivables reconciliation on a fixed cadence so you catch manual billing errors early, before they turn into larger cash flow issues.
1. Reconcile the full receivables list.
Start with one complete invoice list for the month, then reconcile each invoice to your bookkeeping records. For each line, confirm the invoice details and bookkeeping entry align.
2. Match invoice records to your books.
Review invoice number, client, service period, amount, and current status side by side. Focus on inconsistencies, missing information, and other manual-entry errors, not just whether totals look right.
A practical checkpoint is to trace a small sample end to end: invoice record, payment record, and bookkeeping entry. If one link breaks the chain, review that client account fully before the next cycle.
3. Clear exceptions before the next billing cycle.
Keep a short follow-up list for anything unresolved, such as:
- missing or incomplete invoice records
- mismatches between invoicing records and books
- invoice details that need correction before collection follow-up
- open items that could delay payment collection
Resolve these before the next cycle so recurring billing does not carry known errors forward.
4. Verify the current billing setup.
Before the next recurring invoices go out, confirm your live billing setup still matches your current terms. If terms changed mid-cycle, update the setup first, then continue.
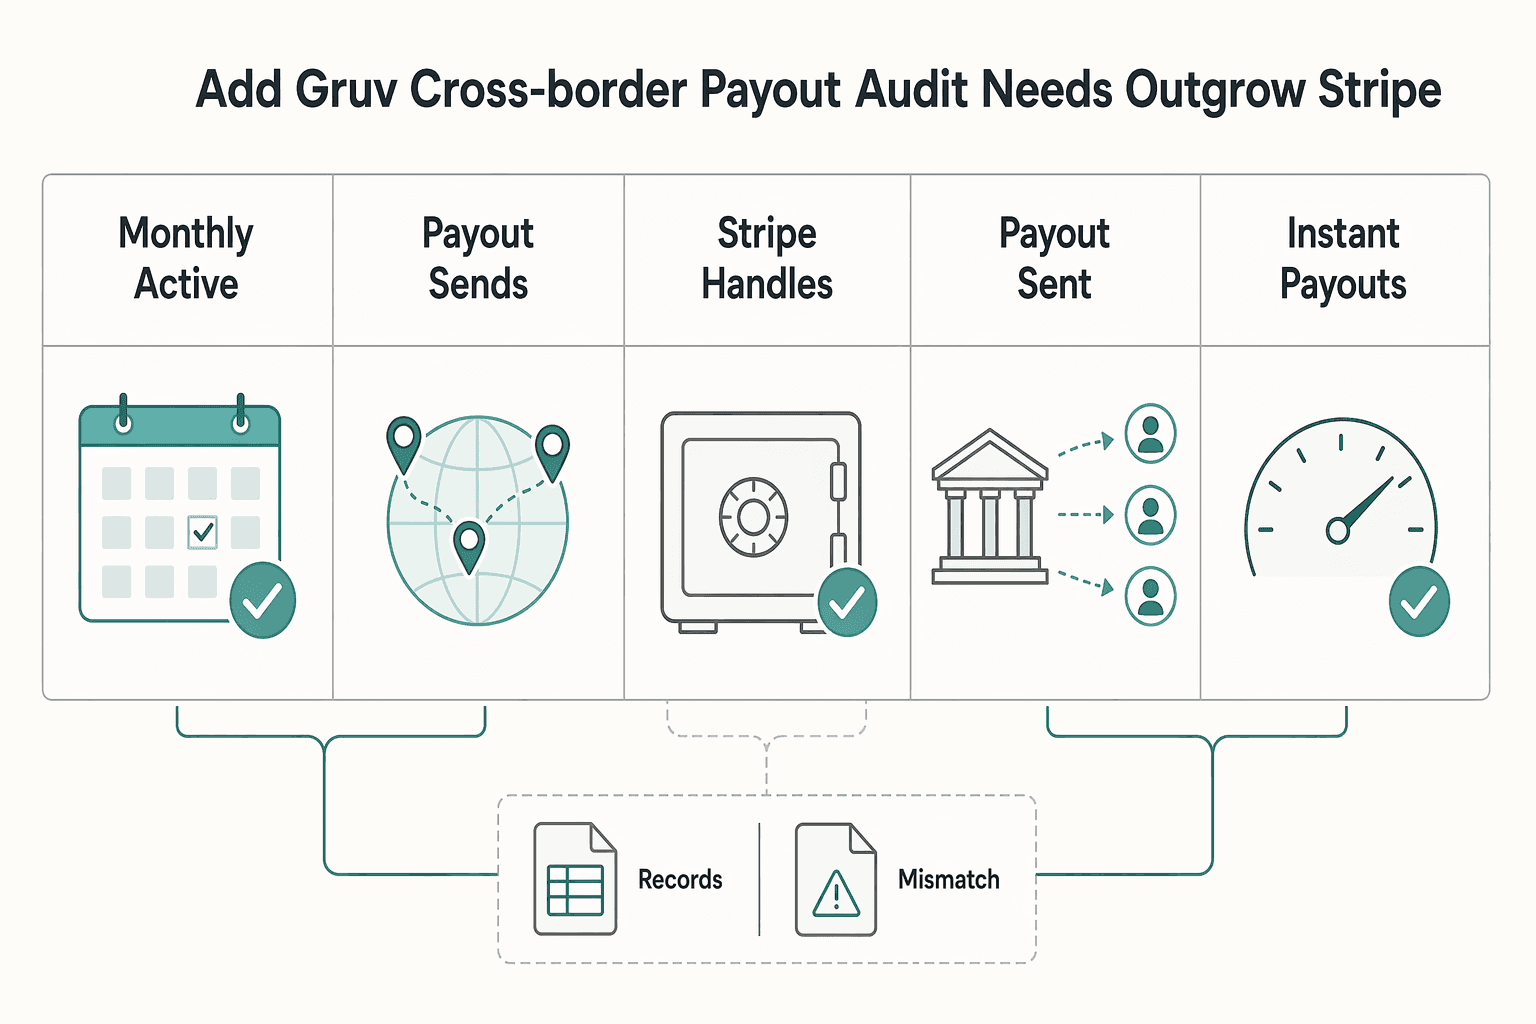
Add Gruv when cross-border payout and audit needs outgrow Stripe alone#
Use Stripe for collection, and add a second layer only when cross-border payout operations and reconciliation become the bottleneck.
| Planning item | Grounded detail | Context |
|---|---|---|
| Monthly active accounts | Accounts that received payouts | Count the last one to two billing cycles. |
| Payout sends | Each time funds were sent to a bank account or debit card | Count the last one to two billing cycles. |
| Stripe handles pricing | No fees for your platform | Connect model |
| Monthly active account fee | $2 per monthly active account | If you use 'You handle pricing' |
| Payout sent fee | 0.25% + 25¢ per payout sent | If you use 'You handle pricing' |
| Instant Payouts | 1% of payout volume | If you use 'You handle pricing' |
Step 1. Separate collection decisions from payout decisions.
Do not mix invoice collection with payout routing. Stripe's main payout planning choice is the Connect model: Stripe handles pricing for your users or You handle pricing for your users, and Stripe advises choosing an integration approach before implementation.
Before you change the stack, check the last one to two billing cycles and count:
- monthly active accounts, meaning accounts that received payouts
- payout sends, meaning each time funds were sent to a bank account or debit card
If you use You handle pricing, Stripe lists $2 per monthly active account and 0.25% + 25¢ per payout sent, with Instant Payouts at 1% of payout volume. If you use Stripe handles pricing, the comparison table lists no fees for your platform.
Step 2. Validate cross-border cost from the exact country pricing page.
Do not plan cross-border margins from one global fee assumption. Stripe states that pricing is country-specific.
The global pricing page shows 2.9% + 30¢ for domestic cards, plus 1.5% for international cards and 1% if currency conversion is required. Country pages can differ. For example, Stripe NZ shows 3.7% + NZ$0.30 for international cards and 2% if currency conversion is required, with new pricing effective 1 May 2026.
For each cross-border setup, document the payment path, currencies, payout country, and the exact Stripe pricing page used for approval.
Step 3. Evaluate Gruv with a narrow proof test before rollout.
If Stripe-only collection is stable but payout routing and review workload are rising, test a Stripe-plus-Gruv setup in a limited scope first. These Stripe excerpts do not establish Gruv-specific fees or workflow details, so confirm market and program support before you change process.
Run one low-risk case end to end and verify a clear chain from invoice collection to payout status to reconciliation. If that chain is not clear and repeatable, keep the rollout narrow until it is.
Fix the failures that break retainer cashflow most often#
Most retainer cashflow breakdowns come from repeat invoicing problems: unclear invoice lines, manual errors, disconnected records, and slow follow-up.
Step 1. Align every invoice line to the signed scope.
Start by making invoice lines specific. Vague line items invite questions, discount requests, and approval delays. A sloppy invoice can also become a procurement red flag.
Use the signed retainer agreement and executed SOW as your source text. Each line item should match a concrete deliverable or service period the client already approved.
Use this quick check: review your last 10 invoices for higher-value clients. If a reviewer cannot tell what an invoice is for in under 15 seconds, rewrite the line items. Confirm you also have a signed SOW on file for every active project.
Step 2. Catch manual errors before they repeat.
Manual invoicing can introduce typos and wrong amounts that delay payment. Before scaling automation, validate your template, wording, and approval path on a small sample.
If you needed corrections, resends, or credits, fix the pattern first so the same issues do not repeat month after month.
Step 3. Keep proposals, agreements, payments, and reconciliation in one workflow.
A practical pattern is to keep proposals, agreements, payments, and reconciliation in one workflow. This makes billing errors easier to spot and reduces handoff friction across the invoicing process.
Step 4. Track DSO and tighten records before delays compound.
Track DSO so you can spot drift before it becomes a larger cashflow problem. Keep the core records aligned: current retainer agreement, signed SOW, sent invoice, reminder history, and proof of deliverables.
If invoice disputes keep repeating, standardize scope and approval language before the next billing cycle with this SOW Generator.
Copy paste this monthly checklist and keep the system tight#
Use this checklist each month to catch drift before it turns into a cashflow problem: confirm terms still match billing, confirm fee assumptions still match reality, and fix mismatches before the next cycle.
| Monthly check | What to confirm |
|---|---|
| Agreement set | Current retainer agreement, scope of work, and payment terms are aligned; service period, included deliverables, and due-date wording still match the signed terms. |
| Recurring billing | Included work, overage rules, and billing cadence still map to the agreement. |
| Overdue invoices | Follow up and decide whether to continue work under current terms. |
| Receivables and bookkeeping | Amount, billing period, and status agree client by client; investigate every mismatch immediately. |
| Dispute and chargeback signals | If a charge is questioned, tighten invoice wording and approval records for the next cycle. |
| Pricing assumptions | Recheck when markets, cards, or currency mix change. |
| Stripe and extra ops | If you use Connect, confirm which pricing model applies; Stripe defines a monthly active account by payout activity, and each transfer to a user's bank account or debit card counts as a payout. |
- Confirm the agreement set is current.
For each active client, verify the current retainer agreement, scope of work, and payment terms are aligned. Check that service period, included deliverables, and due-date wording on the invoice still match the signed terms.
- Match recurring billing to the actual retainer.
Review each recurring invoice or subscription and confirm included work, overage rules, and billing cadence still map to the agreement. Keep line descriptions clear enough that the client can understand the charge without extra explanation.
- Resolve overdue invoices before opening new work blocks.
Check overdue status, follow up, and decide whether to continue work under current terms. Treat repeated lateness as an operational risk, not just an admin task.
- Reconcile receivables with bookkeeping.
Compare invoice outcomes against your books client by client: amount, billing period, and status should agree. Investigate every mismatch immediately so errors do not roll into the next cycle.
- Review dispute and chargeback signals.
If a charge is questioned, tighten invoice wording and approval records for the next cycle. Keep your agreement version, scope notes, and billing records easy to trace.
- Recheck pricing assumptions when markets, cards, or currency mix change.
Stripe's US page shows 2.9% + 30¢ for domestic cards, with add-ons such as +1.5% for international cards, +1% for currency conversion, and +0.5% for manually entered cards. Stripe's NZ page differs: 2.65% + NZ$0.30 domestic, 3.7% + NZ$0.30 international, with a pricing update noted as effective 1 May 2026.
- Document where Stripe ends and where extra ops begin.
If you use Connect, confirm which pricing model applies: one path states "No fees for your platform," while another lists $2 per monthly active account and 0.25% + 25¢ per payout sent. Stripe defines a monthly active account by payout activity, and each transfer to a user's bank account or debit card counts as a payout; for Global Payouts, Stripe states fees are collected from storage balance.
Run this checklist consistently, then turn repeated fixes into your baseline process once they stay stable over time. For related reading, see How to use 'Stripe Connect' to build a marketplace. When payments become cross-border and you need stronger payout controls plus traceable operations, review Gruv Payouts to decide if it should extend your Stripe setup.
Frequently Asked Questions
Can Stripe handle recurring retainers?
Yes. Stripe explicitly lists recurring billing as a supported capability, and contract invoices can be sent on a regular schedule. To keep a retainer setup clear, define agreement terms, scope, and payment timing before you automate.
What should a retainer invoice include?
Make payment terms explicit and use detailed descriptions of charges. In practice, each invoice should make it easy for the client to see what period and services they are paying for and when payment is due. If a reviewer cannot quickly understand the charge, tighten the line descriptions.
What is the practical difference between recurring invoices and subscriptions for retainers?
From the provided material, Stripe supports recurring billing, but it does not define feature-level differences between recurring invoices and subscriptions. So the practical choice is whichever format matches your retainer workflow and review process. Keep cadence, wording, and payment terms consistent either way.
How should I handle overages in Stripe without confusing the client?
Use one overage method consistently and describe it clearly on the invoice. Keep the base retainer and overage charges distinct so the client can see what changed in that billing period. Clear terms and detailed charge descriptions can help reduce avoidable disputes.
How can I reduce late payments on retainers without damaging client relationships?
Start with explicit payment terms and keep them consistent across the agreement and invoices. Send invoices on the agreed schedule so expectations stay predictable. Clarity and consistency can help more than ad hoc exceptions.
Do I need bank transfer options for retainer invoices?
It can help, especially if your clients prefer invoice-style payment methods. Stripe pricing pages list bank debits and bank transfers as available payment-method categories. Do not assume they are always cheaper: Stripe shows ACH Direct Debit at 0.8% with a $5.00 cap on stripe.com/pricing, while NZ BECS Direct Debit is shown as 1% + NZ$0.40 with an NZ$4.00 cap on stripe.com/nz/pricing.
What key setup details are still unknown before I launch this system?
Your final fee picture is still unknown until you confirm country, payment methods, card mix, and currency-conversion exposure. Stripe's main pricing page shows 2.9% + 30¢ for domestic cards, plus 1.5% for international cards and 1% for currency conversion, while country pages can differ and update over time, for example NZ notes new pricing effective 1 May 2026. If Connect is involved, also confirm which pricing model you are on, because fee responsibility changes by model.
Try a related tool
Researched and edited by the Gruv editorial team. Gruv builds cross-border billing, payouts, and finance-operations software for global businesses.
Sources
- apps.dot.illinois.gov/eplan/desenv/042321/136-61G95/61G95-136.pdftrusted
- chandlerazpd.gov/wp-content/uploads/2024/12/A00-GO-Public-Web...trusted
- collier.gov/files/assets/county/v/2/growth-management/do...trusted
- eservices.fairfield.ca.gov/weblink/0/doc/75336/Page1.aspxtrusted
- forwardhealth.wi.gov/kw/archive/DME050113.pdftrusted
- govinfo.gov/content/pkg/FR-2023-11-24/xml/FR-2023-11-24.xmltrusted
- govinfo.gov/bulkdata/ECFR/title-33/ECFR-title33.xmltrusted
- pinevillenc.gov/wp-content/uploads/2024/01/Town-Council-Pack...trusted
Educational content only. Not legal, tax, or financial advice.
Related Posts

Value-Based Pricing for Freelancers Under Real Payment Risk
Value-based pricing works when you and the client can name the business result before kickoff and agree on how progress will be judged. If that link is weak, use a tighter model first. This is not about defending one pricing philosophy over another. It is about avoiding surprises by keeping pricing, scope, delivery, and payment aligned from day one.

How to Use Stripe Payment Links for Easy Invoicing
---

How to Set Up a Business Bank Account in the UK as a Non-Resident
Opening a UK business bank account as a non-resident director is one of the harder early operating tasks for a global founder. The process is full of inconsistent eligibility rules, preventable rejections, and risks you often only see after approval. The way through is not a loophole. It is a disciplined sequence.