
Quick Answer
Start by splitting the project into `MANUSCRIPT` for book text, `RESEARCH` for support files, and `ADMIN` for deadlines, permissions, and submission notes. Use Outliner to keep a short `Status` list, test order changes in Corkboard, and create Snapshots before major cuts. When sharing, run Compile by scope first, then confirm the export contains only the chapters or scenes you intended.
Phase 1: Project Architecture - Building Your Bulletproof Foundation#
Set up the Binder before you write real pages. Give every new item one home and every edit a recovery path. That saves you later. Long projects often get messy when material sprawls.
Step 1. Build a three-part home for everything#
The Binder is your project map. Every project starts with three protected root folders: Draft or Manuscript, Research, and Trash. You cannot delete those root folders, though you can rename them. The cleanest setup is to use the built-in Draft or Manuscript root as MANUSCRIPT, keep RESEARCH as your non-draft holding area, and use a custom ADMIN folder for business and planning material.
That ADMIN folder keeps a writing project usable. It holds permissions, submission notes, deadlines, and author bio material outside the draft without burying them in research.
| Folder | Store here | Keep out | Common mistake | When uncertain, file it here | Why it matters |
|---|---|---|---|---|---|
MANUSCRIPT | Only text you expect to compile into the book | PDFs, images, contracts, stray notes | Treating it like an inbox | If you expect readers to see it in the final export, put it here | The draft stays clean, and Compile is simpler later |
RESEARCH | Source notes, web clippings, interview summaries, images, reference files | Final draft pages, admin records | Dumping every interesting file you may never use | If it supports the writing but will not appear in the final book, put it here | You can import almost any file type outside Draft, and media belongs here, not in Draft |
ADMIN | Permissions log, submission notes, deadlines, outline versions, metadata, author bio | Scene drafts, raw source files | Letting operational docs live in random documents | If it concerns the project as work, not as prose, put it here | Non-writing obligations stay visible without cluttering the manuscript |
Use one triage rule when something lands in the wrong place. If it is meant to be compiled, move it to MANUSCRIPT. If it helps you write, move it to RESEARCH. If it helps you manage the project, move it to ADMIN. If you still are not sure, park it in RESEARCH and sort it during your next Binder review.
Step 2. Run a recovery checklist every session#
Automatic backups are on by default, but that is not the same as being ready to recover. What you want is a short operating check you can repeat without thinking.
| Scenario | What to do |
|---|---|
| Backup folder | Know where Scrivener stores its automatic backups |
| Restore test | Open a backup copy and confirm that your most recent test edit appears in it |
| Another device | Finish syncing completely before continuing on another device |
| Two open copies | Do not keep the same project open in two places |
| Desktop to iOS | Close the project on desktop first, then open iOS and sync |
| Between computers | Copy the entire project folder, not only the .scrivx file |
| Online-only cloud files | Make them available offline before opening the project |
- Check backup state. Know where Scrivener stores its automatic backups before you need them. If you cannot point to the backup folder, you are not recovery-ready yet.
- Do one restore confidence check early. Open a backup copy and confirm that your most recent test edit appears in it. This catches the failure mode where backups exist, but you have never verified that one restores cleanly.
- Use single-device handoffs. A Scrivener project is made up of many linked files, so partial sync is risky. Finish syncing completely before continuing on another device, and do not keep the same project open in two places.
- Be strict across platforms. If you hand off from desktop to iOS, close the project on desktop first, then open iOS and sync. If you move a project between computers, copy the entire project folder, not only the
.scrivxfile. If cloud storage marks files as online-only, make them available offline before opening the project.
The tradeoff is speed versus certainty. Fast device switching feels convenient until one unsynced package file breaks the project state. A 30-second handoff ritual is cheaper than reconstructing a chapter.
Step 3. Choose the lightest template that matches your maturity#
Template choice should follow how settled your habits are, not how impressive the setup looks. Templates help most when you are new to Scrivener or want the app to provide some structure. If your process is already stable, extra scaffolding often turns into cleanup.
| Situation | Start here | Decision note |
|---|---|---|
| New project and you already know how you want the Binder arranged | Start light | Fewer default folders means less cleanup and less temptation to fill sections just because they exist |
| You want a genre-guided start | Use a built-in template such as Novel (Parts) | It includes Part and Chapter folders, Scene documents, and planning sheets |
| You have a repeatable method | Save your configured project as your own reusable template | That is when consistency starts paying off |
| The template adds cleanup work | Go simpler and trim unneeded items to Trash | Keep a template only if it makes the Binder clearer within a few minutes |
If this is a new project and you already know how you want the Binder arranged, start light. Fewer default folders means less cleanup and less temptation to fill sections just because they exist.
If you want a genre-guided start, use a built-in template that gives you real scaffolding. For example, the Novel (Parts) template includes Part and Chapter folders, Scene documents, and planning sheets. That helps when structure gets you moving, but it becomes friction if your first ten minutes go to deleting half the setup.
If you have a repeatable method, stop rebuilding from scratch. Once you have a project arranged the way you like, save that configured project as your own reusable template. That is when consistency starts paying off.
Version labels and template names can vary by platform, so verify what you see in your app. The decision rule is simple. If the template makes the Binder clearer within a few minutes, keep it. If it adds cleanup work, go simpler and trim unneeded items to Trash.
Before you move into daily use, confirm three things:
- You know where every new document should go without hesitating.
- You can locate a backup and have opened one successfully.
- You chose a template because it fits your current writing habits, not because it looked impressive.
For a separate pricing workflow topic, read Value-Based Pricing: A Freelancer's Guide.
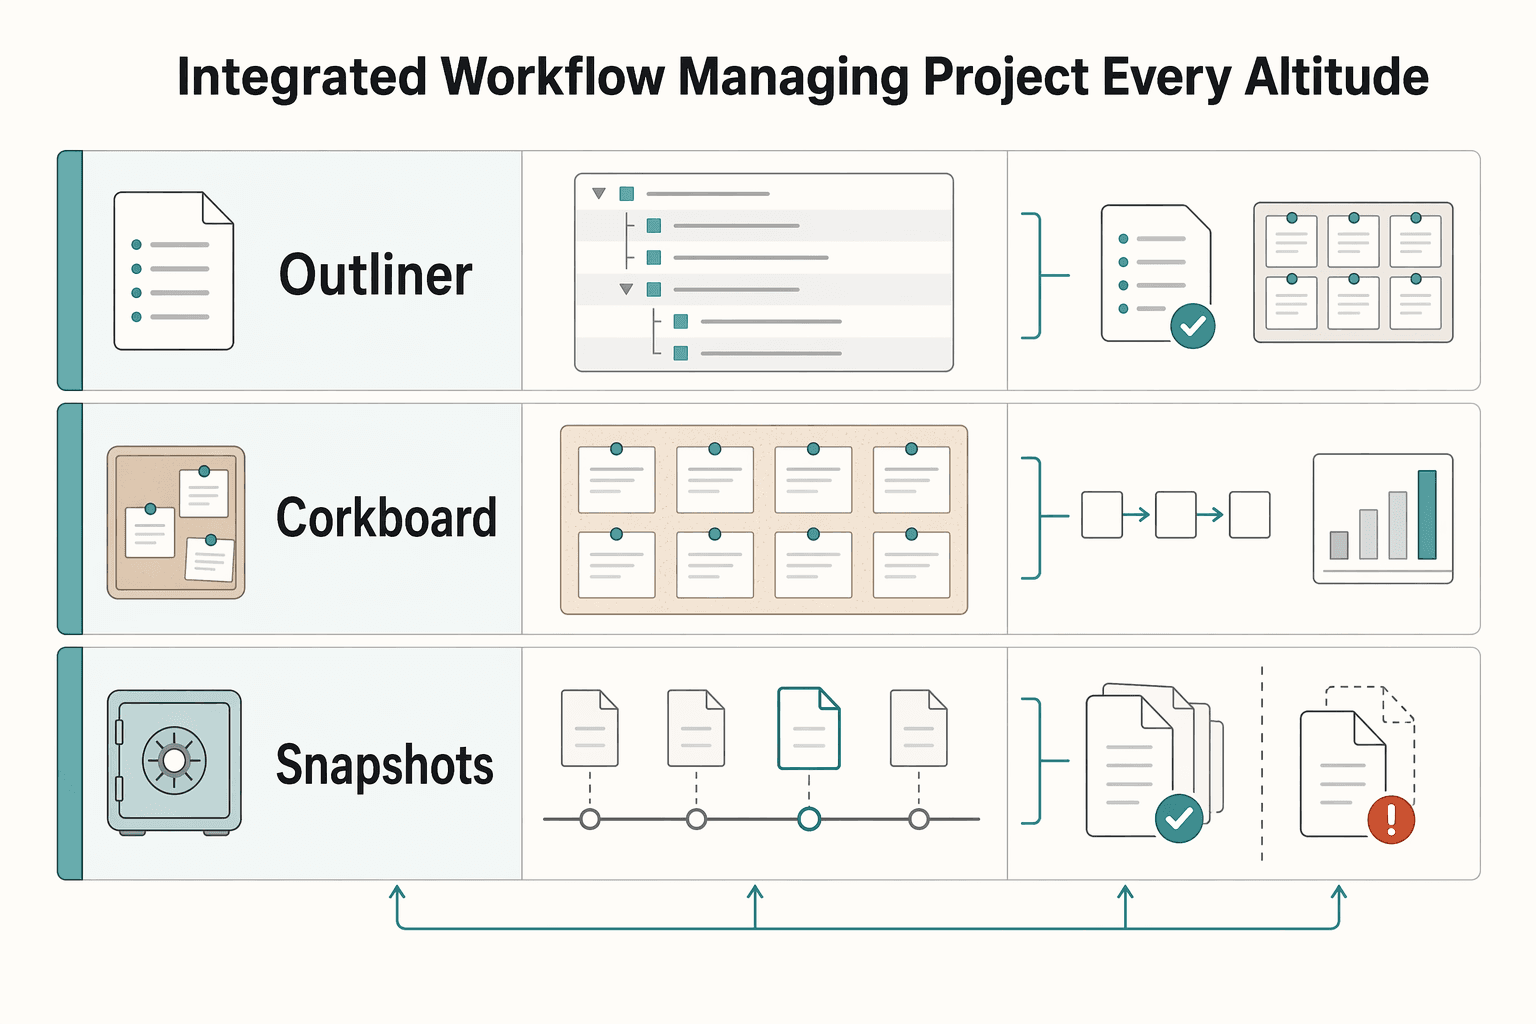
Phase 2: The Integrated Workflow - Managing Your Project at Every Altitude#
Run one view per decision: use Outliner for project state, Corkboard for sequence, and Snapshots for rollback safety. Scrivener links Binder, Corkboard, and Outliner, so changes in one view carry into the others.
| Tool | Use this when | Avoid this when | What you learn fast |
|---|---|---|---|
| Outliner | You need status and sequencing visibility across many documents | You are adding metadata you will not maintain | What is unfinished, blocked, or out of order |
| Corkboard | You need to test chapter/scene order as index cards | You are polishing sentences instead of testing structure | What should move, merge, split, or drop |
| Snapshots | You are about to make a risky document-level revision | You need whole-project backup coverage | Whether to compare changes, restore, or continue |
Step 1. Use Outliner as your control panel#
Use Outliner as a control panel, not a storage bin. Open Outline mode with Command-3 (Mac) or Ctrl+3 (Windows), then keep only decision-driving fields: Status, a simple sequence marker, and one short next-action note.
Scrivener supports Status metadata, and common template sets include To Do, In Progress, First Draft, Revised Draft, Final Draft, and Done. Keep your own list small and closed so you can scan it quickly. Set a short weekly cleanup rule: remove stale notes and update statuses that no longer match the draft.
Step 2. Reorder in Corkboard, then verify in Outliner#
Use Corkboard to test structure first. Because each index card maps to a Binder file and an Outliner item, reordering cards updates project order across views.
After each reorder pass, verify dependencies before line editing: setup before payoff, reveal after setup, and no missing bridge scene. Then switch to Outliner and confirm each moved document still has a clear role and status.
Step 3. Use Snapshots as named checkpoints#
Create a Snapshot before high-risk edits to a document: major cuts, splits, or rewrites. Snapshots capture document-level state, so treat them as revision checkpoints, not project backups.
Name snapshots so recovery is instant: YYYY-MM-DD reason (for example, 2026-03-25 before chapter 4 split). If an edit goes wrong, compare first to review additions/deletions, then roll back only when needed.
Workflow health check:
- You can identify unfinished work from Outliner without opening each document.
- Your sequence still supports setup, payoff, and reveal timing.
- Risky documents have clearly named Snapshots ready for compare or rollback.
Related: The Best Project Management Tools for Freelance Writers.
Phase 3: The Professional Hand-Off - Mastering the "Compile" Function#
Treat Compile as a delivery workflow, not a formatting afterthought. Draft in the editor, then package in Compile, because Scrivener lets compile formatting differ from what you see while writing.
Step 1. Choose scope before you touch formatting#
Start with what you are sending, then format it. Compile processes content in Binder order from the Draft/Manuscript folder, so confirm scope first and keep manuscript structure stable.
| Handoff scenario | What to include | If result is wrong |
|---|---|---|
| Full draft | Entire manuscript in current Binder order | Fix Compile inclusion/scope choices, not manuscript structure |
| Excerpt/sample | Only the chapters/scenes you intend to share | Recheck selected content in Compile and re-export |
| Review packet | Only review-ready manuscript content, plus any front matter you want visible | Adjust compile selection and matter options before formatting tweaks |
If research notes, admin docs, or the wrong range appears, correct Compile setup first. Do not rearrange the manuscript just to force one export.
Step 2. Run a preflight QA check before final export#
Use a pass/fail check every time:
| Check | Pass signal | Fail signal |
|---|---|---|
| Scope | Only intended draft/excerpt/packet appears | Extra content, missing sections, or wrong range |
| Structure | Reading order matches Binder order | Chapter/scene sequence is off |
| Breaks | Chapter and scene breaks read cleanly | Missing, doubled, or awkward breaks |
| Format fit | Compile For target matches recipient use | Wrong target for the handoff context |
| Metadata and matter | Front/back matter and metadata are complete when needed | Missing or incorrectly included matter/metadata |
Keep in mind: section layouts control output at the Binder-structure level, not only at text formatting level.
Step 3. Govern presets so reuse stays reliable#
Use one base compile format, then create variants by audience/output so you can reuse safely. Keep names consistent and easy to scan (for example, format + audience + scope + version), and retire old variants you no longer trust so outdated presets are not reused by accident.
| Output target | Best use | Validate before sharing | Common failure mode that should trigger a re-check |
|---|---|---|---|
| DOCX | Editable review and collaboration | Heading hierarchy, scene/chapter breaks, included front/back matter | Export used the wrong variant, so structure or matter is off |
| Fixed-layout proof/read-only circulation | Page flow, break behavior, front/back matter presence | Looks correct in editor but compile layout produced unexpected breaks | |
| EPUB | Ebook delivery | Section type/layout mapping, metadata fields, front/back matter options | Folder/file mapping or metadata setup is incomplete |
Step 4. Confirm section types and layouts, then verify like the recipient#
If compile output looks wrong, check section type to section layout mapping before editing draft text. This is especially important when folders represent chapters and files represent scenes.
Then do a quick recipient-view check: open the compiled file and review beginning, middle, and end. Confirm chapter starts, scene breaks, matter placement, and metadata where relevant. If something fails, fix it in Compile and export again.
Conclusion: You Are Now the CEO of Your Book#
At this point, the job is straightforward: keep the Binder clear, keep progress visible, and make handoff predictable. That is the practical way to use Scrivener well on a long project.
Step 1. Clean the architecture. Open the Binder and confirm the three root folders still make sense in practice: Draft or Manuscript for book text, Research for supporting material, and Trash for what is out. Those root folders have fixed roles, even if you rename them. If supporting material has drifted into the draft area, move it now. Your check is simple: when you glance at the Binder, can you tell what belongs in the book and what only supports it?
Step 2. Make progress visible. Pick one status method and use it consistently. Scrivener gives you custom icons, labels, and status metadata, and you can review those signals in the Binder, Corkboard, Outliner, and Inspector. If your markers mean different things in different chapters, they stop being useful. Tighten them down to a short set you will actually maintain, then update every active section before you write more.
Step 3. Confirm production readiness. Compile is where Scrivener stitches your project texts into a single file for the rest of the world. Run a fresh export in the format you actually need, such as Word, PDF, or print output. Do a quick check that the output includes the manuscript content you intend to share. If the export looks wrong, adjust Compile choices or document selection.
Before you move on#
Run this quick gate before the next writing session:
| Gate check | Pass condition |
|---|---|
| Binder | Draft text is in Draft or Manuscript, and support material is in Research |
| Status signals | They are current on every active chapter or scene |
| Compile | A current compile opens as a file you would be willing to hand off |
If those three checks pass, you can start the next draft with control instead of cleanup.
Frequently Asked Questions
How should you organize research when you are gathering interviews, PDFs, notes, or images?
Keep source material in the Research area and draft chapters in the Manuscript area. That separation keeps support material close without letting it sprawl into the draft, and Scrivener treats those areas differently. Run a test compile and confirm only the manuscript items you intend to export are included.
How should you use Compile when you are ready to share pages?
Treat Compile as handoff, not formatting cleanup. A practical path is to compile to Word for downstream editing or formatting, then inspect the exported file at the beginning, middle, and end before you send it. If chapter breaks, scene spacing, or included material look wrong, fix Compile settings or selection scope, not the draft itself.
How should you use Snapshots before you cut, rewrite, or merge sections?
Open the Inspector and create a Snapshot before the cut. Name it for the decision you are about to make, such as Before chapter 4 cut or Pre-beta rewrite. The Inspector is the panel Scrivener uses for synopsis, notes, and snapshots, so keep all three working together instead of scattering revision context elsewhere. Make one test Snapshot on a low-risk document and confirm it is saved and clearly labeled before you do major surgery.
When should you draft in Scrivener and when should you move to Word?
Use Scrivener as your authoring master file when you need structure, research nearby, or out-of-order drafting through drag and drop. Move to Word when another person expects a familiar editable file, especially for comments, line edits, or formatting work. If you are deciding between them, use this rule: | Situation | Stay in Scrivener | Hand off to Word | |---|---|---| | Authoring | You are building chapters and scenes as separate pieces and may write out of sequence | You want one continuous document and do not need project structure | | Review | You are still reshaping sections, using synopsis, notes, and snapshots in the Inspector | An editor, client, or reviewer expects tracked comments in a familiar file | | Collaborator expectations | You are the only active operator on the master project | Other people need the working file itself, not a compiled export | | Tradeoff | Useful for long-project organization and keeping research separate from the manuscript | Often simpler for shared review in a familiar .docx workflow | A red flag here is forcing collaborators into your Scrivener project when they really want a .docx. If outside review has started, compile to Word and keep Scrivener as the source of truth.
What usually goes wrong when you are importing text from Word?
Formatting issues are a common failure mode. If pasted text carries bad styles into the project, try Paste and Match Style with Ctrl+Shift+V, then check one imported section before you bulk-import the rest. The checkpoint is whether the imported scene matches the surrounding project text without extra fonts, spacing, or heading behavior.
How do you reduce sync risk when you work across devices?
Exact sync guarantees and provider support are not confirmed here, so use a conservative handoff routine: finish writing, let the project save, and fully stop work on the first device. Then reopen the project on the second device and verify that your newest edits are present before you continue. Do not trust a sync icon alone. Check against a known recent sentence or scene title after the sync.
What should you rely on when you are checking trial or licensing details?
Use the official Scrivener site as the source for current trial and licensing details before you buy, reinstall, or plan a multi-device setup. Treat licensing and syncing as two separate decisions, because people often assume one answers the other.
Try a related tool
Researched and edited by the Gruv editorial team. Gruv builds cross-border billing, payouts, and finance-operations software for global businesses.
Sources
Includes 6 external sources outside the trusted-domain allowlist.
- forum.literatureandlatte.com/t/best-way-for-new-user-to-learn-basics-of-s...external
- literatureandlatte.com/blog/how-to-compile-your-scrivener-project-f...external
- literatureandlatte.com/blog/how-to-use-front-and-back-matter-when-y...external
- scrivener.tenderapp.com/help/kb/features-and-usage/the-three-root-fo...external
- scrivener.tenderapp.com/help/kb/general/revising-in-scrivenerexternal
- thecreativepenn.com/tutorial-scrivener-fiction-non-fictionexternal
Educational content only. Not legal, tax, or financial advice.
Related Posts

Value-Based Pricing for Freelancers Under Real Payment Risk
Value-based pricing works when you and the client can name the business result before kickoff and agree on how progress will be judged. If that link is weak, use a tighter model first. This is not about defending one pricing philosophy over another. It is about avoiding surprises by keeping pricing, scope, delivery, and payment aligned from day one.

The Best Project Management Tools for Freelance Writers
**Build one traceable system for scope, execution, and billing, and give each tool one clear job.** Freelance writing ops is not "a writing project." It is overlapping deadlines, revision cycles, approvals, and payment triggers. When you can't reconstruct what happened, you lose time, margin, and sometimes trust.

Scrivener vs Ulysses for Authors Who Need a Resilient Stack
You are not just choosing a writing app. You are deciding how your solo business will handle draft control, file recovery, and the risk of getting stuck mid-project. That is why reviews of author tools should start with operational risk checks, not feature excitement.