
Quick Answer
Use Gaia GPS reliably by building one current trip package, verifying it on the exact device you will carry, and checking that your route, waypoints, map views, and offline area all work before you leave home. In the field, confirm position at decision points, pause when the map and terrain do not match, and review the track and notes after the trip.
Your Second Job is Costing You a Fortune#
If using Gaia GPS feels like a second job, the cost is usually not the app. It is the friction around it. When you piece together routes from mixed map sources, guess what you will need, and second-guess every turn once you are out of service, you burn focus before you even leave the trailhead.
That is why route uncertainty can feel expensive. It is not just extra screen time at home. It can show up later as slower decisions, more stops, and more stress when the terrain does not match what you expected. One common failure mode is simple: you thought you were prepared, but your maps, route notes, and tracking plan were never checked together as one set.
Stop treating scattered advice as a substitute for a repeatable method. GPS discussions can help, but they are not a process. Even a lively thread like Backpacking Light's "GPS: The Good, The Bad, and the Ugly" shows the limit of forum advice. It had 22 replies across 16 voices, and the excerpt shows it was last updated 3 years, 1 month ago. That is a useful checkpoint. If your current approach comes from old forum fragments, verify it before you depend on it in 2026.
Use this article as a sequence, not a bag of tips. The goal is to reduce planning friction and decision stress with a method you can repeat and re-check with current information. What follows moves from problem framing into a practical workflow so your navigation setup feels more consistent from trip to trip.
If you want a related gear angle, see The Best GPS Watches for Hiking and Trail Running.
Phase 1: Why Your Compliance Foundation is More Critical Than Your Tech Stack#
Build a reliable foundation first. New tools do not fix a system where records are scattered, checks are inconsistent, or source quality is unclear. In practice, fragmented records are harder to verify and more vulnerable to error.
If you want this to hold up under pressure, make your setup predictable. You should be able to see what you are relying on, what has been checked, and what still needs review without hunting across multiple places.
Before you start#
Use one rule in this phase: organize for stressed future-you, not calm planning-you. If the structure is unclear when you are rushed, the process is not ready.
Standardize your compliance baseline#
Start with one repeatable structure and keep it consistent. At minimum, your baseline should make four things obvious:
| Baseline element | What it should show |
|---|---|
| Authoritative records | What records are authoritative. |
| Active vs archived items | Where active items live versus archived items. |
| Verification step | What verification step each item has passed. |
| Challenge path | Who can confirm or challenge a claim if needed. |
The exact labels can vary, but the rule does not: do not split critical records across disconnected locations with different logic. Fragmented records are difficult to verify later, and that is where small prep mistakes become operational risk.
Use one simple readiness test: when you open a trip package, can you identify the current version, the last verification point, and the missing pieces in under a minute? If not, fix the structure before you add more tools.
Build a verification protocol#
Treat verification as part of the workflow, not an optional final check. Your protocol should define what gets checked, when it gets checked, and what quality bar the source must meet.
| Validation check | Question or check |
|---|---|
| Source quality | Is this claim supported by a source quality level that matches the risk? |
| Record completeness | Is the record complete enough to verify now, not later? |
| Verification trail | If this claim is challenged, can I show a clear verification trail quickly? |
| Current-state check | Add one current-state check tied to the live situation. |
A practical way to keep this grounded is to separate source confidence clearly. For example, official government sources and early-stage preprints should not be treated as equal confidence by default. If a claim depends on lower-confidence material, mark that uncertainty plainly in your workflow.
Before you rely on any important decision, run those three questions, then add one current-state check tied to the live situation so you are validating present reality instead of relying only on older assumptions.
If useful, keep a short run log with the claim, source type, verification status, and next checkpoint. Once this foundation is stable, the next phase can focus on execution quality instead of preventable rework. For a step-by-step walkthrough, see How to Use a YubiKey for Maximum Account Security.
Phase 2: How to Implement a Zero-Error Invoicing & Payments Protocol#
Use the same simple protocol for every outing: set up, verify, execute, then review. The point is to reduce errors at handoff points, where one source, map view, or plan gets carried into the next decision.
Before you start#
Create one short trip card for each outing, in your notes app, on paper, or in your route folder. Include the primary route, key waypoints in intended order, primary map view, backup view, offline status, power plan, and one hard stop line. Set that threshold only after you verify it against current conditions and source records.
Step 1. Verify your route package before you leave#
A saved item is not automatically ready to use. Confirm that the route opens on your device, waypoint order still matches your plan, your map view gives enough terrain context, and your planned area is available offline.
Run one quick check: with no live connection, can you open the route, find the next decision point, and switch to your backup view without delay? If not, fix the package before you leave.
Also verify provenance before you rely on old, imported, or shared route data. Inclusion in an index is not endorsement, and specialized setups do not always transfer cleanly to a new context.
| Navigation choice | Best use | Common failure mode |
|---|---|---|
| Planned route | Following a known line with decision points already thought through | Following a saved line you did not actually review |
| Track recording | Keeping a record of what happened for post-trip review | Recording data you never use to improve the next outing |
| Ad hoc waypointing | Marking a new hazard, turn, camp, or bailout point in the field | Creating isolated points with unclear naming or sequence |
Step 2. Execute with explicit decision rules#
In the field, make your decision rules explicit and repeatable. Confirm your position at planned decision points, and if the map view no longer matches the terrain well enough for confident movement, pause before you keep going.
| Action | Use when |
|---|---|
| Reroute | The destination is still reasonable but the current line is no longer the right line. |
| Pause | The mismatch may be resolved by checking map context, conditions, or position. |
| Turn back | You cross your hard stop line. Current hard-stop threshold pending source verification. |
Those are your three actions. Treat your hard stop as a fail-safe, not a suggestion. If conditions make the original plan unsuitable, update the decision instead of forcing the old plan.
Step 3. Review the outing like reusable data#
After the trip, save the track, note where plan and reality matched or diverged, and update your template. Keep notes short: missed turn, weak map choice, waypoint naming issue, bailout result, battery margin.
This review is what makes the next outing safer and faster. If future-you can open the track, waypoints, and short debrief and immediately see what changed, the protocol is working.
If you want a deeper dive, read How to Plan a Multi-Day Hiking Trip.
Phase 3: What an "Always Audit-Ready" Data System Looks Like#
An always audit-ready setup means your active trip data is clear before you leave, not cleaned up at the trailhead. The source material for this section does not verify Gaia-specific buttons, sync behavior, or feature limits, so keep your standard at the data level: clear storage, clear naming, clear provenance, and clear review.
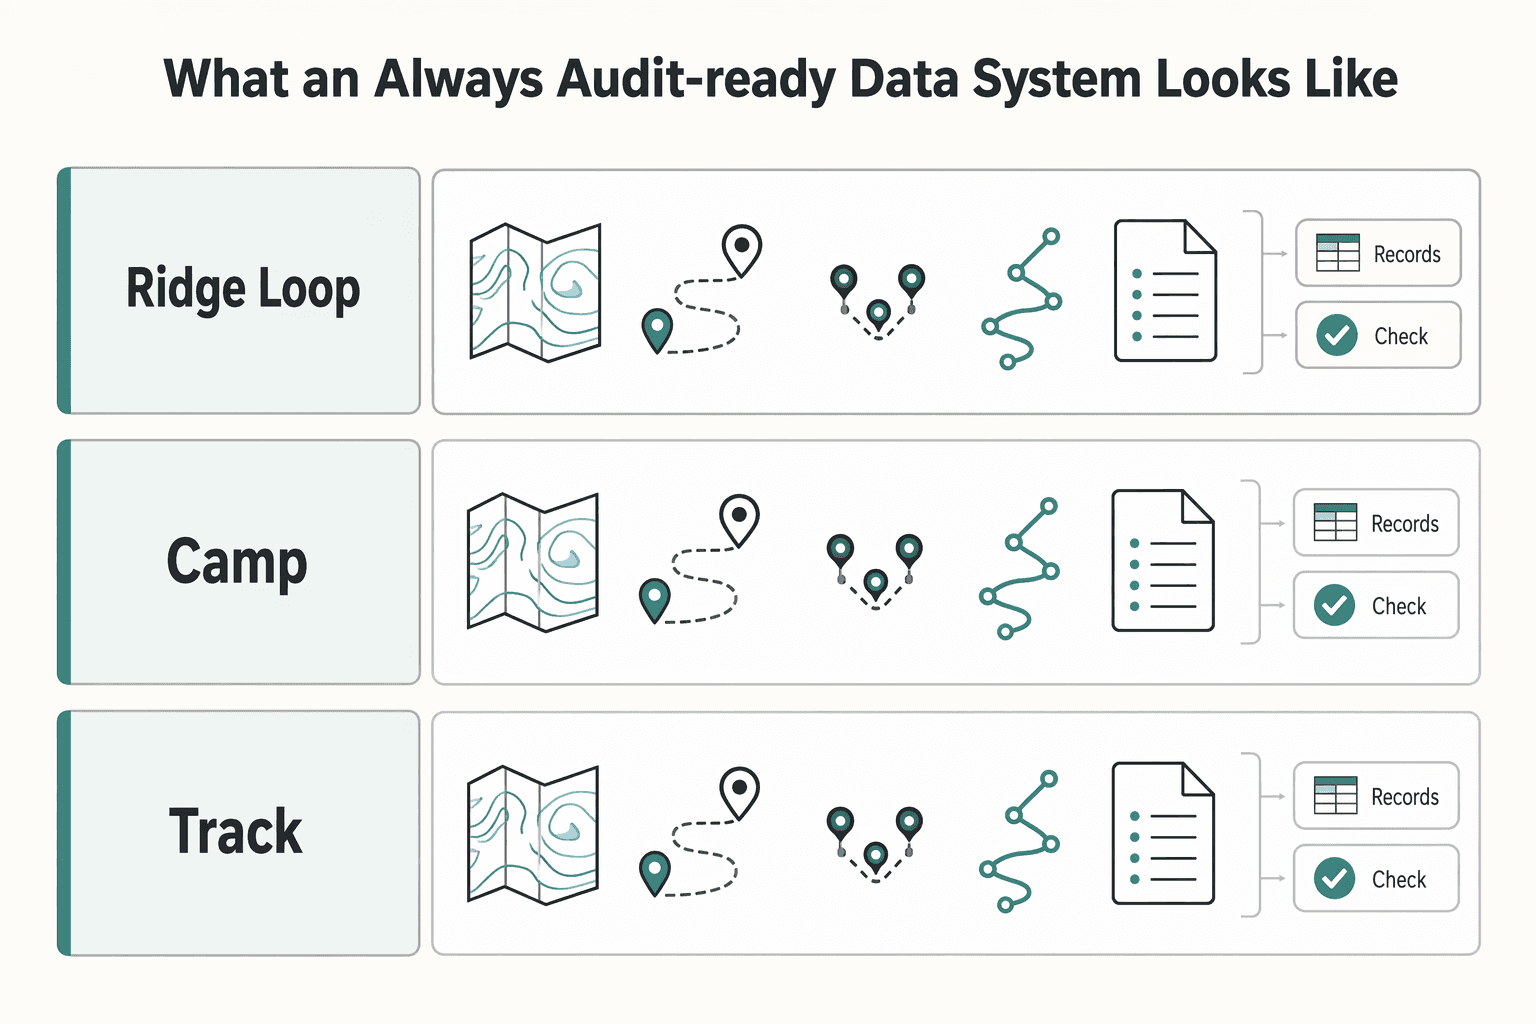
Step 1. Keep one single-source trip library for active use. Use one predictable structure for each outing so the field-ready package is easy to identify: maps, route, decision waypoints, recorded track, and notes. Separate active items from drafts, imports, and historical alternates so older files cannot be mistaken for current ones.
A simple readiness check: on the device you will carry, can you open the active package and immediately tell what is current versus historical? If not, the library still needs cleanup.
Provenance is the core control. Formal records use identifiers like COM(2024) 591 final and 2024/0327(NLE) so people can verify exactly what they are reviewing; use the same principle in your trip data by recording origin, last review point, and status.
Step 2. Use one naming pattern that is easy to scan. Pick one format and apply it everywhere: area, trip, object type, and status or sequence. The goal is immediate recognition on a small screen when attention is limited.
| Messy label | Standardized label |
|---|---|
ridge loop new | Cascades_RidgeLoop_Route_01_Current |
camp | Cascades_RidgeLoop_WP_03_Camp |
track(7) | Cascades_RidgeLoop_Track_2026-03-21_Actual |
Vague labels create ambiguity, and ambiguity slows decisions.
Step 3. Run a pre-outing readiness review. Before the next trip, confirm the active package is still usable and unambiguous:
- Open the package on the exact device you will carry and verify it is the intended current set.
- Ensure only one route is marked current for that outing.
- Confirm primary and backup views are labeled and marked as reviewed; current review threshold pending source verification.
- Move clearly stale items out of the active area using your own archive threshold; current archive threshold pending source verification.
- Verify your trusted device copy reflects your latest edits.
The target is simple: one current package, zero ambiguity, and no last-minute fixing in the field.
We covered this broader organization pattern in detail in How to Use Scrivener to Write and Organize a Book.
Your Business is an Enterprise. It's Time to Run it Like One.#
Run each trip like a system, not a memory test: keep one current record, run the same checks every time, and plan for recovery before you need it. In remote sections, help can be far away, so your setup needs to be self-sufficient.
| Area | Reactive mode | Deliberate mode |
|---|---|---|
| Decisions | You rely on memory or old notes. | You confirm the current trip record before acting. |
| Documentation | Records are spread across places and hard to trust. | Records live in one clear library with consistent naming. |
| Risk handling | Problems show up late, under pressure. | You run repeatable checks early and fix drift fast. |
Step 1: Maintain your Foundation. Keep your core trip record current enough to answer the next decision without guesswork. During a weekly check, confirm that your active route package and supporting notes still match reality, then update anything stale immediately.
Step 2: Follow your Protocol. Use the same pre-trip sequence every time, including a quick open-close-reopen check on the device you will carry so you can verify that the trip package is still there and usable. Consistency matters most on routine trips, when skipped checks are easiest to justify.
Step 3: Protect your System. Avoid data silos in your trip prep. When records are fragmented, you create manual cleanup work and uncertainty exactly when you need clarity.
You might also find this useful: How to Use a Wise US Business Account to Satisfy 'Proof of Income' for Spain's Digital Nomad Visa.
Frequently Asked Questions
How do I prove my tax residency status if questioned?
To defend your status, you need a comprehensive and contemporaneous record of your physical presence. This is built on the daily discipline of tracking your location in a "Single Source of Truth" dashboard, supported by verifiable evidence stored in your "Digital Vault," such as flight confirmations, rental agreements, and time-stamped receipts.
What is the EU "Reverse-Charge Mechanism" and why does it matter?
The Reverse-Charge Mechanism shifts the responsibility for remitting Value Added Tax (VAT) from you (the seller) to your VAT-registered client (the buyer) for B2B services in the EU. Your invoice must explicitly state "Reverse-Charge" instead of adding VAT. Failure to do so can lead to invoice rejection and payment delays.
How do I avoid the FBAR penalty as a US citizen?
The key is proactive, consistent tracking. You must file a Foreign Bank Account Report (FBAR) if the aggregate value of all your foreign financial accounts exceeds $10,000 USD at any point during the year. The only way to avoid a penalty is to monitor this total during a Monthly Compliance Check-in and file FinCEN Form 114 if you cross the threshold.
What's the most efficient way to receive money from a US client?
For US-based clients, an ACH (Automated Clearing House) transfer is the most efficient method, as it's typically low-cost or free. Use a multi-currency account (like Wise) that provides US-based ACH routing numbers to give your client a seamless domestic payment experience and protect your revenue from high wire transfer fees.
Can I use a single US LLC if I work all over the world?
Using a single US LLC globally carries the risk of creating a "Permanent Establishment" (PE) in another country. If a foreign tax authority determines your activities are substantial and ongoing, they can deem your LLC to have a taxable presence, subjecting your business profits to local corporate taxes. This requires professional legal advice.
Is it better to invoice in my home currency or the client's currency?
Invoicing in your client's currency is a professional courtesy but exposes you to currency fluctuation risk. The best practice is to invoice in a stable, major currency (like USD or EUR) and use a professional multi-currency account. This allows you to hold the funds and convert them when the exchange rate is favorable.
Researched and edited by the Gruv editorial team. Gruv builds cross-border billing, payouts, and finance-operations software for global businesses.
Sources
Includes 3 external sources outside the trusted-domain allowlist.
- academia.edu/77891981/Digital_Art_through_the_Looking_Gla...trusted
- eur-lex.europa.eu/legal-content/EN/TXT/HTMLtrusted
- pmc.ncbi.nlm.nih.gov/articles/PMC12995689trusted
- pmc.ncbi.nlm.nih.gov/articles/PMC12988861trusted
- snap.berkeley.edu/project/12206725trusted
- 5gaa.org/content/uploads/2023/04/gmec4auto-cybersecur...external
- aanda.org/articles/aa/full_html/2025/09/aa54198-25/aa5...external
- arxiv.org/html/2407.12799v1external
Educational content only. Not legal, tax, or financial advice.
Related Posts

Value-Based Pricing for Freelancers Under Real Payment Risk
Value-based pricing works when you and the client can name the business result before kickoff and agree on how progress will be judged. If that link is weak, use a tighter model first. This is not about defending one pricing philosophy over another. It is about avoiding surprises by keeping pricing, scope, delivery, and payment aligned from day one.

How to Plan a Multi-Day Hiking Trip
If you want to plan a multi-day hiking trip with fewer avoidable mistakes, treat it like something you build on purpose, not something you improvise the night before. By the end, you should have a practical phase-by-phase plan and a checklist mindset you can use right away.

The Best GPS Watches for Hiking and Trail Running
Choose among the **best GPS watches for hiking and trail running** the same way you would handle any other risk-management decision. Start with battery runtime in the tracking mode you will actually use. Then verify on-watch navigation and the companion platform you will rely on before and after the trip.