
Quick Answer
Start by enrolling a primary YubiKey and a spare on one high-risk account, then immediately sign out and sign back in with each key. For how to use yubikey reliably, repeat the same order on every account: find the security setting label (security key, passkey, or MFA), register both keys in one session, and confirm the key appears in sign-in prompts. Record method name, key tests, and recovery details before moving on.
How to use a YubiKey without getting locked out later#
Treat setup as a repeatable sequence, not a one-time device task. Start with one account, verify a real sign-in with the key, then repeat that same order account by account.
Service labels differ, so do not trust wording alone. You may see security key, passkey, or another multi-factor label. A practical check is whether the new method actually appears in the sign-in flow after setup. If it does not, treat that account as unfinished.
A clean rollout starts with one account you can focus on. That first enrollment is your rehearsal. You are confirming where the add-key option appears, how the prompts look, and which notes you need to capture for later accounts. Once that pattern is clear, the rest becomes much less guesswork.
Lockout risk goes up when steps are skipped or handled inconsistently. The fix is simple: keep the order steady, verify before moving on, and write down what each account actually supports. You do not need special tooling for this. You need a steady sequence and short records you can trust under stress.
Before You Start#
Have your primary key and spare key ready before you open settings. If you use a YubiKey Bio Series, finish fingerprint enrollment first. Bio supports up to five fingerprint templates, and Chrome 90 or later is called out for fingerprint enrollment on macOS, Linux, and Chrome OS.
- Choose one anchor account and find the add-key path in security settings.
- Enroll the primary key, then enroll the spare key in the same session.
- Sign out and sign back in with each key before moving to the next account.
Repeat this exact sequence across accounts. For the best protection, use it with each of your online accounts. If you want adjacent setup guidance, see How to Handle Taxes for a US Citizen Child Born Abroad and Browse Gruv tools.
What to prepare before you touch any account settings#
Do your prep before you change any login settings. Once enrollment starts, context switches create avoidable mistakes.
| Prep item | What to check | Detail |
|---|---|---|
| Both keys | Have your primary YubiKey and spare YubiKey in front of you | Do this before opening account security pages |
| Real device path | Check the laptop and phone you actually use for logins | Not just your preferred setup |
| YubiKey Bio fingerprints | Enroll fingerprints first if you use YubiKey Bio | Windows 10/11: Windows Sign-in options; macOS, Linux, and Chrome OS paths that use Chrome: Chrome 90 or later; up to five fingerprint templates |
| Recovery records | Choose one secure location for recovery codes and account notes | If a service prompts for a PIN, note it separately; if a PUK reset path exists, note where to find it |
Service naming and support vary, so treat labels as hints, not proof. You may see security key, passkey, or another MFA label depending on the account. Setup on a computer is not required, but it is still recommended.
The goal here is simple: remove friction before the first enrollment. Put both keys in front of you, check the devices you actually use, and decide where your recovery details will live. If any of that is vague, lockout risk goes up once you start changing account settings.
It helps to prepare a small note template in advance so each account entry stays consistent. Keep fields short: account name, method label, primary key tested, backup key tested, and recovery path checked. You can reuse those same fields later during verification and maintenance.
Before You Start#
- Gather both keys now. Put your primary
YubiKeyand spareYubiKeyin front of you before opening account security pages. - Confirm your real device path. Check the laptop and phone you actually use for logins, not just your preferred setup.
- If you use
YubiKey Bio, enroll fingerprints first. On Windows 10/11, useWindows Sign-in options. On macOS, Linux, and Chrome OS paths that use Chrome, use Chrome 90 or later. Bio supports up to five fingerprint templates. - Prepare recovery records before enrollment. Choose one secure location for recovery codes and account notes. If a service prompts for a
PIN, note it separately from the key. If aPUKreset path exists, note where to find it.
If one prep item is missing, pause and complete it before touching the first account.
Choose the right key setup for your actual devices#
Choose for daily behavior, not ideal hardware specs. If you move between phone and laptop, start with your main connector (USB-C or USB-A) and add NFC when phone logins are common.
Treat any legacy-device requirement as a constraint for that device only. The goal is reliable use across your most common login contexts.
A key that is inconvenient in your normal routine can get skipped. If your daily logins happen on a phone and laptop, pick a setup that works in both places without adapters you may not carry every day. If almost all sign-ins happen at one desk machine, your connector choice can be narrower.
Do not buy for edge cases first. Start with the path you use most days, confirm it works, then add coverage for less common devices. You can expand later once your baseline is stable.
Step-by-step device fit check#
- Map your real sign-in pattern. List the devices you use today for account access, and mark which ones matter for critical accounts.
- Pick a primary connector plus phone path. Choose
USB-CorUSB-Aas your anchor, then addNFCif phone logins are common. - Check model prerequisites before rollout. If you plan to use
YubiKey Bio, verify your OS enrollment path first. Bio fingerprint enrollment differs by OS, some enrollment flows call for Chrome 90 or later, and Bio supports up to five fingerprint templates. - Prepare and roll out account by account. Have your main key and spare key ready, and set up the key with each online account for best protection. Service labels can vary (
security key,passkey, or MFA wording), so expect different menu names.
Quick device matrix#
Fill this before you buy or enroll so gaps are obvious.
| Device | Port type in daily use | Daily login context | Best key form factor |
|---|---|---|---|
| Work laptop | |||
| Personal laptop | |||
| Primary phone | |||
| Backup phone/tablet |
If a row stays blank, pause and resolve it before rollout. If you want a deeper device tradeoff guide, read The Best Gear for a Portable Home Office.
Decide which accounts to secure first#
Secure accounts by blast radius, not by convenience. Start with any account that can reset other accounts, then work outward.
A common first batch is primary email, password manager, and core identity accounts. What matters most here is rollout order.
Random order creates hidden risk. You may spend time hardening a low-impact account while a reset-power account stays weak. A simple tier queue helps keep highest-consequence accounts first.
Before enrollment starts, scan your account list once and decide what belongs in Tier 1, Tier 2, and Tier 3. The first pass does not need to be perfect. You can revise as you discover account limits, but you should still begin with a clear first batch.
Build your queue before enrollment#
- List reset-power accounts first. Mark each account as
can reset others: yes/no. - Record the real settings label per account. Note what you actually see, such as
security key,passkey, or another MFA label. - Check whether multiple keys are supported. Do not assume every service allows more than one hardware key.
- Tier by urgency. Use a planning cadence such as Tier 1 now, Tier 2 this week, Tier 3 this month.
- Place common platforms by risk, not familiarity.
Google,Dropbox, andFacebookcan be Tier 1 if they are critical in your stack. - Confirm effort on the first few Tier 1 accounts. Validate the sequence early so rollout stays predictable.
Priority checklist#
| Tier | Target window (planning) | What belongs here |
|---|---|---|
| Tier 1 | Now | Primary email, password manager, identity accounts, and any account that can reset others |
| Tier 2 | This week | High-value service logins used in day-to-day work |
| Tier 3 | This month | Remaining important accounts, including accounts with limited key options |
If an account can reset others, keep it in Tier 1 even if you rarely log in. Frequency is less important than consequence.
Register your first key on one high-risk account#
Use your first Tier 1 enrollment as the template for every account that follows. A clean first setup can reduce repeated mistakes later.
Expect label differences in settings. One service may say security key, while older pages may still use U2F Token wording.
Set aside enough uninterrupted time for this first account. You are not only adding a key. You are documenting the exact setup labels and steps so the rest of the rollout stays consistent.
Keep the first account focused. Do not change unrelated account security settings during this pass. Mixing password changes, recovery-email edits, and key enrollment can make troubleshooting harder if something breaks.
First account sequence#
- Sign in and open security settings. Go directly to the page where second-factor methods are managed (for example, a 2-Step Verification area).
- Choose the key option and register your device. Select
security key,U2F Token, or equivalent, then insert or present your key and confirm touch. - Record account-specific details. Note the exact label used, enrollment date, and whether that service limits enrollment to one hardware key.
- Confirm the key is listed in account security settings. Verify the new key appears before you move to another account.
If the key does not appear in the account's second-factor methods, stop and recheck settings before you continue.
Add your backup key immediately on the same account#
Enroll the backup key before you leave the page. Delaying this step can make recovery harder later.
If you delay backup enrollment, you may need to log into every account and go through the setup process again. Adding the backup immediately avoids that rework and gives you a cleaner recovery path from day one.
Use clear labels while context is fresh. Labels like Email-Primary and Email-Backup can prevent mix-ups when you need fast access.
- Enroll the second YubiKey in the same session. Add another key on the same screen and use clear labels, such as
Email-PrimaryandEmail-Backup. - Track provider constraints. Some accounts limit YubiKey enrollment, so record each exception and keep other recovery factors enabled where needed.
- If enrollment is delayed, expect rework. You may need to log into each account and complete setup again.
- Store backup material securely. If setup exposes a QR code or shared secret, save a secure copy so re-enrollment is possible later.
Support varies by provider, and some accounts limit key enrollment. Record each exception and confirm a recovery path before moving on.
One expectation to set clearly: YubiKey secrets are write-only, and exact cloning is not supported.
Set PINs recovery codes and fallback methods without weakening security#
Lock in recovery details before you move to the next account. A good setup is not complete until PIN handling and fallback paths are clear.
This is also where setups get weaker. Stronger sign-in gets enabled, then fallback paths stay untouched. The account can look hardened, but recovery details are still fragile.
Treat PIN handling, spare-key enrollment, recovery-code storage, and fallback cleanup as one package. If one piece is missing, the package is incomplete. You can move quickly here, but do not skip verification that your recovery route is retrievable and understandable by your future self.
- Set a PIN when prompted, and store it separately from the key. Some hardware token and smart card paths use a local PIN as an added factor. Keep it out of notes that describe login steps.
- Enroll a spare key during setup. Have your key and spare key ready, and do not forget to set up the spare.
- Save recovery details in a retrievable location. Keep one clear record of where they are stored. If you want a structured storage option, use a trusted option such as The Best Password Managers for Freelancers and Teams.
- Review fallback methods account by account. Service names and options vary, so confirm what each account supports before you change anything.
Using two factors does not automatically mean strong phishing resistance. Hardware key methods can pair possession of the key with knowledge of a local PIN for stronger protection.
Labels still vary by account. Look for options such as security key, passkey, or multi-factor authentication, and finish only after key access and recovery access are both verified.
A practical tradeoff to decide explicitly is where recovery details live. If you keep passwords and recovery details in one vault, document that choice and apply stricter protection to that vault. If you separate storage, document where each piece is so recovery is still possible when you are tired or traveling.
Handle accounts that only support older methods#
When an account only offers older options, treat FIDO U2F and one-time password (OTP) as compatibility paths, not your target state. Use the strongest option available, then document the limitation so recovery is predictable.
The mistake here is treating all accounts as equal. They are not. Some services make key enrollment straightforward, while others expose legacy options with unclear labels or tighter key-enrollment limits. Your job is to harden what you can now and make exceptions explicit so they can be revisited later.
Legacy does not mean ignore it. Legacy means contain it. You still need a tested sign-in path, a recovery path, and clear notes about what the account supports today. That way, a single old account does not become the weak link that blocks everything else.
- Capture exact method names first. Record what the UI actually says, such as
security key,multi-factor authentication,OTP, orU2F. - Enroll the least-weak available option and tag it as legacy. If modern key-based login is available, use it first. If not, mark the account as
legacyin your notes. - Document account-specific dependencies.
FIDO U2F,OTP,Smart Card (PIV), andOpenPGPare separate key application areas, so success in one does not confirm the others. - Run one controlled verification cycle. Complete a clean sign-in with the enrolled method, then walk a non-destructive recovery prompt.
You may see smart card authentication, PIV, or OpenPGP in provider-specific login or cryptographic workflows. They are valid where required, but specialized, and most readers can skip them unless a provider explicitly asks for them.
Key limits also vary by provider. In one Auth0 community response (Oct 2023), the reported limit was one enrolled YubiKey per user in that context. Keep key-count notes per account and recheck them during maintenance.
Unknowns to verify before marking an account complete:
- Exact supported method names in that account UI.
- Number of hardware keys allowed for one user profile.
- Fallback behavior after key loss, including whether recovery works without the original key.
If an account only offers legacy methods today, keep it as a documented exception and schedule a later review for stronger options.
A useful note format for these exceptions is short and repeatable: current method, fallback method, number of keys allowed, and next review date. You are not trying to create perfect documentation. You are creating enough clarity that future updates do not start from zero.
If you encounter U2F-related errors, pause before removing fallback access. Verify sign-in and recovery before any cleanup step that could reduce access paths.
Verify every account hardening change#
Treat enrollment as incomplete until a fresh login proves it worked. This is where false confidence often starts.
A common failure mode is believing 2FA is enabled when login still defaults to password-only. Use the same verification sequence every time so misses are easy to spot.
Verification should happen immediately after each account change, not at the end of the day. Immediate checks are easier to troubleshoot because session context is still fresh and rollback steps are still obvious. Delayed checks can turn small mistakes into multi-account cleanup.
Keep your verification process boring and consistent. The same steps on every account reduce mental load and make deviations easy to catch. If a service behaves differently, capture that in your notes so the next pass is faster.
- Sign out, then sign back in with the method you enabled. Confirm the account prompts for your second factor, such as a
security key. - If the service supports it, repeat login in a second device context. Use a separate browser profile, phone, or computer.
- Re-open security settings and confirm enforcement is active. Enrollment can succeed while stronger authentication remains optional on some services.
- Check lockout prevention in the environment you changed. For local Windows changes, confirm local credentials before reboot. For SSH changes, keep an active root session during testing so you can revert quickly.
If you keep a short evidence log per account, include:
datemethod(security keyor other second factor)primary_key_tested(yes/no)backup_key_tested(yes/no)recovery_path_checked(yes/no, short note)
If any check fails, pause that account, fix it, and rerun the full sequence before continuing. One practical rule keeps this manageable: no account is complete until the verification checks are complete.
Common mistakes that cause lockouts and how to recover#
Lockouts can come from setup gaps. Treat recovery as part of enrollment, and do not leave an account until you have a tested way back in.
| Mistake | Recovery move | Detail |
|---|---|---|
| Only one key enrolled | Register a backup YubiKey on the same account and test both keys | If a service allows only one key, document the exception and rely on that account's recovery path |
| PIN set without a plan | Write account-specific reset steps before changing other settings | FIDO2 YubiKey and Security Key devices do not ship with a factory default PIN; one key can have up to three PIN contexts; PIV or OpenPGP may still be 123456 until changed |
| Recovery codes skipped | Save recovery codes when you enable key protection | Store them somewhere you can access during recovery |
| Many accounts changed at once with no log | Work account by account and retest one account at a time if something fails | Keep a short log with date, method, primary key test, backup key test, and recovery-path check |
The patterns below are easy to miss during long setup sessions. Keep this list nearby while you work through accounts so you can catch each one early.
- Enrolling only one key.
Recovery move: register a backup YubiKey on the same account and test both keys. If a service allows only one key, document that exception and rely on that account's recovery path.
- Setting a PIN without a plan to retain and reset it.
Recovery move: write account-specific reset steps before changing other settings. For FIDO2, YubiKey and Security Key devices do not ship with a factory default PIN, so the PIN you set is the one you must retain. One key can also have up to three PIN contexts, and PIV or OpenPGP may still be 123456 until changed.
- Skipping
recovery codeswhen they are offered.
Recovery move: save recovery codes when you enable key protection, and store them somewhere you can access during recovery.
- Changing many accounts at once with no log.
Recovery move: work account by account and retest one account at a time if something fails. Keep a short log with date, method, primary key test, backup key test, and recovery-path check.
Two details are easy to miss. Some accounts issue recovery codes when you enable key protection. Storing both keys in one bag or wallet can wipe out your backup advantage in a single loss event.
If you do get locked out, resist the urge to change several settings at once. Recover one account, verify access, update notes, and only then move to the next account.
Keep your setup reliable with a lightweight maintenance rhythm#
Reliability comes from small, scheduled checks. You do not need heavy process, but you do need consistency.
| Check type | When | What to do |
|---|---|---|
| Regular check | Every few months | Sign out and sign back in with both your primary and backup key on top accounts, and confirm the backup key is still in its documented location and accessible |
| Event-driven check | After changing a phone, laptop, browser, or adapters | Retest top accounts using the connection methods you rely on, such as NFC, USB-C, USB-A, or Lightning, and keep fallback access until your usual paths work again |
| Onboarding check | When new critical services are added | Add each new critical account to your inventory during setup, enroll the key immediately, and record the method used, number of keys enrolled, and last recovery test date |
| Periodic fallback review | After stronger methods are working across real devices | Remove legacy fallback paths you no longer need; if you replace a key, run an authenticity check and log activation details |
Maintenance matters because, in the end, you are responsible for verifying a new hardware security token is authentic and unmodified. Lack of transparency and information can also lead people to skip essential checks.
Keep checks short so you will actually do them. The target is not perfect coverage on every pass. The target is regular proof that your highest-impact accounts still behave as expected.
- Regular check (for example, every few months): test priority accounts.
Sign out and sign back in with both your primary and backup key on top accounts. Confirm the backup key is still in its documented location and accessible.
- Event-driven check: retest after device or browser changes.
After changing a phone, laptop, browser, or adapters, retest top accounts using the connection methods you rely on (for example, NFC, USB-C, USB-A, or Lightning, as relevant). Keep fallback access until your usual paths work again.
- Onboarding check: update inventory when new critical services are added.
Add each new critical account to your inventory during setup, then enroll the key immediately. Record method used (passkey or security key), number of keys enrolled, and last recovery test date.
- Periodic fallback review: retire weak options only after stability is proven.
When stronger methods are working across real devices, remove legacy fallback paths you no longer need. If you replace a key, run an authenticity check and log activation details. Also remember no single authenticity check covers every distribution-attack variant.
A simple maintenance note for each account is enough: last tested date, last device used, and any change needed. These notes make scheduled checks fast and keep new-account onboarding consistent.
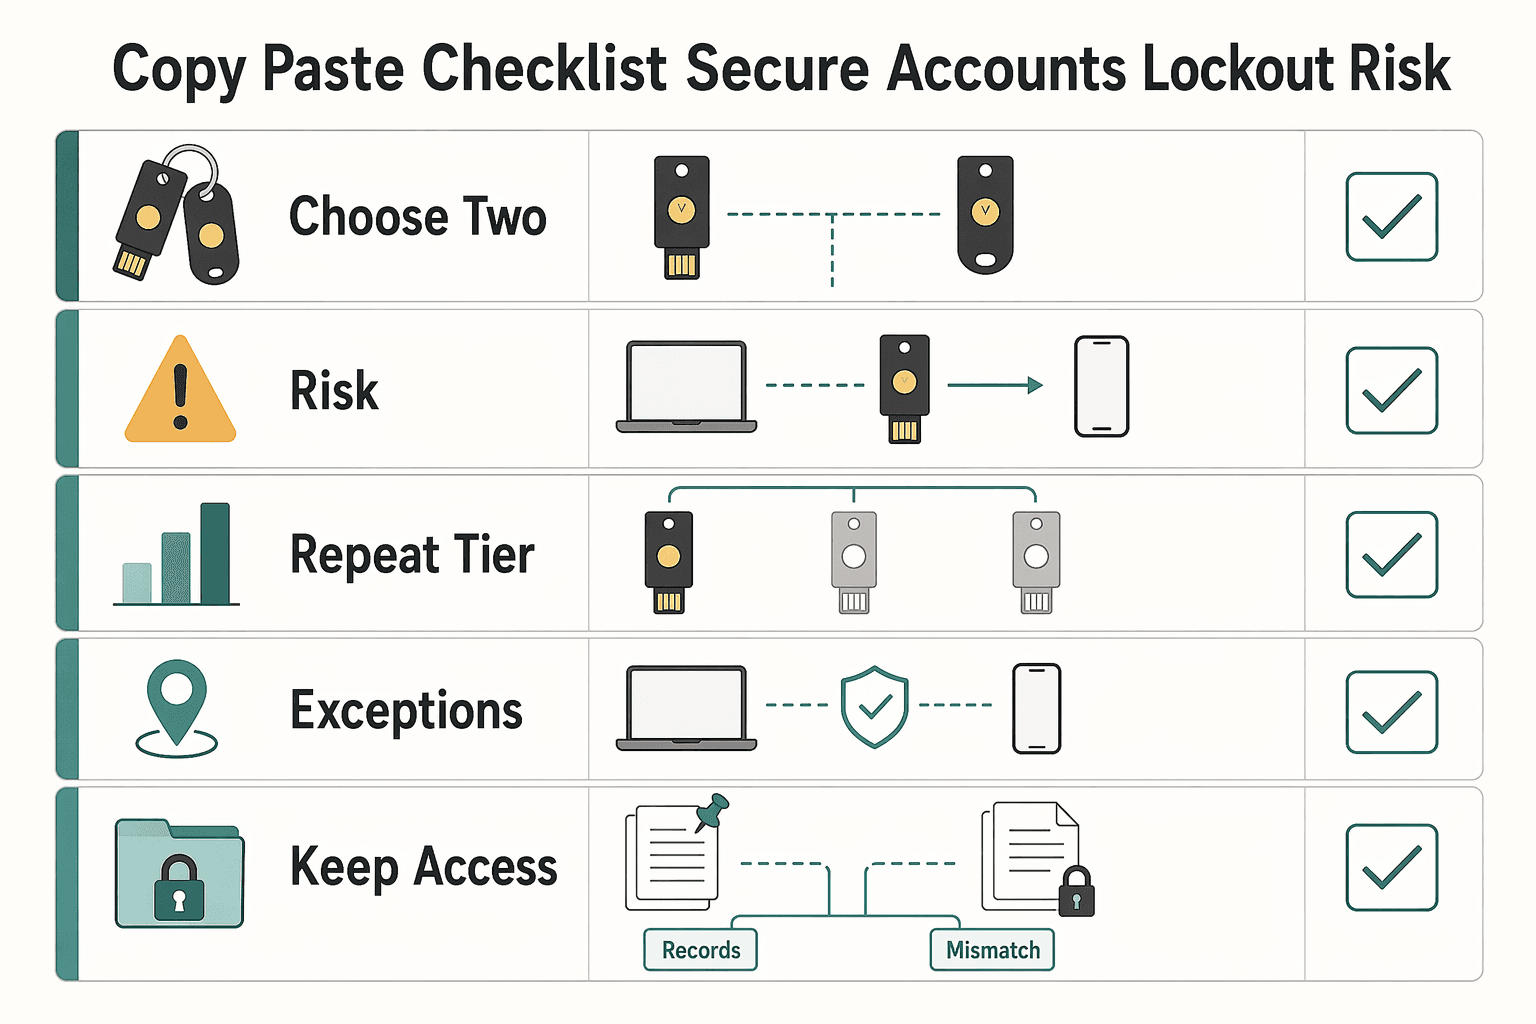
Your copy and paste checklist to secure accounts without lockout risk#
Use this staged checklist to improve account security while reducing lockout risk.
- Step 1: Choose two keys and prep recovery storage.
Pick a primary and backup YubiKey, then confirm your devices support the transport you expect (USB or NFC). Decide where PIN notes and recovery codes will live before you enroll anything. Expected outcome: both keys are labeled and storage is set. Stop rule: do not start enrollment until both keys and storage details are ready.
- Step 2: Harden one high-risk account end to end.
Start with one high-risk account. Add the first key using the option your service exposes (often passkey or security key), then add the backup key if allowed. Run a real sign-out/sign-in test with each enrolled key once. Log method name, key test status, and recovery-path status before moving on. Expected outcome: one complete account with key login verified and notes captured.
- Step 3: Repeat on Tier 1 accounts with the same sequence.
Use the same order across Tier 1 accounts to keep execution clean. For each account, record method used and test status for each enrolled key. Run one real login test after enrollment instead of trusting setup banners. Expected outcome: reset-power accounts are secured first, with consistent records across them.
- Step 4: Close Tier 2 and Tier 3 gaps, then document legacy exceptions.
Finish remaining accounts and tag services still on FIDO U2F or one-time password (OTP). If you hit U2F counter-related errors, pause and verify access before removing fallback options. Counter rollback has been documented as a real U2F failure mode. Expected outcome: all important accounts are covered, and exceptions are visible instead of hidden.
- Step 5: Keep access stable with scheduled and event-driven checks (ongoing).
Run periodic checks on priority accounts, and rerun checks after key, browser, or device changes. Remove weaker fallback only after stronger access is proven on your real devices. If passwords and recovery codes live in one vault, document that decision as a tradeoff and protect that vault accordingly, since opinions differ on whether this collapses factors. Expected outcome: setup quality stays stable over time instead of decaying after initial rollout.
Copy this checklist into your notes and mark each line complete as you go. A completed checklist is more reliable than memory when you are tired, rushed, or troubleshooting on the road. If you need country or program support details, Talk to Gruv.
Frequently Asked Questions
Do I really need two YubiKeys, or is one enough?
Use two whenever an account allows it. Guidance for FIDO setups recommends enrolling both a primary and a backup authenticator to reduce lockout risk. One key may work day to day, but it leaves no backup path if that key is unavailable. Two authenticators make recovery much simpler. If a provider only allows one authenticator, keep that account clearly marked and verify the recovery path before you call setup complete.
How do I set up multiple YubiKeys on the same account?
Add both authenticators in the account security settings and confirm both are registered. Labels and steps vary by service, so follow the prompts carefully and label each key clearly so you do not have to guess later which one is primary and which one is backup. Finish with one clean login using each key. If one key fails, fix it before moving to the next account.
What should I do first if I lose my YubiKey?
Use your backup authenticator first. Then remove the lost key from affected accounts and enroll a replacement so you return to two authenticators. If no backup exists, use the account recovery flow, regain access, and re-enroll keys as soon as possible. After recovery, update your notes so key labels and storage records match reality.
Should I choose `USB-C` or `NFC` for daily use?
There is no single best option for everyone. Choose the option that matches your daily login behavior and the devices and account flows you actually use. Compatibility varies by device and provider, so verify support on your phone and computer before standardizing. Prioritize the path you can use consistently.
What changes in daily login when moving from `SMS-based 2FA` to a `security key`?
On accounts that support security keys, sign-in shifts from SMS code entry to using a registered authenticator. Prompts vary by provider. Keep a tested recovery path while you transition. Once stronger access is stable on your real devices, reduce weak fallback paths where the provider allows it.
What is the difference between a `passkey` and a YubiKey?
A passkey is a WebAuthn/FIDO credential type, and FIDO2 and passkey are often used interchangeably. A YubiKey is hardware that can hold WebAuthn/FIDO credentials and also support other protocol modes. Passkeys refer only to WebAuthn/FIDO credentials, not OTP, PIV, or OpenPGP. That distinction matters when an account offers multiple security options and uses overlapping labels. When in doubt, confirm the exact method name in the account UI and record it in your notes.
When do `FIDO U2F` or `one-time password (OTP)` still matter?
They matter on accounts that still use those methods instead of WebAuthn/FIDO passkey flows. Treat them as compatibility methods, not your baseline target. Use the strongest method the account supports today, then mark it as a legacy exception. Recheck that account during maintenance in case stronger options appear later. Do not remove fallback access on legacy accounts until you have verified the enrolled method in a real login test.
Try a related tool
Researched and edited by the Gruv editorial team. Gruv builds cross-border billing, payouts, and finance-operations software for global businesses.
Sources
Includes 4 external sources outside the trusted-domain allowlist.
- userlab.utk.edu/files/papers/ruoti/2018/reynolds2018tale.pdftrusted
- codeberg.org/Aviac/YubiKey-Guideexternal
- justanswer.com/computer/sifg1-yubikey-pin-reset-lockout-gma...external
- rameerez.com/how-to-use-yubikey-to-log-in-via-ssh-to-serverexternal
- security.stackexchange.com/questions/226748/is-there-a-way-to-lock-a-yu...external
Educational content only. Not legal, tax, or financial advice.
Related Posts

The Best Password Managers for Freelancers and Teams
A client asks for an urgent file, you open their portal, and the login fails. Ten minutes later your invoicing app wants a reset too. That is why your password setup is a business risk, not just a nuisance. Weak credential habits can turn one mistake into wider account access problems, then into delivery delays and cleanup work.

The Best Gear for a Portable Home Office
The evidence here does not directly test portable-office gear decisions, so use this as a practical framework rather than a proven standard.

How to Handle Taxes for a US Citizen Child Born Abroad
Treat this as an operations problem. Confirm status, confirm obligations, document the trail, and escalate fast when facts get fuzzy. You are the CEO of a business-of-one, and this is a recurring compliance workflow you want to run on rails instead of rebuilding from scratch every year.