
Quick Answer
Start by choosing your setup from the recording context and failure risk, then run the same pre-flight checks before every take to record high-quality audio for video. Keep the mic close, confirm signal at real speaking volume, and review a short test clip before committing to full takes. For hard-to-repeat sessions, enable a backup path such as on-board transmitter recording, dual-record mode, or a camera scratch track. In post, use minimal processing and stop when speech sounds natural.
Why Your Audio Kit is a Non-Negotiable Business Asset, Not a Creative Expense#
If you want to record high-quality audio for video without risking avoidable reshoots, buy for reliability first. Your audio setup determines whether people can follow your message. If they cannot, you are not just looking at a gear expense. You are dealing with poor engagement and a worse overall experience.
Step 1. Map each recurring video format to failure cost before you buy anything#
Start with the videos you make most often, not with microphone categories. For each format, note three things: the business goal, what a failed take would cost, and how dependable the setup needs to be on the day.
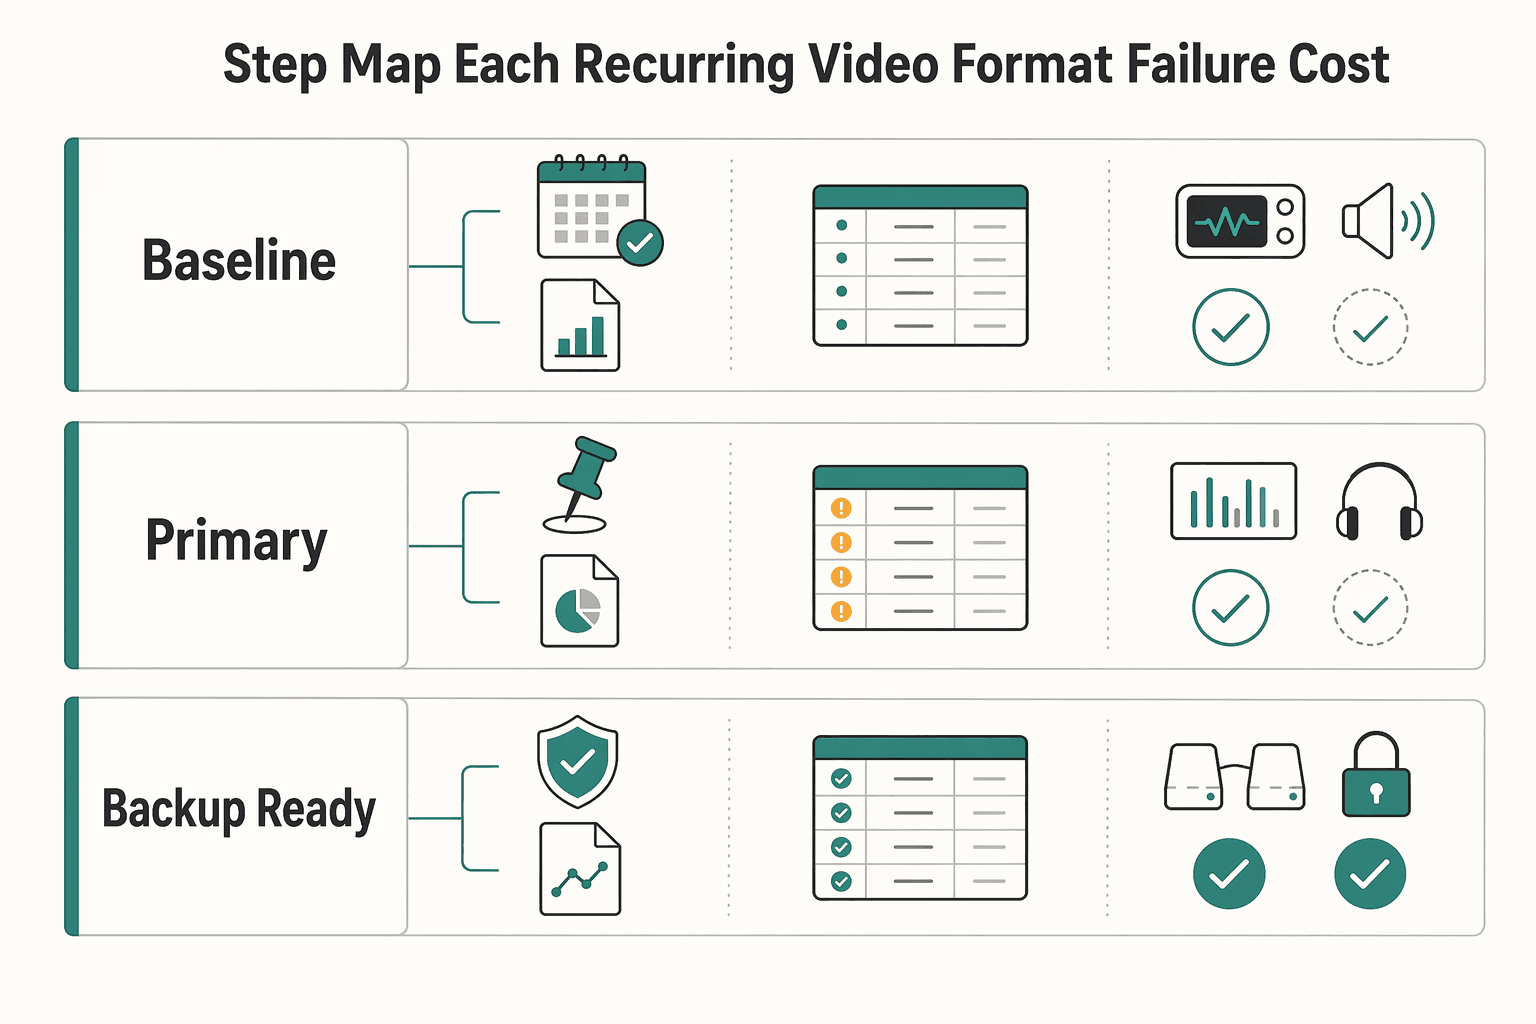
A weekly talking-head update does not carry the same failure cost as a client testimonial, launch video, or one-time interview. If the speaker can easily record again, a simpler setup may be enough. If the moment is hard to recreate, you need redundancy, monitoring, and a clean sync path.
A practical rule is to choose the lightest setup that still protects the outcome. That keeps you from paying for complexity on low-stakes content and from underbuying when a failure would be expensive.
| Setup | Workflow fit | Operational burden | Risk if a take fails |
|---|---|---|---|
| Baseline | Occasional desk videos, repeatable solo takes | Low. One external mic, simple capture path, basic monitoring | High if you miss distortion, room noise, or a dead input until edit |
| Primary | Regular publishing, client-facing explainers, repeatable weekly production | Moderate. Dedicated monitoring, stable placement, consistent file handling | Manageable if you catch problems in test playback before full takes |
| Backup-ready | Interviews, testimonials, launches, live demos, travel shoots | Higher. Primary path plus backup capture such as on-board recording, dual-recording mode, or camera scratch track | Lower single-point-failure risk, but more setup and more files to manage |
Step 2. Choose your path by recording context, then check the reliability points#
Recording context usually matters more than brand. Clear speech depends heavily on proximity and signal-to-noise ratio, so get the mic as close to the speaker as you can without putting it in frame. Once the mic moves farther away, you usually pick up more room sound and noise, even with expensive gear.
| Setup | Portability | Monitoring | Power/storage | Consistency |
|---|---|---|---|---|
| Travel setup | Fits in one small bag and sets up fast | Wired headphones you will actually use on location | Spare batteries, charged transmitters, confirmed free space | Works in hotel rooms, offices, and event spaces with minimal changes |
| Desk setup | Low priority | Easy live monitoring and quick playback at the desk | Fixed power where possible, predictable file location | Same mic position, same speaking position, same room treatment |
| Hybrid setup | Portable enough to move, stable enough to leave partly assembled | One monitoring habit for both desk and field work | A charging routine and labeled media/cards | Matching mic technique so your voice does not change wildly between shoots |
Use that as the quick fit check for your main setup.
If you use a lavalier mic, placement matters more than many buyers expect. Some manufacturer guidance places certain lavs about 3 to 6 inches below the neckline, but treat that as model-specific. Verify it against your wardrobe, body movement, and clothing rustle.
If you need help choosing the mic category, see The best 'Microphones' for voiceovers and podcasting. If desk space is the blocker, A guide to setting up a 'Home Video Studio' on a budget is the better next read.
Step 3. Run a short SOP before any shoot you would hate to redo#
Once you know which setup fits the job, the next priority is consistency. For high-stakes sessions, run the same sequence every time:
- Quiet the room. Turn off hum sources you can control, such as air conditioning, water coolers, or noisy lights.
- Verify the primary path. Speak at real performance volume, confirm signal is present, and check that the mic is close enough to favor your voice over the room.
- Record and review a short test. Capture a few seconds, then listen back immediately on headphones or speakers. This is where you catch clipping, clothing noise, and wrong-input mistakes.
- Confirm resilience. Check power and storage against your own minimums: verify battery status, verify free space, verify file destination.
- Trigger backup when risk is real. If the shoot is one-time, uses wireless, cannot be repeated easily, or involves a client, arm a backup path. That can mean transmitter on-board recording, a recorder's dual-recording mode, or at minimum a camera scratch track for sync.
Common failure points are an unverified path, a mic placed too far away, and a backup that was assumed rather than checked. Treat those checks as part of delivery, and your audio kit starts behaving like an asset you can trust.
The Pre-Flight Checklist: Your System for Eliminating Audio Anxiety#
Most avoidable audio failures happen when you skip the same core checks. Run this pre-flight before every take, and force a clear outcome at each step: proceed, retest, or change setup.
Step 1. Scan the room and decide if it is usable#
Check the space before you touch levels, because room conditions can overpower good gear. Record a short voice sample and review it on headphones. Proceed only if your voice is clearly dominant.
| Noise source type | Audible symptom | Immediate fix | Fallback if it persists | Outcome |
|---|---|---|---|---|
| HVAC, vents, traffic, low rumble | Low-frequency wash under your voice | Turn off what you control; move away from vents/windows | Change room or timing; if available, enable a low-cut filter and retest | Retest |
| Computers, fans, lights, electronics | Constant whirr, buzz, or hum | Power down nearby devices; increase mic-to-noise distance | Relocate; if hum is still obvious in headphones, do not continue | Change setup |
| People, pets, phones, outside interruptions | Random peaks, background speech, interruptions | Silence notifications; close doors; pause activity | Wait, move, or reschedule for critical takes | Retest |
| Hard reflective surfaces | Splashy, sharp, echoey voice | Move toward carpet, curtains, or other soft surfaces | Reposition or change room; reduce mic distance and retest | Retest |
Step 2. Place the mic for consistent speech#
Mic placement is your main quality control. Proceed only when playback sounds stable from start to finish at your normal delivery.
| Mic format | Starting check | Movement/stability check | If you hear this | Correction | Outcome |
|---|---|---|---|---|---|
| Desk mic | Dynamic: start around 2-6 inches. Condenser: start around 6-12 inches. | Speak at real volume and hold your normal posture. | Roomy tone or drifting level | Move closer, stay on-axis, and lock speaking position | Retest |
| Lavalier mic | Clip for a clear path to your voice and avoid fabric/jewelry contact. | Turn your head and move as you will during the take. | Rustle, thumps, cable rub | Reclip and secure cable; use a broadcast loop if rub persists | Retest |
| On-camera/shotgun | Point the mic at the speaker, not just the camera direction. | Rehearse subject/camera movement to catch off-axis drift. | Hollow tone, off-axis shifts, handling/vibration noise | Re-aim, move closer, confirm shock mount isolation | Retest |
Step 3. Set levels with a real-performance test#
Set levels using your own verified target, not guesswork. Add the target range to your SOP only after verifying it against the destination, source, device, or operating records. Reference points can help: many workflows target peaks around -12 to -6 dB, and some devices specify around -12 dB.
| Reference point | Value | Context |
|---|---|---|
| Workflow peaks | -12 to -6 dB | Many workflows target peaks around this range |
| Device reference | -12 dB | Some devices specify around this level |
| Clipping indicator | 0 dB | If clipping indicators appear, lower input and retest |
| Safety track example | -6 dB | For higher-risk shoots, arm a safety track or backup channel if available |
Run a short sample at normal delivery plus your loudest expected phrase:
- If clipping indicators appear (for example, at 0 dB), lower input and retest.
- If clarity is weak or noisy, fix placement or room first, then retest levels.
- For higher-risk shoots, arm a safety track or backup channel if available, for example a -6 dB safety track.
Step 4. Monitor on headphones as a hard gate#
Headphone monitoring is a hard gate before full takes. If you hear a fault, stop and fix it before you continue.
| Issue | Correction | Follow-up |
|---|---|---|
| Clothing rub | Reclip lav, secure cable | Repeat the movement that caused noise |
| Hum or fan noise | Remove source or move farther away | Stop and correct it before proceeding |
| Clipping/harshness | Reduce input | Run another short sample |
| Unstable volume | Lock mic position, speaking position, or camera-subject distance | Stop and correct it before proceeding |
| Off-axis shotgun drift | Re-aim toward the mouth | Rehearse movement again |
Step 5. Run the same reliability pass every time#
Use this checklist to protect delivery reliability, not chase perfection:
- Room checked with short playback; voice clearly leads
- Mic position verified for clarity and movement stability
- Levels verified with normal and loud phrases using your SOP target
- Headphone check passes with no obvious hum, rub, clipping, or room issues
- Backup capture armed when the shoot is hard to repeat or client-facing
The 10-Minute Polish: Achieving Broadcast Quality Without the Learning Curve#
Use one polish path per project, then stop when your checkpoints pass. Start with one-click cleanup when the recording is already usable, and move to manual processing only if a clear fail appears: distracting noise remains, speech sounds synthetic, or dynamics still feel obvious.
| Path | Best input condition | Control needed | Turnaround pressure | Common artifact risk |
|---|---|---|---|---|
| AI quick fix | Clear speech with mild, steady background noise | Low | High | Robotic texture, over-dry voice |
| Manual cleanup | Mostly good speech with one identifiable issue | Medium | Medium | Harshness from overdoing EQ or denoising |
| Manual cleanup + dynamics | Good raw speech that still needs tone and level consistency | High | Lower | Pumping, exaggerated sibilance, thin tone |
If you are unsure, test the fast path first and A/B it in headphones. If processed audio sounds less natural than raw, treat that as a fail and switch paths.
Step 1. Cut pacing before processing. Edit timing first: remove filler words, long pauses, repeated starts, and dead air. Pass if flow feels natural and your edits do not clip breaths or word endings. Fail if it already sounds chopped, because later processing will magnify that.
Step 2. Reduce only the noise your tool is built to handle. Use noise reduction for steady noise such as hum, hiss, or buzz, not irregular events like clicks or traffic bursts. Pass if distraction drops without smearing consonants or adding chirpy residue. If noise is mainly between phrases, use a noise gate approach instead of pushing denoise harder.
Step 3. Shape tone, then control dynamics. Apply broad tone shaping first, then light compression. Pass if speech is clearer and more even but still sounds like you. Fail if you hear pumping, sharp sibilance, or an overprocessed tone; then back off settings, and use de-essing only when sibilance is the issue. For tool-specific workflow options, see The Best Video Editing Software for Freelancers.
Quick troubleshooting map:
| Symptom | Likely cause | Corrective move |
|---|---|---|
| Robotic texture | Cleanup is too aggressive | Reduce processing amount or move to targeted manual cleanup |
| Pumping | Compression or gating is too heavy | Ease threshold/ratio and relax release behavior |
| Harshness | Too much upper-frequency shaping or denoise artifacts | Reduce top-end emphasis and recheck speech clarity |
| Over-dry voice | Excessive room removal | Blend back processing so natural room tone remains |
Step 4. Export, then run delivery QC. Use one loudness target per destination, and mark the current loudness target as pending until it is verified against that destination. If publishing to YouTube, account for transcoding and verify export settings against destination requirements, for compressed audio: 48kHz, 320 kbps or higher for stereo, 24-bit recommended or 16-bit acceptable.
Final pass/fail checklist:
- Headphones: no chirping artifacts, clipping, or pumping
- Speakers: voice remains natural, not brittle, boxy, or flat
- Phone playback: speech stays clear on single-speaker playback, with no mono-compatibility surprises
- Export file: settings match destination, and you checked the actual exported file
For capture improvements before post, see The best 'Microphones' for voiceovers and podcasting.
Your Audio is Your Brand: From Anxious to In Control#
Your listener experience becomes your brand when your process is repeatable: capture clearly first, then do only the polish that helps.
Step 1. Choose stable capture. Use the setup you can place the same way every session and monitor with confidence. There is no single universally correct mic position, so optimize for repeatability in your room and voice. If plosives show up, try slight off-axis placement and retest before moving on.
Step 2. Run pre-flight checks. Wear headphones while recording, run a short test, and review it before the real take. If you are on location, check the recording before you leave. When the space is usable, record 1 minute of room tone/ambi with the mic in the same position to make edits cleaner later. Escalation rule: if capture fails core clarity checks, fix setup first and only then process after the current target has been verified against the destination, source, device, or operating records.
Step 3. Apply minimal polish. Treat editing as refinement, not rescue. Light cleanup can improve a solid recording, but noise reduction is weak for background talking or music, and aggressive settings can introduce artifacts. If you use noise reduction, capture a true noise profile first; in Audacity, the minimum noise-only selection is 2048 samples (about 0.05 sec at 44,100 Hz).
Step 4. Review the delivered file outside the editor. Export and listen on headphones, speakers, and a phone. If YouTube is your destination, verify current specs before export; published guidance includes 48kHz, 24-bit recommended (16-bit acceptable), and YouTube may apply automatic enhancements on some uploads.
Use this quality-control loop after each project: note exactly what repeats, identify one probable cause in capture or room, change one variable only, and test again in the same setup.
That loop is how you stay in control: prevent problems early, adjust deliberately, and make each session more reliable than the last. If your space keeps creating the same failures, improve the room and mic plan first, then edit. For practical setup and workflow support, use A guide to setting up a 'Home Video Studio' on a budget, The best 'Microphones' for voiceovers and podcasting, and The Best Video Editing Software for Freelancers.
Frequently Asked Questions
How can you get professional sounding audio in a hotel room?
The provided guidance does not give hotel-room acoustic tactics for creator production. It is archival-focused, so treat this as unknown and rely on your local recording workflow and verification checks.
What microphone should you use if you travel often?
Pick a travel microphone based on your local standards, then verify consistency with repeatable tests in your real setup.
How do you make your voice sound better on video calls?
Use a verification-first process in your own setup and adjust according to local policy rather than assuming one fixed recipe.
Is a separate audio recorder necessary when you record video?
Not as a universal rule. Decide case by case and verify the result meets your delivery needs.
What is the one part of the chain you should not cheap out on?
This material does not rank gear purchases for modern creator workflows. The strongest supported takeaway is process quality: use documentation and checks that help others understand the recording and access it correctly.
How do you stop clothing noise with a lavalier mic?
Specific anti-rustle techniques are not supported in the provided excerpts. Treat method details as unknown here and validate your approach through local testing before final recording.
What should you check before exporting or handing audio off to someone else?
Prioritize access-focused documentation. The handoff should make the content understandable (intellectual access) and usable (physical access), and include only the technical detail needed for that use case.
Try a related tool
Researched and edited by the Gruv editorial team. Gruv builds cross-border billing, payouts, and finance-operations software for global businesses.
Sources
Includes 4 external sources outside the trusted-domain allowlist.
- aaa.si.edu/book/export/html/46555trusted
- ctl.columbia.edu/resources-and-technology/teaching-with-techn...trusted
- ogs.ny.gov/system/files/documents/2025/12/rfp-3076-adde...trusted
- ogs.ny.gov/system/files/documents/2025/12/rfp-3076-adde...trusted
- audio-technica.com/en-us/atv-sg1external
- audio-technica.com/en-us/support/audio-solutions-question-of-th...external
- help.rode.com/hc/en-us/articles/12966417339919-Techniques-...external
- manual.audacityteam.org/man/basic_recording_editing_and_exporting.htmlexternal
Educational content only. Not legal, tax, or financial advice.
Related Posts

The Best Video Editing Software for Freelancers
**Choose the best video editing software based on the workflow you can repeat under pressure, not the tool that looks most impressive on YouTube.** You are the CEO of a business-of-one, and your editor is part of your delivery infrastructure. When a client changes scope, sends a new batch of footage, or asks for "one more revision," your editor stops being a creative playground and becomes a system you either trust or fight.

Set Up a Home Video Studio on a Budget That Stays Reliable
Start with the job, not the gear. For most independent professionals, the target is straightforward: produce client-ready content with clear audio and repeatable framing, without rebuilding your setup every time you record.

Best Microphones for Voiceovers and Podcasting by Room, Workflow, and Business Stage
You are not buying a desk accessory. You are buying an operating asset that shapes how clients hear your judgment, how cleanly you deliver paid work, and how often you have to do the same work twice.