
Quick Answer
Set your primary monitor directly in front of you, keep the top edge at or slightly below eye level, and start at arm’s length, typically around 20 to 26 inches. Then choose layout by task: center one main screen for dominant work, or place two displays side by side with the keyboard centered when usage is equal. For long sessions, externalize laptop input devices so screen height and typing position can be adjusted separately, then test one change at a time on real work.
Your Desk Isn't Furniture - It's Your Most Critical Business Asset#
Your desk setup shapes how consistently you can do client work. If you work independently, ergonomics is not a nice-to-have. It is an operating safeguard: fitting work to your capabilities so you can sustain focus, limit avoidable fatigue, and stay reliably available.
Use that as the frame for the rest of the guide: find the avoidable setup risks first, then fix them in a clear order.
| Common workstation mistake | Likely consequence | What you will adjust next |
|---|---|---|
| Screen is too close or not directly in front of you | More awkward posture and faster fatigue | Distance and centered placement |
| Screen height or angle makes you lift or drop your head for long periods | More discomfort over long sessions and harder-to-sustain output | Viewing angle and monitor height |
| Long screen sessions without setup checks | More eye discomfort during the day | Positioning plus simple strain-prevention habits |
A practical starting checkpoint: if your monitor is not directly in front of you or sits closer than 20 inches, you already have a meaningful adjustment to make. In the next sections, you will set distance, angle, and height using workable ranges, then refine from there based on your body and your tasks. Use 20 to 40 inches and about 15 degrees below horizontal as starting points, not rigid rules.
You might also find this useful: How to Set Up a Professional Voicemail for Your Business Line.
Part 1: The Foundation - Non-Negotiable Protocols for Asset Protection#
Lock in three basics first: line of sight, viewing distance, and laptop externalization. In practice, these are the setup choices most likely to affect day-to-day comfort, task pace, and whether discomfort starts interrupting your delivery rhythm.
| Protocol | Starting point | Check |
|---|---|---|
| Line of sight | Monitor directly in front of you; top edge at or slightly below your natural eye level | No sustained chin lift or head drop to see your main work area |
| Viewing distance | About an arm's length; typically 20 to 26 inches | Reading feels easy without leaning in; your hand lands near the screen without your torso moving forward |
| Laptop externalization | Separate screen height from keyboard and mouse position | Screen stays at the right height while your hands use separate input devices below |
Before you touch anything, sit the way you actually work and open real files or apps. If you use a laptop, have your full externalized setup ready so you can check the complete version rather than an incomplete one.
Step 1#
Start with monitor placement. Put the screen directly in front of you, with the top edge at or slightly below your natural eye level.
Check it in your normal posture: shoulders relaxed, eyes forward, no sustained chin lift or head drop to see your main work area. Do not force a numeric tilt target unless you have one you can verify.
Step 2#
Next, set the distance. Start at about an arm's length, then fine-tune until reading feels easy without leaning in. Grounded guidance supports arm's length, with a typical range of 20 to 26 inches.
Verify it from your seated position by extending your arm toward the screen. Your hand should land near it without your torso moving forward. If you prefer a different fixed range, verify it before you lock it in.
Step 3#
If you are doing long work blocks, avoid staying on a laptop-only setup. The tradeoff is built in: when the screen is at a good height, the keyboard usually is not, and when the keyboard is right, the screen usually is too low.
Externalize the setup so screen height and input-device position can be adjusted separately. The check is simple: the screen stays at the right height while your hands use separate input devices below. If that is not true, you are still working inside the compromise, and discomfort is more likely to slow you down.
| Core choice | Do this | Avoid this |
|---|---|---|
| Monitor position | Keep it directly in front of you | Keep it offset for primary work |
| Monitor height | Set top edge at or slightly below eye level | Work with head tilted up or down for long stretches |
| Viewing distance | Start at arm's length (typically 20 to 26 inches) | Leave distance unadjusted based on desk layout |
| Laptop setup | Separate screen height from keyboard/mouse position | Use laptop alone for long sessions |
Quick checklist before Part 2:
- Monitor is centered in front of you.
- Top edge sits at or slightly below eye level.
- Screen is about arm's length away.
- You can read without leaning in.
- Laptop users have screen height and keyboard/mouse positions separated.
Related: A Guide to Ergonomic Travel Setups for Digital Nomads.
Part 2: The Multiplier - Engineering Your Setup for Peak Workflow#
Once the basics are stable, match the layout to the work you do most. That usually matters more than adding more gear. A good layout can cut window shuffling, keep posture steadier, and make long sessions easier to sustain.
| Task cluster | Mostly this work |
|---|---|
| Deep reading and drafting | Text, code, contracts, research, or spreadsheet rows |
| Multi-panel | Dashboards, timelines, or multiple live panes |
| Presentation | Client calls, demos, or presentations |
Do not assume extra screens automatically improve output. Evidence on multi-monitor productivity is mixed, so treat layout as a fit problem, not a universal formula.
Step 1#
Define your primary task cluster before you buy anything or start rearranging. Pick the pattern that takes up most of your week.
- If your day is mostly text, code, contracts, research, or spreadsheet rows, use a deep reading and drafting cluster.
- If your day is mostly dashboards, timelines, and multiple live panes, use a multi-panel cluster.
- If your day is mostly client calls, demos, or presentations, use a presentation cluster.
Then place displays around actual usage, not symmetry.
If one screen does most of the work, keep that monitor and your keyboard directly in front of you. Put the second screen to the side, keep the secondary at about a 30 degree angle, and keep the keyboard center line within 12 inches of the primary monitor center line.
If both screens get used equally, place them adjacent and center the keyboard between them so your eyes do more of the moving than your neck.
Step 2#
Choose one blueprint based on your main task, then accept the tradeoff that comes with it. That is where people usually get tripped up. The layout that helps one kind of work can create a new strain point somewhere else.
| Blueprint | Best-fit workflow | Choose it when | Skip it when | Setup complexity | Portability impact | Common failure mode |
|---|---|---|---|---|---|---|
| Vertical secondary monitor | Long-form writing, coding, legal review, research, tall spreadsheets | You need more vertical lines while keeping a main primary centered | Most work is visual layout, slides, or video timelines | Medium | Medium to high | Portrait screen becomes your off-center primary, causing repeated neck rotation |
| Ultrawide primary monitor | Side-by-side analysis, editing, dashboard monitoring | Your bottleneck is constant window swapping across panes | Desk depth cannot keep distance in range, or wide viewing already irritates your neck | Medium | High | Screen is too close, so you turn your head to chase edge content |
| Client-call centered setup | Video meetings, consulting, teaching, demos | On-camera work is frequent and you want camera placement near eye level with neutral posture | Calls are occasional and your main bottleneck is document-heavy production work | Low to medium | Low | Laptop camera stays low, pulling gaze and posture downward |
Use these checks while testing:
- Vertical setup: rotate an existing external display to portrait first before buying anything.
- Ultrawide setup: keep at least 20 inches distance; practical guidance range is 20 to 40 inches, with arm's-length guidance around 20 to 26 inches.
- Client-call setup: place the webcam near the top of the primary monitor; if you wear bifocals, lower monitor height another 1 to 2 inches.
Step 3#
Before you buy new gear, run a short test-and-adjust cycle with what you already have. That keeps you from solving the wrong problem.
- Stage the layout with current gear first.
- Work a focused session on a real task from your main cluster.
- Verify the checkpoints: primary screen centered, top at or slightly below eye level, distance in a workable range, viewing zone slightly below horizontal, tilt back about 10 to 20 degrees if needed.
- Log one failure mode: leaning in, repeated head turns, constant window dragging, or posture collapse on calls.
- Change one variable and retest the next day.
Buy gear only after the test points to a specific problem. A checklist-first approach works well both for reviewing the setup you have and for deciding what to purchase next.
If you want a deeper dive, read The Best Ergonomic Gear for Your Remote Work Setup.
Before you upgrade gear, run a quick cost sanity check so your setup choices fit your business budget: Home Office Deduction Calculator.
Part 3: The Resilient System - Deploying Your Workstation Anywhere#
A portable setup works best when you can rebuild it quickly in imperfect spaces. Treat each travel setup as a repeatable deployment. Limited desk space, mixed devices, and inconsistent chairs are common conditions, not edge cases.
| Constraint | Fallback |
|---|---|
| No foot support | Use a stable bag or folded towel as a temporary footrest |
| Chair height mismatch | Adjust foot support or seat cushion first, then retest typing comfort |
| Strong glare | Rotate your position or screen and prioritize the clearest display for active work |
| Desk too small | Keep only primary essentials on the surface and move non-active devices aside; when possible, keep computers away from the immediate workspace to save space and reduce heat and noise |
Before You Start#
Keep a simple setup card on your phone or in your bag with:
- Your laptop ports
- The exact cable or adapter path that works
- A photo of your proven desk layout
That small reference helps when the desk in front of you is not the desk you expected.
Step 1#
Build your go-bag by function, not brand. Prioritize stability, packability, and connection compatibility so you are not improvising the same fixes every time you travel.
If you switch between two computers, include a simple multi-device switching path. The goal is straightforward: one screen, one keyboard, and one mouse controlling multiple systems, with a quick switch method that does not require replugging your whole desk. Where possible, define a main and backup path and test a fast switch method, for example programmable hotkeys.
Use this tier table as a practical planning template, not a validated standard.
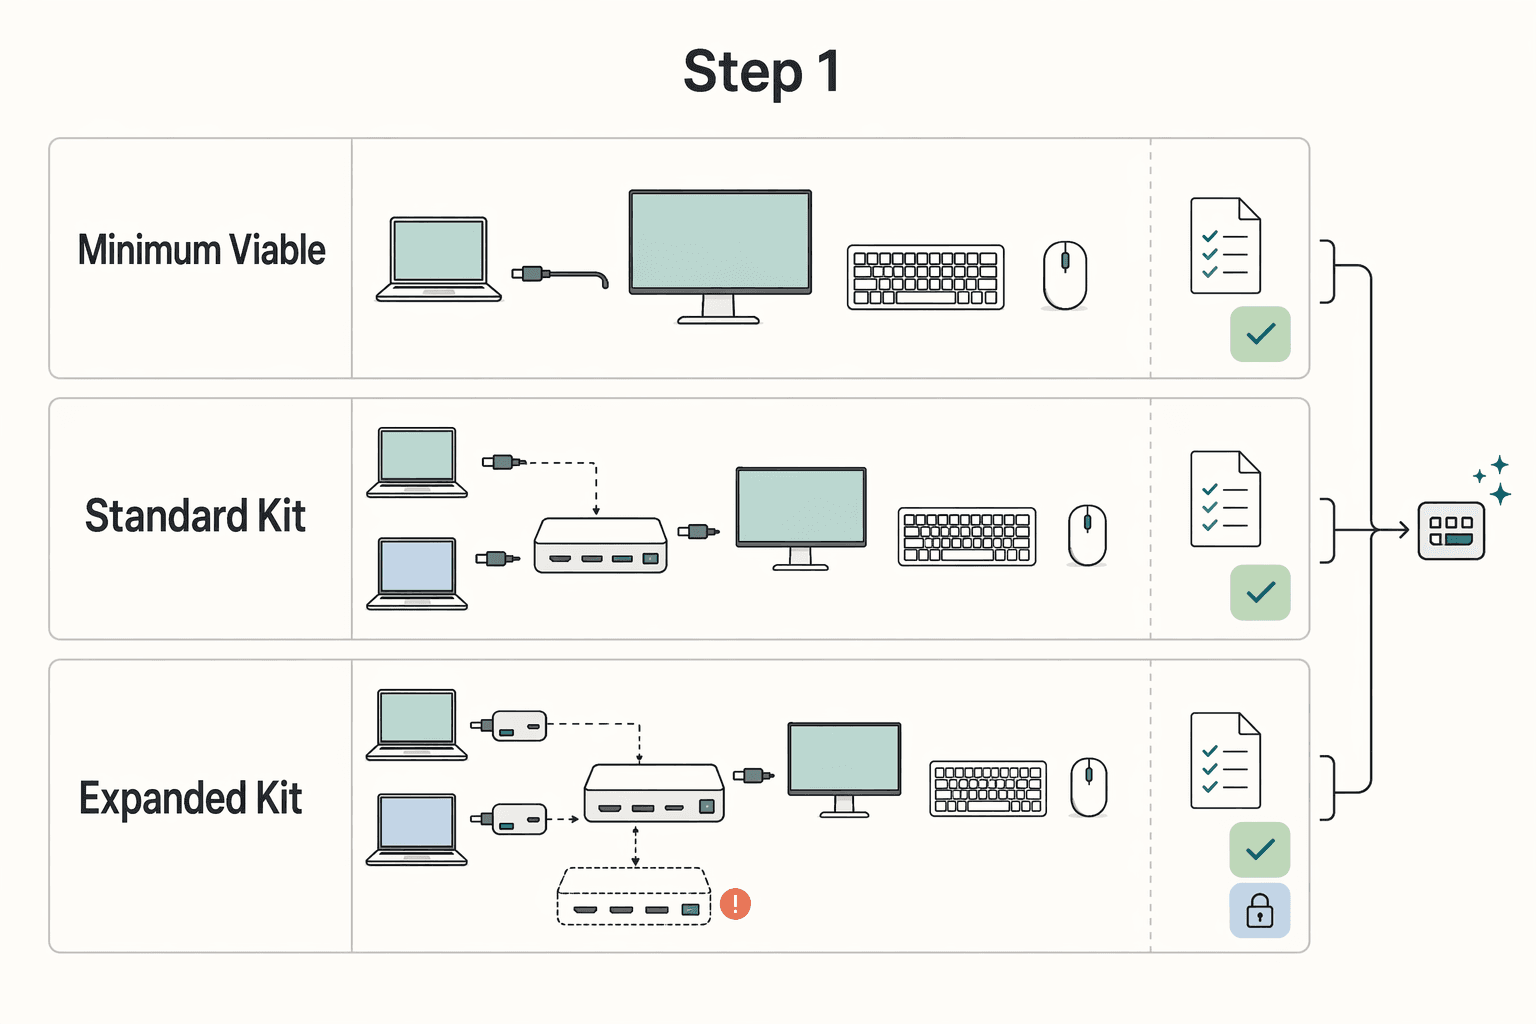
| Kit tier | What to pack | Best use case | Key tradeoff |
|---|---|---|---|
| Minimum viable kit | Portable stand, compact keyboard, compact mouse, required adapter/cable | Short trips, day-use workspaces, backup bag | Simplest setup, least redundancy |
| Standard kit | Minimum kit plus spare adapter/cable and basic cable organizer | Frequent travel, shared desks, hotel setups | More reliability, more components to manage |
| Expanded kit | Standard kit plus portable second display or compact multi-device switch path | Work that already depends on multi-screen or multi-device flow | Most capability, most setup complexity and failure points |
Pack the lightest tier that still lets you work cleanly and consistently.
Step 2#
Set up for control before you start working. Your active display gets priority placement.
Use this pre-work checklist:
- Choose the desk position with the least glare.
- Clear the main work zone first.
- Place your primary display directly in front of you.
- Connect keyboard and mouse before opening your inbox.
- Confirm you can work without twisting, reaching, or cable strain.
If one of those checks fails, fix that variable immediately instead of working through a bad setup.
Step 3#
When furniture is limited, use fallbacks early. The goal is not a perfect desk. It is restoring basic support with what you have.
If one of these is missing, use the corresponding fallback:
- No foot support: use a stable bag or folded towel as a temporary footrest.
- Chair height mismatch: adjust foot support or seat cushion first, then retest typing comfort.
- Strong glare: rotate your position or screen and prioritize the clearest display for active work.
- Desk too small: keep only primary essentials on the surface and move non-active devices aside; when possible, keep computers away from the immediate workspace to save space and reduce heat and noise.
If you end up defaulting to the laptop keyboard for your main session, stop and redeploy the setup.
Step 4#
If you switch to a standing desk, recalibrate from scratch. Reset screen, keyboard, mouse, and viewing position as a full rebuild, not as a quick height change.
Use these posture checkpoints:
- Primary display centered
- Shoulders relaxed
- Elbows comfortable
- Wrists neutral
- Knees not locked
If any checkpoint breaks, lower the desk or simplify the layout. For sit-stand timing, verify the current threshold from authoritative source records before using it in workstation guidance.
For a step-by-step walkthrough, see The Best Ergonomic Keyboards for Programmers and Writers.
Conclusion: Engineer Your Environment, Own Your Output#
Treat your workstation like a business asset. It should protect your body, support steady work, and reduce preventable issues.
Use this end-of-article checklist:
- Protect your body first. Make sure your desk, chair, and monitor setup have enough adjustability to fit you, and actually use those controls. If the setup still creates strain during normal work, treat that as a risk to fix, not something to push through.
- Match your layout to your real work. Keep the screen setup that reduces constant context switching during your most common tasks. More screen space can help when it keeps key information visible, but keep it only if it genuinely makes your work smoother.
- Keep a portable setup ready. If you work across locations, confirm your travel kit is complete and usable now so you are less likely to rely on long laptop-only sessions later.
As a long-term operating decision, favor adjustability over appearance. Core desk and chair purchases can last 10 years or more.
Review your setup whenever your task mix changes, you replace gear, or you start working from a new location more often. Before your next session, do one practical pass: confirm your desk and monitor setup, confirm your task layout, and confirm your portable kit is ready.
We covered this in detail in The Best Ergonomic Mice for Preventing Repetitive Strain Injury (RSI).
Once your workstation is dialed in, tighten the rest of your solo-operator workflow with practical templates and calculators in Gruv Tools.
Frequently Asked Questions
What is the optimal dual-monitor setup for productivity?
The most practical dual-monitor setup is the one that keeps your most frequent work in an easy viewing position and limits repeated neck turning. A simple next step is to run a short real task, notice where your head and eyes go most, then reposition based on that pattern.
How do you make a laptop ergonomic for travel?
When your laptop becomes your main workstation, prioritize a setup that lets you keep a natural, comfortable posture instead of forcing a fixed layout. In travel conditions, small adjustments and regular movement breaks are a practical way to reduce strain when the desk is imperfect. Work briefly, watch for neck, shoulder, or arm tension, then adjust before continuing. If you need portable equipment ideas, see The Best Gear for a Portable Home Office.
Is an ultrawide monitor better for ergonomics than dual monitors?
This guidance does not establish a universal winner. Choose the format that lets you work with less strain during your normal tasks. | Option | Best for | Ergonomic tradeoff | Setup complexity | |---|---|---|---| | Ultrawide | People who prefer one large display area | Strain can increase if the setup leads to awkward posture or long static periods | Varies | | Dual monitors | People who prefer separate display areas for concurrent work | Strain can increase if placement leads to awkward posture or repeated turning | Varies | The practical test is to use your normal workload and keep the version that feels easier on your neck, shoulders, arms, and eyes. For finer positioning control, see A Guide to Monitor Arms for a Professional Home Office Setup.
What is the correct monitor height for video conferencing?
There is no single correct height in this guidance, so keep your working posture stable first and adjust your call view or camera setup around that. If calls force you into a strained posture, treat that as a setup problem to fix before the next meeting. Run a short test call and adjust until you can stay comfortable without leaning or craning.
How do I adjust my monitor if I wear bifocals or progressive lenses?
There is no one-size-fits-all lens rule here, so let comfort and neutral posture guide the decision. If your setup makes you repeatedly tilt or strain to find a clear viewing zone, make small position changes and keep the one that reduces tension. Test one change at a time, and if discomfort continues, get prescription-specific guidance instead of forcing a generic setup.
Try a related tool
Researched and edited by the Gruv editorial team. Gruv builds cross-border billing, payouts, and finance-operations software for global businesses.
Sources
- bls.gov/iiftrusted
- cdc.gov/niosh/ergonomics/about/index.htmltrusted
- cdc.gov/niosh/bulletin/2020/working-from-home.htmltrusted
- faa.gov/sites/faa.gov/files/data_research/research/m...trusted
- faculty.cc.gatech.edu/~stasko/papers/gi08-mmon.pdftrusted
- htu.edu/wp-content/uploads/2025/10/ActivExpression-2...trusted
- mn.gov/admin/government/risk/safety-loss-control/er...trusted
- nrc.gov/docs/ML2602/ML26022A094.pdftrusted
Educational content only. Not legal, tax, or financial advice.
Related Posts

The Best Ergonomic Gear for Your Remote Work Setup
**Treat your ergonomic remote work setup as operating infrastructure, not a comfort splurge.** When posture breaks down, delivery quality and scheduling usually break down right after. Start by setting a baseline that protects your body and your business before you compare products.

The Best Gear for a Portable Home Office
The evidence here does not directly test portable-office gear decisions, so use this as a practical framework rather than a proven standard.

Best Monitor Arms for a Professional Home Office Setup
If you earn from your desk, treat it as business infrastructure, not decor. A monitor arm is worth judging on three things: will it protect expensive gear, help you stay focused, and keep your setup looking composed on client calls?