
Quick Answer
Start with fit, moisture control, and immediate hot-spot action to prevent blisters hiking. Use your exact hike-day socks while checking heel lift, toe crowding, and pressure points, then test the full setup across short-to-long outings before bigger days. On trail, stop as soon as warmth or rubbing appears, dry the area, remove grit, and protect skin before continuing. If a blister forms, reduce pressure and choose protection based on whether skin is intact or broken.
The Mission-Readiness Protocol: A Systems Approach to Eliminating Hiking Blisters#
To prevent hiking blisters, treat them as a shear-related injury you can influence, not as random surface rubbing. Irritation can build before you ever see a visible bubble. In practice, when you notice redness or a stinging hot spot, pressure, moisture, and movement are already working against you. What changes outcomes most:
- Fit: Keep footwear neither too tight nor too loose so your foot is not sliding or compressed.
- Moisture and heat: Warm, moist skin blisters more easily, so moisture management matters from the start.
- Friction and pressure: Repeated stress in the same area raises risk.
- Early intervention: At first pain, discomfort, or redness, stop and protect the area right away.
| Common myth | Practical reality |
|---|---|
| Blisters are just surface rubbing | Repetitive shear is the core injury mechanism |
| You can push through a hot spot and fix it later | Early action at the first warning sign helps prevent escalation |
| Socks or tape alone can overcome poor fit | Poor fit keeps creating pressure and movement |
| Treatment starts only after a blister forms | Prevention starts before and during the hike with quick hot spot response |
Use that sequence throughout this guide. Prepare before the hike, monitor on the trail, manage hot spots or blisters quickly, then review what happened so your next hike starts with better decisions. Related: A Guide to Wilderness First Aid.
Phase 1: Pre-Hike System Hardening - Building Your Resilient Foundation#
Much of your blister risk is set before your first mile. If fit, socks, and rehearsal walks are off, trail-side fixes often only limit the damage. Test your exact hike-day setup early, then keep only what stays comfortable under real movement.
Do every fit and lacing check in the socks you plan to wear. Test on stairs, a slope, or a short downhill so you can feel heel lift and whether your toes hit the front.
Step 1. Check boot fit before you trust it#
Fit problems often do not improve just because you spend more time in the boots. Start with the footbed test: remove the footbed, stand on it, and confirm at least a finger-width of space in front of your toes. Then confirm the core fit points:
| Fit point | Check |
|---|---|
| Width | Your feet should not rub the boot sides |
| Heel hold | Your heel should stay down without noticeable lift |
| Toe protection | On downhill movement, your toes should not hit the front |
| Volume and depth | Your forefoot should fill the internal space without being squeezed, and the toe box should have enough depth, width, and length |
Check width, heel hold, toe protection on downhill movement, and overall volume and depth together.
Do not treat pain as normal break-in. If short wear sessions leave rubbing, redness, or pressure points, reassess fit early. Use a simple gate: if a small change fixes it, keep testing. If the same hot spot returns, stop and change the setup. Mild heel slip may respond to lacing, but repeated toe bang, side rubbing, or forefoot compression can mean fit still needs work.
Step 2. Progress from easy walks to trail-like outings#
Break-in should prove your exact setup under real conditions, not just check a box on the calendar. A practical conditioning benchmark is 8 weeks before a first long hike. Use this progression checklist:
| Stage | What to do |
|---|---|
| Start | Start with short, easy walks in your exact boot-and-sock setup |
| Build terrain | Repeat with longer walks and add hills, stairs, or uneven ground |
| Trail-like outings | Move to trail-like outings once easier sessions stay comfortable |
| Add load gradually | Add pack load gradually until longer practice hikes reach about 80% of your expected trip load |
| Final 2 weeks | Switch cardio days to long day hikes of 60+ minutes |
If you are also building base capacity, a common structure is 2 nonconsecutive strength days and 3 nonconsecutive cardio sessions weekly until those final two weeks. After each test, decide fast:
- Proceed: No rubbing, redness, or pressure points.
- Adjust setup: Mild pressure, heel movement, or top-of-foot tightness.
- Stop and re-test: Any friction or pain appears.
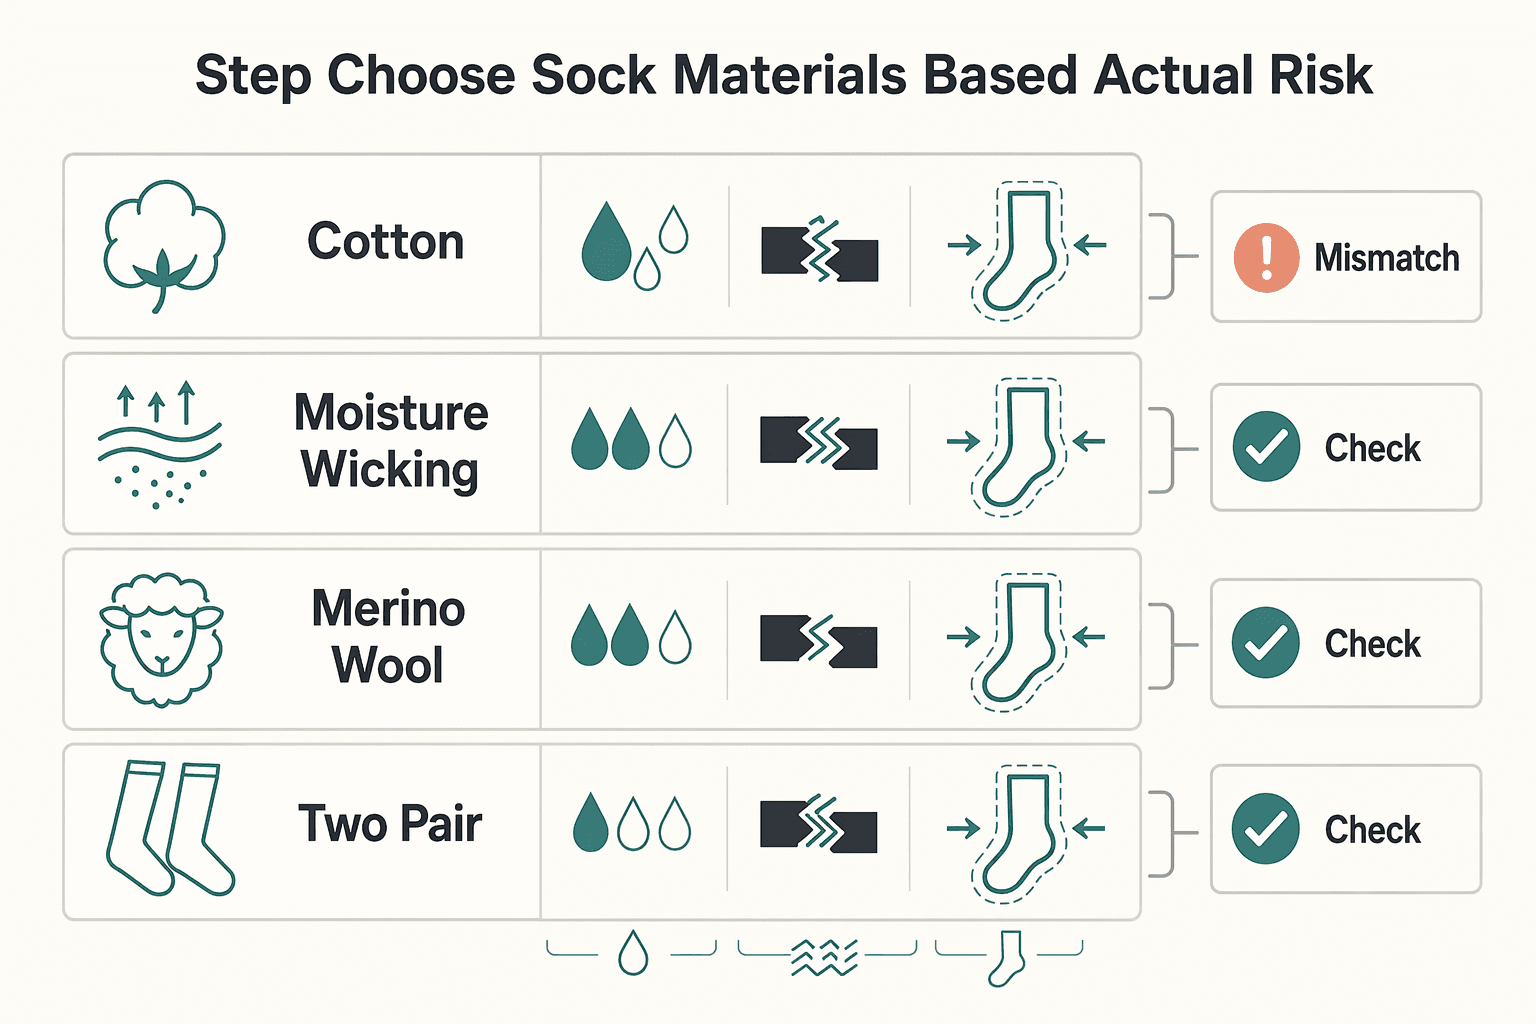
Step 3. Choose sock materials based on your actual risk#
Your sock choice affects moisture, friction, and fit volume, so treat it as part of the fit decision, not an accessory choice. Recheck fit in the exact sock setup you will hike in.
| Material or sock type | Best use | Limits | When to choose |
|---|---|---|---|
| Cotton | Low-sweat casual use | Holds sweat and moisture, which can increase friction/chafing | Generally avoid for hiking |
| Moisture-wicking synthetic/nylon | Warm or sweaty hikes where moisture management matters | Feel varies by model | Use when moisture is your main trigger |
| Merino-wool-dominant hiking sock | General hiking across mixed conditions | Blend and thickness vary by model | Use as a standard hiking baseline |
| Two-pair or dual-layer setup | When one layer is not enough for friction control | Extra layers can change fit volume | Use only after confirming fit still works in both layers |
Step 4. Match lacing to the symptom you feel#
Lacing can solve small movement or pressure problems, but it cannot fix a major fit mismatch. Use it to address one symptom at a time, then recheck the result.
| Symptom | Lacing change | What to expect |
|---|---|---|
| Heel slip | Surgeon's Knot | Helps reduce heel movement and back-of-foot rubbing |
| Top-of-foot pressure | Window Lacing | Reduces pressure over the sore area |
| Toe crowding or toe-box pressure | Toe-Relief Lacing | Temporarily relieves toe-box pressure |
If you need extreme lacing just to tolerate the boots, treat that as a fit problem, not a lacing problem.
Phase 2: On-Trail Threat Detection - Your Real-Time Mitigation Protocol#
On the trail, quick action matters. When you feel heat, rubbing, or pressure, stop right away and fix it before it becomes a blister.
Use a quick stop, assess, treat sequence#
- Stop. Do not keep walking to test it. Stop movement and check the area right away.
- Assess. Remove your sock(s), let skin dry, and identify the driver: early hot spot, moisture-softened skin, debris, or pain that is escalating.
- Treat. Address the cause before you move again: dry skin, clear debris, change wet socks, and protect the spot based on whether skin is intact or already broken.
| Symptom | Likely issue | Immediate action |
|---|---|---|
| Early hot spot (red, warm, sore area) | Friction is building | Dry the area, correct the friction source, protect the spot, then recheck with a few steps |
| Pale, soft, wrinkled skin | Moisture has increased friction risk | Dry feet fully and change into dry socks |
| Grit, sand, or pebble inside sock/shoe | Focused rub point | Empty sock and shoe completely, then reset fit |
| Pain is increasing or returns quickly | Initial fix was not enough; damage may be progressing | Pause for a full reset and prepare to move to treatment mode |
Treat by skin status#
Once you stop the cause, choose treatment by what the skin actually looks like. If skin is still intact, keep it intact. Protect the area and reduce pressure so friction does not continue.
| Skin status | Action |
|---|---|
| Skin is still intact | Keep it intact; protect the area and reduce pressure so friction does not continue |
| Formed but unbroken blister | Avoid breaking it when possible; a moleskin donut can offload pressure if cut about 1 inch (2.5 cm) larger than the blister, and a hydrocolloid dressing is also an option to protect the blister and reduce pain |
| Blister is already broken | Let fluid drain, then cover with a clean plaster or dressing and protect it from further rubbing |
If the blister is formed but unbroken, avoid breaking it when possible. Unbroken skin helps protect against infection. A moleskin donut can offload pressure if cut about 1 inch (2.5 cm) larger than the blister. A hydrocolloid dressing is also an option to protect the blister and reduce pain.
If the blister is already broken, let fluid drain, then cover it with a clean plaster or dressing and protect it from further rubbing. If you need a more complete kit for this stage, How to Build a Travel First-Aid Kit is a practical companion.
Control moisture and debris before restarting#
Moisture and trail grit can undo an otherwise good fix. Use gaiters on debris-heavy trails to keep material out of your footwear.
Use spare dry socks as soon as conditions demand it, especially:
- after your socks get soaked
- when socks stay wet through a break
- when skin looks pale, soft, or wrinkled
Decision checkpoint before you move#
Before you restart, make a clear call:
- Continue if the cause is fixed, skin is protected, and your first steps feel normal.
- Pause for a full reset if burning returns, socks remain wet, or debris keeps reappearing.
- Transition to treatment if you now have broken skin or a worsening blister.
- Stop and seek medical care if the blister looks infected.
If you want a deeper dive, read How to Stay Healthy and Fit While Traveling.
Contingency Plan: The Field Treatment Protocol for Mission Continuation#
If early action was not enough and a hot spot has become a blister, switch from prevention to damage control. Blisters are shear injuries, so your priorities are to reduce further friction, protect the area with available first-aid supplies, and reassess before you keep moving.
- Stop, prep, then treat. Pause before continuing and manage the issue with your first-aid kit. Softened skin is more vulnerable to shear damage, so continuing without a reset can worsen the injury.
- Pick your path by severity and trend.
- Stable and manageable: If it remains a minor issue you can handle in the field, treat it and monitor. - Not improving: If the condition worsens after restarting, stop again and reassess instead of pushing through. - Escalate: If you cannot self-evacuate safely and your condition is deteriorating, activate emergency help.
- Use available supplies to reduce further shear and protect skin. Keep the setup simple, take a few careful steps, and recheck. If your setup increases friction or discomfort, stop and adjust before continuing.
- Reassess early in serious situations. Waiting can make outcomes worse, especially when response times slow or rescue options narrow.
Tool choice at a glance#
| Situation | Field approach | Switch when |
|---|---|---|
| Minor blister and stable condition | Manage with your first-aid kit, then recheck after a short restart | The condition starts deteriorating |
| Condition worsens after restart | Stop and reassess before continuing | You cannot self-evacuate safely |
| Cannot self-evacuate and deteriorating | Activate emergency help promptly | Immediate support is required |
Safety checkpoint#
Many blisters are manageable in the field with a basic first-aid kit. Do not try to push through if you cannot self-evacuate safely or the problem is clearly getting worse.
For a step-by-step walkthrough, see How to Plan a Multi-Day Hiking Trip.
Phase 3: Post-Hike Debrief - Optimizing Your System for the Next Objective#
The debrief is what turns one painful hike into a better next one. Run a short review soon after the hike. Capture what started the irritation, what conditions were in play, what you changed, and what to test before your next hike.
1. Record the first warning sign. Write the exact location and first signal: warmth, redness, soreness, or blistering. A hot spot is an early warning, and continued friction can turn it into a blister, so timing matters. Add the context: where you were on trail, terrain, moisture, and pack/load at that point.
2. Log conditions and setup, briefly but specifically. Track pressure, heat, and moisture: sweaty feet, rain, stream crossing, humidity, or other wet-foot conditions. Then record your full setup: footwear used, whether it felt new, tight, or uncomfortable, socks, and any lacing changes you made.
If you ended with a blister, avoid the same shoe or equipment setup until the area heals. Healing-time guidance varies, from within a week to one to two weeks.
3. Record what you tried and whether it worked. Note your first intervention and outcome. That might be stopping immediately when pain or redness starts, tape on intact skin, a moleskin donut for offloading around a blister, or a hydrocolloid dressing for protection and comfort. Do not just write "treated." Write whether symptoms improved, stayed the same, or returned quickly.
| Symptom pattern | Likely cause | Next-hike adjustment | What to monitor next time |
|---|---|---|---|
| Irritation starts after feet get sweaty or wet | Moisture made skin more vulnerable to friction | Test sock changes and pre-tape repeat trouble spots | Whether symptoms begin only after feet get damp |
| Blister appears with new, tight, or uncomfortable footwear | Repetitive rubbing from fit/pressure | Do not reuse that setup until healed; reassess fit before reuse | Whether rubbing starts in the same spot early |
| Foot issues show up mainly with heavier loads | Added pressure from carrying more weight | Reduce load where possible or retest on a lighter-load day | Whether symptoms track with load more than distance |
| Hot spot progressed to blister | Friction was not reduced soon enough | Plan an earlier stop and pre-tape repeat areas | Whether you stop at the first red/sore signal |
4. Convert notes into next-outing prep. Turn the pattern into one or two concrete actions before your next hike. Pre-tape a repeat spot, run a sock swap test, or change the setup that matched the pattern in your notes.
Add an aftercare check. If the area becomes more painful, feels warm/hot, shows spreading skin color changes, or develops green/yellow pus, stop self-testing and get medical assessment.
We covered this in detail in How to Pack a Backpack for a Multi-Day Hike.
Conclusion: From Anxiety to Agency - Owning Your Trail Experience#
Blister prevention works best as a repeatable loop, not a one-time fix. Set up before you hike, act at the first hot spot, and review what happened after the trip. Done consistently, that loop can help you stay more comfortable on the trail.
- Before you start: Wear well-fitting footwear, tape known friction areas before activity, and start with dry feet and socks when possible. Prioritize fit first.
- At the first warning sign: If you feel pain or discomfort, or see a red, tender hot spot, stop immediately. Dry the area, reduce friction, and protect intact skin early. If a blister forms, keep the skin intact when possible, offload pressure with donut padding, and use a hydrocolloid dressing when protective coverage helps.
- After the hike: Check any blistered area daily for infection. Many blisters improve on their own within about a week, and most heal on their own in one to two weeks. Then capture quick notes on where the hot spot formed and what gear or moisture conditions were involved so you can adjust before the next hike.
Before your next outing, place your blister kit where you can reach it quickly and test this loop on a short hike. Repeat, adjust, and build a system you trust.
Frequently Asked Questions
Should you use sock liners?
Treat liners as optional, not required. Focus first on footwear that already fits you well, then test your setup on a short hike with the same shoes and socks you plan to use, and confirm your toes still have room to move. The usual mistake is using liners to compensate for shoes that are too tight or too loose.
When should you use Leukotape for prevention?
For prevention, cover a hot spot before friction builds and keep monitoring that area as you hike. Bandages or moleskin are the common pre-cover options. If you use Leukotape, treat it as a personal choice rather than a proven best method.
Can lacing really help with blister problems?
Yes, when friction comes from foot movement or pressure points. Adjust one zone at a time, then walk a few minutes to see whether rubbing actually drops. The common mistake is tightening the whole shoe and creating a new pressure point.
Should you drain a blister on the trail?
If the blister is intact, first protect it from more rubbing and keep the area as dry as you can. Reassess after reducing rubbing instead of draining immediately.
Is Leukotape or moleskin better?
Neither is better in every case. Pick based on what keeps friction down and works with your fit and conditions. This grounding pack supports pre-covering hot spots with moleskin or a bandage and does not establish Leukotape as universally better. | Option | Use case | Strengths | Limitations | Best moment to apply | | --- | --- | --- | --- | --- | | Leukotape | Optional tape approach some hikers use for early rubbing | Barrier option for some hikers | Not established here as superior to moleskin or bandages | Early, before repeated rubbing worsens | | Moleskin | Covering hot spots ahead of time | Useful protective coverage | Not a substitute for fixing poor fit or moisture problems | Before friction worsens at a hot spot | | Simple bandage | Quick cover for a mild hot spot with available supplies | Fast, simple protective coverage | May need to be checked and replaced during a hike | Early, before repeated rubbing escalates |
How do you know new boots are ready for a longer hike?
Use short-hike performance as your readiness check, not calendar time. You are closer to ready when your toes can move, the fit is not too loose or too tight, and you finish short tests without hot spots. The common mistake is making a long or multi-day route the first real break-in test.
Try a related tool
Researched and edited by the Gruv editorial team. Gruv builds cross-border billing, payouts, and finance-operations software for global businesses.
Sources
Includes 5 external sources outside the trusted-domain allowlist.
- medlineplus.gov/blisters.htmltrusted
- nols.edu/blog/how-to-prevent-and-treat-blisters-videotrusted
- nols.edu/blog/how-to-keep-your-feet-happy-on-the-trailtrusted
- aad.org/public/everyday-care/injured-skin/burns/prev...external
- aad.org/public/skin-hair-nails/injured-skin/blistersexternal
- adlerfootankle.com/blog/preventing-foot-blisters-while-hikingexternal
- americanhiking.org/blistersexternal
- dermnetnz.org/topics/friction-blisterexternal
Educational content only. Not legal, tax, or financial advice.
Related Posts

How Remote Professionals Stay Healthy During Long Stays Abroad
Use this sequence before workload, housing, and travel friction make health tasks harder to execute. If you are traveling for months, treat this as four pass-fail gates. A gate is closed only when you have a written output you can verify.

How to Build a Travel First-Aid Kit
**Treat your travel first aid kit like a system for long stays, not a vacation pouch.** If you move city to city, you need repeatable coverage for everyday minor problems and a simple way to keep that coverage current. Build once, review it regularly, and stop re-deciding the basics before every move.

Wilderness First Aid for Remote Professionals
Your business is built on freedom: the freedom to work from anywhere, serve clients globally, and set your own terms. That freedom also removes the layers that usually absorb disruption before it turns into a business crisis. Your office might be a villa in rural Spain, a research site in Costa Rica, or a temporary base in a developing nation. In any of those places, you are also the security lead, risk manager, and first responder.