
Quick Answer
Set one communication objective, then build a one-page brief with topic, outlet, deadline, format, and source asset before you accept. Draft two to three key messages with a short sound bite and a longer plain-language version, and run an on the record check so you do not guess. Rehearse for the actual channel, whether phone, radio, or television. After the interview, send promised clarifications within 24 hours and log what to improve.
Start Here and Define the Outcome You Want#
Interview quality is decided before the first rehearsal answer. Set the outcome, narrow the message, and define boundaries before you polish delivery.
You will not control every question. Most reporters will not share a full list in advance, and even when they share themes, the angle can shift once the conversation starts, which aligns with practical prep advice from the University of Minnesota communication team. The control you do have is that your answers can stay clear, accurate, and steady when the framing shifts. Prep built on repeatable, defensible points keeps you from saying something you later need to walk back.
A common failure mode is going in with a loose topic and no communication objective. Then every question feels equally important, answers get long, and your priorities blur. You start explaining everything and landing nothing. Defining the outcome first gives you a filter for every later decision. It tells you what belongs in the interview, what belongs in follow-up, and what should stay out.
This is also where tone discipline starts. If your objective is vague, your language will be vague. If your objective is concrete, your language can be concrete. That is why the objective should come before message drafting. You are not trying to sound polished yet. You are making sure the audience can repeat your main idea in plain words after one pass.
A clear objective also helps legal, comms, and client-facing teammates review your prep. It becomes easier to see what supports the goal and what distracts from it. That shortens review loops and reduces last-minute rewrites that usually make language clunky.
Before You Start
Keep one short prep note with three inputs: the audience you want to influence, the action you want after the interview, and one boundary you will not cross in public comments.
- Write one communication objective in one sentence.
Use a plain formula: after this interview, I want [audience] to understand [point] and do [next action]. If that sentence feels fuzzy, tighten it before you accept the request. If you cannot say it out loud cleanly without self-editing in the middle, your scope is still too broad.
- Reduce your points to a small set of messages.
Keep each point short and repeatable. Prepare a plain-language version for follow-up questions and a shorter quotable line that can stand on its own. You are building stability, not performance. Short, accurate lines survive pace changes better than long explanations.
- Set risk boundaries before you practice delivery.
Decide what is in scope, what stays high level, and what you will defer until details are confirmed. This protects you when the interviewer pushes for specifics. It also keeps you from saying something technically true but context-poor in a way that creates unnecessary risk.
- Run a quick clarity check out loud.
Read your objective and messages once, then ask someone to repeat the main point back in one sentence. If they cannot, simplify. This quick step catches jargon, hedging, and over-explaining before those habits show up live.
Once the outcome is clear, the next decision is whether this interview is even the right fit for you. That starts with intake discipline.
Gather the Interview Brief and Risk Boundaries Before You Say Yes#
Do the intake work before you commit. A short brief makes it easier to accept, defer, or decline without burning prep time or backing yourself into a weak fit.
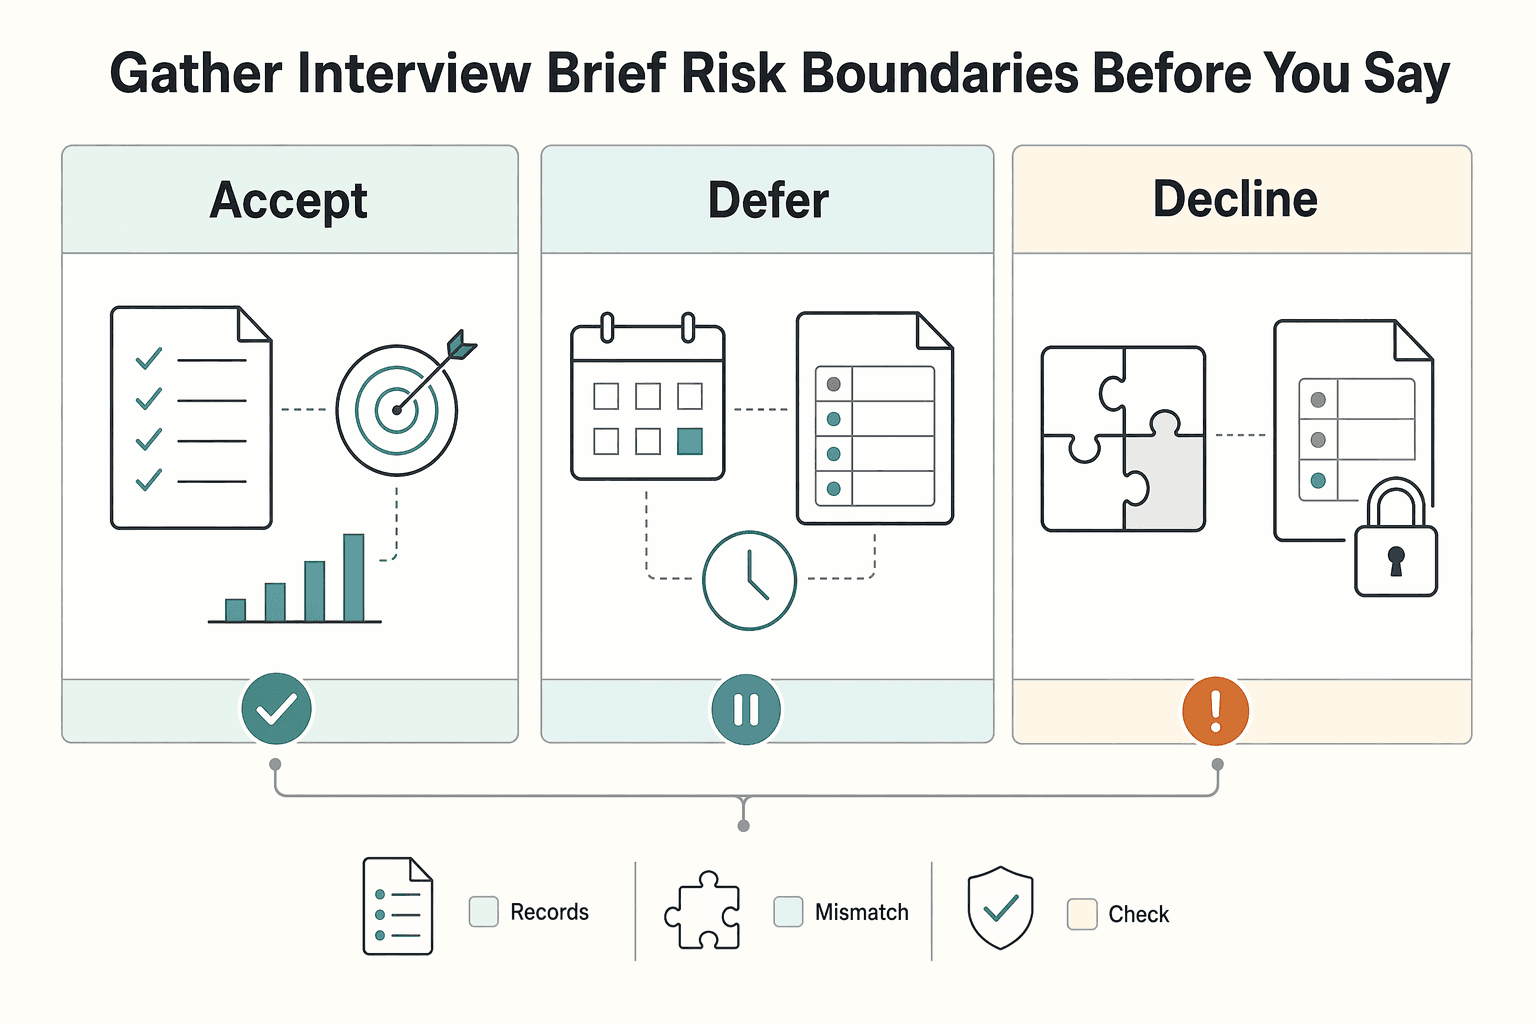
| Decision | When to use |
|---|---|
| Accept | The topic fits your core messages and the brief is complete. |
| Defer | Scope, approvals, or ownership is unclear. |
| Decline | Likely questions push you outside your expertise or agreed boundaries. |
Most interview problems start at intake, not on air. Skip the brief and you spend your prep window answering basic questions that should have been resolved first: what the story is, who the audience is, whether you are the right spokesperson, and what is safe to discuss. A one-page brief gives you enough structure to make a clean call and avoid last-minute scrambling.
It also protects your future self. A complete brief creates a record of what was requested, what was agreed, and what was deferred. That makes handoffs cleaner, protects team alignment, and reduces confusion when timing gets tight.
A good intake note does not need elegant language. It needs operational clarity. If a teammate picked up your brief ten minutes before airtime, they should still understand the topic, boundary lines, and decision status without asking basic follow-up questions.
Before You Start
Use a one-page brief with five practical fields: topic, outlet, deadline, format, and source asset, such as a press release.
- Step 1: Capture non-negotiables before you say yes.
Record the topic, outlet, deadline, format, and source asset. Add the target audience and likely angle. If any core field is missing, keep the request pending. A scheduled callback is safer than filling those gaps with assumptions.
- Step 2: Confirm spokesperson fit and prepare a handoff line.
Decide early whether you are the right person for this angle. If not, use clear handoff language and offer a professional handoff instead of forcing weak answers. A clean handoff usually protects the relationship better than trying to cover ground you do not own.
- Step 3: Set discussion boundaries in writing before prep begins.
Create three buckets: safe to discuss, discuss after internal confirmation, and out of scope for this interview. Align those boundaries with active client commitments. Treat a press release as a starting reference, not your only prep material.
- Step 4: Apply a fast accept, defer, or decline rule.
Accept when the topic fits your core messages and the brief is complete. Defer when scope, approvals, or ownership is unclear. Decline when likely questions push you outside your expertise or agreed boundaries. Writing this rule down before pressure hits makes the decision easier to defend.
A disciplined intake gate keeps you useful without overcommitting. It also gives you a clean base for the next step: building the evidence behind what you plan to say.
Prepare Your Evidence Pack Before Writing Any Talking Points#
Build the evidence pack first, then write talking points from it. Good phrasing cannot rescue claims you cannot support.
When people reverse that order, they often end up with polished language that sounds strong until follow-up gets specific. Then they have to retreat from a claim or add urgent nuance in real time. A one-page pack prevents that. It gives your team one reference page to review, challenge, and approve before anything goes live.
You do not need a long dossier. You need one practical page that answers a hard question quickly: can we stand behind this line under pressure? According to the Harvard media interview workbook, this one-page structure is practical under pressure, and the AAFCS interview prep guide supports using a concise prep brief. If the answer is unclear, the line is not ready.
This step also protects delivery quality. When your claims are already pressure-tested, you can focus on pacing and clarity during rehearsal. Without that foundation, rehearsal becomes a patch session where every hard question triggers a new rewrite.
Before You Start
Use one page with fixed slots: proof points, client-safe examples, one limitation statement, and your bio line.
- Step 1: Build the one-page pack before polishing language.
Start with your strongest proof points, then add examples you can share safely, one clear limitation, and your bio line. Treat this page as the source for everything you plan to say. If a point is not on this page, it should not appear later in final talking points.
- Step 2: Separate facts from views in every line.
Label each item as Fact or View. If one sentence mixes both, split it or rewrite it so the distinction is obvious. This keeps corrections clean if challenged and helps your tone stay credible under pressure.
- Step 3: Add a red-line list early.
List what you will not discuss, such as confidential client details or unresolved disputes. Mark anything that requires explicit permission before mention. Keep this list visible in rehearsal so boundaries become automatic instead of improvised.
- Step 4: Pressure-test claims before rehearsal.
For each proof point, write one likely challenge question and a short response. Reporters can probe for a fuller story, so keep only claims you can defend clearly. If a point needs too much setup to stay accurate, narrow it until it stands in plain language.
- Step 5: Freeze the pack, then write talking points from it.
Do not add new claims in talking points that are not already vetted in your evidence pack. Once this page is clean, prep shifts from risk control to wording. Delivery usually feels calmer because the hard claim decisions are already done.
In practice, this page also improves cross-team review. Legal, comms, and client-facing teams can react to substance before anyone debates style. That sequence is faster and safer than approving elegant lines that later prove weak.
With evidence locked, turn it into a tool you can actually use in the interview itself.
Write a Message Sheet You Can Use Under Pressure#
Your message sheet should help you think clearly under pressure, not tempt you to memorize or read.
This is a live reference, not a script. If the sheet is dense, you will ignore it when pace rises. If it is vague, it will fail when the interviewer asks for a direct answer. The best version is short, ranked, and specific enough to keep you from inventing lines mid-conversation.
A reliable sheet also solves a common tension: you want consistency, but you do not want robotic delivery. Structure gives you consistency. Plain language preserves your natural voice. When both are present, you can stay on point without sounding rehearsed.
Keep the page visually simple. If you need to hunt for the right line, it is too busy. If every message looks equally important, nothing is prioritized. A practical structure is 3 ranked key messages, each with 1 sound bite and 1 expanded line. Ranking and spacing are practical decisions, not design preferences.
Before You Start
Use four columns: key message, sound bite, expanded answer, and return line. Keep your evidence pack beside it so each line stays grounded.
- Step 1: Set one communication objective.
Write one sentence for what you want the interview to achieve. A clear objective helps you answer the question in front of you and still return to the point that matters most. It also gives you an edit rule when a line sounds good but does not support the goal.
- Step 2: Choose your key messages.
Pick points you can repeat cleanly across different prompts. Rank them so you know what must land if time gets cut or the segment moves faster than expected.
- Step 3: Create two versions of each message.
Write one short sound bite and one expanded version with a supporting fact or client-safe example from your evidence pack. Keep both natural enough to say without sounding memorized. The short line works in tight windows. The expanded line protects meaning when you have room for one more sentence.
- Step 4: Add return lines for control.
For each message, add one line that brings your answer back to the core point and one line that explains why it matters for the audience. Keep these conversational. If they sound mechanical in rehearsal, they will sound worse live.
- Step 5: Rehearse message discipline.
Practice until you can make the point, support it, and stop. If you regularly over-answer, shorten expanded versions until they feel complete without inviting drift. Strong delivery is usually less about adding language and more about ending on time.
One practical checkpoint: hand the sheet to someone else for a quick scan. If they cannot identify your priorities in seconds, the sheet still reflects internal thinking more than audience needs. Tighten that gap before you rehearse again.
Once the sheet is solid, rehearse for the interview format you actually have, not a generic version.
Practice for the Format You Actually Have#
Format-specific practice cuts avoidable mistakes. Generic practice helps, but it does not train the timing and answer shape your real setup requires.
A taped remote segment, a live radio hit, a phone interview, and an in-studio conversation all create different pressure on pacing and structure. Practice the wrong shape and your first live answer becomes the warm-up. That is a costly place to discover timing issues.
Start by confirming the setup: expected length, live or taped, solo or multi-guest, and remote or in-person. These details decide how self-contained your answers must be and how quickly you need to land each point. For a television interview, build answers that still make sense if the question is edited out.
Use the format check to shape your rehearsal. If the segment is short, train for short answers. If it is likely to include sharper follow-up, train for concise responses plus disciplined pivots. Rehearsal quality comes from matching conditions, not from repeating the same generic lines.
Before You Start
Keep your message sheet nearby. Work from one communication objective and two to three key points.
Then run two focused practice passes.
- Pass one: shortest complete answer.
Lead with the main point, add only background that changes meaning, and stop. This pass improves clarity and removes habits that stretch answers past usefulness.
- Pass two: harder framing.
Rehearse tough or awkward questions that may push tone or scope. Answer briefly, stay within your role, and return to the message that matters most.
Also practice the moment many people skip: stopping. Finish the sentence and leave it there. A lot of avoidable risk appears in the extra line added after the real answer is already complete.
Finally, clear logistics before the interview begins. If it is remote, test your audio, camera, and connection at least 15 minutes early, then run one 30-second answer check. If it is in studio, arrive 5-10 minutes early. Great talking points can still underperform when setup is rushed.
After format rehearsal, you need one rule for hard, vague, or off-topic prompts so pressure does not change your standards.
Use a Decision Rule for Hard, Vague, or Off-Topic Questions#
When pressure rises, do not invent a new standard in the moment. Use one rule every time: stay within your role, stick to confirmed facts, and do not fill gaps with guesses.
This rule works best when ownership is set before interview day. Keep a spokesperson map during prep with a primary and backup person for each major topic. Choose those people for subject-matter credibility, composure under pressure, communication clarity, and availability. If ownership is vague, the interview is where that confusion shows up.
When a hard question lands, run a short sequence instead of reacting emotionally.
- Answer only within the topic you own and the facts you can confirm.
Give a direct response where you have authority. Keep it short, accurate, and useful.
- Route off-topic questions to the designated primary or backup spokesperson.
Use clean handoff language so scope is clear without sounding defensive.
- Return to your core messages after the handoff.
Do not linger in explanation about why you cannot answer more. Set scope, then move to what you can discuss responsibly.
A reluctant spokesperson can look evasive on camera, but a spokesperson with clear boundaries usually reads as credible and steady. The difference is not charm. It is decision discipline.
Another practical rule: if you hear yourself building a long disclaimer, stop and shorten. One clear boundary sentence is usually enough. Extra justification often weakens confidence and steals time from your actual message.
Hold your message set to three to five key points you can repeat clearly. Fewer clear points are easier to defend than a long list you cannot deliver consistently.
That rule matters even more when the topic intersects with client work, confidentiality, or obligations you cannot ignore.
Protect Client Trust and Contract Obligations While Staying Useful#
You do not need to choose between being useful and protecting client trust. The skill is setting boundaries early enough that you can still answer helpfully without exposing details that should stay private.
Risk usually appears when general commentary drifts into specific examples. The interviewer may be looking for color, confirmation, or detail that strengthens the story. You can still contribute by using principles, anonymized framing, and client-safe examples that carry the point without exposing identities.
The real challenge is social pressure. People often share too much because silence feels awkward. Prepare boundary language in advance so you can respond quickly without sounding evasive.
If you have to refuse detail, keep the refusal short and useful. State the limit, explain what you can discuss, then deliver a concrete general answer. That pattern protects trust and keeps the interview moving.
Before You Start
Keep three items in front of you: confidentiality boundaries, a red-line list of details you never share, and two client-safe examples you can reuse. Share the same boundaries with anyone who might be asked for comment.
- Step 1: Build speak and no-speak categories from your boundaries.
Sort likely topics into speak, speak in general terms, and do not speak. Include anything that could expose confidential client information. Keep labels simple enough to use quickly when pace rises.
- Step 2: Extend the boundary list beyond the main spokesperson.
Journalists may ask junior staff or front-desk contacts for comment. Give everyone the same boundary sheet so responses stay consistent and client-safe. Internal alignment matters because small contradictions can create larger problems than one careful refusal.
- Step 3: Stay useful without exposing specifics.
If a question touches sensitive material, avoid identifiers and private details. State the boundary, then offer a general principle and a client-safe example. If asked about a dispute, explain your general standard and return to what you can discuss safely.
- Step 4: Replace flat refusals with boundary language.
A blunt no comment can sound evasive. A better move is to give a short reason for the limit, set scope, and continue with what you can share.
- Step 5: Run a final identification check before you go live.
Remove lines that could identify a client or reveal confidential details. Check your message sheet and any follow-up notes you may send after the interview.
In practice, unsafe disclosure is often not one headline fact. It is the combination of small details that lets someone connect dots. That is why a final review matters. Once those details are public, you do not get them back.
When requests come late, this same boundary logic still applies. You just need a tighter sequence.
Run a 30-Minute Prep Sequence When the Request Comes Late#
Late requests call for triage, not perfection. In 30 minutes, your job is to lock the essentials that protect accuracy, scope, and message control.
| Minutes | Focus | What to do |
|---|---|---|
| 1-5 | Constraints and objective | Confirm format, deadline, and audience, then restate your communication objective in one sentence. |
| 6-15 | Core message assets | Draft key messages, short sound bite lines, and a few bridging phrases. |
| 16-25 | Pressure questions | Practice likely off-topic or hostile framing prompts; answer briefly, return to a core message, and explain why it matters. |
| 26-30 | Final risk sweep | Remove unverified numbers and any line you cannot support clearly. |
A timebox works because it forces prioritization. Under pressure, people often try to cover everything and end up securing nothing. The result is polished phrasing with weak foundations. A tighter sequence prevents that.
Open the interview brief, message sheet, evidence pack, and speak or no-speak notes. Set a 30-minute timer and keep one page for edits so all decisions stay visible.
Before You Start
Use the minutes intentionally. Do not spend the first half polishing language before constraints and claims are confirmed.
- Minutes 1-5: confirm constraints and objective.
Confirm format, deadline, and audience, then restate your communication objective in one sentence. If the slot is short, keep setup tight and focus on the most likely questions. If the conversation is longer, leave room for follow-up.
- Minutes 6-15: lock core message assets.
Draft key messages, short sound bite lines, and a few bridging phrases. Cut wording that sounds polished but does not improve understanding. Keep language you can deliver naturally and defend if pressed.
- Minutes 16-25: rehearse pressure questions.
Practice likely off-topic or hostile framing prompts. Answer briefly, return to a core message, and explain why it matters. If facts are incomplete, state what you can confirm now and hold the rest for follow-up.
- Minutes 26-30: run a final risk sweep.
Remove unverified numbers and any line you cannot support clearly. If a detail is uncertain, say so plainly and continue with what you can stand behind.
If you reach minute 25 and still feel crowded, narrow further. One objective and your strongest points are safer than a long set you cannot control. In late-stage requests, discipline beats range.
Done well, this sprint leaves you with a stable answer set and a clear boundary line. That is enough to execute cleanly, even when prep time was limited.
Execute Cleanly During the Interview#
During the interview, your point has to survive pace, pressure, and the final edit.
The simplest structure is still the strongest: lead with the conclusion, add the detail that gives it shape, and stop. This pattern travels across formats and reduces the chance that your core point gets buried in side explanation.
You do not need performative language. You need clear sequencing and predictable boundaries. A concise answer that lands is more valuable than a longer answer that sounds complete but leaves the audience unclear.
Pacing matters as much as wording. A short pause before your core line can improve clarity, while rushing through the first sentence can bury your best point. Calm delivery with a clear endpoint usually reads as confidence.
- Lead with the conclusion, then add context.
Start with the line you want remembered or quoted, then add only the context that changes meaning. If you are remote, keep your eye line, audio, and framing steady. Technical distractions can weaken even strong content.
- Keep answers quotable and complete.
Aim for an answer that still makes sense if the question is edited out. Use concise summaries from your message sheet rather than long explanations. If a sentence starts running long, split it and close earlier.
- Use simple signposts and bridging with intent.
If a tangent pulls you away, answer briefly, then bridge back to what matters. Keep phrasing natural so you still sound like yourself. The goal is clarity, not control theater.
- Close cleanly with your main point.
End each response with a brief restatement or practical takeaway. Do not drift into extra examples after the answer is already complete.
One clean answer usually does more for you than three half-answers in the same minute. If something still goes wrong, recover quickly and keep the correction small.
Recover Fast When Things Go Sideways#
The strongest recovery is immediate, brief, and unremarkable. Correct course, tighten the answer, and continue.
Interviews go sideways in ordinary ways: a rushed answer, a misheard question, a technical interruption, or a phrase you want to refine. The initial mistake is usually manageable. The risk goes up when you overreact and spend the next minute explaining why it happened.
Use a simple recovery pattern you can apply without thinking.
- If you ramble, stop and reset.
Give the shorter direct version of the answer and close.
- If you misspeak, correct once in plain words.
State the correction, then move on. Do not add a long defense around it.
- If timing changes before airtime, notify early.
If you are running late, alert your point of contact as soon as you know so the interviewer can adjust.
- Treat the next answer as a reset point.
Lead with your strongest message, support it with one clear line, and stop.
One mindset helps here: do not narrate your stress. The audience does not need your internal process. They need a clear correction and a useful next answer.
Calm recovery usually reads as preparation, not damage control. Most interviews can absorb a brief correction. Few recover well from long apologies or defensive detours.
The interview may feel finished once the microphone is off, but the value of the appearance is decided in what you do next.
Close the Loop After the Interview to Build Long-Term Leverage#
The first day after the interview determines whether value compounds or fades. A focused closeout strengthens credibility, sharpens future prep, and leaves reusable assets instead of fuzzy memory.
| Action | What to capture or send |
|---|---|
| Follow-up within 24 hours | Send a short thank-you note and include only what you promised: clarifications, corrected wording, and approved context that supports accuracy. |
| Log what worked | Capture your strongest sound bite, strongest bridging line, the questions that exposed prep gaps, and one sentence on what you would answer differently next time. |
| Repurpose the interview | Turn notes into a site bio update, a social clip script, and a talking-point bank for the next press release. |
| Strategic touchpoint | Close with one practical next step and stop. |
Treat follow-up as part of the interview process, not optional courtesy. The same discipline that protects you before the conversation also protects you after it.
This is where experienced people separate signal from noise. They do not archive everything. They capture the few lines and decisions that improve the next interview.
Keep your closeout short enough to complete on busy days. If your process depends on ideal conditions, it will fail when pace picks up. A tight routine that gets done is better than an elaborate one that is skipped.
- Send a focused follow-up within 24 hours.
Send a short thank-you note and include only what you promised: clarifications, corrected wording, and approved context that supports accuracy. Keep it easy to scan.
- Log what worked before memory fades.
Capture your strongest sound bite, strongest bridging line, and the questions that exposed prep gaps. Add one sentence on what you would answer differently next time. Run a short post-interview survey: if more than 20% of answers ran too long or fewer than 70% of your key points landed clearly, tighten those lines before adding them to How to Build a Media Kit for Your Freelance Business.
- Repurpose the interview into a small asset set.
Turn notes into a site bio update, a social clip script, and a talking-point bank for the next press release. Then convert those lines into reusable assets with How to Build a Media Kit for Your Freelance Business. Reuse is stronger when tied to language tested in public.
- Use follow-up as a strategic touchpoint.
Close with one practical next step and stop. To keep this aligned with broader positioning, connect interview notes to How to Manage Your Personal Brand as a Freelancer.
If you want less scramble on future requests, protect the first day after each appearance as carefully as prep day. For cross-channel consistency, align those updates with How to Create a Freelance USP.
Leave With This Checklist and Use It Before Every Interview#
Use the same short checklist every time. Consistency catches small misses before they become public problems. Keep a one-page report after each appearance and fold repeated message fixes into How to Create a Freelance USP.
Think of this as your final gate. Run it once during prep and once right before the interview begins. If a key detail is still unclear, pause and confirm it or schedule a callback instead of improvising.
- Define your communication objective and key messages.
Take five minutes to say them out loud in plain language. Keep each point brief and specific enough to repeat under pressure. If fewer than 80% of answers are clean on the first read, tighten the wording before you continue.
- Prepare support for each message before you speak.
For each message, note one concrete detail you can stand behind and a short spoken version you can deliver clearly. Keep lines grounded in facts you can verify quickly. If a point needs too much explanation to stay safe, narrow it.
- Confirm logistics twice.
The day before, confirm date, time, place, expected length, and format details such as live or taped status and audience interaction. For virtual interviews, run a tech check about 15 minutes before. For on-site interviews, plan to arrive 5-10 minutes early.
- Set boundaries in advance.
Clarify what you can discuss, what should stay high level, and what you should decline for now. Write limits on your prep sheet so you do not invent them under pressure.
- Rehearse difficult scenarios, not only easy ones.
Practice likely easy, hard, and off-topic questions. Rehearse how you will answer what you can, set scope where needed, and return to the main point. Keep transition lines plain so they stay natural.
- During the interview, lead with your main point and keep answers concise.
Give the core answer first, add one supporting detail, and stop when the answer is complete. If you feel drift, return to ranked messages and close cleanly.
- Know one media-process boundary.
Do not ask to pre-approve the story. If something feels unclear, ask for clarification before the interview begins instead of trying to negotiate the process after the fact.
Run this checklist until it feels automatic. The goal is not rigid performance. The goal is reliable judgment when time is short and stakes are high.
Want to talk it through? Talk to Gruv.
Frequently Asked Questions
How do I prepare for a media interview in 30 minutes?
Use 30 minutes as a triage window, not a complete process. Start by confirming the outlet audience and interview format, including whether it is live or taped. Then lock your core message in three bullet points and do an on the record check so you do not guess. If key format details are still unclear, ask before the interview starts.
How many key messages should I prepare?
A practical framework is three key messages in three bullet points. Keep them repeatable under pressure, use plain language, and remove jargon. If two points overlap, merge them into one clearer message.
What should I do if I do not know an answer?
Say what you can confirm now, then state what you still need to verify. Do not guess in public comments. If the topic is outside your scope, use deflecting and route it to the right person. Clear limits usually protect credibility more than speculative detail.
Is off the record ever safe?
Treat off the record as uncertain protection, not a guarantee. A safer default is to speak as if anything said could appear in the story. If a detail would create risk if published, do not share it.
How do I stay on message without sounding scripted?
Use flagging to mark your main point and bridging to return when the conversation drifts. Keep language conversational instead of memorized. A short message sheet helps you sound clear, not rehearsed. Practice out loud so your delivery feels natural when you pivot.
What are the top mistakes to avoid?
Common mistakes are guessing, using jargon, and skipping format checks until the last minute. Confirm interview length, live or taped status, and whether it is solo or multi-guest before you begin.
What changes between phone, radio, and TV interviews?
Each format changes delivery constraints, so do not treat them as interchangeable. Confirm setup details early, including live or taped status and interview structure. If you are going on site, arrive 5-10 minutes early so you can settle before the first question. Tailor rehearsal to each format so your timing and tone match the channel.
Try a related tool
Researched and edited by the Gruv editorial team. Gruv builds cross-border billing, payouts, and finance-operations software for global businesses.
Sources
Includes 3 external sources outside the trusted-domain allowlist.
- hsph.harvard.edu/wp-content/uploads/2024/11/Workbook-Prepare-...trusted
- umarcomm.umn.edu/blog/2024/07/15/prepare-media-interview-successtrusted
- aafcs.org/advocacy/congress-outreach-strategies/prepar...external
- askamanager.org/2023/02/interviewer-asked-how-i-prepared-for...external
- askamanager.org/2024/08/candidates-ask-so-many-questions-tha...external
Educational content only. Not legal, tax, or financial advice.
Related Posts

How to Manage Your Personal Brand as a Freelancer
Your brand is not a mood board. Think of it as the experience people have of your work: the promise you make, the proof you can show, and the way you present yourself across client touchpoints. Get that clear first, and your fit is easier to read from profile to proposal.

How to Write an Arbitration Clause for a Freelance Contract
**Build a simple dispute playbook so both sides know what happens next. Use it when conflict starts.** When you run a solo business, you cannot absorb unpaid work, vague terms, or open-ended civil court uncertainty. You are the CEO of a business-of-one, which means your contracts need to function like systems, not wishful thinking.

How to Track Your Schengen Days: A Practical Guide
**Use a repeatable weekly system to track Schengen days, validate your math, and protect your plan under the 90/180 rule before each border move.**