
Quick Answer
Start with a personal-item-first setup, then cut bulk only after core access is protected. For how to pack light for long term travel, use the strictest carrier and fare on your route as the binding bag rule, keep identity and account-recovery items within immediate reach, and pressure-test your setup at home with the main bag out of reach. If you cannot clear checks, pay, and start work from that smaller bag, your pack is not ready.
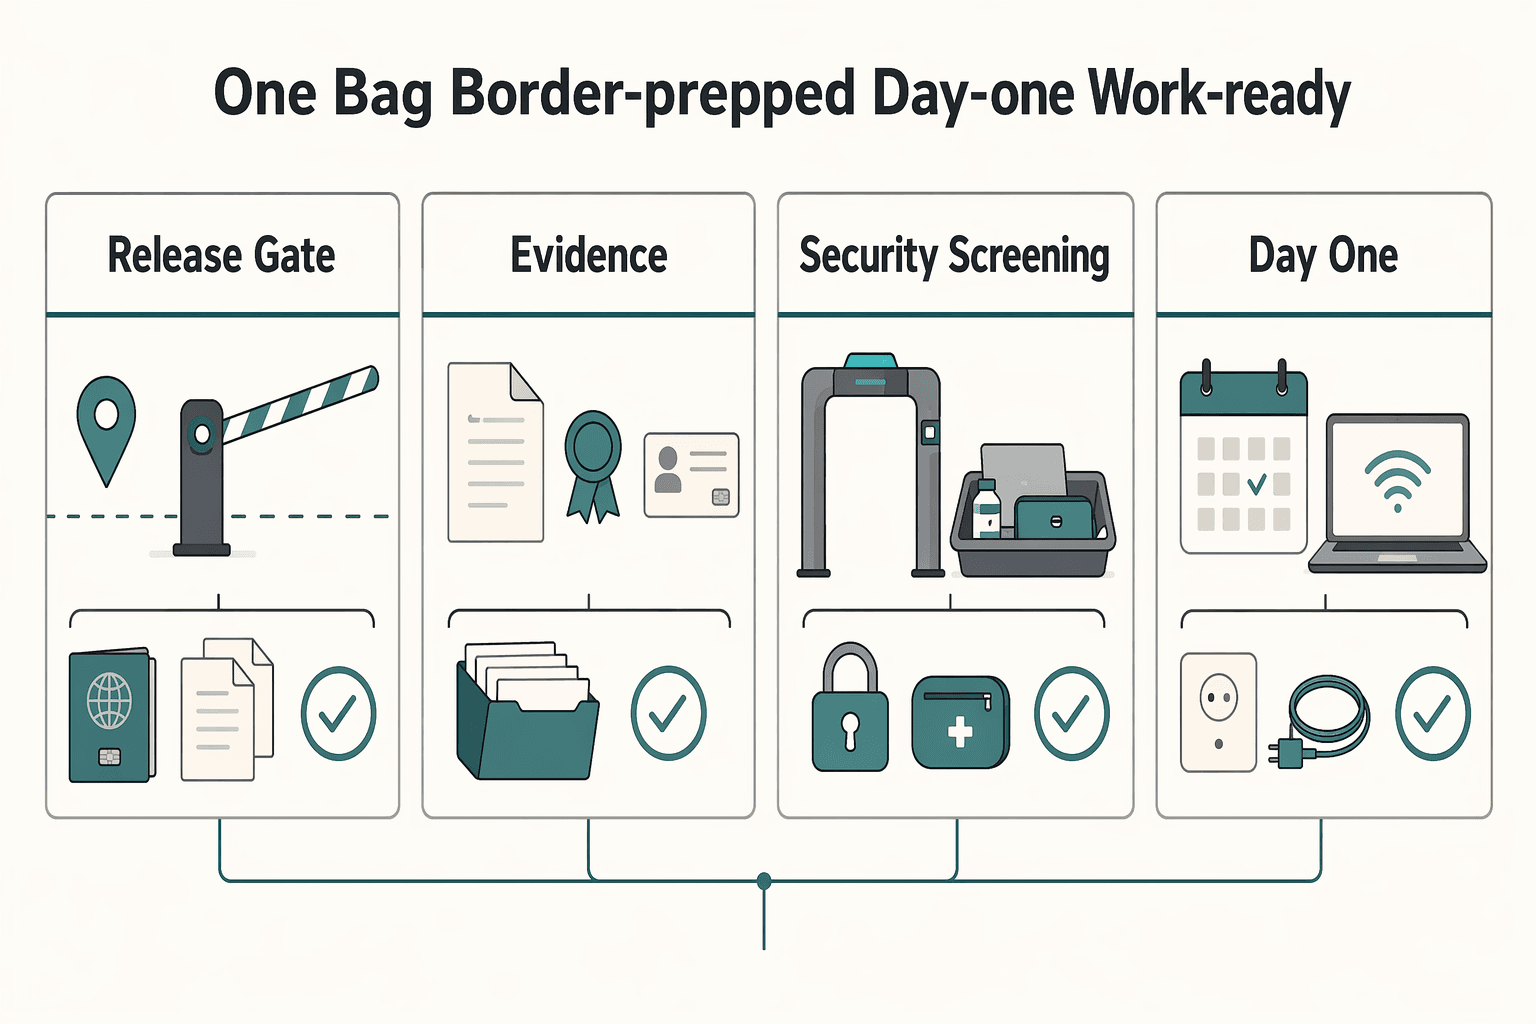
Pack light like a relocating remote pro: one bag, border-prepped, day-one work-ready#
The rule is simple: pack light only if losing your main bag would not break identity, payments, health essentials, or your first work session. If those four still work from your personal item, you can travel much lighter without turning arrival day into a recovery exercise.
That is where packing mistakes hurt most. The trouble usually is not clothes. It is a gate-checked bag, an earlier-than-expected document check, or needing to log in for work before you have time to unpack. In one-bag travel, your personal item is not overflow. It is your continuity bag.
Step 1. Build the personal item before you pack a single shirt. Group it by function so missing pieces are easy to spot.
-
Identity
-
Passport - Visa, entry support documents, or onward-travel proof if your route requires them - Booking and accommodation details - Check that names match across bookings and documents - Verify current destination and transit document rules before departure
-
Money
-
Primary wallet or payment card - Backup payment method stored separately inside the same bag - Phone with banking access already signed in where appropriate - Check that you can approve a payment or view funds without depending on one fragile login path
-
Health
-
Daily medication for the opening stretch of the trip - Prescription or doctor note if relevant to your medication or equipment - Health items packed so they can be shown separately if needed - Verify destination and transit rules for medications and related supplies
-
Work access
-
Laptop - Laptop charger - Phone - Backup MFA or login recovery method - First-day notes, client files, or call details saved offline - Check that your first work block can happen with only this bag
Use a blunt test: if your main bag disappears for 24 hours, can you still clear the border, reach your lodging, pay for basics, and join your first call? If not, the split is wrong.
Step 2. Split everything else by failure impact, not by category. Treat clothes, extra shoes, and spare toiletries as inconvenience items. Identity loss, payment lockout, or MFA failure can stop the trip. Pack the replaceable items in the higher-risk bag, and keep anything that protects access close.
| Risk trigger | Keep in your personal item | Can live in the main bag | Go or no-go test |
|---|---|---|---|
| Carry-on is removed at the gate | Passport, wallet, phone, laptop, medication, charging essentials | Most clothing, spare shoes, backup toiletries | Go if you can arrive, check in, and work without the main bag. No-go if one missing item blocks any of those. |
| Border or check-in document request | Required travel documents and booking proof | Extra copies only | Go if you can produce what is needed without opening the main bag. No-go if the evidence pack is buried elsewhere. |
| Security screening friction | Electronics, health items, anything you may need to present separately | Nonessential bulk items | Go if you can unpack and repack fast without exposing the rest of your bag. No-go if screening turns into a full repack. |
| Day-one work access problem | Laptop, charger, phone, MFA recovery, offline notes | Secondary tech and nice-to-have accessories | Go if you can sign in and start work from the personal item alone. No-go if login recovery depends on something packed elsewhere. |
One failure mode is splitting one task across two bags. Your laptop is with you, but the charger is not. Your bank app works, but the recovery codes are packed away. Your passport is handy, but the booking proof is buried. Pack complete chains, not isolated objects.
Step 3. Run the home drill before you call it done. Put the main bag in another room and work only from the personal item.
- Retrieve your passport, booking proof, wallet, and laptop without digging. If you have to hunt for them, repack.
- Open airline, lodging, banking, and core work apps. Then test login recovery, not just normal login.
- Simulate checkpoint handling. Confirm electronics and health items are easy to present. Check current liquids and medication screening guidance for each airport on your route.
- Check power banks and batteries against your airline's current rules and current security guidance (spare vs installed, carry-on vs checked).
- Start a real test: log in, open the first files you need, and join a short call or meeting link.
If any step fails at home under mild pressure, it will fail harder in transit. Fix the bag split first, then worry about cutting wardrobe volume. If you still need to choose the bag itself, The Best Travel Backpacks for Digital Nomads is the right comparison before you buy. If you want to pressure-test the rest of your move the same way, Gruv's Digital Nomad Pre-Travel Checklist for Long-Stay Moves pairs well with this approach.
Related: How to Pack a Backpack for a Multi-Day Hike.
What does "one bag" actually mean for 3-12 months of long-term travel?#
For long stays, "one bag" means your setup passes the strictest rule on your route while keeping identity, payment access, account recovery, and day-one work available if your overhead bag is removed at the gate.
Step 1 Set the binding bag rule#
Do not pack to a generic cabin standard. Pack to the most restrictive segment, fare, and aircraft on your itinerary. Carry-on limits vary by airline, and even a compliant bag can be checked when fit or cabin-space limits are hit. IATA's 56 x 45 x 25 cm reference is useful context, not a guarantee, and some airlines start carry-on weight limits at 5 kg.
| Bag profile | When it fits | Pass or fail check | Verification status |
|---|---|---|---|
| Personal item only | Strict, fee-sensitive, or frequent budget segments | Pass if fully packed it fits under seat and still carries passport, phone, wallet, laptop, meds, charger, and MFA fallback. Fail if overstuffing changes shape. | Current personal-item size/weight rule pending carrier verification |
| Carry-on + personal item | Mixed carriers, multi-hop routes, normal remote-work load | Pass if the personal item alone covers border checks and your first work block. Fail if any critical access item lives overhead. | Current carry-on and personal-item rule pending carrier verification |
| Full-service carry-on + personal item | Less restrictive cabins, fewer segments, more climate range | Pass if the packed bag fits a real sizer without forcing it. Fail if your plan assumes overhead space is guaranteed. | Current carrier size/weight rule pending carrier verification |
| Budget fare with paid cabin bag | Airlines where overhead access depends on fare bundle | Pass if your purchased fare matches the bag you are bringing. Fail if you assume overhead access is included when it is not. | Current fare-linked cabin bag rule pending carrier verification |
Live examples make the mismatch risk obvious: American Airlines lists 22 x 14 x 9 inches for carry-on and 18 x 14 x 8 inches for a personal item; Southwest allows 24 x 16 x 10 inches; Ryanair includes one 40 x 30 x 20 cm small bag, while Priority adds a 10 kg 55 x 40 x 20 cm cabin bag.
Step 2 Build for laundry cycles, then split by risk#
For 3-12 months, pack around laundry and repeat wear, not trip length. Use a compact capsule you can rotate across work, transit, and casual settings, then add stackable climate layers. Cut single-use items that do not improve mobility, comfort, or work continuity.
| Storage zone | Items |
|---|---|
| On-body | Passport; phone; primary payment method |
| Personal item | Laptop; charger; medication; backup card; power bank; printed or safely stored recovery codes; offline files for your first work block |
| Main bag | Clothing; extra shoes; standard toiletries; other replaceable items |
Then lock that split. Keep document copies separate from originals, and carry print and digital versions when feasible.
Watch for split-task failures: laptop in hand but charger in the hold, bank app open but recovery path inaccessible. If your carry-on is gate-checked, spare lithium batteries and power banks must stay in the cabin, so pack them for fast removal.
Step 3 Run the compact go or no-go drill#
Before departure, run four checks:
| Check | What to verify | Detail |
|---|---|---|
| Measure and weigh | Fully packed bags against the strictest segment and fare | Include bulging pockets and attached items |
| Test fit | Bag fit as packed, not half-empty | If it would fail a sizer or under-seat check in real boarding conditions, it fails |
| Rehearse screening | Pull out laptop, medication, and liquids quickly | For U.S. TSA lanes, liquids are limited to 3.4 oz (100 ml) containers in one quart-size clear bag, one bag per passenger |
| Simulate gate check | Set the main bag aside and work only from the personal item | If you cannot show ID, pay, pass MFA, and start your first work block, repack |
If the open question is still the bag itself, use The Best Travel Backpacks for Digital Nomads. If work comfort is pushing extra gear into your load, Ergonomic Travel Setup for Digital Nomads: A Three-Tier System for Comfort and Uptime is the right next check. If you want to stress-test the rest of your move workflow, use Digital Nomad Pre-Travel Checklist for Long-Stay Moves.
You might also find this useful: How to Negotiate a Long-Term Stay Discount on Airbnb.
Prerequisites: what to decide and gather before you start packing#
Decide constraints first, then documents, then work-access resilience, then keep-vs-buy. If any step fails, pause there. Packing faster will not fix a missing rule, missing document, or access gap.
Step 1 Lock your constraints sheet. Build one page with each flight, train, bus, and ferry segment, including operator, fare/class, and date. Carry-on rules are not universal and can vary by airline, cabin, aircraft, destination, and partner carrier, so treat the strictest confirmed segment as your practical packing rule unless the operator publishes a different governing allowance for your ticket.
| Transit mode | Verify now | Verification status |
|---|---|---|
| Flight | Carry-on size, personal-item rule, weight cap, screening limits, lithium battery handling, gate-check risk | Current screening and baggage threshold pending official verification |
| Train | Piece count, size or length limits, storage rules, excess-bag policy | Current route limit pending operator verification |
| Bus | Bag count, hold-vs-cabin policy, excess-bag option, full-compartment handling | Current baggage rule pending operator verification |
| Ferry or regional transfer | Whether bags stay with you, are tagged, or are staff-handled | Current vessel and boarding rule pending operator verification |
Go or no-go: if you cannot identify the segment that sets your bag size, personal-item size, and screening assumptions, do not choose a bag yet. If route prep is still loose, use the Digital Nomad Pre-Travel Checklist for Long-Stay Moves.
Step 2 Stage your document bundle. Arrange it so you can prove identity and entry eligibility without opening your main bag. Keep originals on-body or in your personal item, one paper copy separate from originals, one offline digital copy, and one copy with a trusted person.
Use this retrieval logic:
- On-body or personal item: passport, primary ID, visa or eTA approval (if required), onward proof (when relevant), stay proof, medication prescription or medical certificate (if needed).
- Separate backup location: paper copies of identity and entry documents.
- Trusted contact: duplicate copies and your itinerary.
Verification details to confirm now: some destinations require passport validity for at least 6 more months after travel dates; U.S. checkpoints require valid ID for travelers 18 and older; and state-issued IDs must meet REAL ID rules from May 7.
Go or no-go: if you cannot prove identity and entry eligibility from your person plus personal item alone, stop here.
Step 3 Test the smallest workable office. Run one continuity test using only your personal item. You should be able to power your laptop and phone, get online through a fallback path, recover account access if normal MFA fails, and reach one trusted contact.
Check in this order:
- Power: charger, cable, and power bank are present and reachable. Spare lithium batteries and power banks must stay in carry-on baggage; if a bag is gate-checked, remove them first. Most personal-electronics spares are limited to 100 Wh, and up to two 101-160 Wh spares require airline approval.
- Connectivity: one backup path to internet and first-work files available offline.
- Credential recovery: MFA backup codes stored offline and separately.
- Emergency reachability: one person has your route, copies, and check-in plan.
Go or no-go: if losing the main bag blocks your first work session, repack.
Step 4 Decide what stays with you and what gets bought later. Keep regulated, hard-to-replace, or first-72-hours items with you; buy common, noncritical items after arrival.
| Item type | Keep with you when... | Buy later when... | Verification status |
|---|---|---|---|
| Medication | Legality or quantity is regulated, or interruption creates health risk | It is clearly legal and easy to replace at destination | Destination and layover medicine rule pending official verification |
| Essential work gear | Loss would stop client delivery or income | Local replacement is fast, compatible, and affordable | Destination replacement plan pending local verification |
| Identity and entry docs | Needed for transit, check-in, or border controls | Never a buy-later item | Current route document set pending official verification |
| Noncritical basics | No legal or operational impact in first 72 hours | Widely available on arrival | Destination availability check pending local verification |
Before finalizing, check destination and layover-country medicine rules: medicines legal at home may be restricted elsewhere, and many countries allow only a 30-day supply of certain medicines without additional documentation.
Go or no-go: if an item is legally sensitive, expensive to replace, or required in your first three days, keep it on-body or in your personal item. Everything else has to earn space. If bag choice is still unclear, use The Best Travel Backpacks for Digital Nomads.
The timeline playbook: pack in phases with go/no-go checks (30-45 days → 14 days → 72 hours → day-of)#
Treat packing as four release gates, not one long session. Move forward only when the same three paths still work without improvising: identity, payments, and first-work access from your person plus personal item.
| Phase | What is locked | What is staged | What is tested | Evidence to proceed | Pause label if it fails |
|---|---|---|---|---|---|
| Step 1, 30 to 45 days | Route rules, destination entry checks, passport-validity assumptions. Current threshold pending official verification. | Originals, separate paper copies, offline digital copies, backup payment methods, recovery codes | Sign in to key work accounts using your planned recovery path | Proceed only if you can prove identity from your person/personal item, keep redundant payment access, and recover access without your primary phone | documentation gap or access single-point-of-failure |
| Step 2, 14 days | What stays on-body, in personal item, and in main bag | Personal-item continuity kit and first-72-hours items | One normal work session using your packed layout | Proceed only if day-one work, payment access, and critical files are reachable in the packed split | carry configuration instability |
| Step 3, 72 hours | Screening assumptions and retrieval order. Current screening rule pending official verification. | Liquids bag, document pouch, chargers, declared medical liquids if needed | Retrieval and repack drill without emptying the whole bag | Proceed only if you can pull ID, payment method, laptop access, and liquids quickly under pressure | screening friction |
| Step 4, day-of | Final bag assignment and carrier timing. Current operator check-in window pending operator verification. | Charged devices, passport, payment access, recovery codes, medicine, power bank | No-main-bag continuity drill | Proceed only if losing the main bag still lets you identify yourself, pay, and start your first work session | Any continuity failure |
Use these failure labels consistently, not just as one-off notes. They tell you exactly what broke so you can fix the right layer instead of repacking reactively.
The final drill matters because carry-ons can be removed at the gate when cabin space is full. Assume it happens: spare lithium batteries and power banks must be removed before gate check, and your personal item must still carry identity, payment access, laptop continuity, and recovery access on its own. If any core path fails, pause, correct the setup, and rerun the drill before departure.
If the blocker is route paperwork or mobility support rather than packing, talk to Gruv. For a companion prep flow, use the Digital Nomad Pre-Travel Checklist for Long-Stay Moves.
Try a related tool
Researched and edited by the Gruv editorial team. Gruv builds cross-border billing, payouts, and finance-operations software for global businesses.
Sources
- cisa.gov/topics/cybersecurity-best-practices/multifac...trusted
- faa.gov/hazmat/packsafe/lithium-batteriestrusted
- fdic.gov/consumer-resource-center/2024-04/travel-tips...trusted
- login.gov/help/create-account/authentication-methods/b...trusted
- travel.state.gov/en/international-travel/planning/checklist.htmltrusted
- travel.state.gov/en/international-travel/travel-advisories/sm...trusted
- tsa.gov/travel/frequently-asked-questions/what-are-s...trusted
- tsa.gov/travel/travel-tips/travel-checklisttrusted
Educational content only. Not legal, tax, or financial advice.
Related Posts

The Best Travel Backpacks for Digital Nomads
Start by ruling out bad fits, not by chasing a universal winner. If a bag does not match how you move, how you work, or what you can comfortably carry, drop it early. That matters far more than one extra pocket or a slick product page.

DMCA for Freelancers in Client Content Disputes
Use the DMCA as a containment tool. The immediate goal is to get copied material removed through a platform process, not to resolve every ownership dispute in one step.

The Freelance Payment Penalty: A Modeled Audit of Platform Fees, FX Spreads, and Payout Delays
The money rarely disappears through a single, easy-to-spot fee. The real loss is stacked. A marketplace takes its commission, a processor adds a charge for international cards, a bank or payment company converts the currency at a spread, a platform holds the funds before release, and a wire sheds a little to intermediaries on the way in. Each layer looks defensible on its own, but the worker feels the combined result as a smaller deposit and a later payday.