
Quick Answer
Pack how to pack a backpack for hiking as a sequence, not a scramble: set trip parameters, group gear by function, and load in three zones for balance and access. Keep dense items close to your back, reserve the Command Layer for things you may need while moving, and protect sensitive gear inside a pack liner. For multi-day flexibility, keep a small pre-staged day setup inside your main bag so you can leave camp without rebuilding from scratch.
The Mission-Critical Loadout: A Systems-Thinking Approach to Packing#
If you want to pack a hiking backpack without constant repacking on trail, the work starts before anything goes into the bag. Define the trip first. Then match gear to functions. Then place each item by access needs and load balance.
Use a simple filter for every packing decision: context, constraints, priorities. Context means the trip conditions and what you actually need to accomplish. Constraints are pack space, total bulk, and the simple reality that every extra "just in case" item adds weight fast. Priorities are the functions that matter most on this trip, starting with safety, comfort, and core objectives before nice-to-haves.
This is where a systems approach beats a basic checklist. Instead of asking, "Did I pack everything?" ask, "Does each item earn its place for safety, comfort, or the purpose of this trip?" That simple test keeps redundancy out unless it solves a real problem.
| Approach | Comfort and carry | Access speed | Risk of missing essentials |
|---|---|---|---|
| Checklist-first | Can become uneven if items are added without placement logic | Slower if must-haves end up buried | Lower for listed items, higher for function gaps |
| Systems-based | Better balance because weight, size, and access frequency guide placement | Faster because high-use items stay reachable | Lower if you check functions, not just objects |
| Last-minute packing | Often top-heavy or lopsided | Unpredictable | Highest |
A good checkpoint is simple. Heavy items should sit close to your spine, and frequently used items should be easy to grab. If the pack feels top-heavy or uneven, fix it now, because poor balance can hurt stability fast. The next step is to define the trip clearly before you choose a single item.
The same planning-first mindset shows up in How to Apply for a Digital Nomad Visa Without Costly Delays.
Step 1: Define Your Mission Parameters#
Decide the trip before you pack. When you set conditions, connectivity, risk tolerance, and your main objective first, gear choices get clearer and overpacking drops fast.
1) Confirm the trip conditions you can verify now#
Use checkable inputs: trail type, current weather pattern, likely water access, how remote the route feels, and realistic bailout options. These details affect both what you carry and how much pack support you need.
| Trip setup | Capacity range |
|---|---|
| Day trip | 10-25 L (short-hike ranges also appear as 10-20 L) |
| Longer day outing | 20-35 L |
| Multi-day tour | 15-35 L |
| Trekking/alpine trip | 30-45 L |
| Trekking holiday setup | 40-70 L |
Trip type and duration are your first size checkpoint. There is no single universal capacity rule, but these ranges are useful guardrails:
- Day trip:
10-25 L(short-hike ranges also appear as10-20 L) - Longer day outing:
20-35 L - Multi-day tour:
15-35 L - Trekking/alpine trip:
30-45 L - Trekking holiday setup:
40-70 L
Before loading anything, do a fit check with the empty pack. Confirm adjustment range, padding, and load-distribution support. On larger packs, chest or pelvic straps help distribute weight better.
2) Choose your connectivity mode (offline vs connected)#
Make this an explicit choice, not an afterthought. It changes your power plan, device protection, and where items should sit in your backpack.
| Decision area | Offline trip mode | Connected trip mode |
|---|---|---|
| Power carry | Keep power limited to essentials | Add charging capacity and cable organization |
| Device protection | Basic protection can be enough with minimal tech | Use padded electronics pockets or separate protection against bumps and shocks |
| Access plan | Rarely used devices can sit deeper | Keep work/navigation devices reachable without a full unpack |
| Weight tradeoff | Lower weight, higher mobility | More utility, with more bulk to manage |
3) Set your risk profile and pack support level#
Match your pack style to your comfort margin. Ultralight setups improve mobility and reduce load, but may trade away support and durability. More regular packs usually provide more structure and features, which helps with heavier loads or rougher trips.
| Factor | Lower risk profile | Higher risk profile |
|---|---|---|
| Route context | Clearer route with easier exits | More remote route with less certainty |
| Group context | Strong support or familiar pace | Less support or lower confidence in pace/decisions |
| Pack choice | Lighter structure may be acceptable | Better support, fit, and load control matter more |
| Margin | Tighter list | More backup margin for delays or changing conditions |
4) Define what success means on this trip#
Pick one primary objective so your packing priorities stay consistent:
- Speed: lower weight, faster access
- Comfort: more camp/carry comfort, even with extra bulk
- Safety margin: more backup and support
- Work continuity: device protection and power planning are non-optional
Once these parameters are set, you are ready for the next step: build a systems-based checklist where every item has a clear job. You might also find this useful: How to Plan a Multi-Day Hiking Trip.
Step 2: Build a Systems-Based Checklist for Zero Anxiety#
Stop packing from memory and pack by function. This is the simplest way to avoid the common pattern of overpacking while still missing something important.
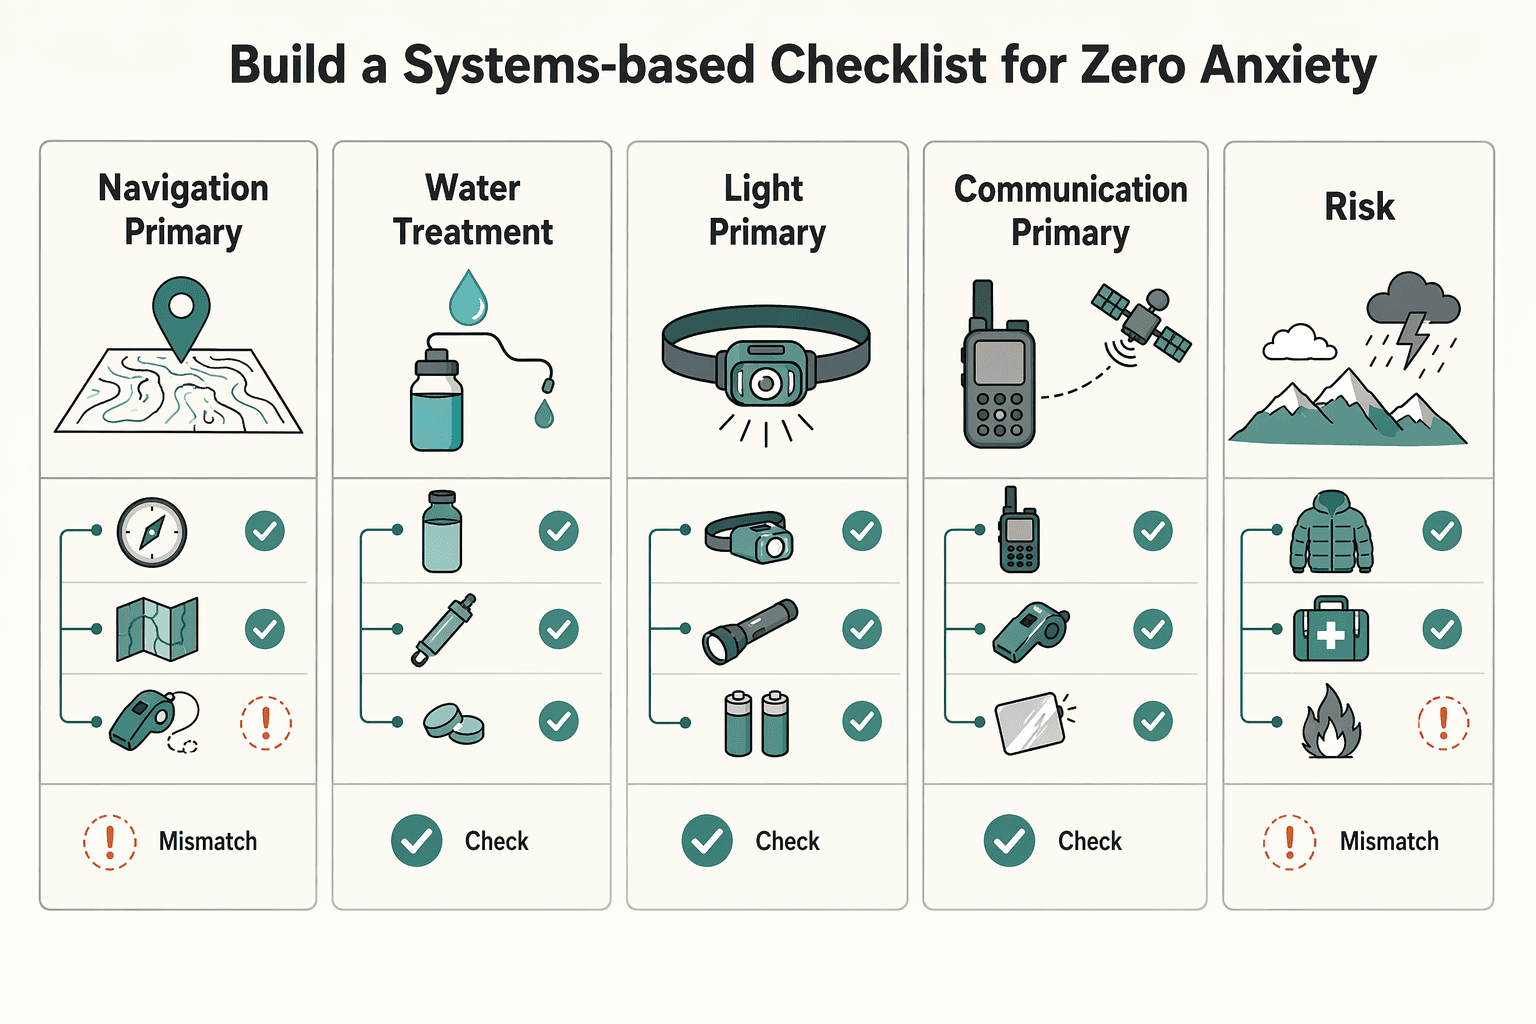
| Function | Primary | Backup |
|---|---|---|
| Navigation | Primary route aid | Backup route reference |
| Water treatment | Primary treatment method | Backup treatment method |
| Light | Primary light source | Backup light source |
| Communication | Primary way to call for help | Backup contact/check-in method |
A memory-first list starts with random items. A systems-first list starts with jobs your trip must cover, then assigns gear to each job.
| Packing approach | Missed essentials | Repacking time | On-trail accessibility |
|---|---|---|---|
| Memory-based packing | Higher risk of gaps because items are recalled out of order | Often slower because you keep re-checking | Often inconsistent because items go wherever space is left |
| Systems-based packing | Lower risk of gaps because each function is checked | Usually faster after setup because the checklist is reusable | Usually better because each system has a planned home |
Before listing gear, pin your trip facts at the top of the checklist: trail length, elevation gain, terrain type, estimated completion time, current forecast, nearest exit points, nearest medical facility, and your way to call for help. Recheck forecast conditions in the days before departure and adjust for weather risk, including hazards like lightning storms or flash floods.
Use this backbone and fill in your own items:
| System | Must-pack | Trip-conditional | Shared-use | Container | Retrieval cue |
|---|---|---|---|---|---|
| Shelter and sleep | Core protection and overnight recovery kit | Add or remove based on forecast and exposure | Split only with clear carry assignments | One dry bag or stuff sack | Camp-only |
| Water and food | Water carry plan, water-safety method, trip-length food plan | Adjust for heat, remoteness, and water availability | Shared cooking/treatment only if ownership is explicit | Food/kitchen bag, treatment kept distinct | Frequent daytime access |
| Navigation | Route information and route-check tools | Add backup if route complexity or conditions increase | Can be shared, but do not leave a critical gap | Top/hip pocket | Reachable without unpacking |
| Safety and first aid | Basic response and emergency essentials | Scale with remoteness, weather, and exit difficulty | Share with caution; avoid single-point dependence | Clearly marked pouch | Fastest grab |
| Power and communication | What you need for your real contact/navigation plan | Add only if your route depends more on devices | Shared power is fine if responsibilities are clear | One tech pouch | Easy break/camp audit |
For critical functions, label primary and backup before you open your pack:
- Navigation: primary route aid, backup route reference (for example, hiking app plus topographic map).
- Water treatment: primary treatment method, backup treatment method.
- Light: primary light source, backup light source.
- Communication: primary way to call for help, backup contact/check-in method.
Keep one operating rule in mind: one system, one container, one retrieval cue. That structure keeps you prepared without carrying dead weight, and it sets up the next step: loading order for balance, protection, and quick access. Related: How to Pack Light for Long-Term Travel (One Bag Guide).
Step 3: The 3-Tier Loadout: A Framework for Tactical Packing#
Pack in three tiers so weight, access, and stability work together: light and compressible gear low, dense weight in the middle near your spine, and quick-use items high in the Command Layer. Once your checklist is done, placement is what makes the pack feel controlled instead of awkward on trail.
| Tier | Placement | Typical items |
|---|---|---|
| Tier 3 / foundation | Bottom of pack | Sleeping bag, sleep clothes, similar shelter/sleep items |
| Tier 2 / engine | Middle of the pack, tight to your back | Food, cook kit, heaviest part of your water carry |
| Tier 1 / Command Layer | Top and easy-reach pockets | Rain gear, first aid, navigation tools, snacks, headlamp, sun protection, water treatment |
What goes in Tier 3, the foundation?#
Put camp-only, soft, compressible gear at the bottom. Your sleeping bag, sleep clothes, and similar shelter/sleep items usually belong here because you will not need them while hiking, and they create a stable base for the rest of the load.
What goes in Tier 2, the engine?#
Put your heaviest, densest items in the middle of the pack, tight to your back. Food, cook kit, and the heaviest part of your water carry are common examples on multi-day hikes. This keeps the load closer to your center of mass, which improves balance and reduces wasted effort.
What goes in Tier 1, the Command Layer?#
Keep fast-access items at the top and in easy-reach pockets. Rain gear, first aid, navigation tools, snacks, headlamp, sun protection, and water treatment should be reachable without unpacking your whole bag.
| Placement choice | Correct placement | Incorrect placement | Likely on-trail effect |
|---|---|---|---|
| Dense/heavy items (food, water, cook kit) | Mid-pack, close to spine | Outer/front area or high/top-loaded | Better balance and stability vs backward pull and faster fatigue |
| Camp-only soft gear (sleep system) | Bottom tier | Mid/high tier | Stable base and cleaner access vs top-heavy feel and cluttered daytime access |
| Quick-use items (rain shell, first aid, navigation, snacks, treatment) | Command Layer / quick-reach pockets | Buried under core load | Faster response and fewer stops vs slow access and repeated unpacking |
After packing, run a quick fit-and-test check before departure:
- Adjust the pack so the load sits close to your body, then fine-tune any uneven strap tension.
- Walk with it and note sway, backward pull, or pressure points.
- Rebalance by moving one dense item inward or slightly lower, then retest.
For edge cases, keep the same three-tier logic and make small adjustments. If water sources are unreliable and you carry extra water, keep that added weight in Tier 2 when possible. Keep wet gear separated from insulation and electronics, even if it needs temporary top or outer-pocket placement. For work electronics, use a dedicated dry bag plus a padded core, and keep that protected weight close to your body.
Once this tier layout feels stable, you are ready to integrate and protect your professional kit in the next step. If you want a deeper dive, read The Best Travel Backpacks for Digital Nomads.
Step 4: The Hybrid Loadout Module: Integrating Your Professional Toolkit#
If you need to arrive ready to work, treat your electronics as one protected module, not loose items spread through the pack. For many remote professionals, that module is your laptop, phone, charging kit, key documents, and the small work essentials you rely on.
Your connectivity needs still set the scope. A lighter setup can stay compact, and a heavier setup can carry more gear, but the same rule applies: protect the kit as one unit, then place it so the pack still carries cleanly.
How do you protect it from water first?#
Your first layer is a dedicated dry bag for the core professional kit. The goal is simple: one sealed bundle that keeps sensitive items isolated from moisture exposure.
If electronics and documents are split across multiple pockets and loose pouches, you create more failure points and more chances to miss an item during a rushed stop. Keeping one protected bundle is usually the cleaner, safer setup.
How do you protect it from impact where the pack is strongest?#
After sealing the kit, build a padded core so electronics are buffered from direct hits. A sleeved laptop plus soft buffering keeps the load better protected than a bare device against hard gear.
Place that protected bundle in the middle of the pack, close to your spine, following the Tier 2 logic from Step 3. That position supports balance and reduces the backward pull you get when dense electronics sit too far from your back.
| Risk area | Common mistake | Recommended setup | Practical consequence |
|---|---|---|---|
| Water exposure | Electronics and documents scattered across pockets | Core work kit grouped in one dedicated dry bag | Better moisture isolation and fewer missed items during quick stops |
| Impact risk | Laptop unbuffered or against the outer panel | Sleeved laptop inside a padded core near your spine | Lower shock exposure and steadier carry |
| Mid-day access | Charging items buried with core gear | High-use power pouch in the Command Layer | Faster top-ups without unpacking the full bag |
How do you keep power accessible without exposing the whole kit?#
Keep the core module sealed, and separate only the high-use charging items into a small Command Layer pouch. That gives you quick access to cables, adapters, or power without opening the protected core every time.
For critical power functions, add redundancy so one failed item does not stop your workday. On rain days, keep the core sealed and adjust only the power pouch placement as needed; on transit days, you can temporarily move document access higher, then return the protected core to the middle near your spine when you are back on foot. This sets up Step 5: modular adjustments for agility without a full repack. Need the full breakdown? Read How to get a 'Global Entry' card for expedited US customs.
Step 5: A Modular System for Agility in the Field#
Treat your pack as three modules so you can adapt quickly without a full repack: Mothership for core carry, Satellite for short objectives, and Brain for immediate access. This keeps camp routines, side trips, town stops, and optional work transitions simpler and less error-prone.
| Module | Primary use case | Where it sits in your pack | Must-have items | Common mistake to avoid |
|---|---|---|---|---|
| Mothership | Full camp-to-camp carry | Main pack body, with heavier items near your spine in the middle | Your core systems (shelter, sleep, food, cook, clothing), grouped by function | Letting high-use items sink into the main body, forcing frequent unpacking |
| Satellite | Short hikes, water runs, town errands, optional work carry | Pre-packed inside the main bag for fast grab-and-go use | A staged core, then a few swaps based on that day's objective | Leaving it empty and rebuilding from memory every time |
| Brain | Fast access while moving | Top-access pocket (your Command Layer) | Items you may need immediately, including navigation, communication, snacks, and weather-response gear | Turning it into a catch-all pocket where key items get lost |
How do you stage the Satellite before you need it?#
Keep your Satellite partly packed at all times. If you wait until departure to build it, you are more likely to miss something important.
- Keep a permanent core staged by function (hydration, an extra layer, food, light, navigation, basic care).
- Swap by objective.
If you are heading to town or a work stop, add what that objective requires (for example, documents or your protected work bundle). If water sources are unreliable, increase water carry.
- Verify before leaving camp.
Check water-source reliability first, then confirm your connectivity requirement so you carry the right tech and power items.
If your backpack includes an integrated daypack that doubles as a hydration sleeve, that can serve as your Satellite. If not, the same structure still works with any lightweight secondary bag.
Adaptation scenarios#
- Day hike from basecamp: Leave the Mothership set, take the Satellite, and pull only immediate-use items from the Brain.
- Weather shift during the day: Move rain and other quick-response gear into the Brain so you can reach it without opening the main compartment.
- Quick town errand or work block: Keep camp systems in place, move your needed work/power items into the Satellite, and go.
For a step-by-step walkthrough, see Best Nomad Cities for Hiking Without Relocation Surprises.
Conclusion: From Packed Bag to Total Confidence#
Once you stop stuffing gear wherever it fits, packing gets calmer and your trail decisions get easier. The practical answer is not one perfect list. It is a repeatable sequence: reset the bag, organize by 3 sections, place dense weight close to your back and centered, and keep high-use items easy to reach.
That shift matters because poor packing changes how the pack carries. A badly loaded bag can throw off your balance and make the hike harder than it needs to be. A well-packed one improves comfort, stability, and balance. Your verification point is simple. When the pack is on, it should feel balanced, not pull you backward, and let you reach items you know you will need during the day.
| Area | Before | After |
|---|---|---|
| Planning style | Pack from memory or a loose pile | Start with a shakedown, then pack with intent |
| Pack structure | Fill open space wherever it appears | Use 3 sections and keep heavy items close to your back |
| In-trail access | Bury frequently used gear under camp items | Put frequent-use items near the top or in easy-reach pockets |
| Error prevention | Accept exterior clutter and shifting loads | Re-evaluate if multiple items hang outside; secure any external item close with side compression straps |
What should you do before your next hike?#
Use this quick sequence:
- Define conditions. Match your gear to the trip conditions you expect.
- Verify your core setup. Empty the pack for a quick shakedown if needed. Check that your must-carry items are present and grouped.
- Load by access priority. Keep dense items centered near your back, and put high-use gear where you can reach it fast. Be selective with stuff sacks if they create wasted air gaps.
- Run a final check. Walk around with the loaded pack. If it feels unstable, pulls backward, or has multiple items strapped outside, repack before you leave.
You finish with something better than a one-off packing list. You leave with a method you can repeat, adjust, and trust on every trip. This pairs well with our guide on How to Prevent and Treat Blisters While Hiking.
Frequently Asked Questions
How do I pack electronics for hiking?
Group your devices, power bank, and cables before you start so you know what really needs trail access. If rain is possible, keep them inside your pack liner and place the densest pieces in the core zone near the back panel. Move only the item you may use during the day into the top zone. That helps avoid two common mistakes: extra weather exposure in outer pockets and burying the one cable you need under camp gear. | Protection method | Best use case | Priority | Main tradeoff | |---|---|---|---| | Pack liner inside the main compartment | Rain protection for your load, including electronics kept inside it | Highest | Slower access because you open one more barrier | | Separate internal bag for electronics, kept inside the liner | Keeping small tech grouped and easier to find | High if you carry work tech | Adds one more pouch to manage and is not a substitute for the liner | | Top pocket or exterior pocket access | Dry-weather access to a battery or cable you may need during the day | Low for rain protection | Fast access, but higher exposure if weather turns |
What is the best packing method for a hiking backpack?
The best method is to pack by function and by zone. Start with a checklist, then load camp-only bulk low in the bottom zone, dense items in the core zone, trail-use essentials in the top zone, and small frequent-use items in side, hip, or lid pockets. That makes the setup repeatable and prevents the common problem of having the right gear but not being able to find it quickly.
How do I waterproof a backpack for heavy rain?
Line the main compartment with a pack liner first, then pack your gear inside that barrier. Keep the items you most need to protect inside the liner, and tighten compression straps so the load does not shift as you walk. This helps keep contents drier in rain, instead of relying only on outside protection.
Where should you pack the heaviest items in a backpack?
Place dense heavy items in the core zone, close to the back panel, then test the loaded pack at home before the trip. There is no single vertical rule that fits every pack and every trail. Use the feel check that matters most: the pack should rest well on your hips and should not shift or sway while you hike. If it feels top-heavy, lower the load slightly. If it pulls you backward and makes you fight your balance, move it up.
How do I create a hiking checklist?
Build your checklist before packing, use it while loading, and update it after the trip with notes on what worked and what did not. Match the list to the way you actually pack: bottom zone, core zone, top zone, and peripheral storage. That prevents repeat misses and gives you a better starting point every time you pack for a hike.
Try a related tool
Researched and edited by the Gruv editorial team. Gruv builds cross-border billing, payouts, and finance-operations software for global businesses.
Sources
Includes 5 external sources outside the trusted-domain allowlist.
- etd.auburn.edu/bitstream/handle/10415/5659/Body_to_Backpack...trusted
- fema.gov/pdf/emergency/nims/508-8_search_and_rescue_r...trusted
- nasa.gov/wp-content/uploads/2025/08/ascension-sp-4115...trusted
- andrewskurka.com/how-to-pack-a-backpack-load-distribution-org...external
- apexproseries.com/blogs/off-season-on-point-how-to-crush-fitne...external
- camelactive.com/en/10-tips-to-pack-your-hiking-bagexternal
- dulcedom.com/blogs/tactical-gear-intel/safe-backpack-weig...external
- eu.gregorypacks.com/on/demandware.static/-/Library-Sites-gregory...external
Educational content only. Not legal, tax, or financial advice.
Related Posts

The Best Travel Backpacks for Digital Nomads
Start by ruling out bad fits, not by chasing a universal winner. If a bag does not match how you move, how you work, or what you can comfortably carry, drop it early. That matters far more than one extra pocket or a slick product page.

How to Pack Light for Long-Term Travel Without Work Disruptions
The rule is simple: pack light only if losing your main bag would not break identity, payments, health essentials, or your first work session. If those four still work from your personal item, you can travel much lighter without turning arrival day into a recovery exercise.

How to Plan a Multi-Day Hiking Trip
If you want to plan a multi-day hiking trip with fewer avoidable mistakes, treat it like something you build on purpose, not something you improvise the night before. By the end, you should have a practical phase-by-phase plan and a checklist mindset you can use right away.