
Quick Answer
Manage your personal brand as a freelancer by defining one clear offer, backing every claim with proof, and keeping the same message across your website, LinkedIn, portfolio, and proposals. Build one proof home, use one distribution channel, and review your headline, bio, scope boundaries, and proof on a weekly and quarterly schedule so your public promise stays aligned with your actual work.
Start Here and Define What You Are Managing#
Your brand is not a mood board. Think of it as the experience people have of your work: the promise you make, the proof you can show, and the way you present yourself across client touchpoints. Get that clear first, and your fit is easier to read from profile to proposal.
For freelancers, the useful definition is even simpler: a personal brand is the experience that tells people who you are and what you offer. Visuals like logos, colors, typefaces, messaging, and imagery matter, but they support the main job rather than replacing it. In practice, freelance personal branding starts with what a prospect can understand quickly. Start with one short statement that answers four questions:
- Who is the target client?
- What core problem do they have?
- What outcome do you promise to help create?
- Where does your scope stop?
Step 1 Write a scope test before you edit anything#
If your current headline, bio, or portfolio intro cannot answer those four points, you likely have a clarity problem first. A simple example is stronger than a broad one. "I write onboarding emails for SaaS teams that need better activation, but I do not take on full website copy." That gives a buyer something concrete to react to.
Use this checkpoint before you move on: after reading your intro once, could a stranger tell what you want to be known for? If not, narrow it. The usual failure mode is trying to sound bigger than you are, with labels like "full service," "creative partner," or "growth expert" that say almost nothing and make you blend in.
| Signal | Noise |
|---|---|
| Names a buyer type and problem | Says "I help everyone grow" |
| Makes one supportable promise | Stacks broad claims with no proof |
| States a boundary | Implies unlimited scope |
| Uses plain service nouns | Uses inflated identity language |
| Matches what you can show | Outruns your actual evidence |
Step 2 Align your message across key touchpoints#
Before you update every public profile, write your one-sentence positioning from Step 1 and keep the meaning consistent across your main surfaces: LinkedIn headline, website intro, portfolio bio, and proposal opener. Consistency is the goal here, not perfect wording.
Then make sure your brand elements support that same message. Your logos, colors, typefaces, messaging, and imagery should point to the same professional identity rather than sending mixed signals. If one channel describes a different offer or audience, tighten it until everything matches what you want to be known for.
Step 3 Treat channel advice as input, not proof#
Advice about channels can still be useful, but treat it as a starting point to test against your audience. Widely shared personal-branding guidance is not always current, and what works in one context may not transfer directly to yours.
Check the comments, DMs, and inquiry emails you get after posting. Are people referring to the actual problem you solve and the boundary you set? If they regularly misunderstand your offer, simplify your positioning and examples instead of broadening claims.
For a step-by-step walkthrough, see How to Create a Speaker One-Sheet for Your Freelance Business.
Gather Prerequisites Before You Edit Any Profile#
Use this as a hard publication gate: no headline, bio, portfolio caption, or proposal opener gets edited until your Brand Prerequisites packet is complete.
| Packet item | What to include |
|---|---|
| As-is snapshot | LinkedIn, your portfolio, your proposal template, and pinned posts; dated text plus links or screenshots |
| Canonical messaging map | One approved version of your offer name, target client, problem statement, outcome language, and scope boundary |
| Claim-to-proof table | For each public claim, attach one artifact and one status label: approved, needs permission, or private only |
| Records that keep client-facing copy accurate | Service terms, invoice sample, scope language from your proposal or SOW, and permission records for testimonials, names, logos, screenshots, or metrics |
| Red lines | Claim limits, confidentiality limits, and permission limits |
| Verification checkpoint | Each public claim maps to one artifact and one status label; if it cannot pass that check in under 30 seconds, it is not ready |
Step 1. Capture the current state before rewriting. Create an as-is snapshot of LinkedIn, your portfolio, your proposal template, and pinned posts. Save dated text plus links or screenshots. Alongside that, build a canonical messaging map with one approved version of your offer name, target client, problem statement, outcome language, and scope boundary. If new copy creates confusion, you need a clean rollback point.
Step 2. Build a claim-to-proof table you can draft from. For each public claim, attach one artifact and one status label: approved, needs permission, or private only.
| Claim | Artifact | Status label | Publish status |
|---|---|---|---|
| Public statement | Supporting file/link/screenshot | approved / needs permission / private only | Keep / Hold / Rewrite / Remove |
Use this decision path as you draft:
- If supported and shareable, keep it.
- If supported but permission is missing, hold it.
- If evidence exists but is private, downgrade to a process claim.
- If no artifact exists, remove the claim.
Step 3. Add the records that keep client-facing copy accurate. Keep these in the same packet:
- service terms
- invoice sample
- scope language from your proposal or SOW
- permission records for testimonials, names, logos, screenshots, or metrics
This prevents drift between profile language, proposal promises, and invoice wording.
Step 4. Set red lines so collaborators can review quickly. Write three plain-text blocks: claim limits, confidentiality limits, and permission limits. Claim limits define what you will not say without evidence. Confidentiality limits define what stays out of public copy. Permission limits define what needs explicit approval before publication.
Step 5. Run one verification checkpoint before publication. Before anything goes live, check every public claim against the packet: each line must map to one artifact and one status label. If it cannot pass that check in under 30 seconds, it is not ready.
If you want a deeper dive, read The 1% Tax Regime for Entrepreneurs in Georgia.
Lock Your Positioning So You Stop Sounding Generic#
Set one clear positioning line before you touch any more copy. If your statement could describe many freelancers, it is still generic and needs tightening.
Step 1. Write a positioning sentence you can reuse everywhere. Use this working template: I help [buyer type] solve [problem] so they can get [outcome], through [service or deliverable], within [scope boundary]. Treat it as an operating draft, not a slogan. The scope boundary keeps your headline, bio, and proposal from promising different levels of work.
Step 2. Apply the narrowing rule before adding content. If the line still fits too many freelancer profiles, tighten it by niche, use case, or delivery context first. Do that tightening now, before you publish more posts or profile edits.
| Generic claim | Specific claim | Required proof |
|---|---|---|
| Full-service copywriter | Writes onboarding and retention emails for B2B SaaS teams | Portfolio sample or approved case note |
| UX expert | Runs UX audits for checkout and signup flows | Audit sample, deliverable outline, or redacted screenshot |
| Helps brands grow | Improves trial-to-paid conversion with onboarding copy | Testimonial, result screenshot, or client-approved metric note |
Step 3. Run the specialist test and remove soft labels. Ask yourself: why would a buyer pick you over a specialist for this exact need? Replace vague terms like "full-service," "strategic," or "results-driven" with concrete service nouns, deliverables, and constraints. One freelancer described competing on a $500 React project with 47 applicants, then ending near $8/hour after unpaid proposal work, scope creep, and revisions. That is the generic-positioning trap you are trying to avoid.
Step 4. Check for interchangeable language across your core surfaces. Run this quick consistency check on your headline, bio, and proposal opener:
- same buyer type
- same problem and outcome
- same scope boundary
If those three lines do not match, your positioning is still drifting. We covered this in detail in How to Get High-Quality Backlinks to Your Freelance Website.
Build a Proof Stack Clients Can Verify Quickly#
Make your promise easy to verify before you publish more. In practice, buyers often check LinkedIn, your website, and, for technical work, code repositories first. If those surfaces show different claims or weak proof, your positioning reads like copy rather than evidence.
| Proof layer | What it includes | Notes |
|---|---|---|
| Headline proof | One short claim plus a visible signal at first contact | For example, a testimonial line, redacted deliverable screenshot, or client-approved metric note |
| Mini case | Problem, what you delivered, one constraint, and the result in a few lines | Tie it to the same promise from the last section |
| Full case breakdown | Timeline, context, constraint, deliverables, and outcome | If the full case changes the meaning of the headline, the headline is too broad |
Build proof in three layers, all tied to the same promise from the last section:
- Headline proof: one short claim plus a visible signal at first contact (for example, a testimonial line, redacted deliverable screenshot, or client-approved metric note).
- Mini case: problem, what you delivered, one constraint, and the result in a few lines.
- Full case breakdown: timeline, context, constraint, deliverables, and outcome.
Use one strict verification rule: if the full case changes the meaning of the headline, the headline is too broad. Replace generic titles with specific, searchable value language, and sanity-check wording against high-paying contract role descriptions in your niche before finalizing profile copy.
Before any claim goes live, log five fields: claim, artifact, context, constraint, permission status. If one field is missing, tighten or remove the claim. Context prevents misleading claims, and permission prevents avoidable risk.
| Claim | Supporting artifact | Caveat | Where it appears |
|---|---|---|---|
| Writes onboarding emails for B2B SaaS teams | Client-approved case note or redacted result screenshot | Metric is private, so publish only with approval or anonymize | Homepage proof strip, LinkedIn Featured |
| Runs UX audits for checkout and signup flows | Redacted audit sample or deliverable outline | If it reflects an older service model, add updated context or retire it | Portfolio page, proposal opener |
| Builds React components for product teams | Code repository, shipped screen capture, or documented contribution note | If the work was collaborative, state your exact role | Website case page, GitHub profile |
Keep one proof home base and point back to it from everywhere else. That page should include your strongest case summary, a short process outline, and links to supporting deliverables.
Then place your How I Work block before pricing as a trust-control checklist:
- sequence of work
- client responsibilities
- revision boundaries
- approval path
- scope-change handling
This protects clarity and margin. One reported failure mode was effective pay dropping to about $8/hour after unpaid proposal writing, scope creep, and revision rounds. And with no clear written agreement, even basic process issues can become ambiguous, including who sends proofs to the end client.
Final check: every line in your headline, bio, service page, and proposal opener should map to an artifact you can show, explain, and publish with permission. Once that is true, choose channels by job, not habit. Related: How to Build a Referral Program for Your Freelance Business.
Pick Channels With a Hard Priority Rule#
Do not spread yourself across every platform. Run a simple order: maintain your proof home first, use one distribution channel second, and treat any discussion channel as optional until it shows clear buyer-fit value for your work.
Step 1 Choose channel jobs before you post#
Assign one job per channel before you assign time. Your proof home is where buyers verify your claims. Your distribution channel is where people discover you and get routed back to proof. A discussion channel only stays in scope if those conversations improve question quality and follow-through.
Start with a name-search audit: Google your name, review what a buyer sees first, and check whether your headline, short bio, offer naming, and profile image present one clear identity. Hide public content you would not want clients to read out of context, and link profiles so people can move between them easily.
| Channel role | Purpose | What you publish | What you do not publish | Success signal | Risk if misused |
|---|---|---|---|---|---|
| Proof home | Verification | Case summaries, process outline, approved artifacts, clear service language | Fragmented updates without context | Buyers can verify your promise quickly | Stale proof or mixed claims reduce trust |
| Distribution | Discovery | Short proof-led posts, offer framing, links to proof home | Deep case detail that belongs in your proof home | Inquiries reference the right service or proof asset | More attention, lower-fit inquiries |
| Optional discussion | Clarification and market reading | Focused answers, caveats, process clarifications | Endless debate, unsupported claims, off-topic commentary | Questions get clearer and follow-up improves | Time drain, device overload, brand sprawl |
Step 2 Qualify channels by buyer fit, not activity#
Treat activity as noise unless it improves lead quality. Use your own buyer-fit signals, such as whether briefs describe a real problem, scope is clearer earlier, and conversations move toward serious calls instead of vague interest.
If a channel keeps generating attention but weak-fit conversations, de-prioritize it. Reallocate that time to stronger proof assets or the distribution channel that consistently sends better-fit people to your proof home.
Step 3 Expand only after your core surfaces match#
Before adding a new platform, confirm:
- Your main public surfaces use aligned offer language.
- Your profile identity is consistent enough to be clearly you.
- Your proof home and distribution channel link to each other.
- Your core process expectations are easy to find and not confusing to a new buyer.
Review channels on a fixed schedule, log each keep/cut decision, and update only the channel with the strongest buyer-fit evidence first.
Standardize Your Public Brand Surfaces#
Treat every public surface as the same identity check: each one should confirm the same offer, boundaries, and fit. When your website bio, LinkedIn headline, and pinned profile content drift, people hesitate, fill gaps on their own, and often default to price comparison. That is when your brand reads as accidental rather than deliberate.
Start with one reusable source block. Write a base statement with your core promise, ideal client, scope limits, and one proof cue. Store it in your Brand Prerequisites packet or changelog, then adapt only the length by platform, not the meaning. If one surface says "retention email strategist for SaaS teams" and another says "full-service marketer," fix the broader one.
Then run a side-by-side alignment check before you publish.
| Surface | Headline | Bio | Service names | CTA | Proof link |
|---|---|---|---|---|---|
| Website | Match source block | Clear fit and limits | Exact offer names | Contact or inquiry | Proof home present |
| Same offer language | Shortened version | Same labels | Message or site link | Proof home present | |
| Pinned post/profile intro | Same promise | Proof-led summary | No new offer names | Next step is clear | Links back to proof |
Any two rows should read like the same professional.
After copy alignment, standardize presentation. Use one approved headshot, one short bio version, one profile image style, and one client-facing tone standard. Keep your values and voice, but remove off-brand variants that make your presence feel inconsistent.
Before any update goes live, run a hygiene pass: do a cross-surface diff, log the edits, and confirm service names, boundaries, and proof links still match. A common failure is updating one profile after refining your offer and leaving the rest stale for weeks. Open any two profiles side by side and confirm they point to the same work, same fit, and same next step.
Related reading: How to Create a Signature Talk for Your Freelance Expertise.
Run a 30-Minute Weekly Maintenance Block#
Protect one recurring 30-minute weekly block so your brand stays consistent when the rest of the week gets noisy. The goal is continuity, not volume: keep your promise, proof, and buyer-fit language current before drift spreads.
Start by booking the slot and protecting it like client work. Put it on your calendar as a repeating appointment, and keep it even in busy weeks by shrinking scope instead of canceling. Putting it on the calendar also gives you a practical capacity check before overbooking turns the week into spillover work.
Next, triage inbound signals before creating anything new. Review DMs, email replies, call notes, comments, and repeated questions, then sort each item into one decision bucket: qualified lead follow-up (reply now), messaging update (fix bio/FAQ/proposal language), or ignore/archive (low-fit or noise). This keeps buyer signals ahead of random posting.
Then publish one proof-led update using the same format: problem, decision, result, caveat. Before publishing, run a claim-to-evidence check against your proof stack, approved testimonials, screenshots, or case notes. If a result is still unverified, leave it unpublished or mark it pending until the evidence and permission record is verified.
Finish by refreshing one brand surface element and logging one feedback loop note. Update exactly one item that matches the message you just published, such as a headline, pinned post line, case snippet, or proposal opener. Then record one lesson and one next action so next week starts from evidence, not memory.
When time is tight, use this order:
| Priority | Do this | Why it stays |
|---|---|---|
| Must-do | Protect the slot, triage signals, log one lesson + next action | Preserves continuity and catches fit/messaging issues early |
| Should-do | Publish one short proof-led update | Keeps visible proof current without a large content push |
| Skip | Extra posting, new channel experiments, multi-profile cosmetic edits | High effort, low decision value when capacity is tight |
If the week is crowded, keep the weekly review habit and reduce output, not the other way around.
Run a Quarterly Audit Before Brand Drift Hurts You#
Use this checkpoint to confirm one thing: your public promise, scope boundaries, and delivery reality still match across client-facing surfaces.
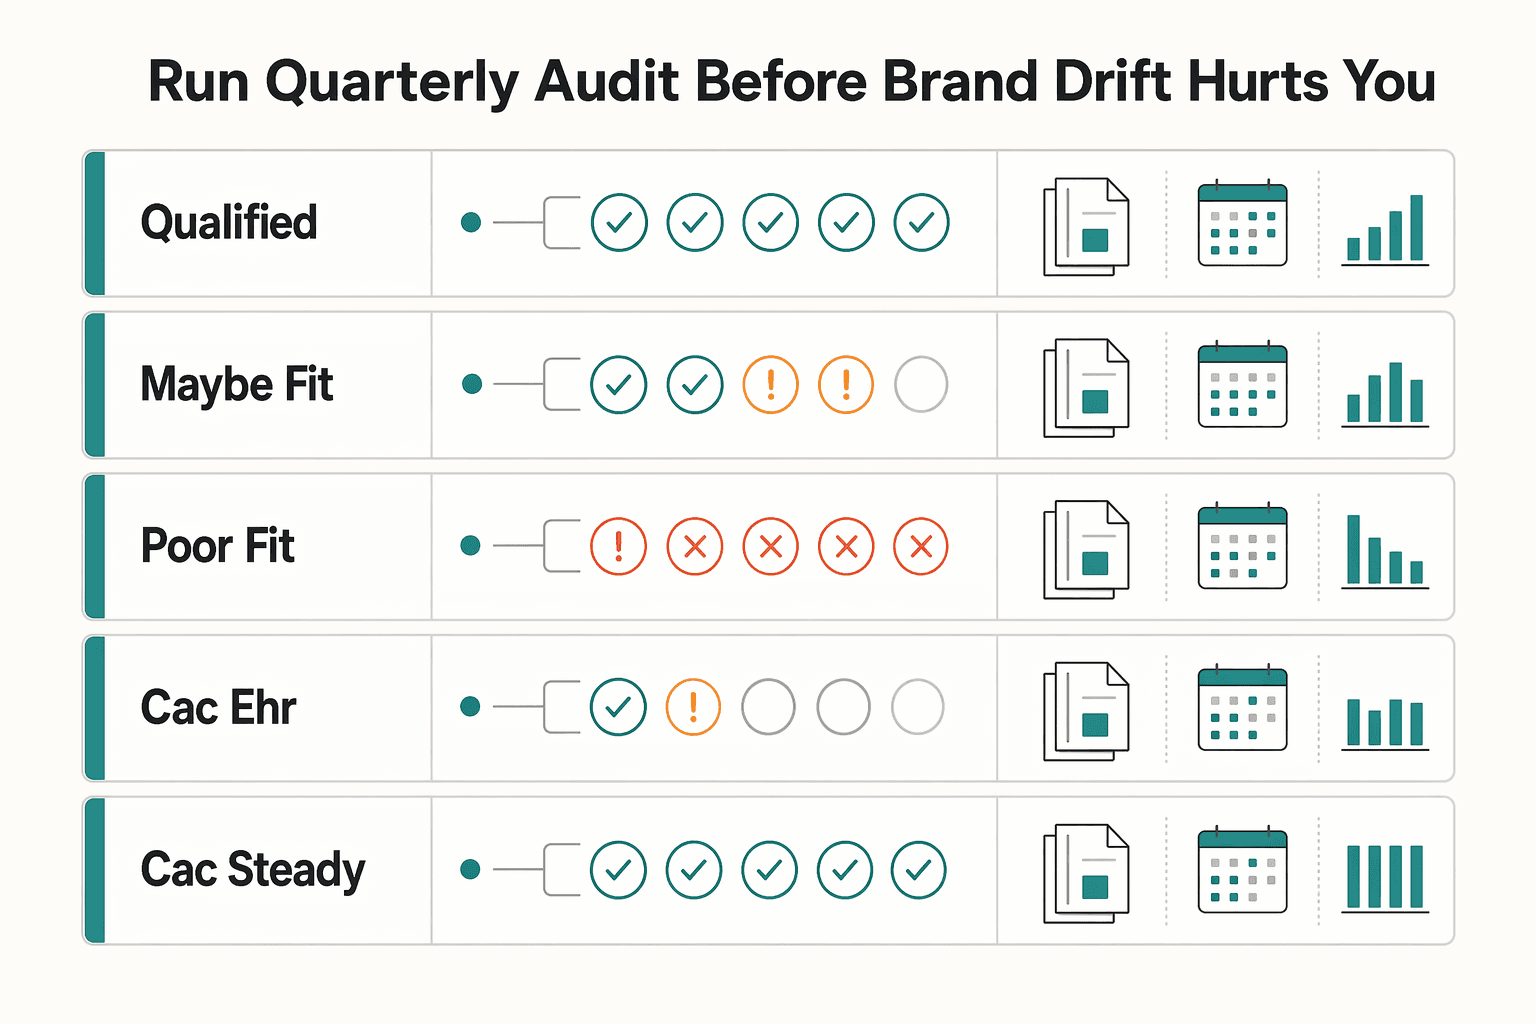
| Lead category | Next decision |
|---|---|
| Qualified | Double down on the channel, message, and proof that brought it in |
| Maybe-fit | Refine wording, examples, or boundaries so fit is clearer earlier |
| Poor-fit | De-prioritize that channel effort or tighten the entry point |
Step 1: Audit drift against one control statement. Set one master offer statement (buyer, problem, outcome, boundary), then compare your headline, bio, portfolio intro, proposal opener, and recent positioning posts against it. Flag drift where the promise is stronger than delivery, scope is looser than your proposal allows, or messaging attracts the wrong inquiries.
Use a simple audit log:
| Current claim | Delivery reality | Risk level | Required fix (owner + deadline) |
|---|
If a first-time buyer reads any two surfaces and gets different expectations, pause new publishing and fix alignment first.
Step 2: Review leads as transactions, not volume. Classify recent inbound as qualified, maybe-fit, or poor-fit based on fit with your current offer and boundaries. Capture source, requested outcome, budget realism, timeline pressure, and early scope friction, then make one decision per category:
- Qualified: double down on the channel, message, and proof that brought it in.
- Maybe-fit: refine wording, examples, or boundaries so fit is clearer earlier.
- Poor-fit: de-prioritize that channel effort or tighten the entry point.
More conversations are not automatically progress if proposal quality keeps dropping.
Step 3: Interpret economics signals as positioning feedback. Read direction, not perfection. Check CAC, EHR, and gross margin together, then decide what to change.
| Signal direction | Likely positioning issue | Next corrective action |
|---|---|---|
| CAC up, EHR down, gross margin down | You are winning lower-value work with more effort | Narrow promise, reduce weak channel effort, make boundaries explicit in bio and proposal intro |
| CAC steady, EHR down, gross margin flat/down | Message attracts interest, but delivery load is heavier than expected | Tighten "How I Work," revision limits, and approval sequence |
| CAC down, EHR up, gross margin up | Positioning is pulling better-fit work efficiently | Keep offer emphasis, refresh proof, avoid unnecessary channel expansion |
If a weak pattern repeats across the quarter, treat it as a positioning issue until your review shows otherwise.
Step 4: Refresh proof before it overstates your offer. Archive proof that no longer reflects your current scope or delivery model. Update older cases with real constraints and tradeoffs, and keep any unverified result unpublished or marked pending until the evidence and permission record is verified. For each published claim, keep a small evidence record: artifact, date checked, permission status, and publish status.
Step 5: Make a channel concentration decision before expansion. If serious inbound is concentrated in one channel, rebalance proof and visibility across your core surfaces before adding more activity. Your check is simple: if that channel goes quiet, can a buyer still find your offer, understand boundaries, and verify proof elsewhere?
You might also find this useful: How to Build a Waitlist for a New Freelance Service.
Add Brand Risk Controls Most Articles Skip#
Trust protection here is operational: run checks before publishing and after delivery so your public claims stay tied to real evidence.
Step 1. Put every material claim through a claim-to-evidence gate before publish. Treat headlines, testimonials, client logos, outcome statements, and expert claims as publishable only when each one maps to a specific artifact you can retrieve fast. Use artifacts like approved testimonials, case notes, dated work samples, screenshots, or written approvals. If you cannot find the backing artifact quickly, rewrite the line or remove it.
Use a quick name-search audit as a control point: what do people see first, and does the same core promise appear across those touchpoints? Keep style flexible by channel, but do not let stronger language outrun weaker proof.
Step 2. Keep lightweight records, and pause promotion when records and messaging diverge. Use a simple per-project record set: proposal versions, approvals, scope-change notes, delivery notes, and billing trail. Then compare your public promise with what those records show. If your messaging says one thing and project evidence shows another, pause that claim until delivery reality matches it again.
Step 3. Follow a short response protocol when criticism appears. Decide response location first, then evidence boundaries, so you do not escalate risk with reactive replies.
| Situation | Where to respond | Evidence safe to share |
|---|---|---|
| Factual error in a public post | Public | Correction plus non-private, dated support |
| Account-specific dispute | Brief public acknowledgement, then private | Process summary only, no private project details |
| Wording dispute with a client or collaborator | Private first | Approved draft, change history, exact disputed line |
Your channel style can vary. Your proof standard cannot. Revisit these controls whenever your offer changes, your scope boundaries move, or your client mix shifts.
Fix the Most Common Mistakes and Recover Fast#
With risk controls in place, recovery is a triage workflow: name the failure type, make one immediate correction, then update your next client-facing message before the next touchpoint.
Step 1. Identify the failure type before you respond. Sort the issue into one bucket: generic messaging, wrong response path, underpricing with overcommitment, or weak accountability. Prioritize in this order: client impact first, communication speed second, evidence-backed next step third. If details are unclear, acknowledge briefly, then check your proposal version, approvals, scope notes, and delivery record before adding more.
Step 2. Make one correction that changes reality now. If your messaging is generic, reset positioning to one target client, one problem, and one scope boundary, then remove any claim you cannot support with proof.
If your response path is the problem, stop reactive posting and use the channel that best serves the client. Keep public comments factual, and move specifics to private discussion when risk, multiple contributors, or unclear communication are involved.
If you underpriced and overcommitted, treat it as an operations control failure. Reset scope, timeline, revision limits, and delivery terms in writing, then review contracts, invoicing, time tracking, and payment tracking. Recheck your billable rate range against overhead and personal financial needs, and confirm whether retainer or project budget is the better fit for that engagement.
Step 3. Update your client-facing message with facts only. Before your next touchpoint, state what happened, what changed, and what clients should expect now. Avoid blame, speculation, and promises you have not operationalized.
| Common mistake | Immediate fix | Proof required | Preventive control |
|---|---|---|---|
| Generic messaging | Rewrite around target client, problem, and scope boundary | Work sample, approved testimonial, or case note tied to the claim | Claim-to-evidence check before publishing |
| Reactive response path | Pause reactive posting and choose a client-first channel | Proposal version, approvals, scope notes, delivery record | Response protocol with public vs. private rules |
| Underpricing and overcommitment | Reset scope, timeline, revision limits, and terms in writing | Updated agreement, invoice plan, time and payment records | Rate-setting check that includes overhead, personal financial needs, and capacity |
| Weak accountability | Publish a factual ownership update | Timeline of decisions and approved changes | Standard update format: what happened, what changed, what to expect now |
Need the full breakdown? Read A guide to the 'Mere-Exposure Effect' for building your personal brand.
Put This Into Practice This Week#
Run a one-week sprint: lock your positioning, assign clear channel roles, refresh proof, sync profiles, publish one value-first update, and log your records. Keep it simple and executable.
Use a two-channel setup for this week so you can tighten consistency faster: one proof home and one distribution channel. This is a practical working constraint, not a universal rule. Choose channels based on where your buyers already look for you, and keep at least a minimal public profile so people can verify you are real.
| Channel role | Option | Use this when | Decision check |
|---|---|---|---|
| Proof home | Portfolio/site service page | Buyers need to evaluate your work and offer clearly before reaching out | Can someone quickly confirm what you do, who you help, and what proof supports it? |
| Proof home | Simple proof page (for example, Notion) | You need a lightweight place to keep proof current | Are your examples specific enough to trust, not just polished claims? |
| Distribution channel | Prospects search your name and compare profiles there | Are conversations improving, or are you getting attention without fit? | |
| Distribution channel | Newsletter | You already have warm readers and can publish consistently | Are you sharing practical value, not posting just to grow followers? |
- Write your one-sentence promise and your no-list.
- Choose your two channels for this sprint and assign their roles: proof home vs distribution.
- Update your claim-to-evidence table and remove or rewrite any unsupported line.
- Refresh one proof asset in your proof stack.
- Sync your key public surfaces so your headline, bio, and offer language match.
- Publish one proof-led update focused on value, not vanity metrics.
- Schedule your next weekly maintenance block and your quarterly audit, then save this week's screenshots, approvals, and proof artifacts in one folder.
Before you move on, confirm this checklist is complete:
- One-sentence promise and no-list finalized
- Two channels selected with clear roles
- Claim-to-evidence table updated
- One proof asset refreshed
- Core profiles and proposal language synced
- One proof-led update published
- Weekly maintenance and quarterly audit scheduled
- Records saved in one place
If anything is incomplete, finish it before adding another channel or increasing posting volume.
This section pairs well with How to Write a Compelling 'About Me' Page for Your Freelance Website. If you want help validating operational setup details for your context, Talk to Gruv.
Frequently Asked Questions
What does freelance personal branding look like when you only have a few hours per week?
You do not need to be active everywhere. Start with one proof home and one distribution channel, then use a short weekly block to refresh one key asset and publish one proof led update. After a name search check, your headline, bio, and offer naming should match across the surfaces clients see first.
Which proof assets matter most before you spend time posting?
Start with proof clients can verify quickly. Use one headline proof, one mini case, and one fuller case with context, constraint, and result, and consider adding a How I Work block before pricing in proposals. If a claim cannot be tied to a document, work sample, testimonial, or case note, rewrite it or remove it.
How do you choose between LinkedIn, a portfolio site, and a newsletter first?
Choose the first channel by buyer behavior and the proof format you can maintain. Start with a portfolio site if clients need deeper evaluation before they inquire, LinkedIn if they search your name and compare profiles there, or a newsletter if you already have warm readers and enough proof led material to send consistently. If a channel brings attention but weak briefs, reduce effort there and invest more in proof assets instead.
What should you publish if you cannot share client names or exact numbers?
Publish the parts that still show judgment, such as the problem, constraint, decision, delivery sequence, and any caveat about what the client had to provide. Anonymized mini cases from process notes, portfolio excerpts, experience, or education can still be credible if the claim stays specific and your permission status is clear. Avoid vague growth claims that have no proof behind them.
How do you correct inconsistent messaging without rebuilding everything?
Do not start from scratch. Compare each public surface to one master offer statement, then fix the lines that disagree on your homepage headline, LinkedIn bio, proposal intro, and service page first. The goal is simple: all four should name the same buyer, business problem, and scope boundary.
Try a related tool
Researched and edited by the Gruv editorial team. Gruv builds cross-border billing, payouts, and finance-operations software for global businesses.
Sources
Includes 3 external sources outside the trusted-domain allowlist.
- mccb.edu/about/publications/ucnstrusted
- waketech.edu/programs-courses/non-credit/workforce-traini...trusted
- waketech.edu/programs-courses/non-credit/personal-enrichmenttrusted
- blog.freelancersunion.org/2018/03/07/personal-branding-for-freelancers...external
- kittl.com/blogs/how-to-build-a-personal-brandexternal
- wip.co/posts/personal-branding-freelancing-doable-w...external
Educational content only. Not legal, tax, or financial advice.
Related Posts

Georgia 1% Tax for Entrepreneurs Without Filing Surprises
Treat Georgia's 1% tax path as a compliance question first and a rate discussion second. The goal is a setup you can defend under review, not a shortcut that fails at filing time.

Build a Freelance Referral Program Without Payout Disputes
Your week one control set is a practical baseline: the offer, the Referral Program Terms and Conditions, and the decision log. If a payout decision cannot point to one clause in the terms and one dated record entry, you are not ready to launch.

How to Build a Waitlist for a New Freelance Service
**Build your freelance waitlist like an operator: treat it as a controlled intake pipeline, not just a "collect emails" project.** You're the CEO of a business-of-one. Your waitlist is how you control demand without letting demand control your calendar. The goal is simple: avoid calendar chaos during your next service launch and keep records clean if you ever need to explain who got offered what, when, and why.