
Quick Answer
To keep valuables safe while traveling, run a repeatable playbook instead of relying on ad hoc tips. Split critical items across separate locations, choose one carry profile per day, and keep behavior controls consistent in transit and crowded zones. Carry only what you need, store backups separately, and use a simple first-hour response plan so one loss does not shut down your trip or workday.
You are not careless, you are under-specified and this playbook fixes that#
You are not failing at travel security. You are operating without a clear spec. If your goal is to keep valuables safe traveling, you need a repeatable playbook, not another pile of tips.
A strong playbook does not try to predict every situation. It gives you tools to think through hard decisions when conditions change. You will use one simple operating model before departure, during transit, and through long-stay routines as a digital nomad.
Before You Start#
Build your baseline once, then repeat it regularly. The goal is to stop improvising when you are tired, rushed, or distracted.
| Step | Default | Verification |
|---|---|---|
| List your critical assets | Write passport, wallet, phone, primary payment method, and backup payment method in priority order | You can say which items are most critical to keep accounted for while moving |
| Assign one default home for each item | Decide where each item normally lives during movement days versus settled days, and keep that map consistent | You stop making ad hoc carry decisions |
| Choose one carry profile for the day | Pick one setup you will use, then keep the same pocket and bag map all day | You can check your setup in seconds before leaving any location |
| Set an incident switch now | Decide your first moves after theft or loss: protect what remains, move to backup access, and continue from a reduced-risk setup | You can execute your first actions from memory |
When you arrive tired and walk into a crowded station, you do not improvise. You run your profile, keep your most critical items consistently placed, carry only what you need day-to-day, limit unnecessary exposure, and keep your carry under your control. That is the point of a spec: not having all the answers, but having defaults that help you think and act consistently when it gets messy.
What should you prepare before departure?#
Prepare a tiered carry system before departure so your passport, wallet, and phone never sit in one failure point.
Lock your pre-departure defaults now so you are not negotiating security decisions on travel day. Keep this setup fast to run and easy to repeat.
Before you start#
On-person rule means you keep core identity and access items physically with you while moving. Use this as your base travel security rule, because thieves often target vacationers in tourist areas and go for easy-access items like phones and other grab-and-go valuables.
| Tier | Items | Default home before and during movement |
|---|---|---|
| Critical | passport, phone, primary card | On-body, split across positions (for example phone in a front pocket, passport in a money belt worn under clothing) |
| Operational | daily wallet cash and one payment method | Front-access pocket or a close-to-body bag you keep in your control |
| Backup | reserve card and contingency cash | Separate from daily carry, stored securely when you are stationary (when available) |
- Step 1. Build your valuables inventory. List each item by tier and mark what never leaves your body versus what can stay in accommodation storage.
Verification point: You can point to one default location for every item without debating it.
- Step 2. Assemble and test your base kit. Pack a
money belt(under-clothing pouch) or other on-body carry option for essentials, then wear your full setup at home, walk, sit, and pay for a small purchase to test comfort and access speed.
Verification point: You can retrieve essentials quickly without exposing everything else.
- Step 3. Confirm accommodation storage in advance. Ask each property what secure storage options exist (if any) and where they are. Set a simple room-entry and room-exit check so you do not leave key items behind.
Verification point: You have a written storage rule before arrival day.
- Step 4. Create a failover packet and keep it separate. Keep backup access items away from daily carry, and align it with your work cadence as a digital nomad. If your
phonedisappears during a transit day, you switch to backup access immediately instead of losing your full operating day.
Verification point: You can continue work and payments from your backup setup. For device prep, use How to Secure Your Devices for International Travel.
If you are still deciding your main bag, this pairs well with: The Best Travel Backpacks for Digital Nomads.
Which carry setup wins on airport day, transit day, and city day?#
Use a scenario-based carry profile: keep identity items on-body for airport and rail movement, then switch to controlled daily carry in city mode.
Stop choosing your carry setup based on mood. Choose it based on the environment, then run it consistently.
Run this scenario matrix#
| Scenario | Default setup | What you protect first | Behavior rule |
|---|---|---|---|
| Airport day | money belt for passport and core documents, minimal wallet, phone on-body | Identity and account access | Keep essentials on your person from check-in to arrivals |
| Rail or crowded transit day | money belt plus locked cross-body bag with low-value daily items | Passport and primary access items | In dense transit zones, keep bag in front and never behind your back |
| City workday | Locked cross-body bag or anti-theft bag, slim wallet, phone in front-access position | Daily spend tools and communication | Expose phone only when needed, then stow it before moving again |
| Flight seat time | On-body carry for passport, wallet, phone | Core valuables during in-flight theft risk | Do not leave critical items in seat pockets or unattended overhead bins |
Pair gear with behavior controls#
- Step 1. Choose one profile before you leave your room. Commit to airport, transit, or city mode and do not mix setups mid-day.
Verification point: You can name where passport, wallet, and phone sit before you step outside.
- Step 2. Treat
anti-theft bagfeatures as delay tools, not guarantees. Zippers, clips, and hidden pockets can help, but they do not guarantee theft prevention.
Verification point: You keep your bag in front at crowd bottlenecks and avoid distracted phone use.
- Step 3. Add luggage controls for transfer windows. Use luggage straps to reduce accidental opening risk, and use TSA security locks on checked bags so the lock is less likely to be cut if TSA inspects your luggage.
Verification point: You lock, strap, and label once, then move without rechecking every minute.
- Step 4. Rehearse one dense-zone script. When you enter a packed station after a long day, zip the bag, shift it to front carry, keep your phone put away, and move with intent.
Verification point: You can run the same script under fatigue without improvising.
Where should each valuable live while moving between room, street, and workspaces?#
Assign one fixed home for each valuable in each environment, then keep those homes consistent throughout your stay.
Once your carry profiles are set, remove the next source of mistakes: item drift. Extended stays create more chances for something to end up in a random pocket or get left behind. Control that risk with a simple map.
Assign fixed homes by context#
| Context | Keep on-body | Store separately | Quick rule |
|---|---|---|---|
| Transfers between locations | passport (as needed), phone, one payment card | Reserve cash and backup card in secure accommodation storage (for example, an in-room safe when provided) | Never carry all access items together |
| Street and daily movement | Slim wallet, phone, a bag you can keep close and controlled | Passport only if required for that day | Keep your bag in a position you can monitor |
| Room time | phone and primary card within reach | Backup items locked away, not in the same pouch as daily carry | Separate daily and backup kits before sleep |
| Work blocks in shared/public spaces | phone, slim wallet | Identity document stored securely unless needed | Keep sensitive items close, not left out |
Run entry and exit routines#
- Step 1. Harden the room on arrival. Lock the door fully, check windows and any connecting doors, then locate two ways out and note where alarm points are.
Verification point: You can leave the room knowing your controls and emergency route.
- Step 2. Split access across two places. Keep
phoneand a primary card on-body, and keep reserve cash or a backup card in separate accommodation storage.
Verification point: A single loss is less likely to take out both money access and communication.
- Step 3. Validate security signals fast. Prefer properties with active front desk presence, visible common-area cameras, and good hallway lighting. If you're using a storage facility, look for indoor units, 24/7 surveillance, and access control systems (like electronic gate or keycard entry) where available.
Verification point: You can explain why you trust the storage environment.
- Step 4. Rehearse under fatigue. When you return late, run the same moves: stow backup items, reset tomorrow's carry map, and do a final visual sweep.
Verification point: You can execute the routine reliably. For phone-hardening travel tips, see How to Secure Your Devices for International Travel.
How do you run the first-week relocation security routine without friction?#
Run one repeatable daily routine for your first week, and keep your carry map, pocket map, and closure checks identical until habits become automatic.
You already have fixed homes. Now you install the habit loop. The first week is when people often misplace items, expose valuables, or make inconsistent choices, not because they are reckless, but because everything is new and they keep changing the system.
Follow a Day 1 to Day 3 habit loop#
| Day window | Non-negotiable routine | Outcome to verify |
|---|---|---|
| Day 1 | Use the same money belt or front-worn cross-body bag, same pocket map, same slim wallet contents | You can check passport, phone, and wallet in seconds |
| Day 2 | Repeat Day 1 and add closure checks on your bag before each move | You stop making ad hoc carry decisions |
| Day 3 | Keep the same setup in crowded transit and tourist routes | You stay consistent when pressure and distractions rise |
- Step 1. Start each day with one carry profile. Pick your profile before leaving your room and do not switch mid-day unless conditions clearly change.
Verification point: You can state where passport, phone, and primary card live before you walk out.
- Step 2. Keep one-card daily exposure. Carry only the card you need in your daily wallet, and keep backup cash or backup access separate.
Verification point: One grab cannot wipe out your full payment stack.
- Step 3. Use front-control posture in dense movement. Wear your cross-body in front, keep zippers closed, and avoid back-pocket storage where silent lifting happens.
Verification point: You keep valuables in sight during crowd bottlenecks.
- Step 4. Plan routes for lower friction. Favor daylight movement and well-traveled, lighted thoroughfares when possible.
Verification point: You reduce rushed decisions in unfamiliar areas.
Add work-session rules you can repeat#
If you work from coworking spaces or cafes, keep your behavior simple and strict.
- Keep
phoneandwalleton your body, not on the table when you step away. - Keep
passportoff-table and off seat-back storage. - Run a two-touch exit check: pocket pat plus bag zip check before you move.
When you finish a cafe call and head into a packed station, run the same rule set. Bag controlled in front, phone stowed, movement intentional. Consistency is the security feature.
If you want a deeper dive, read The 2025 Global Digital Nomad Visa Index: 50+ Countries Compared.
How much security gear is useful and what is just clutter?#
Carry the smallest kit that supports your routine, then let prevention and behavior do most of the protection work.
Once your habits are stable, trim anything that adds friction. Petty theft is a bigger risk in tourist-heavy areas, and it gets easier when you are distracted. Your first control is still how you carry, not how much you carry. The more you are loaded down with valuables, the more you stand out.
Keep a lean kit and assign each item a job#
| Gear | Role | Keep daily or situational | Decision rule |
|---|---|---|---|
money belt | On-body protection for passport and critical access | Situational | Use when you need essentials continuously on-body (for example, in dense, fast-moving situations) |
small daily bag | Controlled carry for active-use items | Daily, choose one | Keep it closed and in your control, and do not treat it like a vault |
luggage straps | Reduce accidental opening risk during transfer windows | Situational | Use them to cut down opening risk, then stop fiddling with your bag |
TSA security lock | Checked-bag control | Situational | Use on checked bags so the lock is less likely to be cut if TSA inspects your luggage |
Use an if then filter before you pack each day#
- Step 1. Choose one carry system. Pick one daily bag for the day, then pair it with your
money beltonly when conditions justify it.
Verification point: You can explain why each carried item is there.
- Step 2. Apply your if then rules. If transit is crowded or you will be moving through tourist zones, move passport and critical access on-body. If it is a stable workday, carry fewer valuables and keep your setup simple.
Verification point: You make one decision per context, not ten per hour.
- Step 3. Reject social-proof clutter. Treat online advice as idea pools, not operating manuals. Keep only what you can convert into a repeatable rule inside your digital nomad safety routine.
Verification point: Every item maps to one behavior.
What mistakes cause most losses and how do you recover in the first hour?#
Most losses get worse through avoidable compounding errors, so separate critical assets and stop carrying valuables where they can be snatched.
Now you need failure control. Even a good system gets tested when you are rushed, tired, or distracted. Your job is to prevent a small problem from becoming a total shutdown.
Catch the three mistakes before they stack#
A common failure starts with single-point failure: you keep your passport, your wallet, and your cards in one place, then one grab threatens everything at once. The fix is simple: do not let identity and payment access live in the same single grab point.
| Mistake | What happens | Correction |
|---|---|---|
| Single-point failure | Passport, wallet, and cards are kept in one place, so one grab threatens everything at once | Do not let identity and payment access live in the same single grab point |
| Snatch theft exposure | Valuables are carried where somebody can quickly grab them | Keep your carry tight and closed in busy areas, and avoid handling or exposing key items where they can be snatched |
| Rebuilding the same risk after a scare | Everything goes right back the way it was after a near-miss | Split identity, payment, and backup access across separate locations so one loss cannot take all of it |
The second failure is snatch theft exposure. If your valuables are carried where somebody can quickly grab them, you are betting your whole trip on a stranger not trying. Keep your carry tight and closed in busy areas, and avoid handling or exposing key items where they can be snatched.
The third failure is rebuilding the same risk after a scare. After a near-miss, people put everything right back the way it was. Instead, treat it as a reset moment: split identity, payment, and whatever backup access you have across separate locations so one loss cannot take all of it.
In the first hour, focus on stopping compounding mistakes#
Your recovery goal here is not a perfect process; it is continuity: secure what you still have, reduce how snatchable it is, and write down what happened while it is still clear in your head. If device exposure is part of your risk, use How to Secure Your Devices for International Travel as a follow-up reference.
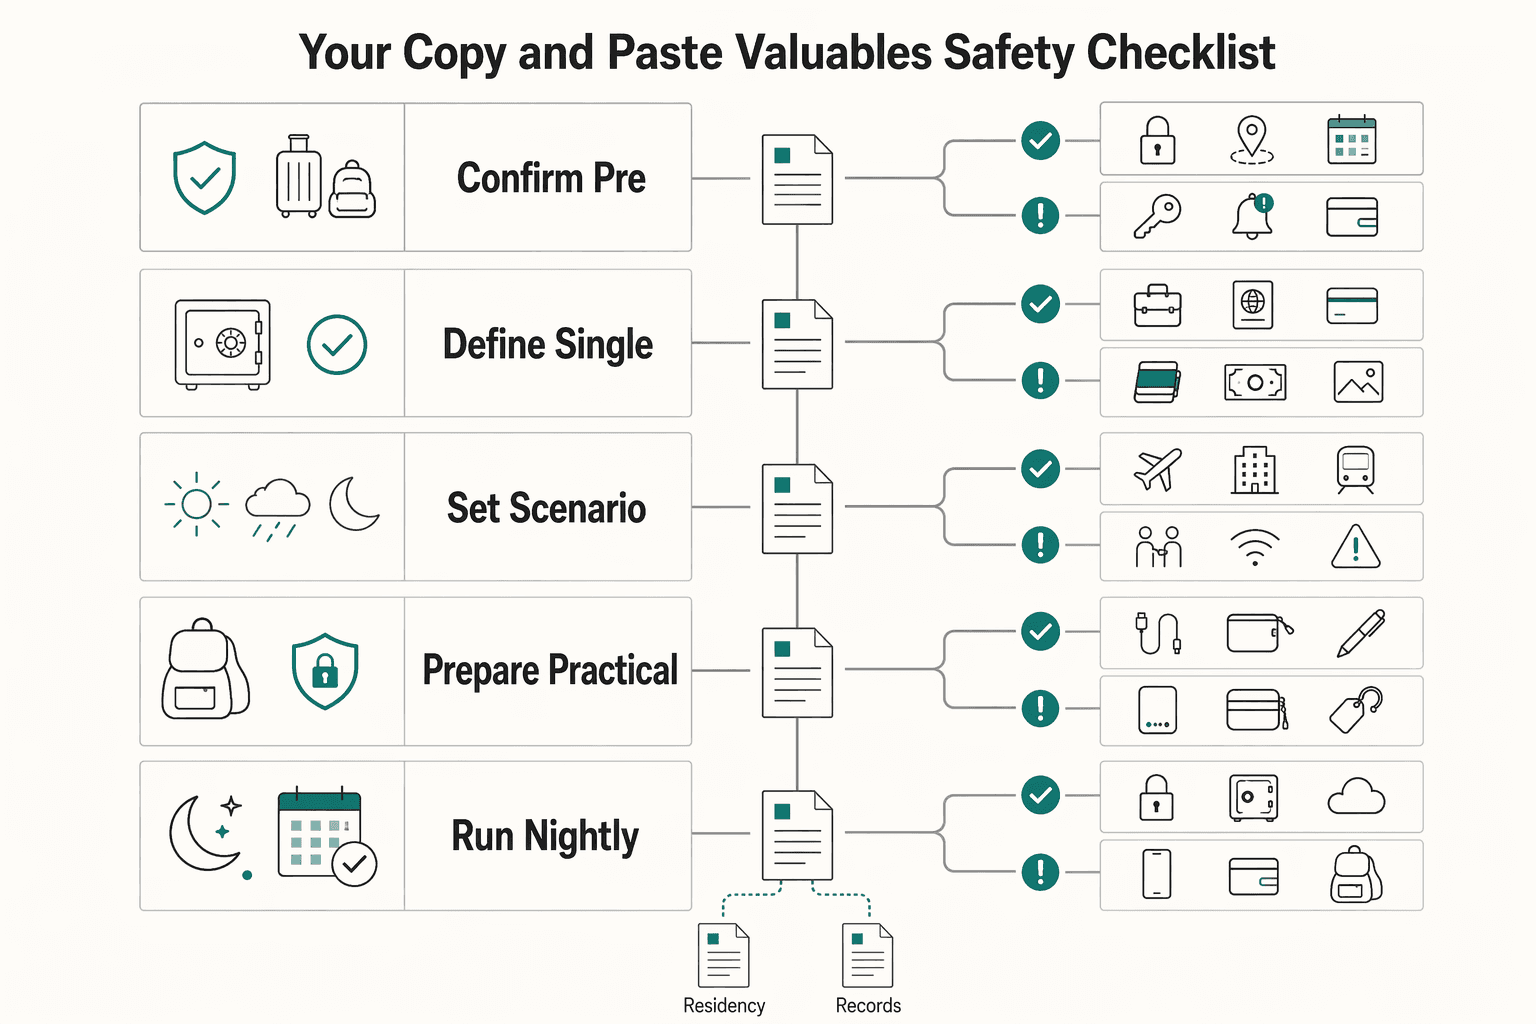
Your copy and paste valuables safety checklist#
Run this checklist with clear defaults you can repeat under pressure.
| Step | Action | Verification |
|---|---|---|
| Confirm pre-departure readiness | Validate that passport, visa, and travel insurance are current well before departure; create digital and printed copies of essential documents; pack and test your chosen secure carry option at home | You can quickly find every essential document copy without digging |
| Define a no single-point-failure carry map | Assign fixed homes for passport, wallet, phone, and backup access items so one loss cannot remove identity and payment at the same time | You can state where each critical item lives during transit and during work hours |
| Set scenario rules before you leave the room | In airports, public transit, and other dense crowds, keep an eye on your belongings; in shared spaces, keep track of your bags and gadgets; avoid unlit, deserted areas at night | Your rules fit on one screen note you can check fast |
| Prepare a practical loss response card | Write down what you will do if theft or loss happens and where your backups and copies live; store this card in digital and printed form with your document copies | You can follow your response from the card without improvising |
| Run a nightly reset | Confirm item locations, and stage next-day carry so morning decisions stay simple | You end each day knowing where your essentials and backups are |
Convert the playbook into a daily system so travel security becomes routine, not guesswork.
- Step 1. Confirm pre-departure readiness. Validate that
passport, visa, and travel insurance are current well before departure. Create digital and printed copies of essential documents, and exchange copies with your travel partner if you have one. Pack your chosen secure carry option (for example a concealedmoney beltor a secure travel pouch) and test access at home.
Verification point: You can quickly find every essential document copy without digging.
- Step 2. Define a no single-point-failure carry map. Assign fixed homes for
passport,wallet,phone, and backup access items so one loss cannot remove identity and payment at the same time. Keep track of your bags, important documents, and gadgets like phones and cameras. Use a concealedmoney beltor secure travel pouch for the items you cannot afford to lose.
Verification point: You can state where each critical item lives during transit and during work hours.
- Step 3. Set scenario rules before you leave the room. In airports, public transit, and other dense crowds, keep an eye on your belongings. In shared spaces (including workspaces), keep track of your bags and gadgets. For evening movement, avoid risky situations such as unlit, deserted areas at night and stay alert in busy tourist zones.
Verification point: Your rules fit on one screen note you can check fast.
- Step 4. Prepare a practical loss response card. Write down what you will do if theft or loss happens and where your backups and copies live. Store this card in digital and printed form with your document copies.
Verification point: You can follow your response from the card without improvising.
- Step 5. Run a nightly reset. Confirm item locations, and stage next-day carry so morning decisions stay simple. If you walk out tired after a long day, this reset protects your routine from rushed mistakes.
Verification point: You end each day knowing where your essentials and backups are.
Want to confirm Gruv coverage for your specific country/program? Talk to Gruv.
Frequently Asked Questions
What are the safest ways to carry a `passport`, cards, cash, and `phone` while traveling?
Keep critical valuables in hand baggage, not checked baggage. Keep essentials with you, and avoid keeping everything in one place so a single loss does not wipe out access. Also lock your travel bags both when you’re carrying them and when you’re leaving them in your room.
Is a `money belt` better than an `anti-theft bag` or `cross-body bag`?
Do not chase one universal winner. Pick the carry method you can keep consistently secured and closed, and keep your most important items on you. The best setup is the one you can manage under stress without getting sloppy.
Should I keep valuables in a `hotel safe` or carry them on me?
Carry only what you need for the day and store backups separately. If the property offers a hotel safe, it is typically more secure than an in-room safe. If your stay feels less controlled, tighten room routines and keep critical identity items with you.
How much cash should I keep in my daily `wallet` versus backup storage?
Set cash by exposure, not habit. Keep only same-day spend in your daily wallet, and keep reserve cash in separate storage so one loss does not stop your week. If you are carrying high-value goods across borders, check reporting rules before you travel (for example, entering the U.S. has specific reporting requirements for goods valued at USD $10,000 or more).
What should I do in the first hour if my valuables are stolen abroad?
Prioritize getting stable first. Secure what remains, write down what you can remember, and be ready to prove ownership if you need to report the loss. If you made a pre-trip visual inventory of what you packed, it can help with a police report or ownership questions.
Which anti-theft items are essential and which are optional for a `digital nomad`?
Lock your travel bags, both when you’re carrying them and when you’re leaving them in your room. Treat a small padlock as optional support: a simple padlock can deter opportunistic theft, but behavior does most of the protection work.
How should I secure valuables during coworking days and transit-heavy days?
Assume travel can be a targeting environment and keep your valuables under control. Keep valuables with you (not left loose or unattended), and lock your travel bags both while carrying them and when leaving them in your accommodation. For a tighter device routine, use How to Secure Your Devices for International Travel.
Try a related tool
Researched and edited by the Gruv editorial team. Gruv builds cross-border billing, payouts, and finance-operations software for global businesses.
Sources
- astoria.gov/Assets/dept_13/pm/pdf/2013%20astoria%20trans...trusted
- in.gov/che/cte/files/NLPS-Review-Doc_Update_07.31.2...trusted
- oecd.org/content/dam/oecd/en/publications/reports/200...trusted
- research.fit.edu/media/site-specific/researchfitedu/coast-cli...trusted
- webapps1.chicago.gov/ChicagoAlertWeb/resources/pdf/Holiday_Safety...trusted
Educational content only. Not legal, tax, or financial advice.
Related Posts

The 2026 Global Digital Nomad Visa Index for 50+ Countries
Start with legal fit, not lifestyle filters. The practical order is simple: choose a route you can actually document, then decide where you want to live. That single change cuts a lot of wasted comparison work and stops you from falling in love with places that were never a real filing option.

The Best Travel Backpacks for Digital Nomads
Start by ruling out bad fits, not by chasing a universal winner. If a bag does not match how you move, how you work, or what you can comfortably carry, drop it early. That matters far more than one extra pocket or a slick product page.

How to Secure Your Devices for International Travel
If your income runs through your phone and laptop, device security is continuity planning, not a gear-shopping task. The goal is simple: keep delivery, billing, and recovery moving when travel conditions change faster than expected.