
Quick Answer
To handle quickbooks billable expenses, run a repeatable reimbursement system instead of ad hoc bookkeeping. Classify each cost, capture proof at entry, assign it to the right customer, pull it into the next client invoice, and confirm payment before closing the item. Set plan and menu-path guardrails, validate setup with a test transaction, and use weekly A/R reviews to escalate aging reimbursements early.
Stop funding client work out of your own pocket#
Treat QuickBooks billable expenses as a reimbursement system, not just a bookkeeping feature, so you recover client project costs through invoices instead of absorbing them.
If you bill clients, cash often leaves your account before payment shows up. This guide gives you a repeatable system: decide if a cost is reimbursable, capture proof, attach it to the right client, invoice on schedule, and confirm the money actually lands. If you run a business-of-one, reimbursements need to work like a system, not a memory game.
A billable expense is a cost you incur on a client's behalf that you track for reimbursement through client invoicing. Keep that definition tight, and your bookkeeping stays clean. You separate reimbursement decisions from pricing decisions, protect margin, and keep project costs visible until they are reimbursed. Run this safe-default workflow on every engagement:
- Classify each spend immediately. Choose one status: billable now, billable after approval, or absorbed.
- Capture evidence at the point of entry. Record receipt, vendor, date, client, and project so disputes stay short and factual.
- Invoice on a fixed cadence. Pull approved billable expenses into your next invoice run instead of waiting for cleanup later.
- Collect and verify payment. If
QuickBooks Paymentsfits your setup, offer the online payment path and confirm settlement before you close the item.
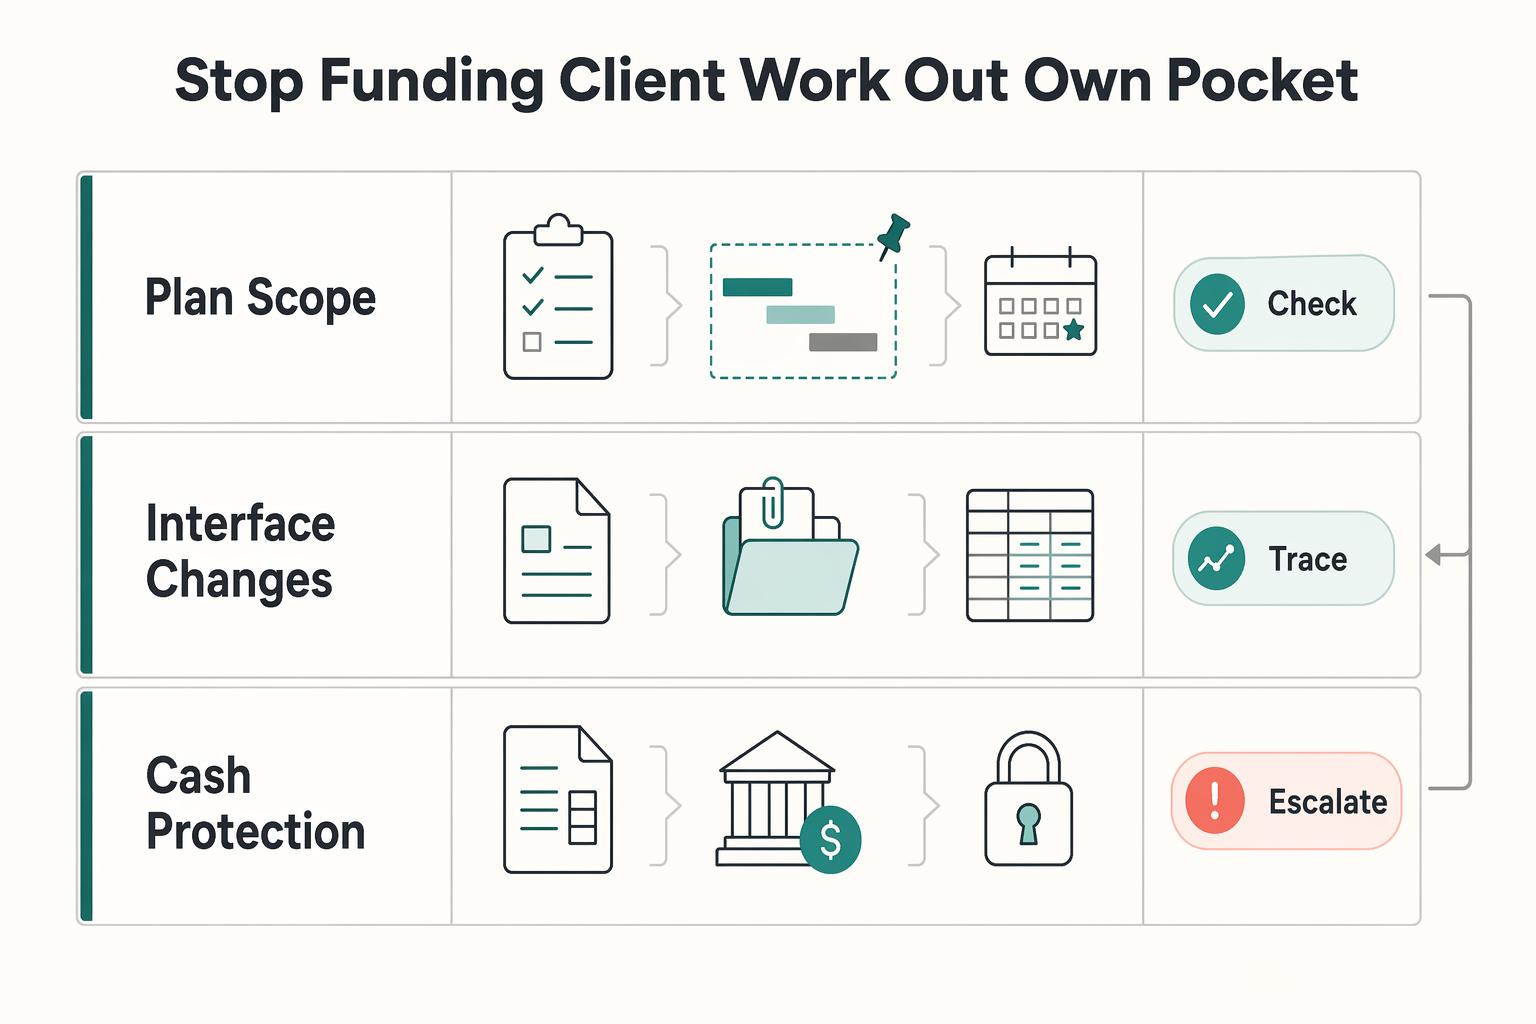
| Guardrail | Safe default |
|---|---|
| Plan scope | Build this workflow first for QuickBooks Online Plus and QuickBooks Online Advanced. If you use another plan, verify behavior in your own account before rollout. |
| Interface changes | Expect QuickBooks screens to change over time. Route by current labels and expense settings, not memory from old walkthroughs. |
| Cash protection | Pause new client-funded project costs when unreimbursed items keep aging. Escalate before you keep spending. |
If a client asks for an extra tool to complete the work faster, log it the same day. Tag it to the client, attach evidence, and queue it for the next invoice. No ambiguity, no hidden leakage, and no avoidable back-and-forth.
What should you prepare before touching QuickBooks?#
Prepare four items before setup: confirm your menu path, lock your reimbursement rules, define evidence standards, and choose your collection method.
Before you change settings, lock in the inputs that keep this system consistent under pressure. The goal is simple: your billable-expense process should support real client invoicing, not drift into improvisation.
- Step 1 Confirm your product and plan. This workflow targets QuickBooks Online Plus or Advanced. Open Settings, Account and settings, Expenses, then Bills and expenses. QuickBooks Desktop preferences are a different product workflow; do not use them as an alternate Online menu.
- Step 2 Write your reimbursement policy. Define what counts as billable expenses, what needs pre-approval, and what you always absorb as internal overhead. Add one line for items that must never appear on a client invoice. Keep this separate from pricing strategy so reimbursement and markup decisions stay clean. If you need a pricing framework, review Value-Based Pricing: A Freelancer's Guide.
- Step 3 Set your evidence standard for every charge. Require a consistent record before anyone marks an item ready for invoicing, such as receipt details, vendor, project, date, and client. Then define where your team reviews open reimbursable items each week.
- Step 4 Choose your payment path upfront. Decide whether you will include
QuickBooks Paymentslinks when available, and define who owns follow-up when an invoice stays open. This keeps collections predictable once project costs move onto invoices.
| Prep area | Safe default | Verification point |
|---|---|---|
| Product context | Document your exact menu route in your SOP | You can get to the billable expense controls without guessing |
| Policy | Keep one written rule set for billable, pre-approved, and never-billable items | Two teammates classify the same sample expense the same way |
| Evidence and collections | Standardize charge records and payment follow-up ownership | Weekly review shows a clear next action for each open reimbursable item |
With those four inputs set, you can make decisions quickly. You can also answer cleanly when a client asks, "What is this charge?"
For freelancer bookkeeping, see A Guide to QuickBooks Self-Employed for Freelancers.
Should this cost be billable or absorbed?#
Classify each cost before you spend it by checking client benefit, scope fit, approval status, and recovery likelihood on the next client invoice.
| Check | What to confirm | Order |
|---|---|---|
| Client benefit | Does the client clearly benefit? | 1 |
| Scope fit | Does the cost match scope? | 2 |
| Approval status | Does it meet your pre-approval process? | 3 |
| Recovery likelihood | Can you reasonably recover it on the next invoice cycle? | 4 |
This is where billable expenses stop being "a QuickBooks thing" and start acting like cashflow control for project costs. You are not trying to be perfect; you are trying to be consistent, so run the same decision routine every time.
- Step 1 Run the decision check. Ask four questions in order: Does the client clearly benefit, does the cost match scope, does it meet your pre-approval process, and can you reasonably recover it on the next invoice cycle?
Verification point: you can explain the decision in one sentence without hedging.
- Step 2 Record the transaction for recovery. In
QuickBooks, mark the Billable checkbox and assign the customer on the expense entry.
Verification point: the cost appears as client-linked work, not a floating internal expense.
- Step 3 Choose a clear status and owner. Keep your bookkeeping clean by assigning a status and follow-up owner. You can use statuses like these:
| Decision outcome | Use it when | Next action |
|---|---|---|
| Billable now | Scope and approval are clear | Add to the next client invoice run |
| Billable after approval | Client benefit is clear but approval is missing | Request approval, then invoice after confirmation |
| Non-billable absorbed cost | Scope, approval, or recovery confidence fails | Keep it internal and do not send to client invoicing |
- Step 4 Separate reimbursement from markup. Recover the underlying cost first. If you apply markup, treat it as a separate pricing decision so margin strategy stays aligned with your main
QuickBooks Onlineinvoice approach.
Verification point: your invoice reflects reimbursement logic and pricing logic as separate decisions.
- Step 5 Use receivables visibility to set follow-up. Review
Accounts Receivablewith theA/R Aging Detailreport regularly. If unresolved reimbursements stack up for the same client, escalate and consider pausing new client-funded spend until collection risk is clearer.
Verification point: you escalate before cash leakage grows.
How do you enable billable expenses in your QuickBooks version?#
Enable billable settings in the correct menu path for your version, then confirm setup by pulling a test expense into a client invoice.
Once your rules are written, QuickBooks needs to reflect them. Treat setup like a one-time implementation with a validation test. Do not treat it like a click-through you redo every time something feels off.
Follow this setup sequence once and save it in your SOP#
| Setup item | Path or action | Verification |
|---|---|---|
| Plan context | Use QuickBooks Online Plus or QuickBooks Online Advanced as the explicitly named references; verify other plans in your own account | Your SOP states which plan you tested and where billable controls appear |
| Online settings path | Settings > Account and settings > Expenses > Bills and expenses | You can reach the expense settings screen without guesswork |
| Tracking controls | Enable the options that track expenses by customer and let you mark expenses as billable | Your expense entry screen supports customer assignment and billable selection |
| Product distinction | Desktop has a separate workflow; verify it in Desktop documentation | Your SOP identifies Online Plus or Advanced instead of mixing menu paths |
| Validation test | Enter one test expense, assign the customer, mark it billable, then open a new invoice for that customer | You can add the unbilled item to the invoice in one pass |
- Step 1 Confirm product and plan context. Start with
QuickBooks Onlineand note that current documented setup guidance explicitly namesQuickBooks Online PlusandQuickBooks Online Advanced. If you use another plan, verify behavior in your own account before rollout.
Verification point: your SOP states which plan you tested and where billable controls appear.
- Step 2 Handle the online settings path. Go to
Settings, thenAccount and settings, openExpenses, thenBills and expenses, and enter edit mode for expense behavior.
Verification point: you can reach the expense settings screen without guesswork.
- Step 3 Turn on billable tracking. Enable Show Items table on expense and purchase forms, Track expenses and items by customer, and Make expenses and items billable. Choose any markup or sales-tax options that fit your accounting policy, then save. See Intuit’s setup instructions.
Verification point: your expense entry screen supports customer assignment and billable selection.
- Step 4 Keep the product workflow clear. If you are in Desktop, use its own documentation. For Online, confirm the current expense settings rather than switching to Desktop-style preferences.
Verification point: the SOP identifies the product and plan beside its tested menu path.
- Step 5 Validate the workflow with a controlled example. Use a sample company where available, or a legitimate test record your bookkeeper can remove correctly without affecting reports. Confirm the customer’s invoice Add to invoice window offers the billable item; avoid leaving a fabricated expense or issued invoice in live books.
Verification point: you can add the unbilled item to the invoice in one pass.
| Configuration checkpoint | Safe default | Why it matters for project costs |
|---|---|---|
| Plan guardrail | Treat Plus and Advanced as confirmed references, verify all others in account | Prevents false assumptions across versions |
| Menu routing | Document the tested Online settings path; maintain a separate SOP for Desktop | Keeps setup moving when UI labels vary |
| Validation test | Require one test expense before production use | Confirms billable expenses will reach client invoicing |
If you want a quick next step, you can also try the free invoice generator.
Build the capture to invoice workflow that protects cashflow#
In QuickBooks Online Plus or Advanced, capture each client cost, mark it billable, pull it into an invoice, collect through your chosen payment path, and reconcile the full trail before it ages in Accounts Receivable.
With billable expense tracking enabled, execution is what protects you. Speed and consistency beat heroics later.
- Step 1 Capture spend fast. Enter each expense as soon as it happens. Assign the correct customer and fill in the fields your policy requires so you can defend reimbursement later without cleanup work.
Verification point: every new client-related cost shows a customer assignment in QuickBooks Online Plus or QuickBooks Online Advanced.
- Step 2 Assign billable status and queue invoicing. Mark the line as billable at entry time. Route it into your next invoice cycle instead of waiting for month-end.
Verification point: reimbursable items move into the next invoice run before they sit unresolved.
- Step 3 Generate the client invoice with clear labels. Open the invoice for that customer and use the add flow for unbilled billable items. Label reimbursement lines clearly so clients can approve quickly and your client invoicing stays low-friction.
Verification point: each invoice shows distinct reimbursement lines linked to the original spend.
- Step 4 Collect with your chosen channel. Send the invoice through your standard collection path, including
QuickBooks Paymentswhere enabled. Support the methods your setup allows, such as cards or ACH. Confirm payment before you close the loop.
Verification point: every paid reimbursement line has a confirmed payment status, not just a sent invoice status.
- Step 5 Reconcile expense to invoice to payment. Match recorded transactions with bank and card statements, and review your
A/R Aging summary reporton a regular internal cadence. Catch missing links early so unrecovered project costs do not turn into write-offs.
Verification point: you can trace any reimbursable expense from entry to payment in one pass.
| Workflow stage | Failure risk | Safe default control |
|---|---|---|
| Capture | Missing customer context | Enter customer details at creation time |
| Invoice | Billable items left unbilled | Pull unbilled items into the next invoice run |
| Collect and reconcile | Open balances drift | Confirm payment and review aging before closing |
How do you prevent delays disputes and fee leakage?#
Set client rules, evidence standards, and escalation triggers before reimbursements age in Accounts Receivable.
If reimbursements still drag, tighten policy, presentation, and follow-through together. Lock all three early so delays, disputes, and leakage do not become normal.
- Step 1 Write reimbursement terms into every MSA or SOW. Define what needs pre-approval, what documentation the client must accept, and when reimbursable project costs appear on each client invoice.
Verification point: your team can point to one contract clause for approval, one for evidence, and one for billing timing.
- Step 2 Standardize dispute-ready naming in
QuickBooks. Use one naming pattern for all billable expenses. Apply consistent labels for client, project, and charge type across your records. Keep supporting files tied to the same labels so every line item stays traceable.
Verification point: any teammate can move from expense entry to invoice line and supporting record without guesswork.
- Step 3 Preserve the accounting trail for reimbursements. Keep the expense, receipt and client approval linked to the invoice. Decide consistently how reimbursement income, expense recovery, markup and applicable tax are recorded; the billable flag alone does not decide gross-versus-net reporting.
Verification point: the bookkeeper can explain the accounts used for both the original cost and its recovery.
- Step 4 Define escalation for non-payment and partial payment. Review aging, assign an owner and apply reminders under the client agreement. A partially paid invoice may cover several line items; confirm the payment allocation before treating an individual expense as fully reimbursed.
Verification point: every unresolved reimbursement in Accounts Receivable has an owner, next action, and deadline.
| Risk signal | Immediate action | Escalation action |
|---|---|---|
| Partial payment on reimbursement lines | Confirm dispute reason and resend supporting records | Pause new client-funded spend until the client resolves open items |
| Overdue reimbursable invoice | Send reminder and call the billing contact | Escalate to decision-maker and adjust terms before next work cycle |
| Repeated documentation disputes | Tighten invoice labels and evidence checklist | Update MSA or SOW language for future client invoicing |
What should you do when billable expenses fail to show up correctly?#
Fix missing billable expenses by checking settings, customer mapping, and invoice pull-through in that order.
When something breaks, do not click around and hope. Diagnose upstream to downstream so you can isolate the failure point and harden your SOP.
- Step 1 Confirm Online configuration. Open Settings, Account and settings, Expenses, then Bills and expenses, and verify customer tracking and billable settings. If your product or plan differs, confirm its supported workflow before changing records.
Verification point: you can document one exact settings path your team should use.
- Step 2 Validate source transaction mapping. Open the original bill, expense, or check and confirm you marked the line as billable and assigned the correct customer. If you skip the billable flag,
QuickBookswill not surface the line in the customer invoice’s Add to invoice window.
Verification point: one test entry shows both billable status and correct customer assignment.
- Step 3 Confirm invoice pull-through before sending. On existing invoices, open the customer invoice’s Add to invoice window and add the line manually when needed. If you run a controlled test entry, use it to isolate where your workflow breaks, not to assume a guaranteed fix.
Verification point: the charge is available to add, belongs to the correct customer and has not already been invoiced.
-
Step 4 Use external help in the right order. If product screens differ from your walkthrough, use the in-app Search bar first. Treat
YouTubewalkthroughs as supplementary support when product layouts change. -
Step 5 Convert each incident into SOP logic. If a reimbursement fails because of something simple, like the wrong customer tag, fix it once, then add a guardrail so it cannot silently repeat.
| Failure mode | Likely cause | SOP fix |
|---|---|---|
| Billable line missing from invoice suggestions | Missing billable flag | Add a pre-invoice billable check in your review checklist |
| Line exists but ties to wrong client | Incorrect customer assignment | Require customer validation at transaction entry |
| Existing invoice does not pull new billable line | Manual add step skipped | Check the customer’s Add to invoice window and confirm the item has not already been billed |
Run one repeatable billable-expense system on every client#
Use the same classification, receipt and invoice checks for each client, with exceptions documented under the agreement.
| Control | Action | Article detail |
|---|---|---|
| Version guardrails | Document QuickBooks Online Plus and QuickBooks Online Advanced as the confirmed workflow and verify any other plan in account before rollout | Keep the setup path in the SOP as Account and settings to Expenses to Bills and expenses |
| Reimbursement structure | Treat a billable expense as a client-on-behalf cost you intend to recover on a client invoice | Require client, project, and evidence attachment on every reimbursable line |
| A/R control loop | Review the A/R aging view weekly | Assign one owner per exception and force a next action before the review ends |
| Accounting consistency | Keep source cost, reimbursement, markup and invoice tax traceable | Apply the approved account treatment and confirm partial-payment allocation |
| SOP upgrades | Repair the mapping when a teammate skips the project tag | Add a pre-send checklist line so it does not leak margin next month |
At this point, you are not learning features. You are installing a rhythm: classify, capture, invoice, collect, reconcile, and escalate early when something slips.
- Step 1 Lock version guardrails early. Document that your confirmed workflow targets
QuickBooks Online PlusandQuickBooks Online Advanced, then require an in-account verification step for any other plan before rollout. Keep your setup path in the SOP asAccount and settingstoExpensestoBills and expenses, and note that interface labels can shift.
Verification point: every client file shows plan or version status and the exact setup path your operator used.
- Step 2 Enforce reimbursement structure at entry. Treat a billable expense as a client-on-behalf cost you intend to recover on a client invoice. Require three fields on every reimbursable line: client, project, and evidence attachment. Then link each approved billable line to the invoice flow so bookkeeping supports cashflow, not cleanup work.
Verification point: your team can open any reimbursable line and trace it to an invoice-ready customer record.
- Step 3 Run a standing A/R control loop. Review the A/R aging view on a fixed weekly cadence to see open balances and how long they have stayed overdue. Assign one owner per exception and force a next action before the review ends.
Verification point: every unreimbursed item has an owner, a due date, and a follow-up action.
- Step 4 Reconcile the recovery amount. Link each reimbursable cost to the invoice and payment allocation. Preserve markup and taxes separately so receipt of part of an invoice does not silently close every expense.
Verification point: the remaining reimbursement balance agrees with the invoice and payment records.
- Step 5 Turn misses into SOP upgrades. If a teammate logs client software spend but skips the project tag, catch it in review. Repair the mapping, and add a pre-send checklist line so it does not leak margin next month.
Copy and paste this checklist into your SOP:
- Billable expense rules documented before project kickoff
-
QuickBooks Online Plus/Advancedsettings verified inAccount and settingsandBills and expenses - Each expense tagged to client and project with receipt evidence
- Billable items reviewed before every client invoice run
-
Accounts Receivableaging checked weekly for unreimbursed costs - Dispute recovery SOP tested and stored for repeat use
Frequently Asked Questions
What is a billable expense in QuickBooks?
A billable expense is a cost you pay on a customer's behalf, then recover through that customer's invoice. In practice, it connects project costs to client invoicing so you do not quietly absorb client spend.
How do I turn on billable expenses in QuickBooks Online?
In QuickBooks Online, go to Settings, open Account and settings, then open the Expenses or Bills and expenses area and enable billable expense behavior. Save the change, then run one test transaction end to end - from expense to invoice - so you know it pulls through before you rely on it.
Which QuickBooks plans are confirmed to support this workflow?
The cited Intuit workflow explicitly names QuickBooks Online Plus and QuickBooks Online Advanced for this billable-expense process. Treat those as confirmed and verify other plan behavior in your account before you lock your SOP.
Do billable expenses create income or just recover costs?
QuickBooks includes an optional setting to track billable expenses and items as income. That setting determines whether those amounts are tracked as income in QuickBooks, so set your policy first and keep it consistent across projects.
Why is a billable expense not appearing on my client invoice?
Check that the original cost is billable, assigned to the same customer and still unbilled. On the customer invoice, use Add to invoice to select it. If it was already billed, inspect the linked invoice rather than adding a duplicate recovery charge.
What is the difference between a regular expense and a billable expense?
A regular expense is a cost your business absorbs. A billable expense is a cost you pass through for reimbursement on a customer invoice. Keep the transaction type clear as well: enter an expense when you already paid, and enter a bill when you plan to pay later.
How quickly should I invoice billable expenses to protect cashflow?
There is no single universal deadline, and billing cadence varies by business policy and agreement terms. In practice, move reimbursable project costs into invoicing promptly once documentation is complete so they do not get missed.
Try a related tool
Researched and edited by the Gruv editorial team. Gruv builds cross-border billing, payouts, and finance-operations software for global businesses.
Sources
Includes 1 external source outside the trusted-domain allowlist.
Educational content only. Not legal, tax, or financial advice.
Related Posts
Value-Based Pricing for Freelancers Under Real Payment Risk
Value-based pricing starts with the client’s expected benefit and willingness to pay. It still needs a deliverable, scope and payment agreement you can perform. Use a discovery phase when the benefit or effort is too uncertain to support a defensible quote.

A Guide to QuickBooks Self-Employed for Freelancers
**QuickBooks Self-Employed is a legacy bookkeeping option for existing subscribers. New buyers should compare current products such as Solopreneur, then test their actual billing and tax workflow.**

The Freelance Payment Penalty: A Modeled Audit of Platform Fees, FX Spreads, and Payout Delays
The money rarely disappears through a single, easy-to-spot fee. The real loss is stacked. A marketplace takes its commission, a processor adds a charge for international cards, a bank or payment company converts the currency at a spread, a platform holds the funds before release, and a wire sheds a little to intermediaries on the way in. Each layer looks defensible on its own, but the worker feels the combined result as a smaller deposit and a later payday.