
Quick Answer
Use the accountant-firm invite flow in QuickBooks Online instead of sharing credentials. From Settings > Manage users, a Primary Admin or Company Admin sends the invite, verifies the recipient through a second channel, and confirms the status moves from Invited to Active. Before sending, make sure key accounts are reconciled, statement-period items in For review are handled, and scope is documented in an engagement letter.
Giving an accountant access to QuickBooks is not just an IT step. It is a business decision about who gets access to your financial records, on what terms, and with what controls.
Done well, this is the point where you stop carrying the full accounting load yourself and start working with a professional who can help protect and grow the business. The goal is not to give up control. It is to set clear scope, clean access, and verification from day one so you get real support without losing oversight.
Part 1: The Pre-Flight Checklist: Preparing for a Strategic Partnership#
Do not send your invite until your books pass a basic readiness check. That speeds onboarding and gives your accountant a clearer starting point when records are reconciled, categorized, and documented.
Before you start#
First, confirm you can send the invite at all. In QuickBooks Online, only a Primary Admin or Company Admin can invite users, including accountant users. If you do not have one of those roles, fix that first. Also check capacity: inviting an accountant through the accountant-user flow does not use a normal subscription user seat. If you need to add more than 2 accountant firms, QuickBooks says you may need QuickBooks Online Advanced.
| Task | Why it matters | How to verify completion | What can wait |
|---|---|---|---|
| Confirm admin authority | Without the right role, the handoff stops at the invite step | Your profile shows Primary Admin or Company Admin | Non-critical role cleanup for other team members |
| Reconcile key accounts | Your accountant needs a reliable starting ledger | Statement-period transactions are added and categorized, and each key reconciliation shows Difference = $0.00 | Cosmetic account naming or structure cleanup |
| Clear unresolved bank-feed items | Items in For review are not in your books until matched or categorized | No statement-period items remain unresolved in For review, or each open item has a named owner and question | Older, low-priority cleanup outside the current period |
| Organize supporting documents | Entries without support slow review and weaken substantiation | Records are orderly and easy to retrieve, and include payee, amount, proof of payment, and date | File-name standardization |
| Document engagement scope | Access without boundaries causes scope drift and rework | You and the firm have written agreement on services, deliverables, communication expectations, and escalation contact | Minor communication refinements after kickoff |
Step 1. Reconcile every key account#
Reconciliation is your go or no-go gate. In QuickBooks Online, it means matching QuickBooks transactions to bank and credit card statements.
You are ready only when statement-period transactions are added and categorized, and each key account reaches Difference = $0.00. If ending balances do not match, fix the issue before you finish reconciliation. A partially reconciled file is still not ready to hand off.
Step 2. Clear uncategorized and unresolved transactions#
Work through the For review tab next. These transactions do not affect your books until you match or categorize them. Focus first on the period your accountant is about to handle. Resolve each statement-period item, or leave a clear owner and a specific question for follow-up. "Need review" by itself is not enough. Make the issue explicit so your accountant is not starting with guesswork.
Step 3. Organize the evidence behind the numbers#
A clean ledger is only as reliable as the records behind it. Keep supporting documents in an orderly, secure system so items can be traced quickly.
At minimum, your records should cover common source documents such as invoices, receipts, paid bills, deposit records, and canceled checks. Each record should show payee, amount, proof of payment, and date. If those basics are missing, review and advisory work can slow down.
Step 4. Define the engagement before granting access#
Set expectations in writing before access is granted. An engagement letter defines the firm-client relationship and should make scope and responsibilities explicit.
Your pre-invite checklist should confirm written agreement on:
- services included
- expected deliverables or work product
- communication expectations
- escalation/contact path for questions or scope issues
Missing engagement terms can create scope and responsibility problems. This step is operational protection, not paperwork theater. When these controls are in place, sending access becomes an administrative step, not a trust gamble. That preparation makes the next phase faster, cleaner, and more useful.
If you work solo, see A Guide to QuickBooks Self-Employed for Freelancers. Before you invite anyone into QuickBooks, clean up your billing inputs so your accountant starts from consistent records with this free invoice generator.
Part 2: The Selection Process: Vetting an Accountant for Your Global Business#
Choose for fit, not for labels. If your income, residency, or accounts cross borders, a PTIN is a starting credential, not proof that someone can handle your actual situation. Before you grant access, confirm both scope of practice and fit for your facts.
Step 1. Separate credentials from actual scope#
Start with two checks: legal authority and practical capability.
A PTIN means someone can prepare federal returns, but it does not prove advanced expertise. For IRS representation scope, confirm whether the candidate is an EA, CPA, or attorney with unlimited representation rights. That matters if a filing is later questioned.
Treat QuickBooks ProAdvisor status as software proficiency, not licensure. It can show QuickBooks training, but it is not a government credential, and a directory listing is not a service guarantee.
Use a quick verification pass:
- Confirm credential status in the IRS preparer directory.
- Confirm whether they are EA, CPA, or attorney when representation scope matters.
- Confirm QuickBooks product fit so workflow expectations are realistic.
Step 2. Probe cross-border depth with fact-based questions#
This is where weak screening usually fails. Do not ask, "Do you do international tax?" Ask how they would evaluate your facts.
| Topic | What to listen for | Grounded detail |
|---|---|---|
| FEIE | Conditional language on eligibility | Eligibility depends on your facts and the applicable requirements, not assumptions |
| FBAR | Recognizes the trigger point | Aggregate foreign-account trigger point of $10,000 at any time during the year |
| Treaty residency tie-breaker | Explains how dual-resident cases are resolved | Treaty tie-breaker rules can determine a single treaty residence, based on treaty text and your facts |
Use these topic probes:
- FEIE: Listen for conditional language. A strong candidate explains that eligibility depends on your facts and the applicable requirements, not assumptions.
- FBAR: They should recognize the aggregate foreign-account trigger point of $10,000 at any time during the year.
- Treaty residency tie-breaker: In dual-resident cases, they should explain that treaty tie-breaker rules can determine a single treaty residence, based on treaty text and your facts.
Add current-year compliance details to your shortlist notes only after you verify them.
Step 3. Test working style and risk controls#
Bring a one-page fact sheet to each consult: countries lived in, entity type, client locations, bank-account locations, currencies, and possible dual residency. Strong candidates ask clarifying questions from your fact pattern before they talk about fees.
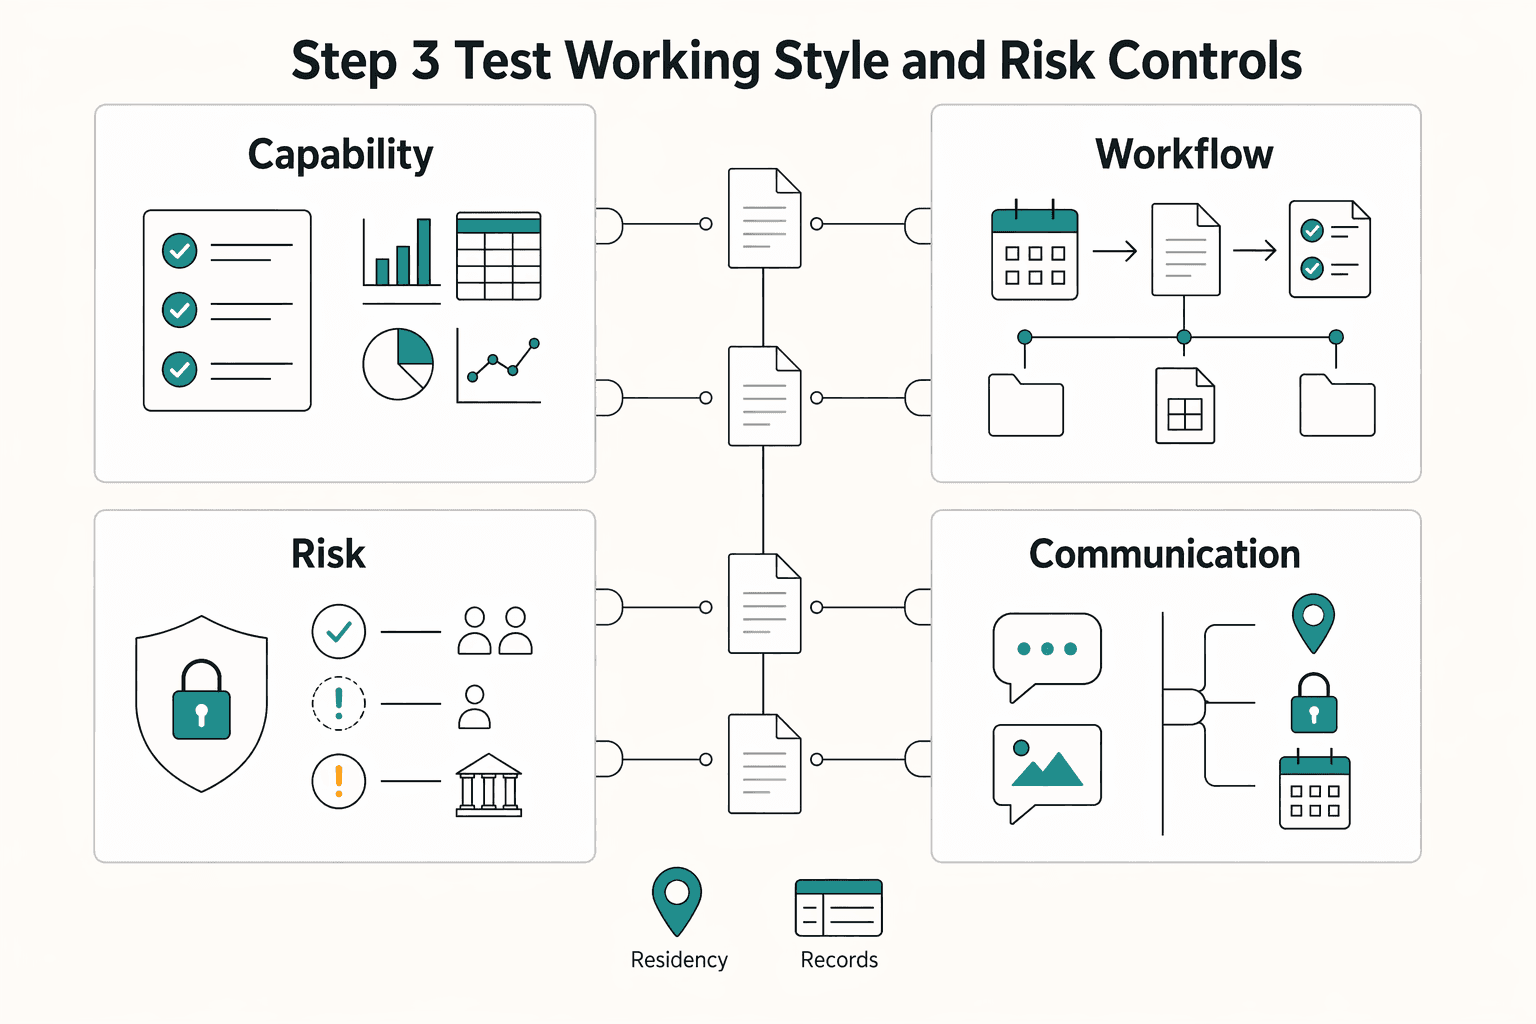
| Group | What to ask | What it covers |
|---|---|---|
| Capability | Which cases like mine do you handle regularly, and what would you review first? | Cases like mine and what they would review first |
| Workflow | Who does the work, what stays in QuickBooks Online, and what records do you need from me? | Who does the work, what stays in QuickBooks Online, and needed records |
| Risk control | If the IRS questions a filing, who responds, and under what representation authority? | Who responds and under what representation authority |
| Communication | How often will you report issues, and what triggers immediate escalation? | Reporting issues and escalation triggers |
Use four question groups:
- Capability: Which cases like mine do you handle regularly, and what would you review first?
- Workflow: Who does the work, what stays in QuickBooks Online, and what records do you need from me?
- Risk control: If the IRS questions a filing, who responds, and under what representation authority?
- Communication: How often will you report issues, and what triggers immediate escalation?
Step 4. Score your shortlist consistently#
| Claim | How to verify | Red flag | Decision impact |
|---|---|---|---|
| "I can prepare your federal return" | Confirm PTIN and identity | Treats PTIN as proof of advanced expertise | Baseline only |
| "I can represent you before the IRS" | Confirm EA, CPA, or attorney status and unlimited representation rights | Vague about representation scope | High |
| "I know QuickBooks Online" | Confirm ProAdvisor status and QuickBooks proficiency | Relies only on a directory profile | Medium |
| "I handle international tax" | Run FEIE, FBAR, and treaty tie-breaker probes on your facts | Uses buzzwords without fact-pattern analysis | Highest |
If two finalists look similar, choose the one who asks sharper, fact-specific questions and states limits clearly. In practice, that discipline is often the difference between a clean handoff and avoidable cleanup later. If you want a deeper dive, read Value-Based Pricing: A Freelancer's Guide.
Part 3: The Technical Handover: Securely Granting Access#
Once you know who you are hiring, the handover should be straightforward and controlled. Grant access through QuickBooks' official workflow, not through a shared login, so you keep a clean audit history and clear control.
Choose the correct path#
Step 1. Confirm your product, your role, and the method. If you use QuickBooks Online, you must be the Primary admin or Company admin to send the invite. Use Settings > Manage users > Accountants or Accounting Firms > Invite firm. This connects your company to the accountant's QuickBooks Online Accountant account.
If you use QuickBooks Desktop, use an Accountant's Copy. You send a .qbx file, your accountant works in that copy, and returns a .qby changes file for import.
| Path | Access model | Control boundary | Collaboration pattern | Use it when |
|---|---|---|---|---|
| QBO invite | Live access through accountant invite in Manage users | Separate user identity tied to accountant sign-in | Both sides work in the online company | You use QuickBooks Online and want ongoing collaboration |
| QBD Accountant's Copy | File exchange using .qbx and returned .qby | You control final import of returned changes | You keep working while accountant reviews and sends changes back | You use QuickBooks Desktop and want controlled import |
Step 2. Verify the destination before sending. Before you send an invite or file, confirm the exact account details through a second channel you already use with that accountant. For QBO, verify that the email or firm user ID matches the sign-in identity they use. Then send only to that destination.
Use the QBO invite#
Step 3. Send the invite from the Accounting Firms tab. Go to Settings > Manage users > Accountants or Accounting Firms > Invite firm. Enter the verified email or firm user ID and save. This invite path does not count toward your subscription user limit. If the accountant does not already have QuickBooks Online Accountant, the invite email includes sign-up before acceptance.
Step 4. Confirm acceptance and access. In Manage users, confirm status changes from Invited to Active. Then confirm your accountant can open the correct company. If you need more than 2 accountant firms, Intuit advises considering QuickBooks Online Advanced.
Use the Desktop copy#
Step 5. Create the Accountant's Copy. In QuickBooks Desktop, create an Accountant's Copy and generate the .qbx file for your accountant.
Step 6. Exchange and import changes deliberately. Share the .qbx file through an agreed method, for example USB, email, or cloud service. When your accountant returns the .qby file, run the import flow and choose Incorporate Accountant's Changes when you are ready to apply them.
Recover cleanly if something goes wrong#
Step 7. Revoke, reissue, and document. Do not share your admin password. Separate user IDs preserve audit history. If a QBO invite went to the wrong recipient, remove that accountant's access and resend through the official invite flow.
If Desktop restrictions were removed mid-process, treat it as a reset point. That action is irreversible and can make the current Accountant's Copy impossible to import. Document what happened, stop the bad handoff, and restart with the official workflow.
You might also find this useful: How to Choose a Tax Preparer for Your Freelance Business.
Part 4: The Control Panel: Managing Permissions and Verifying Trust#
Once the invite becomes Active, move from setup to control. Once your accountant has access, you should still keep Primary admin authority and verify trust through repeatable checks.
Step 1. Keep the right role and assign access intentionally#
Keep Primary admin if you are the account owner. QuickBooks defines this as the main person with access to every part of the account, and only the Primary admin can change business details in Company info.
Use Company admin only when someone truly needs broad internal admin control. Use Accountant user for outside accounting work. This role is built for review and correction tools and does not count toward your subscription user limit.
| Role | What they can do | Key limits in this workflow | When to assign |
|---|---|---|---|
| Primary admin | Access every part of the account, manage roles/permissions, remove an accountant, change Company info business details | Required to remove an accountant and the only role that can change Company info business details | Keep for yourself or the true account owner |
| Company admin | Access everything in the account, including admin tasks like changing permissions and roles | Cannot change business details in Company info | Assign only to a trusted internal operator who needs full admin reach |
| Accountant user | Use accountant-specific tools to review books and make corrections; does not consume a subscription user seat | Invite acceptance can fail if the invite destination does not match the sign-in email or firm user ID | Assign to your outside accountant or accounting firm |
For an outside accountant, use the accountant-firm invite route first instead of broad internal admin access.
Step 2. Run identity checks before every invite or re-invite#
Use the same identity-check process every time. QuickBooks lets primary admins and company admins invite by email or firm user ID, and acceptance can fail when the destination does not match the sign-in identity.
| Check | What to confirm | Article detail |
|---|---|---|
| Verified channel | Use a verified channel you already use with that accountant | Confirm through that channel before sending |
| Destination | Exact sign-in email or firm user ID | Acceptance can fail when the destination does not match the sign-in identity |
| Documentation | Date, channel, who confirmed, and destination used | Document confirmation details |
| Invite status | Manage users moves from Invited to Active | If it does not, confirm the destination again first |
| Invite age | Invite older than 30 days | Delete it and send a new one |
| Intuit email | Forwarded Intuit email messages | Legitimate Intuit emails come from @intuit.com |
- Confirm through a verified channel you already use with that accountant.
- Confirm the exact destination: sign-in email or firm user ID.
- Document confirmation details: date, channel, who confirmed, and destination used.
After sending, verify status in Manage users moves from Invited to Active. If it does not, confirm the destination again first. If the invite is older than 30 days, delete it and send a new one. If you review forwarded Intuit email messages during this process, use Intuit's domain check: legitimate Intuit emails come from @intuit.com.
Step 3. Review the Audit Log on a fixed loop#
Treat the Audit Log as a routine control, not just an emergency tool. Admin access is required, it cannot be turned off, and events are available for 2 years, shown 150 records at a time.
Review it at three points:
- After new accountant access becomes active.
- After major cleanup or correction work.
- At month-end close.
In each review, scan for:
- Expected sign-ins by the invited person or firm.
- Expected settings changes.
- Book changes that match the agreed scope.
If you see unknown activity, verify before assuming compromise. Some audit-log profiles are system-generated. If unexpected sign-ins or unapproved changes continue, escalate to removal.
Step 4. Revoke and recover quickly when trust breaks#
If access is wrong or trust fails, remove accountant access as the Primary admin immediately. QuickBooks states removal requires Primary admin access, and deleted accountant access ends immediately.
Then recover based on what happened:
- Wrong destination or expired invite: re-verify identity details, document confirmation, and re-invite correctly.
- Suspicious activity: change your Intuit password right away.
- Harden sign-in: confirm two-step verification (2FA) is enabled on your Intuit account.
That is the control loop: deliberate role assignment, verified identity checks, routine audit review, and fast revoke and recover. For a step-by-step walkthrough, see How to Run a Profit & Loss Report in QuickBooks.
Conclusion: From Delegation to Alliance: The CEO Mindset#
The practical end state is not "I handed off bookkeeping." It is a working alliance: clear ownership, regular collaboration, and recurring review of clean, current books.
Preparation means role clarity#
Define ownership before work starts. You should both be clear on who handles routine bookkeeping, who owns final decisions, and which questions move into advisory conversations. Operational takeaway: Keep a written scope you can both point to.
Execution means controlled rhythm#
Treat execution as a structured operating rhythm, not open-ended handoffs. Keep check-ins focused on current priorities, then expand scope only when responsibilities change. Operational takeaway: Match the operating plan to the work in front of you.
Verification means recurring review#
An alliance still needs verification. Review recent activity, confirm it matches scope, and adjust when the engagement changes. Operational takeaway: Keep a recurring review habit so your process stays controlled.
What changes next#
| If you stay reactive | If you run an alliance |
|---|---|
| You spend cycles fixing stale or unclear records. | You use current books to make forward-looking decisions. |
| Conversations focus on what happened. | Conversations include what to do next and why. |
| Support stays transactional. | Support expands into collaboration and advisory services when needed. |
Escalate from routine bookkeeping to broader advisory planning when decisions become more complex, more cross-border, or more forward-looking than cleanup and categorization alone can support.
Keep this checklist active. We covered the offboarding side in detail in How to Fire Your Accountant or Lawyer.
- Reconfirm ownership and scope as responsibilities change.
- Keep a recurring review cadence for recent activity and open decisions.
- Update written scope whenever work moves from routine bookkeeping into advisory support.
If this handover is part of a broader cross-border finance setup, align controls and payout operations early by talking with Gruv.
Frequently Asked Questions
When should you use a high-privilege role instead of role-based staff access?
Use a high-privilege role only when the person needs to view or update other staff members’ access or privacy settings. If they do not need that admin responsibility, keep them on the narrowest role-based access that supports the work.
Why should you avoid sharing your own login?
Named role-based access gives you a way to grant, change, limit, or remove access by person. Sharing one login can bypass that structure and make permission management less clear.
What if your accountant’s setup does not match your platform?
Do not broaden access by default. Define the narrow scope first, then verify permissions in access checkpoints such as Settings > Staff Permissions or the staff member profile path under Staff. Also confirm plan availability, since some features are not available on all plans, and watch for exceptions where a specifically assigned treatment can still be editable from the staff profile.
How should you offboard an accountant cleanly?
Remove or tighten their role-based access in your permissions settings, then confirm the change on the staff member profile path. If needed, re-check role restrictions so confidential information remains limited to the right people.
Try a related tool
Researched and edited by the Gruv editorial team. Gruv builds cross-border billing, payouts, and finance-operations software for global businesses.
Sources
Includes 6 external sources outside the trusted-domain allowlist.
- irs.gov/tax-professionals/understanding-tax-return-p...trusted
- irs.gov/businesses/small-businesses-self-employed/wh...trusted
- cpai.com/Education-Resources/my-firm/Engagement-Lette...external
- jane.app/guide/staff-access-levelsexternal
- nasba.org/wp-content/uploads/2025/12/AT_Top-100-Most-I...external
- ncacpa.org/wp-content/uploads/2024/08/2C_Johnston_K2s-C...external
- quickbooks.intuit.com/learn-support/en-us/help-article/account-man...external
- quickbooks.intuit.com/learn-support/en-us/help-article/statement-r...external
Educational content only. Not legal, tax, or financial advice.
Related Posts

Value-Based Pricing for Freelancers Under Real Payment Risk
Value-based pricing works when you and the client can name the business result before kickoff and agree on how progress will be judged. If that link is weak, use a tighter model first. This is not about defending one pricing philosophy over another. It is about avoiding surprises by keeping pricing, scope, delivery, and payment aligned from day one.

A Guide to QuickBooks Self-Employed for Freelancers
**QuickBooks Self-Employed can support basic bookkeeping, but predictable cashflow comes from your payment controls, not invoicing alone.**

How to Choose a Tax Preparer for Your Freelance Business
**Choose a tax preparer for freelancers by ranking compliance controls ahead of speed and price, then shortlist only candidates who can show strong documentation habits.**