
Quick Answer
To get an EU pet passport, first confirm that you are eligible: pets arriving from outside the EU enter on an EU animal health certificate, while the passport is for travel between EU countries and is issued only to pet owners resident in the EU. Follow the exact sequence of microchip, rabies vaccination, waiting period, then bring matching original records to an authorised vet.
For most people moving internationally, a pet is not optional cargo. They are part of the move. Getting the paperwork right matters because the process is manageable, but unforgiving when the sequence is wrong or the records do not match.
Treat it like a project: build the file first, confirm who can issue what, and check every handoff before you travel. Done that way, the process is more predictable and much less stressful.
Phase 1: Work Backward From Your EU Arrival Date#
Work backward from your EU arrival date and build a valid entry file first. If you are traveling from outside the EU, the entry document is the EU animal health certificate. The European pet passport is for travel between EU countries and is only issued to pet owners who are resident in the EU.
Step 1: Reverse-plan your timeline#
Start with arrival, then work backward to the certificate appointment, rabies milestone, microchip check, and a buffer for delays or rule changes. Treat these as live-rule checks for your exact route and current official guidance:
- Confirm the current waiting-period rule with the official source
- Confirm the current certificate issuance window with the official source
Do not assume one universal timeline. As a current reference point, UK guidance says at least 21 full days after a first rabies vaccination. EU guidance says the non-EU-origin certificate must be issued not more than 10 days before arrival in the EU.
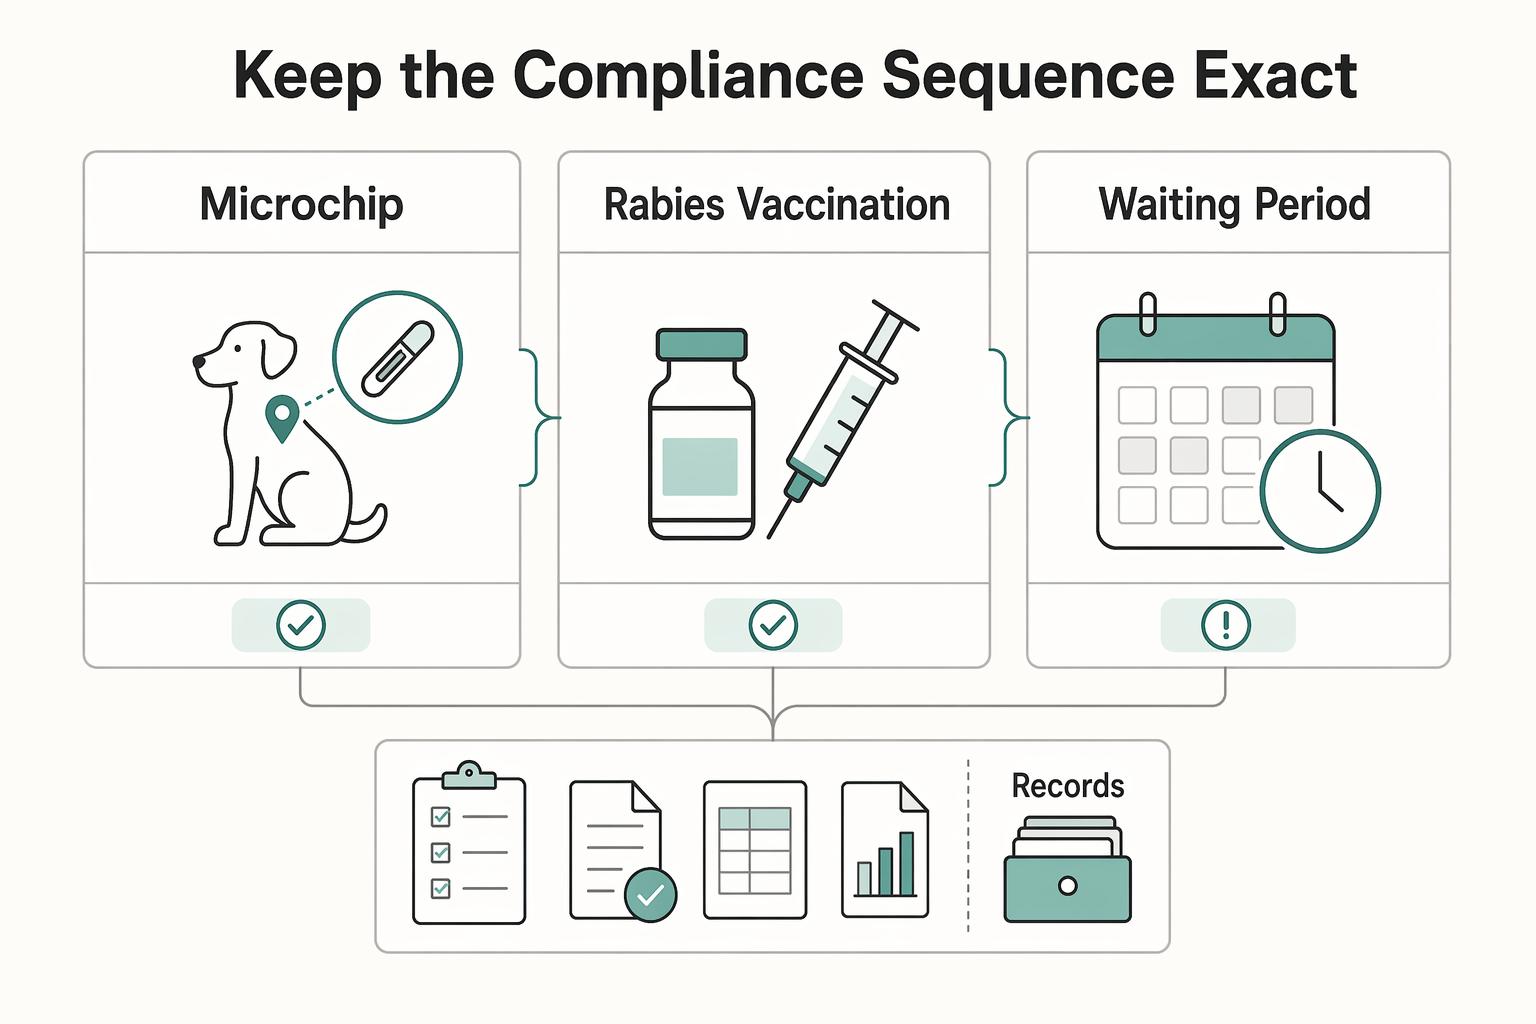
Step 2: Keep the compliance sequence exact#
This sequence is not flexible for EU entry planning: microchip -> rabies vaccination -> waiting period. That order matters because vaccine timing is tied to microchip marking or reading dates. If the sequence is wrong, your travel eligibility timeline can be invalidated.
| Step | Rule | Check |
|---|---|---|
| Microchip | Must come before rabies vaccination for EU entry planning | Ask the vet to scan and read the chip number aloud |
| Rabies vaccination | Vaccine timing is tied to microchip marking or reading dates | Match the chip number on the rabies record |
| Waiting period | Sequence is microchip -> rabies vaccination -> waiting period | If the sequence was broken, verify next steps with the issuing authority before assuming records can be corrected without revaccination |
At the appointment, do three things:
- Ask the vet to scan and read the chip number aloud.
- Match that number on every record, especially the rabies record.
- If the sequence was broken, verify next steps with the issuing authority before assuming records can be corrected without revaccination.
Step 3: Book the right appointment for your departure pathway#
The biggest avoidable mistake is booking a general travel visit when your route requires a specific issuing or signing path. Never assume one certificate process fits all non-EU departures.
| Departure pathway | Who issues/signs | Appointment to book | Confirm before booking |
|---|---|---|---|
| U.S. | USDA-accredited veterinarian starts process; endorsement depends on destination rules | Pet travel exam with USDA-accredited vet | Accepted certificate type, whether APHIS endorsement is required, and carrier paperwork |
| Great Britain / UK | Official Veterinarian (OV) signs AHC | AHC appointment with an OV | New AHC is needed per trip to the EU; Great Britain-issued pet passports are not valid for EU entry |
| Other non-EU origin | Official State vet in country of departure issues/signs required certificate | Local export/travel certificate route that reaches state-vet sign-off | Correct form for destination, authorized signatory, and any route-specific tests/treatments/endorsements |
Step 4: Prepare your document go-bag before the certificate visit#
Treat the certificate visit as a signing appointment, not a discovery call. You want the vet reviewing a clean file, not figuring out what is missing in real time.
| Category | Bring | Notes |
|---|---|---|
| Core proof | Proof of microchipping date and microchip number; rabies vaccination history | Bring these to the certificate visit |
| Route-dependent documents | Owner ID/passport details; travel itinerary or entry plan | Confirm before the appointment |
| Backup | Previous EU animal health certificate or pet passport; prior clinic records with matching pet/owner details; route-specific treatment records, for example tapeworm proof where required | Bring if available |
| If anything is missing | Confirm acceptable evidence with the issuing or signing authority | For U.S. routes, confirm with your USDA-accredited vet; for UK routes, confirm with your OV; do not rely on verbal history unless the authority confirms it is acceptable |
If anything is missing, stop and confirm acceptable evidence with the issuing or signing authority before the appointment. For U.S. routes, confirm with your USDA-accredited vet. For UK routes, confirm with your OV. Do not rely on verbal history unless the authority confirms it is acceptable.
Step 5: Budget by route and re-check before you book transport#
Budgeting is route-specific, and transport booking should come after document checks, not before. Separate private veterinary fees from government endorsement or sign-off fees. Do not use one universal total across routes.
- U.S. private vet prep: confirm the current fee range with your USDA-accredited vet
- U.S. APHIS endorsement, separate from vet fees: starts at $101 per certificate where no lab tests are required; higher tiers apply when tests are involved
- UK OV/AHC costs: confirm the current fee range with your Official Veterinarian
- Other non-EU origin export/state-vet costs: confirm the current fee range with the official export authority
Before you finalize flights, ferries, or trains, confirm carrier-specific pet paperwork. Border documents and carrier boarding documents are not always the same. Related: A Guide to the Schengen 90/180 Day Rule. Once your pet-document timeline is drafted, align your own entry requirements in one place with the Digital Nomad Visa Cheatsheet.
Phase 2: Operation 'Vet on Arrival'#
Once entry is covered, the next job is making sure arrival does not turn into a scramble. Pre-book a clinic and get clear written confirmation of what they can actually do for your case.
Step 1: Shortlist clinics before you fly#
Directory labels are a starting point, not a decision tool. Build a short list, then filter for clinics that can confirm in writing what service they can provide.
| Clinic context | Outreach approach | What to request in writing | How to validate service scope |
|---|---|---|---|
| Large city / many options | Use directories plus direct clinic websites | Whether they can handle your case type | Ask them to state what they can do directly vs by referral |
| Bilingual / expat-heavy city | Contact clinics by both email and phone | Earliest available appointment and service scope | Ask whether they handle your case directly or only initial consults |
| Smaller town / regional area | Include nearby towns in your search | Whether a referral is required | Request the referral path and next-step details |
Step 2: Use a short inquiry checklist#
Keep the message short and decision-focused. You are trying to confirm service scope, not tell the whole relocation story. Include:
- Pet basics: species, breed, age
- Your arrival city and date
- Current document status: what you already have available
- Requested service:
consultordocument review - Owner status:
newly arrived/non-localif relevant - Direct confirmation ask: can they provide this service for your case, and what should you bring?
Step 3: Confirm before you lock the booking#
Before you book, get the important parts in writing. That is what turns a vague clinic reply into something you can actually rely on.
- Service availability for your specific case
- Expected timeline for next steps, if they can provide one
- Exact bring-list and whether originals are required
- Fallback path if this clinic cannot complete the service
Step 4: Arrival-day execution#
Handle the first appointment like a controlled handoff, not an exploratory visit.
- Reconfirm appointment time, location, and service scope.
- Recheck your paperwork against the clinic's confirmed bring-list.
- If any route-specific deadline may apply, verify timing with the relevant authority and the clinic.
- If the clinic cannot complete the service, activate the fallback the same day.
- Save clear digital copies of any records created or updated at the visit.
You might also find this useful: How to Get a 'Carte Vitale' in France.
Phase 3: The 'Go-Live' Appointment#
This is the quality-control stage. Do not leave until the passport entries match your records and the authorised vet has completed every part that needs to be completed.
Step 1: Bring your dossier in four groups#
Bring originals and group them so the clinic can review them quickly.
- Your identity: passport or the ID the clinic requested
- Pet identity: microchip record and any prior pet ID document
- Vaccination evidence: rabies certificate and vaccination history
- Entry-certificate continuity: the original EU animal health certificate used for entry
For entry from outside the EU, that certificate must be issued by an official state vet no more than 10 days before arrival. It can support onward EU travel for 4 months from issuance, or until rabies validity ends sooner.
Step 2: Verify line by line before you leave#
Line-by-line checking feels tedious, but it is where a lot of preventable problems get caught. Ask the vet team to review the document with you before finalizing it.
| Source record | Passport entry | Action if mismatch |
|---|---|---|
| Your ID | Owner name | Ask front desk to correct it immediately before final issue |
| Microchip record + live chip scan | Microchip number | Ask the authorised vet to rescan and correct any digit mismatch |
| Rabies certificate / EU animal health certificate | Rabies date and validity details | Ask the vet to reconcile directly against the original document |
| Clinic completion details | Vet name, address, phone, signature | Ask for completion before final issue while you are still in clinic |
Step 3: Handle edge cases before departure#
Do not carry uncertainty forward if the clinic can resolve it while you are there.
- If a record is missing, ask the clinic which original records they need before they can complete issuance.
- If identity or rabies details conflict, ask the authorised vet which source record they will rely on and request that correction in writing.
- If a signature is unclear, ask the clinic to make a clear correction before you leave.
Step 4: Use the passport for the right jobs#
Once the passport is correctly issued, it becomes a practical travel tool for movement between EU countries. A third-country health certificate can be exchanged for a passport while rabies status is current.
Keep the limits clear. An EU pet passport does not replace non-EU entry rules. For U.S. dog entry or return, you still need a CDC Dog Import Form receipt that is valid for 6 months. If high-risk-country documentation is required, the microchip number must be listed consistently across those required documents.
If you want a deeper dive, read the 2026 Global Digital Nomad Visa Index.
Phase 4: Long-Term Asset Management#
After issuance, the goal shifts from getting the booklet to keeping your travel position clean. Treat every trip as a fresh compliance check, not a repeat of the last one.
Step 1: Recheck live rules before every trip#
Do not rely on memory, prior approvals, or old screenshots. Make a fresh verification note for every route.
This is not pet-travel guidance, so treat timing and treatment details as unverified until you confirm current official rules.
Before each trip, check these live-rule items against current official sources:
- Confirm the current booster timing rule with the official source
- Confirm the route-specific treatment window with the official source
- Confirm covered destinations for any extra treatment requirement with the official source
Your note should include:
- Route and transit points
- Official rule source checked, with date
- Exact document or action required for that route
Step 2: Map the actual travel scenario#
A generic "Europe trip" label is not enough. Use the route you are actually flying, driving, or transiting.
| Scenario | Trigger | Required document/action |
|---|---|---|
| Intra-EU travel | Travel between EU countries | Reconfirm current acceptance conditions for your route; exact booster timing must be checked against official sources before travel |
| Entry to higher-control destinations | Destination has additional published requirements | Verify any extra requirements; treatment timing and covered destinations must be checked against official sources before travel |
| Travel involving Great Britain or Northern Ireland | Any leg enters, exits, or reconnects through GB/NI | Reconfirm current entry and re-entry requirements for the full itinerary before booking |
Step 3: Keep a recovery-ready record set#
Assume you may need to verify or explain a record quickly. Organize your file so you can do that without digging.
- What to store: clear images or scans of key record pages, plus supporting records you already have
- Where to store: original booklet protected physically, one device copy, and one cloud copy accessible from another device
- Pre-trip check: confirm key identifiers match across all records and that entries are legible
Step 4: Use a first-response checklist for loss, damage, or inconsistencies#
Keep loss/damage recovery handling as a verification item until you confirm current official guidance.
Keep these recovery details unresolved until you verify current official guidance:
- Confirm the current first contact point with the official source
- Confirm the reissue or replacement process with the official source
- Confirm the travel-readiness decision rule with the official source
We covered this in detail in How to Get an International Driving Permit (IDP).
Run a Final Readiness Check Before Travel Day#
At this point, the job is simple: run one final readiness check and close any gaps before travel day. Border issues usually come back to four misses you can still fix now: the wrong document pack, the wrong issuing vet, outdated rule checks, or no fallback contact when a document is questioned.
Step 1: Compile your document pack#
Build the file so it can be checked quickly. For entry from outside the EU, that usually means your EU animal health certificate, rabies record, microchip record, and the written non-commercial declaration attached to the certificate where required.
Check that pet name, species, microchip number, and vaccination dates match everywhere. A mismatch, or details entered in the wrong place, can stop travel.
Step 2: Confirm the issuer and entry point#
Confirm in writing that your clinic can issue or endorse what your route requires. For non-EU entry, the EU animal health certificate must be issued by an official veterinarian, or by an authorised veterinarian and then endorsed by the competent authority.
| Item | Who issues/confirms | Key rule |
|---|---|---|
| EU animal health certificate | Official veterinarian, or an authorised veterinarian and then endorsed by the competent authority | For non-EU entry |
| European pet passport | Authorised vet | Issued only to pet owners resident in the EU |
| Travellers' point of entry | Competent authority | Confirm whether your route must pass through a designated travellers' point of entry |
A European pet passport must be issued by an authorised vet. EU guidance also says it is issued only to pet owners resident in the EU, so confirm how your case is handled before you book around assumptions.
Also confirm whether your route must pass through a designated travellers' point of entry. Save that competent authority contact in your phone and in your printed folder.
Readiness snapshot#
| Check | Done | Fix before travel |
|---|---|---|
| Document pack | Names, microchip numbers, and dates match across all records | Any mismatch, missing declaration, or missing endorsement |
| Issuing vet | Written confirmation the vet can issue or secure required endorsement for your case | Clinic can only prepare records, not issue or endorse |
| Entry-country rules | Destination and transit rules rechecked on official pages | You are relying on old screenshots or forum posts |
| Border contingency | Entry-point authority and clinic contacts saved | No live contact if check-in or border staff question a document |
Step 3: Recheck timing rules#
Do one more timing pass before you leave. Rabies vaccination cannot predate microchip marking or reading, and a primary rabies vaccination is valid for movement only after 21 days.
If your dog is entering Finland, Ireland, Malta, Norway, or Northern Ireland, verify whether tapeworm treatment applies and time it within 24 to 120 hours before scheduled entry.
Step 4: Execute your handoff#
Carry originals in one folder and keep readable scans on your phone and in cloud storage. Then clear anything still in "Fix before travel" before departure day.
For the broader move plan beyond document handling, use A Guide to Pet Relocation for Digital Nomads. For a step-by-step walkthrough, see How to get a 'Global Entry' card for expedited US customs. If this relocation includes multi-country travel, use the Digital Nomad Visa Hub to map your next visa steps around your pet's paperwork cycle.
Frequently Asked Questions
Can you apply in your home country, or only after you reach the EU?
This article does not verify a single rule for where you can apply. Confirm it in writing with the relevant official pet-travel authority and with the clinic you plan to use. Save the response and the date checked.
What documents do you need, and in what order?
The exact document flow is route-specific and should not be taken from an old checklist without confirmation. Build a note using the exact document names for your departure country, first EU destination, transit points, and carrier. If two official channels describe the same step differently, get written clarification before travel.
Does the vet need specific authorization to issue the document?
Yes, issuer authorization matters, but it depends on the document and route. The article says a European pet passport must be issued by an authorised vet, while a non-EU entry certificate must be issued by an official veterinarian or by an authorised veterinarian and then endorsed by the competent authority. Confirm in writing whether your clinic can issue the document or only prepare records for another office.
What timeline should you plan before departure and after EU arrival?
Plan backward from your arrival date and verify the timeline for your exact route before you book travel. As current reference points in the article, UK guidance says at least 21 full days after a first rabies vaccination, and EU guidance says a non-EU-origin certificate must be issued no more than 10 days before arrival. After arrival, confirm whether local issuance or conversion applies, book the clinic or authority appointment, and recheck onward-travel rules before the next trip.
How long does the passport stay usable, and what about booster continuity?
This article does not verify a fixed validity period for the passport or booster continuity rules. Treat both as live checks before each trip and save the exact wording from the current official guidance with the date checked. If you already have the booklet, keep a clear image of the relevant page with the matching clinic record.
What should you budget?
Budget by route and use written line-item quotes instead of one generic total. Separate private veterinary fees from government endorsement or sign-off fees, and confirm whether endorsement, translation, courier, correction, or reissue charges are included. The article notes that U.S. APHIS endorsement starts at $101 per certificate where no lab tests are required, separate from vet fees.
What mistakes cause the most preventable trouble?
The article flags four common trouble points: the wrong document pack, the wrong issuing vet, outdated rule checks, and no fallback contact if a document is questioned. Mismatched names, microchip numbers, vaccination dates, or missing endorsements can also stop travel. Get route-specific confirmation in writing and keep dated copies.
Try a related tool
Researched and edited by the Gruv editorial team. Gruv builds cross-border billing, payouts, and finance-operations software for global businesses.
Sources
Includes 2 external sources outside the trusted-domain allowlist.
- cdc.gov/importation/dogs/faqs.htmltrusted
- direct.aphis.usda.gov/pet-travel/us-to-foreign-country/cost-to-end...trusted
- europa.eu/youreurope/citizens/travel/carry/pets-and-ot...trusted
- food.ec.europa.eu/animals/movement-pets/eu-legislation/non-com...trusted
- gov.uk/taking-your-pet-abroad/getting-an-animal-hea...external
- gov.uk/taking-your-pet-abroad/rabies-vaccinations-a...external
Educational content only. Not legal, tax, or financial advice.
Related Posts

The 2026 Global Digital Nomad Visa Index for 50+ Countries
Start with legal fit, not lifestyle filters. The practical order is simple: choose a route you can actually document, then decide where you want to live. That single change cuts a lot of wasted comparison work and stops you from falling in love with places that were never a real filing option.
Pet Relocation for Digital Nomads Without Last-Minute Surprises
Treat this move like a regulated project, not a travel booking. Success is not just getting your pet from one place to another. It means arriving on the planned date, on a route the carrier accepts, with documents that match the destination's current rules, while protecting your pet's welfare throughout.
A Guide to the Schengen 90/180 Day Rule
**Treat Schengen short-stay limits as an operating constraint, then run every movement decision through one repeatable system.** If you treat Europe travel like a chain of bookings, you create avoidable risk. Run it like operations, and you protect flexibility, reduce stress, and keep your visa compliance posture clean across the Schengen Area.