
Quick Answer
Yes. You can get nie number spain remote either through your Spanish consulate or through a duly accredited representative using a limited power of attorney. The consulate route gives you more direct control, while delegation reduces your handling workload. In both cases, someone must appear physically, and your file has to be internally consistent. Confirm your post’s current instructions for EX-15, Form 790 (code 12), appointment rules, and proof of purpose before submission.
The Strategic Crossroads: Choosing Your Remote NIE Pathway#
If you're handling your NIE remotely, choose the pathway first. The NIE (Numero de Identidad de Extranjero) is your personal foreigner identification number for Spain-related procedures that require identification. It identifies you before the Spanish public administration, but it does not give you the right to reside in Spain. Residence must be handled through the relevant visa process.
Step 1. Choose your application channel#
From abroad, official guidance gives you two practical options:
- Apply through the Spanish consulate in your country of residence.
- Have a duly accredited representative submit the request on your behalf.
In both cases, physical appearance is still required, either by you or by your representative. This is not a fully online process from start to finish.
Step 2. Compare the tradeoffs that affect your timeline#
Both routes are official. The real difference is where the friction sits.
| Consulate | Intake/timing note |
|---|---|
| Los Angeles | Requires appointments and notes NIEs are normally issued within two weeks. |
| Washington | Allows walk-in submission windows (Mondays, Wednesdays, Fridays, 10am to 12pm) and notes 20-30 days. |
| New York | Notes five weeks. |
| London | Says NIE is normally issued within three weeks, but warns this can be extended by factors beyond administrative control. |
| Decision factor | Consulate path | Representative path |
|---|---|---|
| Processing predictability | Lower. Rules and intake logistics vary by consulate, and the consular office cannot shorten processing time. | Moderate. Preparation can be more structured, but official processing time is still outside your representative's control. |
| Your time burden | Often higher. You manage local instructions, submission logistics, and follow-up yourself. | Often lower after setup. You focus on appointing the representative and providing required documents. |
| Documentation workload | You prepare and submit the file, including EX-15 and your stated reason. | You still provide documents, and the representative files with the authority you grant. |
| Error exposure | Can be higher if local requirements are misunderstood or forms are inconsistent. | Shifts to authorization quality: the power of attorney must expressly allow NIE filing. |
| Support level | Primarily published consular instructions. | Direct support depends on the representative you appoint. |
Consulate timelines and intake methods are not uniform, as the examples above show.
Step 3. Pick based on urgency, budget, and bureaucracy tolerance#
A simple filter usually gets you to the right route faster than overthinking edge cases.
| Factor | What to consider | Article note |
|---|---|---|
| Urgency | If delays are hard to absorb | Delegated filing may reduce operational friction, even though official processing speed is not guaranteed. |
| Budget flexibility | Compare total costs in your location | Compare before choosing a route. |
| Process comfort | Comfort with changing local instructions | DIY is viable if you are comfortable tracking changing local instructions. If not, delegation may be safer. |
Even without a universal formula, the cost of delay still matters.
Step 4. Avoid the two mistakes that cause preventable setbacks#
Two common setbacks are easy to avoid. First, EX-15 must state the economic, professional, or social reason for requesting the NIE. Keep that reason specific and consistent across the rest of your file.
Second, if you delegate, your power of attorney must expressly authorize NIE submission.
Before you choose a route, verify the current page for your consulate because local instructions can change. Keep the planning boundary clear: NIE is identification, not residence permission.
The next section covers the consulate route step by step. After that, the representative route shows you what to check in the POA before filing.
If you want a deeper dive, read The Global Digital Nomad Visa Index: 50+ Countries Compared.
Before you commit to the consulate or representative route, map your application sequence against visa milestones with the Digital Nomad Visa Cheatsheet.
Path 1: The Control & Cost Method (Navigating the Spanish Consulate)#
If you handle the consulate route yourself, the main risk is usually not the form. Delays tend to come from consular jurisdiction, appointment logistics, or a file that does not line up internally.
Step 1. Confirm your consular jurisdiction#
Start with the Spanish consulate that covers your country of residence. A NIE may be requested at the consular office in your country of residence, and process details are consulate-specific.
- Find your consulate's current NIE page.
- Save that exact page and note its posted date.
- Use only that page for process details.
Common risk: preparing from another consulate's instructions. How to avoid delay: follow only your own post's channel, format, and checklist.
Step 2. Secure the cita previa#
If your consulate uses a cita previa, book it first and treat that confirmation as part of your file.
- Book using the channel listed by your consulate.
- Save confirmation details, whether by email or screenshot.
- Add any confirmation-specific instructions to your checklist.
Common risk: assuming there is one universal booking method. How to avoid delay: do not lock in later steps until you have a confirmed slot and a complete file plan.
Step 3. Complete EX-15 with a reason that matches evidence#
Complete EX-15 (preferably online), print it, and submit it unsigned at filing if your consulate instructs that. Your reason must be economic, professional, or social, and your documents should support that same reason.
Check three things before you print:
- Intent category: choose economic, professional, or social.
- Evidence match: attach proof that supports that exact category.
- Consistency: keep the same purpose across EX-15 and supporting documents.
Common risk: the stated reason and the proof point to different purposes. How to reduce risk: keep the reason specific, document-backed, and consistent.
Step 4. Build and verify your dossier#
Once EX-15 is aligned with your purpose, check the rest of the file. Verify each item against your consulate page before appointment day.
| Category | What to prepare | Verification check |
|---|---|---|
| Mandatory | EX-15 completed and printed (unsigned if instructed) | Personal details and reason are consistent with your proof |
| Mandatory | Form 790, code 12 completed | Confirm local payment handling for your post |
| Mandatory | Documentary proof of need for NIE | Proof directly supports your economic/professional/social reason |
| Post-specific items | Local copies, cover sheets, or formatting items | Add only what your consulate currently lists |
| Confirm with your consulate | Identity document format and copy rules | Do not assume another post's ID-copy requirements |
| Confirm with your consulate | Fee and payment method | Confirm the current fee and payment process with your consulate (example: London listed £ 8.15, debit/credit card payment on appointment day, page dated January 1, 2025) |
Common risk: one data mismatch across forms. How to reduce risk: line-check names, document numbers, and purpose statement before printing.
Step 5. Attend and file cleanly#
Clean execution matters here. Physical presence is mandatory in every case, whether by you or by your representative. On this route, you are filing in person. Bring your dossier in the order your consulate requests, plus your appointment confirmation.
Common risk: missing confirmation, missing proof, or signing EX-15 early when the post requires unsigned submission. How to reduce risk: follow the consulate's filing order and signature instruction exactly.
Step 6. Plan the wait with buffer#
After submission, the file moves on an official timeline you do not control, and the consular office cannot shorten central processing time. One post, London, says NIE is normally issued within three weeks, but also warns this can be extended by factors beyond administrative control.
Use that as a planning principle, not a promise. Build buffer into your timeline. If appointment availability is still the blocker, evaluate filing through a duly accredited representative under your consulate's rules. If you use a representative, the power of attorney must expressly authorize NIE filing and be apostilled.
Related reading: How to Get a SIREN/SIRET Number as a Freelancer in France.
Path 2: The Speed & Efficiency Method (Delegating via Power of Attorney)#
If consulate timing is your bottleneck, delegation can be a practical answer. The tradeoff is clear: you give up some hands-on control, and your main risks move to representative quality, POA wording, and legalization accuracy.
Step 1. Screen your representative before sharing documents#
Start with fit, not title. Choose the profile that matches your case, then verify that the person can actually handle the job the way you need.
| Option | Best fit | What to verify |
|---|---|---|
| Gestor administrativo | Administrative processing that does not require legal technique reserved to lawyers | Professional registration details, written scope, update process, secure document workflow |
| Abogado | Cases with legal interpretation, unusual facts, or related immigration/legal complexity | Número de colegiado, listing in the Censo de Colegiados, and direct Colegio de Abogados confirmation if you want maximum certainty |
Before you proceed, require a written engagement document, or equivalent, that clearly states scope, fee basis, exclusions, and how updates will be communicated. Also confirm the practical handling of passports, certified copies, and originals: named contacts, secure transfer method, and clear receipt and return tracking.
Step 2. Limit authority with the right POA scope#
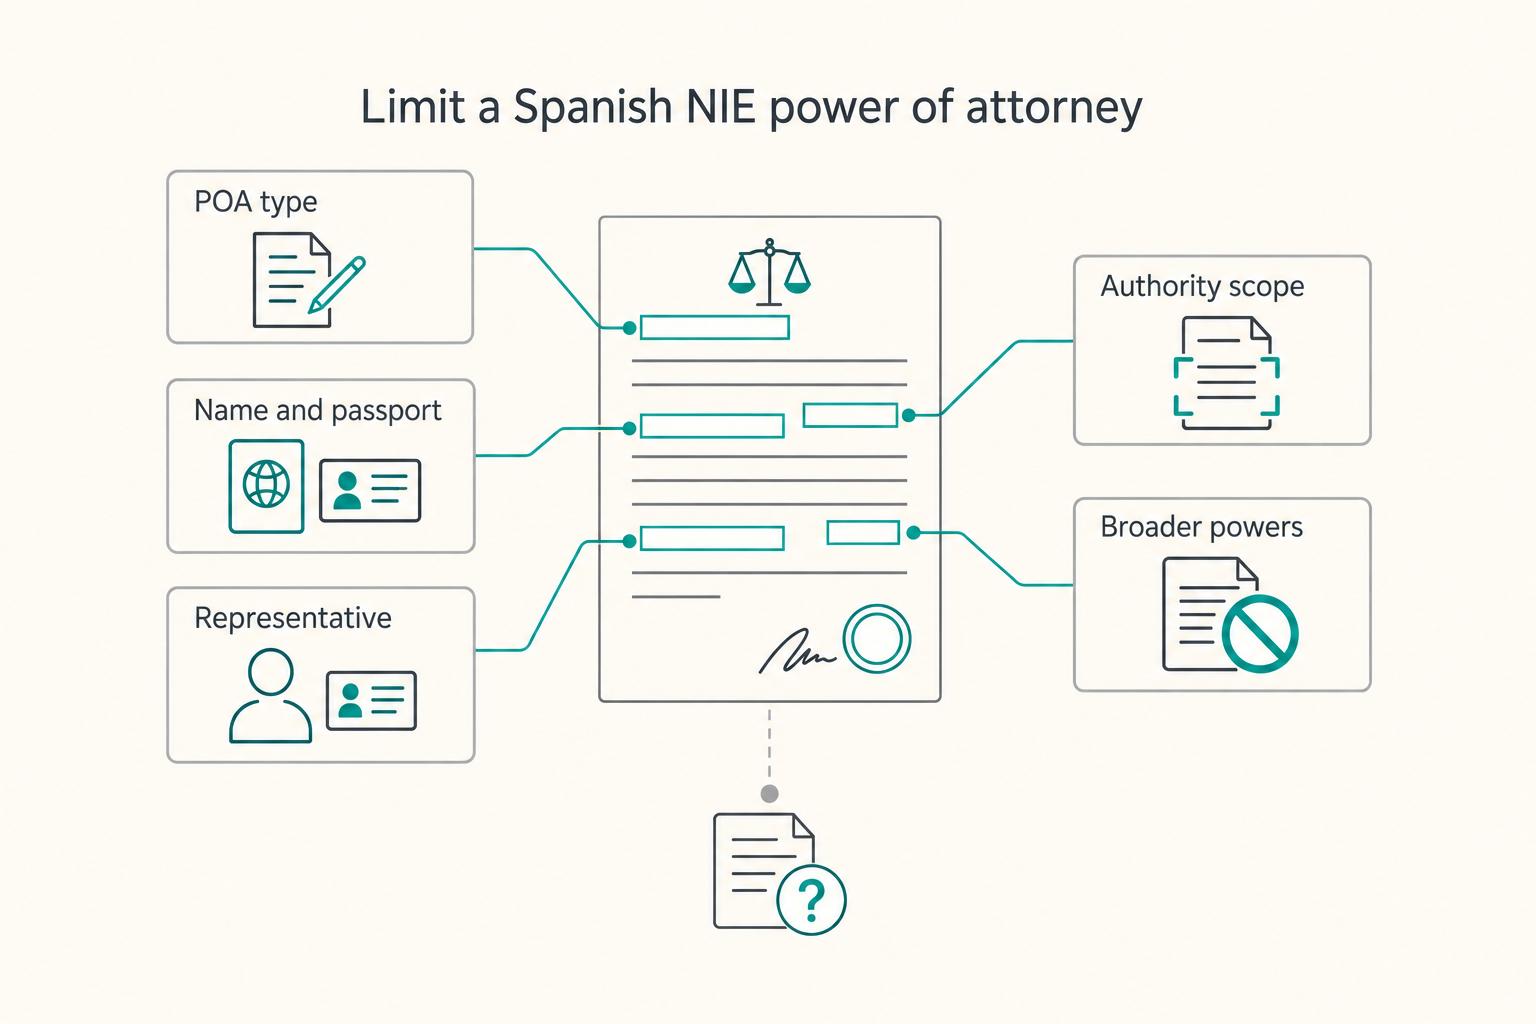
A narrow POA is usually safer here. Use a poder especial unless you intentionally want broad authority. A poder general allows the agent to act without limitations across lawful acts, while a poder especial is limited to specific legal acts.
| Scope item | Article requirement |
|---|---|
| POA type | Use a poder especial unless you intentionally want broad authority. |
| Name and passport details | Your full name and passport details exactly match your ID. |
| Representative identification | The representative is identified exactly. |
| Authority scope | Authority is limited to NIE filing and related document presentation. |
| Broader powers | No broader powers, such as banking, property, tax, or company acts, are included unless you explicitly want them. |
For NIE delegation, the POA must expressly authorize filing the NIE application. Before you sign, make sure each scope item above is exact.
Draft the delegated powers first, then sign. If you execute at a Spanish consulate, you must appear in person on signing day.
Step 3. Run the notarization and legalization flow from abroad#
This is where precision matters. If you sign before a local notary outside Spain, the document must be legalized or apostilled and translated into Spanish before Spain treats it as valid.
Use this sequence:
- Finalize POA wording with your representative.
- Sign before the notary with identity details matching your passport.
- Complete the correct legalization path, with an apostille where applicable.
- Arrange Spanish translation.
- Send originals to your representative and confirm receipt.
If the document is apostilled by the issuing country's authority, no extra embassy step is required before use in Spain. Confirm the country-specific legalization route before filing. Do not assume scans or e-signatures will be accepted in legalization channels that require originals and handwritten signatures.
Step 4. Reconcile the filing pack before submission#
Before anyone files, do one final consistency check across the whole pack. In representative-filed NIE submissions, the representative's original and copy of ID or passport must be presented. Your identity document follows certified-copy rules for this route.
Before filing, verify that name, passport number, and authority wording match across the POA, certified identity copy, and NIE application file.
Step 5. Prevent the common failure points#
At this point, the big risks are straightforward and avoidable:
- Incomplete authority wording: POA does not expressly authorize NIE filing.
- Identity mismatch: differences across passport, certified copy, and POA.
- Unclear service terms: scope, updates, and original-document handling are vague.
Use one hard gate before filing: get written confirmation of POA scope, document receipt, identity-match check, and filing readiness.
You might also find this useful: How to Get a Tax ID Number (NIF).
Your NIE is Secured. What's the Next Strategic Move?#
Once the NIE is in place, the next job is sequencing. Confirm what document you actually need next, separate tax and social security setup, choose a bank path that matches how you will operate, and start compliance record-keeping immediately.
Step 1. Confirm whether you only need the number or also a residence card#
Do not assume NIE and TIE are interchangeable terms. Verify the current official definition and requirement for each in your exact visa or residence path before you book anything.
| Item | What it is | When you use it |
|---|---|---|
| NIE | Confirm the current official definition for your route | Use where your verified process asks for NIE details |
| TIE | Confirm the current official definition and whether it applies to your route | Use where your verified process asks for card-based residence/ID proof |
| Timing check | Current TIE appointment/deadline rule | Book only after confirming deadline + required documents |
Keep your name and passport details identical across every file before you submit the next application.
Step 2. Split your self-employment setup into tax registration and social security enrollment#
Do not bundle these into one mental task. Run them as separate workstreams so one delay does not block the other.
| Workstream | Prepare before arrival | Complete after arrival |
|---|---|---|
| Tax registration | Confirm the authority, form ID, activity-code rules, address rules, and start-date logic from the official source. | File once your local operating details are final. |
| Social security enrollment | Confirm the enrolling entity, required IDs, payment details, and timing rule from the official source. | Enroll once your filing pack is complete and internally consistent. |
If you are U.S.-linked, whether self-employed or employed through the U.S., add a coordination check first. Spain is listed as a U.S. Social Security agreement country, and SSA shows the Spain agreement effective date as April 1, 1988. These totalization agreements are intended to prevent dual Social Security taxation.
If U.S. coverage applies, SSA issues a U.S. Certificate of Coverage that serves as proof of exemption from foreign Social Security taxes. Employers and self-employed individuals can request certificates online, but SSA warns web transmission confidentiality cannot be guaranteed. Keep a copy of your request and final certificate, and use SSA support if needed: (410) 965-7306, Monday to Friday, 8 a.m. to 3 p.m. Eastern.
Step 3. Choose the bank account path that matches how you will operate#
The fastest account is not always the right one. Choose the account path based on how you will actually live and bill. Then confirm in writing whether the bank will classify you under your current status and what that changes for features, fees, and direct debits.
Use a bank-confirmed document checklist before applying. Do not rely on a generic document stack: requirements, timing, and downstream dependencies can differ by bank and status, so confirm the exact list in writing for your case.
Step 4. Set your tax compliance baseline before your first invoice or filing date#
Your first win is not mastering every tax issue immediately. It is getting the classification right and keeping clean records from the start.
- Verify your tax-residency status under the current legal test for your filing year and facts.
- Verify your filing obligations for your status, filing year, and facts.
- Set a record system for income, expenses, cross-border payments, and social-security documentation.
A common failure mode is waiting until filing season and trying to rebuild the paper trail later. Start your filing archive now and save every registration receipt and status document as it is issued.
For a step-by-step walkthrough, see How to Get Your 'Certificado Digital' in Spain.
Conclusion: You Are Now in Control#
By now, the decision is no longer abstract. Your route was the right one if it matched your real constraint: consulate if you preferred to handle it directly, representative if you preferred less handling on your side. In both cases, the objective is the same: secure your NIE without avoidable delays. You handled the NIE before it could block the rest of your move.
Keep the role of the NIE clear. It is your Spain administrative and tax identifier for legal and economic activity, including tax administration, banking, and business setup, but it is not a residency permit. It supports the next steps. It does not replace them.
Before you move on, verify your details across every document in your file. Procedural mismatches can cause delays or rejection, so compare your issued NIE record against your passport data and your submitted EX-15 packet. Then keep clean copies of all filing and appointment records.
- Lock your records. Save digital copies of your NIE document, passport ID page,
EX-15, and filing or appointment proof. - Plan the next appointment step. If your next step requires a police-station appointment, book early and plan for full file compliance review.
- Use the NIE in sequence. Move to the next task you actually need now: tax setup, banking, or self-employment registration.
- Keep unresolved checks visible in your plan. Track the current consulate processing window and the document-acceptance check for your next bank, tax, or immigration step.
Related: Tax Guide for Digital Nomads in Thailand.
After you secure your NIE, keep your Spain move plan clean with the Tax Residency Tracker.
Frequently Asked Questions
Can you handle the NIE from outside Spain?
Yes. You can apply through the Spanish consular office in your country of residence or file through a duly accredited representative, but physical presence is still required from either you or your representative. Before filing, confirm your post-specific rules for EX-15, Form 790 (code 12), and whether you need an appointment. | Route | Best fit | Control level | Main tradeoff | Who handles paperwork | | --- | --- | --- | --- | --- | | Consulate | You want to manage filing directly with your consular post | High | Process rules and timing vary by post, and consulates state they cannot expedite | You | | Representative | You want someone to appear on your behalf for NIE filing | Medium | You must grant express authority and rely on the representative’s document handling | Your duly accredited representative |
How long does it take remotely?
Do not plan around one universal timeline. Official posts publish different examples, and those can change. Your next step is to verify your exact consulate processing window before planning around a date. Keep in mind that consulates also state they cannot expedite processing.
What is the difference between NIE and TIE?
Your NIE is your personal, unique identification number for Spain-related procedures. Your TIE is a physical foreigner identity card that certifies legal stay in Spain when applicable. The practical rule is simple: the NIE number itself is not residence permission and does not prove residence.
Where does the NIE fit in the digital nomad visa timeline?
It depends on your route. If you are using the consular telework visa route, Washington guidance says you need your NIE before applying. If you are already legally in Spain, that same guidance says you may apply directly for telework residence authorization through UGECE. Decide the route first, then sequence the NIE and residence steps around that route.
Does the NIE expire?
Official consular material describes the NIE as a personal, unique, and permanent number. What you should verify each time is whether the specific document or certificate you hold is accepted for your next bank, tax, or immigration step. Treat that acceptance check as route-specific and current to the process you are about to use.
Is a power of attorney for an NIE safe?
It can be, if you keep the authority narrow and explicit. Before signing, confirm the POA expressly authorizes NIE submission, verify the professional’s identity or registration details, and limit scope to this task only. Stop if you see broad property powers, refusal to share the draft POA, or no written engagement terms.
What about a gestor versus an abogado?
For this decision, focus less on title and more on authority, scope, and accountability. Ask who will physically appear as your representative, whether they are duly accredited for the filing, and what legal advice they are or are not providing. If those points are not confirmed in writing, do not authorize them yet.
Try a related tool
Researched and edited by the Gruv editorial team. Gruv builds cross-border billing, payouts, and finance-operations software for global businesses.
Sources
Includes 1 external source outside the trusted-domain allowlist.
- bea.gov/sites/default/files/2022-06/iea-concepts-met...trusted
- exteriores.gob.es/Consulados/losangeles/en/ServiciosConsulares...trusted
- exteriores.gob.es/Consulados/londres/en/ServiciosConsulares/Pa...trusted
- ftb.ca.gov/file/personal/residency-status/part-year-and...trusted
- ssa.gov/international/CoC_link.htmltrusted
- ssa.gov/international/agreements_overview.htmltrusted
- uscc.gov/sites/default/files/2025-11/2025_Annual_Repo...trusted
- consejogestores.org/ser-gestorexternal
Educational content only. Not legal, tax, or financial advice.
Related Posts

The 2026 Global Digital Nomad Visa Index for 50+ Countries
Start with legal fit, not lifestyle filters. The practical order is simple: choose a route you can actually document, then decide where you want to live. That single change cuts a lot of wasted comparison work and stops you from falling in love with places that were never a real filing option.

Thailand Tax for Digital Nomads Without Residency Mistakes
The most expensive mistakes here happen before anyone opens a tax return. People pick a visa, assume the tax answer comes with it, then try to rebuild the year from scraps after the fact. By then, the damage is usually not one dramatic error. It is a pile of small gaps: an unverified day count, a transfer with no clear purpose note, invoices that do not line up cleanly with payments, and assumptions nobody wrote down when the facts were still fresh.
How to Get a Tax ID Number (NIF, NIE, TIN) in Europe
Traditional tax advice is usually backward-looking. Your NIF, NIE, and TIN decisions are forward-looking. You need to know what to apply for, where, and in what sequence before travel, client work, or registrations push you into a harder compliance path.