
Quick Answer
Start by treating every free-camping option as unverified until you confirm legality and operational fit. To find free camping in the US reliably, identify the land manager, validate access rules through official channels, and test your real work setup on arrival before you unload. Check route legality against the relevant source, including MVUM use on USFS roads and designated-road expectations on BLM areas. If connectivity, power, or safety checkpoints fail, relocate early instead of forcing the stay.
1. Mastering the Terrain: Your Off-Grid Operational Arenas#
To find free camping in the US that you can actually work from, treat every listing as a lead until you verify it. Use a simple discovery workflow (search, site, contact, map, reviews), but do not assume a listing tells you the current camping rules.
Step 1 Start with the official source, not the label#
A campsite lead is only a lead until you can identify who manages that land and where the current rules are published. On the first pass, sort each option into a decision bucket, then require an official rule check before arrival.
| Candidate type | Use it for initial discovery | What you need to verify before driving in | Connectivity and power notes to capture | Rule source to save offline |
|---|---|---|---|---|
| Search result | Yes | Who manages the land and whether camping is currently allowed | Your own notes only; do not assume from marketing language | Official site, current map page, contact page |
| Map pin | Yes | Whether the pin matches a legal, open location | Notes from your own verification checks | Official site, current map page, contact page |
| Review thread | As supporting context | Whether any rule claims match the official source | Date/context from reviewers; ignore unverified claims | Official site, current map page, contact page |
| Listing with unclear manager | Only as a clue | Manager identity before treating it as usable | No performance assumptions until ownership is clear | Confirm manager first, then save the official page |
The checkpoint is simple: if you cannot name the managing unit and point to its official page, you do not yet have a usable work site.
Step 2 Build a quick verification chain#
Use discovery apps and user-submitted maps to generate options, not to settle legality. Cross-check each candidate against the official source for that unit. Before you leave cell service, save three things: the exact pin, the official rules page, and the contact page you used to confirm details.
A good pre-arrival note is short and specific: date checked, manager, access route, likely turnaround point, and any rule that still needs confirmation. If a listing gives you only a nice view and no operational detail, treat it as a lead, not evidence.
Step 3 Read reviews like field notes#
Useful reviews give details you can validate: when the reviewer went, what they actually observed, and what can be cross-checked against the official source. You can usually ignore vague praise, old comments with no date context, and any rule statement not backed by an official page.
A common failure mode is stacking assumptions from multiple unverified listings. Your evidence pack should stop that before it starts.
Step 4 Run a pre-camp compliance check. Before you settle in, confirm these items from the official source and write them down:
- Any posted stay limit (if listed): Current stay limit pending official verification
- Any movement requirement after that limit (if listed): Current movement requirement pending official verification
- Road or area status: check date pending official verification
- Contact page or office reference saved offline
- Low-impact camp plan documented for your own operations
One hard guardrail: raw numbers pulled from scraped word lists are token counts, not camping limits. Do not treat a number as a legal threshold without official confirmation.
2. The Productivity-First Site Selection Protocol#
A site only works if it supports your workday, not just your campsite setup. Use the same order every time: shortlist, verify remotely, validate on arrival, then commit or relocate.
Step 1 Shortlist workable candidates. Start with frontcountry dispersed options on public land, since they are typically vehicle-accessible. If a pin is on private property, treat it as a paid stay, not free camping. Build a shortlist of three to five options because many dispersed sites are first come, first served. Save the exact pin, land manager, and route notes in an offline map app, and use tools from The Best Apps for Planning a Road Trip. If the area uses designated dispersed sites, keep only placard-marked established sites.
Step 2 Verify remotely. Confirm camping is permitted at that specific location, then grade each site by connection path before scenery. Before you leave pavement, you should be able to name a primary connection and a fallback.
| Connection path | Verify before driving in | Commit rule | Fallback path |
|---|---|---|---|
| Direct cellular | Coverage map, terrain exposure, recent user comments | Meets your call/upload threshold; current performance threshold pending field verification | Move to backup site in same region |
| Cellular with external gear | Setup space, power draw, whether parking position improves exposure | Clears threshold after on-site test; current performance threshold pending field verification | Use town backup workspace |
| Satellite internet | Open-sky view, tree cover, weather exposure, placement area | Sky view is workable and call quality is stable; current performance threshold pending field verification | Switch to cellular or relocate |
| Off-site backup workspace | Hours, parking, drive time, noise, privacy | Reachable without losing a core work block | Library, coffee shop, coworking, or paid campground Wi-Fi |
For fallback planning, use A Guide to Finding Campgrounds with Wi-Fi in the US and A Guide to Full-Time RVing on a Budget.
Step 3 Validate on arrival. Test from the exact spot where you would park, not from the road entrance. Then run a power-fit check: when shade hits your panel area, how much open sky you actually have, and what charging backup you will use if weather cuts production. Tie each answer to work continuity before you unpack. If your setup cannot cover your work blocks with a realistic backup path, do not commit.
Many dispersed sites also lack toilets, sinks, and running water, so include that in your same-day resupply and schedule planning.
Step 4 Commit or relocate. Run this pass/fail scan before leveling or unloading:
- Confirm you can resupply water, food, and fuel without losing a core work block.
- Name one emergency route out and one place to regain signal if conditions change.
- Identify one backup work location for calls if your on-site connection fails.
- Check privacy, road noise, generator noise, and camera background for meetings.
If any item fails, relocate before setup. A scenic site is not a productive site if it cannot reliably support your workday.
3. The Triple-Threat Protocol: Mitigating Your Biggest Off-Grid Risks#
A site can be legal and still fail operationally, financially, or personally once conditions change. Treat this as your pre-commit risk pass: set trigger points, define backups, and decide in advance when you leave.
Step 1 Build your operational failover matrix#
If you only have one path for connectivity or power, your setup is fragile. Use this matrix and fill in your real cutoffs after on-site verification.
| Critical lane | Trigger condition | Backup path | Fallback action |
|---|---|---|---|
| Connectivity primary | Current call quality, upload speed, or session stability threshold pending field verification from your parked position | Switch to the secondary connection you already tested | Move to your off-site backup workspace or relocate before your next core work block |
| Connectivity secondary | Secondary path also degrades because of terrain, congestion, blocked sky, or weather | Use a pre-verified tertiary path (for example, another carrier or satellite setup) | Reclassify the site as day-use only and leave the same day |
| Power generation | Current daily production/runtime threshold pending field verification | Switch to alternate charging (vehicle charging, power bank, or other backup source) | Cut nonessential loads and relocate before your next work block depends on recovered power |
| Stored power | Current overnight and meeting-period battery threshold pending field verification | Shift to lower-draw devices and recharge from the alternate source | End the stay if you cannot rebuild enough capacity for the next day |
What you do next: if you cannot state your trigger, backup, and leave point in under a minute, do not commit to the site yet.
Step 2 Run your asset checklist before driving in and before leaving camp#
Your vehicle is your transport, office, and storage. Run one checklist before you drive in and another before you leave camp.
| Stage | Focus | Requirement |
|---|---|---|
| Pre-drive | Route legality | Confirm land manager and route legality before you enter. |
| Pre-drive | MVUM | On USFS land, verify the route on the MVUM; routes not shown are not open to public motor vehicle travel. |
| Pre-drive | Designated roads and trails | On BLM land, stay on designated roads and trails unless the area is specifically open to off-road use. |
| Pre-drive | Maps and recent conditions | Save maps offline and check recent conditions plus satellite view for washouts, deep sand, tight turns, low branches, and turnaround room. |
| Leave-camp | Valuables | Remove valuables from sight before leaving the vehicle. |
| Leave-camp | Doors, blinds, and gear | Lock doors, close blinds, and leave no gear outside. |
| Leave-camp | Passports and backup drives | Store passports and backup drives in a secured container. |
| Leave-camp | Unattended personal property | On BLM land, remember unattended personal property generally cannot be left longer than 10 days unless otherwise authorized. |
Pre-drive (route legality and road fit)
Confirm the land manager, match the route to the MVUM or local access rules, and check offline maps, recent conditions, and satellite view for washouts, deep sand, tight turns, low branches, and turnaround room before you enter.
Leave-camp (theft and unattended gear)
Before you walk away, secure valuables out of sight, lock doors, close blinds, leave no gear outside, and remember that on BLM land unattended personal property generally cannot be left longer than 10 days unless otherwise authorized.
What you do next: if route legality is unclear, road fit is marginal, or valuables cannot be secured out of sight, pick another site.
Step 3 Follow a repeatable personal safety protocol#
Before setup, run the same safety sequence every time.
| Stage | Check | Action |
|---|---|---|
| Arrival scan | Hazard trees | Look up for hazard trees (broken limbs, broken tops, leaning trunks) and avoid camping under them. |
| Arrival scan | Flood exposure | Check terrain for flood exposure (washes, drainage bottoms, flooded crossings). |
| Arrival scan | Floodwater crossings | Treat floodwater crossings as no-go; never drive or walk into flood water. |
| Emergency comms setup | Wireless Emergency Alerts | Keep Wireless Emergency Alerts enabled. |
| Emergency comms setup | Non-cell backup | Set up your non-cell backup (such as a satellite messenger) before signal degrades. |
| Emergency comms setup | Trusted contact | Send a trusted contact your location, vehicle details, check-in time, and missed check-in plan. |
| If conditions deteriorate | Response order | Use this practical order: stabilize, communicate, relocate. |
| If conditions deteriorate | Flood conditions | For flood conditions, move to higher ground first. |
| Overnight go/no-go screen | Overhead and terrain | No hazard trees overhead and no obvious flood trap. |
| Overnight go/no-go screen | Access | Legal access in and out is confirmed. |
| Overnight go/no-go screen | Emergency communication | At least one emergency communication path is ready. |
| Overnight go/no-go screen | Check-in plan | A trusted contact has your check-in plan. |
Arrival scan
Look up for hazard trees, check terrain for flood exposure such as washes or drainage bottoms, and treat floodwater crossings as no-go.
Emergency comms setup
Keep Wireless Emergency Alerts enabled, set up your non-cell backup before signal degrades, and send a trusted contact your location, vehicle details, check-in time, and missed check-in plan.
If conditions deteriorate
Use this practical order: stabilize, communicate, relocate. For flood conditions, move to higher ground first.
Overnight go/no-go screen
Do not stay overnight unless there are no hazard trees overhead, no obvious flood trap, legal access in and out is confirmed, at least one emergency communication path is ready, and a trusted contact has your plan.
What you do next: if any one item fails, do not stay overnight.
For a step-by-step walkthrough, see How to Find Reliable Wi-Fi Anywhere in the World.
4. The Compliance Dashboard: Mastering Regulations with Confidence#
Compliance is easiest when you run it the same way every time: log before arrival, verify on arrival, and close out before departure. To avoid avoidable disruptions, track each site the same way every time.
Step 1 Log the site before you drive in#
Identify the exact land manager for the exact site, not just the region. Rules can change by authority and by unit. In the Adirondacks, land is split across public and private ownership, and DEC ties recreation rules to land classification and unit management plans, so you should not copy rules from a nearby pin or another district.
Use one tracker per stop:
| Stage | Land manager | Site identifier | Stay rule | Movement requirement | Local restrictions | Verification status |
|---|---|---|---|---|---|---|
| Before arrival | Current land manager pending official verification | Current coordinates, unit name, trailhead, parking area, or access point pending official verification | Current stay rule pending official verification | Current movement requirement pending official verification | Current permit, fire, waste/disposal, road-access, and temporary-closure notes pending official verification | Official page check pending; date/time log pending |
| On arrival | Confirm posted manager on site | Confirm signed site, trailhead, parking area, or nearby landmark | Confirm posted or office-confirmed threshold | Confirm posted or office-confirmed movement condition | Confirm current restrictions and access conditions | Signs checked; page screenshot or call note saved |
| Before departure | Reconfirm same manager | Record departure location | Record departure timing against logged rule | Record next move condition against the verified rule | Note any closure updates and cleanup status | Departure time logged; evidence saved |
Your standard is simple: you can show where the rule came from, when you checked it, and which site it applies to.
Step 2 Verify rules in the same order on every move#
| Category | Where to verify | What to log |
|---|---|---|
| Permits or reservations | Official government domains and secure connections; current unit pages, notices, and listed contacts. | Page title, screenshot, date/time, and office or staff contact details if you called. |
| Fire restrictions | Official government domains and secure connections; current unit pages, notices, and listed contacts. | Page title, screenshot, date/time, and office or staff contact details if you called. |
| Waste/disposal rules | Official government domains and secure connections; current unit pages, notices, and listed contacts. | Page title, screenshot, date/time, and office or staff contact details if you called. |
| Road-access rules | Official government domains and secure connections; current unit pages, notices, and listed contacts. | Page title, screenshot, date/time, and office or staff contact details if you called. |
| Temporary closures | Official government domains and secure connections; current unit pages, notices, and listed contacts. | Page title, screenshot, date/time, and office or staff contact details if you called. |
- Identify the authority first. Match map, signs, and access point to the managing agency or unit.
- Confirm current rules in official channels. Use official government domains and secure connections, then check current unit pages, notices, and listed contacts.
- Log who confirmed what and when. Save page title, screenshot, date/time, and office or staff contact details if you called.
Re-check these categories each move: permits or reservations, fire restrictions, waste/disposal rules, road-access rules, and temporary closures.
Watch for timing shifts when access controls change. Public comments in Glacier's dataset describe arrivals moving to before 6am and parking windows like 1-3 pm; treat that as a planning risk to monitor, not as a rule to rely on or a workaround to copy.
Step 3 Close the site cleanly before you leave#
Treat Leave No Trace as an operating standard tied to continued access and lower-friction interactions with land managers. At camp, keep your footprint tight, stay within allowed access and parking use, and control trash and waste so nothing is left behind. At exit, do a slow final walk, pack out all trash, check for small debris, and leave the site looking unused.
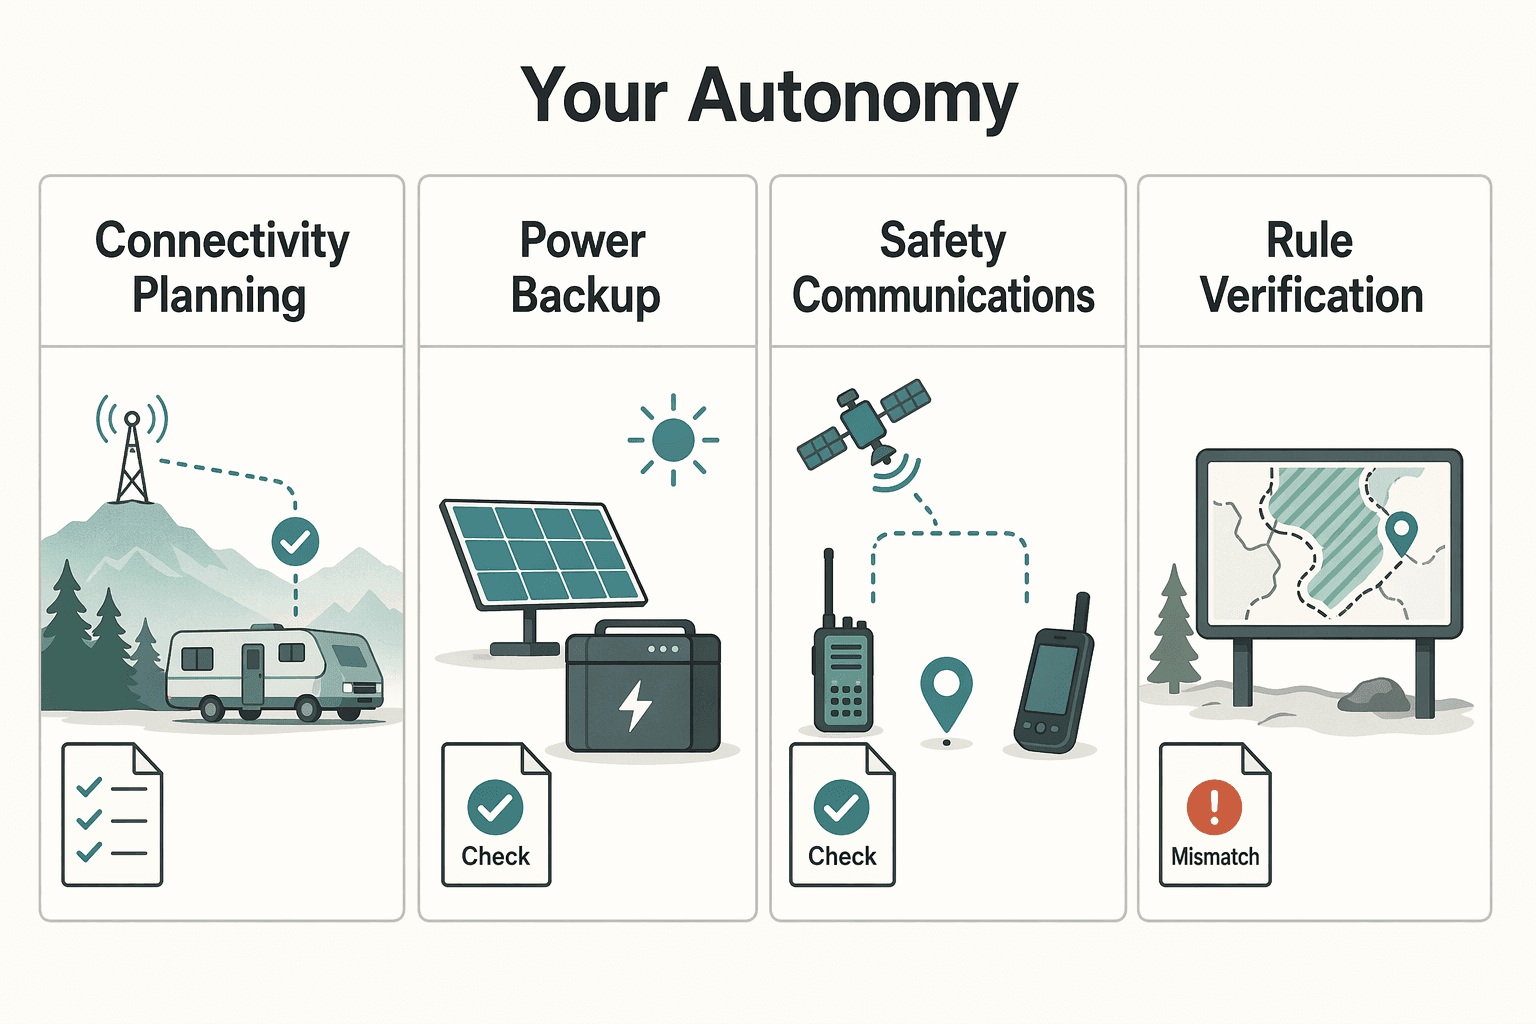
From Campsite to Command Center: Your Autonomy, Secured#
Use one operating model for every move: screen the site, run your risk checks, and verify current rules before you settle in. That keeps day-to-day execution more predictable, with fewer avoidable interruptions and clearer go/no-go decisions on public land.
Step 1: Screen the site against your actual workday, not the view. Check access, terrain, shade, turnout size, and whether the spot can handle your use without obvious expansion, degradation, or crowding. If the road approach, footprint, or pin does not match what you saw in maps and field notes, pause and reassess.
Step 2: Check weak points before you commit. Validate that your setup can support the work block you need to run that day, and make sure someone you trust has your route or overnight plan. If conditions shift and the site becomes marginal, treat that as a decision point, not something to push through.
Step 3: Verify rules with the actual land manager. Community tools are useful for discovery, but legality comes from the office or page managing that ground. A practical sequence is to identify and evaluate the problem, choose actions, then keep monitoring and adjusting as conditions change.
| Criteria | Reactive camping approach | Professional operating approach |
|---|---|---|
| Connectivity planning | Assumes the signal will be fine | Confirms the site can support the workday before committing |
| Power backup | Hopes battery lasts | Checks available power against the planned work block |
| Safety communications | Leaves plans vague | Shares route or overnight location before stopping |
| Rule verification | Relies on comments and old pins | Confirms current rules with the land manager |
Before your next move, run this sequence: discover, inspect, verify, arrive, test, decide. If connectivity is still your main constraint, use A Guide to Finding Campgrounds with Wi-Fi in the US. For vehicle planning context, see The Best RVs and Campervans for Digital Nomads. If you need help with global money operations, you can Talk to Gruv.
Frequently Asked Questions
What counts as dispersed camping, and is it the same as boondocking?
Treat dispersed camping as camping outside developed, designated campgrounds. Treat boondocking as camping without hookups. In practice, people often use the terms interchangeably, but the operational point is the same: expect few or no services and plan to be self-sufficient.
How do I know a free site is actually legal to use?
Verify the land manager first, then verify the exact site rule. Free dispersed spots are often first come, first served and usually free. They are commonly found along roads on public land such as national forests and BLM land where camping is permitted, but that does not make every pullout legal. If you see a popular area that requires specific marked sites or placards, use only those. If the land is private, assume you need a booking and payment.
Which tool should I use first when I am screening a site?
Use community tools to discover, maps to inspect, and official channels to confirm. That order keeps screening fast without treating user comments as law. | Tool type | Use it for | Do not use it for | | --- | --- | --- | | Community listing or app | Finding candidate sites, reading notes on road approach, turnout size, and how busy an area feels | Final rule checks, reservations, or current closure decisions | | Satellite map or route planner | Checking access geometry, shade, terrain, nearby roads, and whether the pin matches reality | Proving camping is allowed there | | Official land manager page or office contact | Confirming current access, restrictions, fires, permits, and site-specific legality | Discovering every informal option on the map | Some discovery aids also label pins by cost status, such as green for free and red for low fee, which is useful for sorting options quickly. If you want a broader planning stack for routes, navigation, and pre-scouting, start with The Best Apps for Planning a Road Trip.
Can I rely on Freecampsites.net comments or use it to reserve a place?
No. Freecampsites.net says it does not handle reservations through its website, and comments left there are not sent to the party managing the campsite. Use those comments as field notes, not authority. For current details, verify with the entity that manages the campsite itself.
What if I need dependable internet and power to work from camp?
Use your redundancy stack and be willing to walk away from a marginal site. Free dispersed sites generally do not offer electricity hookups, and you cannot assume cellular coverage. Do not promise a call-heavy workday until your primary connection works and your fallback is still viable. Test your connection on arrival, check whether terrain blocks your backup path, and confirm your stored power can cover the work block you actually have that day.
Is free camping safe enough for remote work?
It can be, if your risk screen passes and you stay honest about self-sufficiency. Before arrival, confirm road conditions, weather, and your exit route, then share your travel plan with someone you trust. During the stay, keep your setup tight and leave if the site, access, or nearby activity feels wrong. Before departure, send a check-out message and log where you actually camped.
How should I handle water, trash, and waste when there are no amenities?
Assume there will be no restrooms, running water, trash cans, or hookups. Before arrival, fill your water, carry extra containers if needed, and know where your next legal disposal stop is. During the stay, ration water, contain trash, and keep food waste from spreading around the site. Before departure, pack out everything and do a slow final sweep.
Try a related tool
Researched and edited by the Gruv editorial team. Gruv builds cross-border billing, payouts, and finance-operations software for global businesses.
Sources
- adamscountyco.gov/wp-content/uploads/2025/08/POSCA-Riverdale-R...trusted
- blm.gov/programs/recreation/campingtrusted
- dec.ny.gov/nature/forests-trees/forest-preserve/welcome...trusted
- dnr.wa.gov/forest-and-trust-lands/ahtanum-state-foresttrusted
- ecfr.gov/current/title-43/subtitle-B/chapter-II/subch...trusted
- fpr.vermont.gov/sites/fpr/files/doc_library/USGS-Sustainable...trusted
- fs.usda.gov/r04/recreation/dispersed-campingtrusted
- fs.usda.gov/r02/arp/maps-guides/motor-vehicle-use-maps-mvumtrusted
Educational content only. Not legal, tax, or financial advice.
Related Posts

How to Work Reliably From Campgrounds With Wi-Fi in the US
If you treat campground WiFi as part of your production setup, you are taking on delivery risk you do not control. In the material here, there is no campground-specific evidence for performance or security, so the practical move is to treat both as unknown before deadline-dependent work.

Full-Time RVing on a Budget for Freelancers Who Need Reliable Cashflow
Before you compare rigs, choose your domicile and make it provable. This comes first because a cheap setup can get expensive fast when your license, vehicle records, banking profile, and client paperwork do not match.

The Best Apps for Planning a Road Trip
If you are planning a move or a long stay, do not start with a random download spree. Build a small operations kit instead. [Road trip planning apps](https://www.headout.com/blog/best-road-trip-apps) are most useful when each one has a defined job. They should fit into a repeatable way of working that protects your time, money, and focus while you are still meeting deadlines on the road.