
Quick Answer
Start with a lean launch path: define one offer, publish core proof, and set one inquiry route, then choose Carrd for speed or WordPress for expansion. For a freelance website on a budget, control cost by separating setup, recurring, annual, and optional spend before you buy add-ons. Keep marketplace profiles like Upwork or Fiverr for discovery, but use your own site as the intake hub so lead quality, proposals, and invoice handoffs stay consistent.
Build a Professional Freelance Website on a Real Budget#
A professional budget site should be your home base, not just another marketplace profile. Launch fast, keep costs controlled, and make it easy for prospective clients to contact you and pay you.
Marketplaces, remote job boards, and portfolio networks can all help with visibility, but their economics are different. Some rely on commissions, some on subscriptions, and some on tiered access. Judge a cheap website builder by value and upgrade path, not first-month price, because low entry pricing can hide limits that slow growth.
Use one rule before choosing tools: if marketplace traffic drops for a month, your site still needs to collect inquiries and move leads toward paid work. That keeps you from over-optimizing profile views while neglecting the pages and handoffs that create revenue.
Before You Start#
- Clear offer: Say who you help, what you deliver, and the expected outcome.
- Clear proof: Show focused examples or testimonials tied to the offer you want to sell.
- Clear contact path: Use one primary CTA and a short inquiry form.
- Clear payment path: Decide how proposals, invoices, and payment confirmation will run before launch.
Run one final budget check before you lock your stack. Verify builder limits and channel fees now, because fee terms can shift by tier or order size. If you cannot explain your expected first-year spend and your primary conversion path in one short note, pause and tighten your plan before building pages.
Decide What the Website Must Do Before You Pick Tools#
Decide the job of the site first, then choose tools. When this is clear, builder selection becomes execution instead of strategy drift.
A planning risk is choosing a platform from screenshots, then forcing your offer and sales path into that template. Reverse the order: write what the site needs to do, then pick the tool that supports that job with the least friction.
Before You Pick Tools#
- Choose a primary conversion goal for this version. Pick one main outcome for now: booked call, project inquiry, or paid discovery. Then point your core pages to that same CTA.
- Set a channel-independence rule. If most work still comes through third-party marketplaces, keep those channels active while your site captures direct leads in parallel.
- Define your ideal client and no-client. Decide which projects you want repeatedly and which you decline. Positioning around a specific problem usually improves fit.
- Write one reusable positioning line. Reuse one sentence on your homepage, freelance portfolio intro, and outreach profiles: I help [client type] achieve [specific outcome] through [specific service].
- Set delivery expectations early. Name one point of contact and outline early milestones so leads understand what happens before proposal stage.
Treat this as a short planning note. Ask a peer to read your one-page plan and explain your offer, client type, and next step in plain language. If they cannot, your copy may attract mixed-fit inquiries.
Prepare the Inputs Before You Build Anything#
Lock your inputs before you touch templates. When content, legal basics, and maintenance ownership are unsettled, launch can slow and revision work can grow.
Design is only one part of launch timing. Missing assets, unclear terms, or last-minute scope and pricing debates can stall the work. A complete input pack turns page drafting into assembly instead of invention.
Before You Start#
- Gather your core asset pack first. Keep your offer list, a few case studies, testimonials, bio, service terms, and headshot in one folder so drafting stays consistent.
- Set business and money foundations early. If relevant in your jurisdiction, set up a formal business structure and a separate business account before launch so business and personal funds stay separate.
- Prepare legal and operating basics before publishing. Draft the policies, terms, invoicing details, and payment terms that apply to your market and service type. Keep records folders simple, such as
Contracts,Invoices,Receipts, andTax. - Choose brand basics now to avoid redesign churn. Decide domain, color pair, typography, and voice before layout work. Reuse the same positioning language across site pages and profiles.
- Assign update ownership and cadence now. Pick one owner and a recurring review schedule so pages, offers, and terms do not go stale after launch.
Before layout work starts, run one readiness pass. Confirm each page has source material, each policy has a current draft, and each proof item has client-safe wording. This helps prevent the common failure mode where a site looks complete but key text is still missing or inconsistent. If you want a deeper dive, read The 1% Tax Regime for Entrepreneurs in Georgia.
Choose Between WordPress and Carrd Using Decision Rules#
Use Carrd for the fastest one-page launch. Use WordPress when your needs are already beyond an ultra-simple MVP page. Make this a stage-fit call now, then define switch triggers before you publish.
Both tools can work early on. The practical difference is how much structure you need now versus how likely you are to outgrow a one-page setup soon.
| Decision point | Carrd | WordPress |
|---|---|---|
| Best starting use | One-page launch with a tight offer | Better fit when you want more structure from day one |
| Early advantage | Fast path to publish an ultra-simple MVP page | Aligns with a broader stage-fit plan if you already expect expansion |
| Common growth friction | One-page structure can get tight as services and content expand | Can be more setup than needed for a very simple first launch |
Step-by-Step Decision Rules#
- Start with the fastest viable launch. If you need to publish this week, start with a one-page structure on Carrd. Keep one offer, one proof block, one CTA, and one contact path.
- Choose WordPress when your plan is already beyond an ultra-simple page. If your roadmap includes broader content and service coverage from the start, begin with the option you expect to scale with.
- Judge a cheap website builder by upgrade path, not entry price. Freemium plans often include hidden costs, limitations, and trade-offs as you grow.
- Set switch triggers before launch day. Write migration rules now. Move from a one-page structure when lead volume, service complexity, or content depth clearly outgrows it.
Add one practical migration note to your planning file before launch. List what content moves first, what URLs need redirects, and which forms must keep working on day one after the switch. This keeps the first platform choice honest: pick what fits your current stage now, not forever. You might also find this useful: Razorpay MoneySaver Deep Dive: A New Contender in Indian Payments?.
Build a Budget That Survives Year One#
Set a 12-month budget before you add optional tools. Year-one control matters more than a low first month because freelance cash flow can swing sharply.
| Budget step | What to do | Control |
|---|---|---|
| Step 1 | Split costs into setup, monthly, annual, and optional growth spend | Set both a yearly cap and a monthly pace for each bucket |
| Step 2 | Review templates, plugin licensing, form limits, transaction fees, and potential redesign labor | Mark each item as required now, likely later, or avoidable |
| Step 3 | Treat competitor fee mentions as caution signals | Fee structures vary and pricing clarity can be weak |
| Step 4 | Enforce a stop-loss rule | If total tool spend exceeds your cap in consecutive months, freeze new purchases and consolidate first |
Budgeting for a site is not just software spend. It protects decision quality when revenue is uneven. Without a cap and review rhythm, small monthly add-ons can become an expensive stack without improving outcomes.
- Step 1: Split costs into four buckets and set yearly totals. Use setup, monthly, annual, and optional growth spend. Set both a yearly cap and a monthly pace for each bucket.
- Step 2: Check hidden costs before calling any plan cheap. Review templates, plugin licensing, form limits, transaction fees, and potential redesign labor. Mark each item as required now, likely later, or avoidable.
- Step 3: Treat competitor fee mentions as caution signals. Keep tool-review notes as reminders that fee structures vary and pricing clarity can be weak.
- Step 4: Enforce a stop-loss rule. If total tool spend exceeds your cap in consecutive months, freeze new purchases and consolidate first.
Keep your budget sheet operational, not decorative. Add owner, renewal month, and cancellation path for each paid tool so you can make fast cuts when needed. In monthly review, compare spend with outcomes from the same period: inquiry count, qualified lead share, and close progress. If spend rises without movement in those indicators, simplify first and postpone new subscriptions so decisions stay tied to actual cash behavior instead of launch-week optimism.
Create the Minimum Credible Site Structure#
A credible structure helps visitors quickly decide whether to contact you. Start lean, make the next step obvious, then expand only when this core path is working.
When structure is weak, visitors do extra interpretation work. They guess your scope, guess your process, and can leave before taking action. A lean structure avoids that by giving each section one clear role and one clear action.
- Step 1: Publish the core conversion structure first. Start with one strong page that shows what you do, proof, portfolio examples, your offer, your process, FAQs, and a contact or booking CTA. Add extra pages only if they support this path.
- Step 2: Add trust markers where hesitation appears. Pair service claims with specific proof. Show your process in 3 to 5 steps, and keep the next step clear near your contact point.
- Step 3: Keep navigation short and task-based. Visitors should be able to review work, understand fit, and contact you with minimal clicks.
- Step 4: Use a clear primary CTA and test for friction. Keep one main action, and add a lower-friction fallback only if it helps visitors continue. Test paths on mobile and desktop.
Run a path test before launch day. Start at Home, click only what a new visitor would click, and verify every route reaches either proof or contact in a few steps. If menu labels are clever but unclear, rename them in plain language. Clarity beats personality when someone is deciding whether to trust you with budget and scope.
Make Your Portfolio Prove Results Instead of Listing Services#
Your portfolio should defend your rate, not just describe tasks. Each case study should show judgment, execution, and scope boundaries so prospects can quickly explain the client problem and your contribution.
A list of services tells people what you can do. A strong case study shows how you think, how you handle tradeoffs, and where your work changed the result. That shift can improve both credibility and qualification quality.
- Step 1: Use four blocks in order: problem, approach, result, scope limits. The problem sets context, the approach explains choices, the result shows change, and scope limits prevent overpromising.
- Step 2: Separate marketplace proof from owned-site proof. Marketplace profiles can support credibility and discovery, but full case narratives should live on your site.
- Step 3: Add selective niche proof and explicit non-fit lines. Show the work you want more of, and state what you do not take.
- Step 4: Run a rate-defense review before publishing. Ask for every item: why hire you at this rate for this scope? If the answer is weak, revise or remove.
Keep scope limits visible in each case. If you solved one part of a broader problem, say that directly. This can help prevent a common sales problem where prospects assume you handled more than you did, then challenge price when they discover the gap. Used this way, profiles help discovery while your site handles qualification and decision confidence. Related: How to Copyright Your Creative Work as a Freelancer.
Set Up Lead Capture and Inquiry Screening#
Build one intake path that screens fit early and keeps every inquiry visible. The goal is clearer qualification and fewer missed leads.
A clean intake path can protect your time and improve buyer experience. Serious leads get clear next steps, and low-fit leads can self-filter before they consume scheduling slots.
- Require the core fit fields. Use a small set of required fit fields and keep responses structured with ranges or dropdowns so leads are easier to compare. Add one short free-text field for context, but do not let open text replace structured screening.
- Route every inquiry into one tracker. Send inquiries from every channel into one tracker, such as a CRM. Track each lead from first contact through close with clear, limited status labels so updates stay consistent.
- Add noise controls before scaling. Use light screening steps that reduce low-intent inquiries without blocking serious buyers, such as required fields and clear next steps after submission.
- Fix clarity before buying more traffic. If lead quality is weak, tighten messaging before increasing traffic. Keep one primary CTA, place proof near it, and align the CTA with the exact offer on that page.
Do not treat every lead-quality issue as a traffic issue. Weak outcomes are often a clarity and conversion problem. Improve page clarity first, then evaluate whether more traffic is justified.
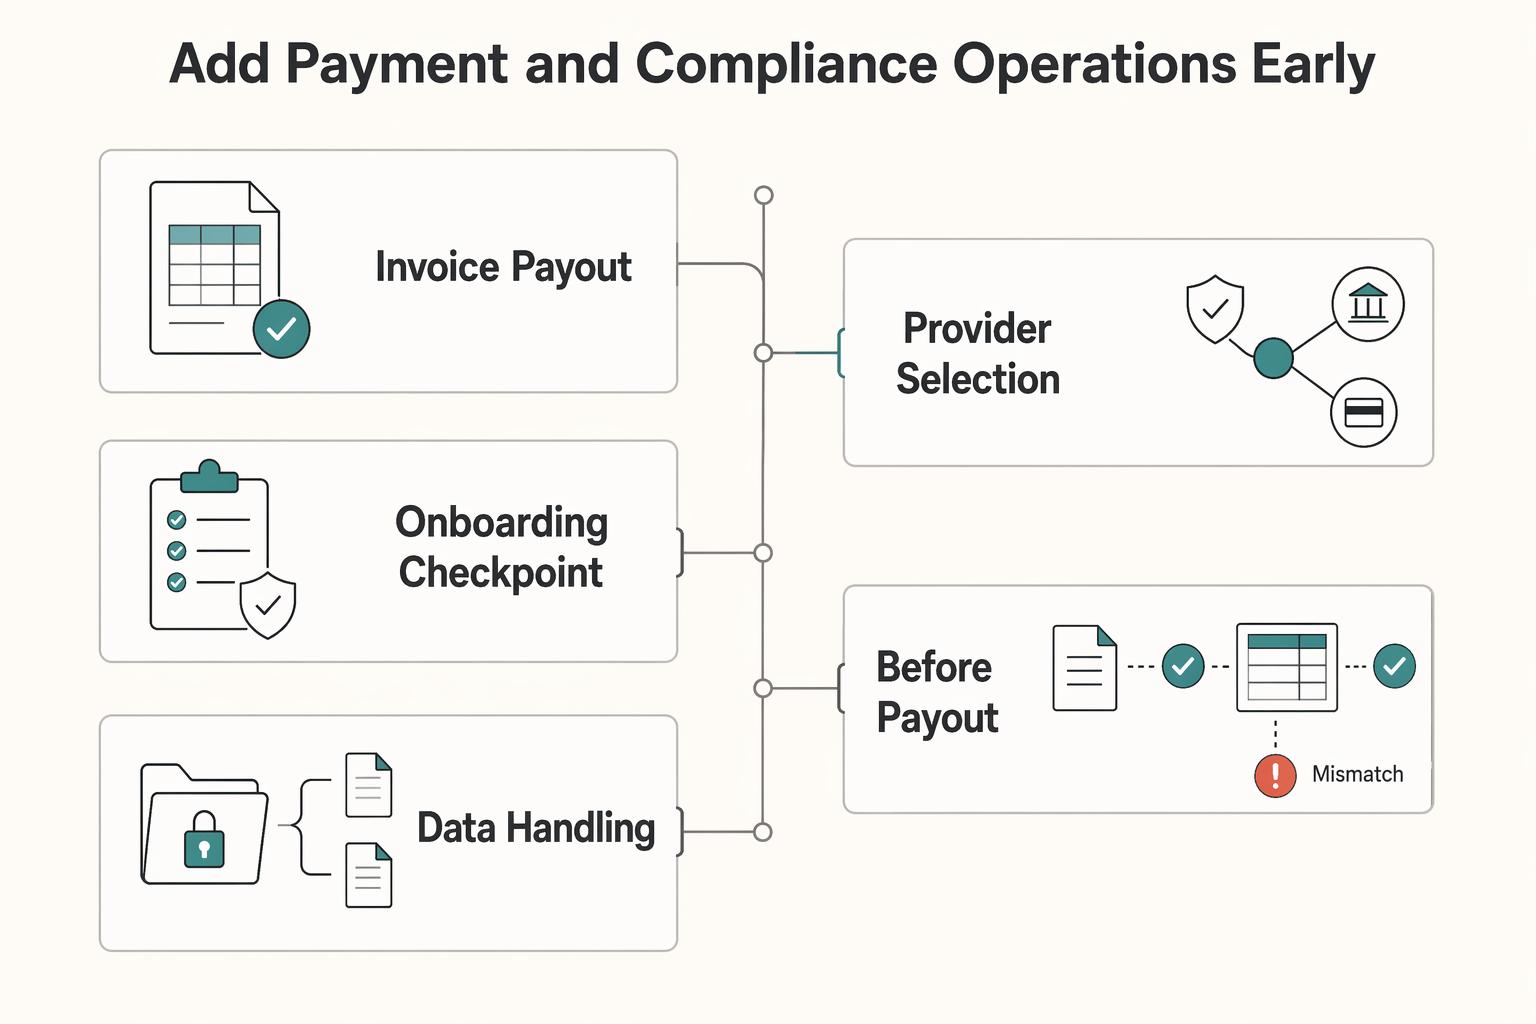
Add Payment and Compliance Operations Early#
Set payment and compliance steps before launch so signed work can move to billing without ad hoc setup. Keep handoffs visible and data exposure low from day one.
| Area | What to do | Validation |
|---|---|---|
| Invoice-to-payout path | Define one path from signed agreement to invoice, payment collection, payout confirmation, and document retention | Document owner and timing at each handoff |
| Provider selection | Prioritize providers that clearly show onboarding, payment status, and payout tracking | Verify current terms and performance in your target market before committing |
| Onboarding checkpoint | Collect identity and tax details at onboarding | Keep onboarding and payout checks distinct to avoid document gaps and delayed closeout |
| Before payout checkpoint | Confirm tax forms and document matching before payout | If U.S. reporting is relevant, verify 1099 support directly with each provider |
| Data handling | Capture only fields needed for billing and tax handling | Store records with restricted access and avoid duplicating sensitive details across inboxes, chats, and notes |
If payment steps are undefined, work can stall after verbal agreement. That delay can affect cash flow and client confidence. A clear sequence removes ambiguity before money is on the line.
- Map one invoice-to-payout path. Define one path from signed agreement to invoice, payment collection, payout confirmation, and document retention. Use the same path across channels to reduce variation in closeout quality by lead source. Document owner and timing at each handoff.
- Pick providers for visibility, then validate fit. For cross-border work, prioritize providers that clearly show onboarding, payment status, and payout tracking. Treat pricing and speed claims as screening input, then verify current terms and performance in your target market before committing.
- Add compliance gates at onboarding and before payout. Use two checkpoints: collect identity and tax details at onboarding, then confirm tax forms and document matching before payout. If U.S. reporting is relevant, verify 1099 support directly with each provider. Keep onboarding and payout checks distinct to avoid document gaps and delayed closeout.
- Keep data capture minimal and storage controlled. Capture only fields needed for billing and tax handling. Store records with restricted access and avoid duplicating sensitive details across inboxes, chats, and notes.
Use one storage location as the source of truth for billing records. If a dispute or audit question appears later, fast retrieval can matter alongside record quality.
Launch in One Weekend With Verification Checkpoints#
Treat launch as a controlled sequence, not a race. Publish only after the visitor-to-billing path works end to end.
| Checkpoint | What to verify | Notes |
|---|---|---|
| Publish order | Lock copy first, then connect domain, publish core pages, test forms, test mobile, and announce last | Submit a real test inquiry and confirm the thank-you message, inbox delivery, and clear next owner |
| Compatibility pass | Run a focused compatibility pass on the devices and browsers your audience uses most | Catch layout breaks, hidden CTAs, and form failures before traffic arrives |
| CTA through invoice and payment handoff | Test CTA click, form submission, confirmation, proposal acceptance, invoice issue, and payment confirmation | If buyers face procurement rules, add jurisdiction-specific signer and disclosure checks before public launch |
| Early friction review | Review failed form submissions, response lag, stalled invoices, and hidden costs | Keep a short issue log with the page involved, the friction observed, and the fix applied |
A compressed launch window can work when you reduce scope and enforce checks. It can fail when teams publish first and test later. The order below catches avoidable breakpoints before public traffic arrives.
- Finalize copy, then publish in order. Lock copy first, then connect domain, publish core pages, test forms, test mobile, and announce last. Submit a real test inquiry and confirm the thank-you message, inbox delivery, and clear next owner.
- Run device and browser checks before sharing links. Before public sharing, run a focused compatibility pass on the devices and browsers your audience uses most. Catch layout breaks, hidden CTAs, and form failures before traffic arrives, and capture proof of CTA state and successful form completion for each check.
- Verify every CTA path through invoice and payment handoff. Test each path as one chain: CTA click, form submission, confirmation, proposal acceptance, invoice issue, and payment confirmation. If your buyers face procurement rules, add jurisdiction-specific signer and disclosure checks (for example, binding-offer signer authorization, anti-collusion attestations, and Chapter 176 disclosures) before public launch.
- Announce, then run an early friction review. After launch, route outreach to one consistent domain path so intake stays controlled. Review failed form submissions, response lag, stalled invoices, and hidden costs such as platform fees, vetting time, onboarding effort, and coordination overhead.
Treat the early post-launch period as calibration, not completion. Keep a short issue log with the page involved, the friction observed, and the fix applied so you do not repeat the same mistakes when you add pages or channels later.
Avoid the Most Expensive Budget Website Mistakes#
Setting rates is one of the hardest parts for new freelancers, and pricing errors can become expensive over time. Prioritize clear pricing decisions before making broader process changes.
- Do not undervalue your work. Undervaluing is identified as a core freelance pricing mistake.
- Do not use only time-based rates for creative work. Exclusive time-based pricing is specifically flagged as a mistake.
- Use "mistakes" lists as calibration, not as exact rules. Pricing-mistake lists vary, with some citing eight items and others nine, so the practical move is to review your own pricing gaps.
- Stay cautious when evidence is limited. Some pricing data can be hard to verify or access, so avoid overconfident claims that go beyond clearly supported pricing guidance.
Scale Without Rebuilding From Scratch#
Scale in layers on your live site instead of rebuilding by default. Add upgrades in sequence, tie changes to your own performance signals, and keep offer language consistent wherever prospects find you.
A rebuild is not always necessary. Avoid defaulting to one by defining clear triggers and adding depth in phases. Start with visibility into what is happening, then expand content and channels where your own evidence supports it.
- Add analytics before adding complexity. Set a simple baseline first so upgrade decisions are evidence-based. Track core inquiry paths, then improve the weakest step. The data does not need to be perfect, but it can show where prospects drop off.
- Increase content depth when demand supports it. Move from quick-launch pages to deeper pages when repeated buyer questions show clear gaps. If you started on
Carrd, shift to a more complex setup only when you need greater control over performance, SEO, or scaling. - Layer promotion channels, but keep your site as home base. Use selective external profiles based on niche fit, then route interest back to your own intake path. Add one channel at a time so you can measure quality without noise.
- Use upgrade triggers and one source of truth. Define triggers in one reference document: lead volume, close rate, project size, and admin load. Use that same document as the single source for offers and policy text, then sync your site and profiles from it.
This helps prevent drift across profiles and pages, which can cause scope mismatch and pricing confusion. As scale increases, review ongoing costs before assuming you need a rebuild. In one Canada pricing example, hidden costs like hosting, maintenance, and premium plugins can add $500-$3,000+ annually, and in some cases basic fixes are a better move than full redesign.
Copy and Paste Launch Checklist#
The FAQ covered the decisions, and this is the execution gate. Run every line before you announce your site.
- Set one primary conversion goal and one clear CTA on each core page. Keep each page focused so visitors always know the next step.
- Publish core pages with complete, readable content. Remove placeholders so visitors can understand your offer and contact path without guesswork.
- Choose a build path you can realistically maintain. Practical options include hiring help, learning
WordPress, or using a ready-made service. - Document website costs before launch. Some options are free, while others are paid.
- Set your inquiry form to collect essentials, then test it. Run a test inquiry so the handoff into your workflow is clear.
- Map your inquiry-to-invoice process end to end. Write the sequence from first message through billing so execution is consistent and not memory-based.
- Test core user paths before going public. Check form delivery and CTA flow, and remove page elements that compete with the main action.
- Schedule regular post-launch reviews. Use early feedback to fix friction quickly, then keep a repeatable maintenance rhythm.
Use this checklist as a go or no-go gate, not a nice-to-have list. If a line is unchecked, you are accepting avoidable risk. Completing every item keeps launch standards clear: focused pages, tested paths, controlled spend, and a reliable client intake path. After launch, revisit the same list during regular reviews so quality stays consistent as pages, offers, and channels evolve.
Frequently Asked Questions
What is the cheapest way to launch a freelance website without looking unprofessional?
Start with a tightly scoped one-page site that makes your offer and contact path obvious. A low-cost build can still look professional, and initial setup can range from free to around $500 when scope stays tight. Before launch, confirm mobile responsiveness and fast load behavior. If you need to cut something, cut optional design flourishes before you cut clarity in offer and contact flow.
Do I still need my own website if I already get work from `Upwork` or `Fiverr`?
Not necessarily, but a simple site can give you a stable place to explain your offer and contact steps outside any single platform. Keep marketplace profiles for discovery if they work for you, and use one consistent intake path so your process stays clear.
Is `WordPress` or `Carrd` better for a solo freelancer in the first year?
It depends on what you can maintain consistently without admin drag. Reassess after a month of live use and switch only when your current setup clearly blocks progress.
What pages are non-negotiable for a credible `small business website`?
Keep the structure simple and clear enough for a first-time visitor to understand your offer, see proof, and contact you quickly. Prioritize readability on both desktop and mobile. If a page does not support trust or conversion, simplify it. Start with a short set of core pages and expand only when needed.
Which hidden costs should I plan for beyond domain and hosting?
Treat website spend as an ongoing operating cost, not a one-time setup event. Include paid add-ons, recurring tool fees, and maintenance time in your planning. Scope before spending so price stays aligned with value. Keep renewal dates visible so annual charges do not surprise your cash planning.
Can I launch in one weekend and still be client-ready and compliant?
You might be able to publish a first version in a weekend, but that timeline alone is not proof of client readiness or compliance. Treat launch as publish plus verification across forms and CTA paths, then improve based on real friction from actual inquiries.
When should I move from a simple one-page site to a fuller multi-page setup?
Move when one page no longer answers repeated buyer questions or when service complexity rises. Expand in layers so each new page removes a clear friction point. Keep acquisition testing steady while you measure quality changes. If complexity rises but results do not improve, tighten messaging before adding more pages.
Try a related tool
Researched and edited by the Gruv editorial team. Gruv builds cross-border billing, payouts, and finance-operations software for global businesses.
Sources
Includes 4 external sources outside the trusted-domain allowlist.
- austintexas.gov/edims/document.cfmtrusted
- emergent.sh/learn/best-website-builders-for-freelancersexternal
- savespendsplurge.com/budgeting-like-a-freelancer-set-yearly-amoun...external
- sheafmediagroup.com/cheap-small-business-website-design-5-proven...external
- websiteplanet.com/blog/cheapest-website-buildersexternal
Educational content only. Not legal, tax, or financial advice.
Related Posts

Georgia 1% Tax for Entrepreneurs Without Filing Surprises
Treat Georgia's 1% tax path as a compliance question first and a rate discussion second. The goal is a setup you can defend under review, not a shortcut that fails at filing time.

How to Copyright Your Creative Work as a Freelancer
Move faster by settling who owns what before signing and keeping the contract, deliverables, and project record aligned from kickoff through filing. Deals usually slow down when those pieces drift apart, not because the legal question is unusually hard.
Razorpay MoneySaver Review for Indian Freelancers and Small Teams
This review is a cashflow decision, not a popularity contest. Treat every claim as provisional, and verify it with live transactions and support records before you route meaningful invoice volume.