
Quick Answer
Start with one content workflow in Notion built around a single `Content OS` database, then connect `Clients` and `Invoices` with Relations and Rollups. Define a clear status path from intake through publish, and require approval evidence before items move live. Keep one canonical feedback location per deliverable and share filtered client views instead of full workspace access. At handoff, attach an invoice link immediately so delivered work is traceable to billing.
Your Content Workflow is Broken. Build a Content OS Instead.#
If your team is chasing updates across chat, docs, email, and a separate invoice sheet, the issue may be less about effort and more about having no single operating record. Ownership can get fuzzy, approvals can disappear into comments, and it becomes hard to see a clean line from brief to publish to billing.
A practical Content OS in Notion can give each asset one trusted record, one status path, one approval trail, and one billing link.
Treat the model below as a practical template to test with your own team.
Define the job first#
Start by defining the job clearly. Here, a Content OS means one operating setup that tracks each content asset from request to delivery in a single record your team can review.
| Area | Ad hoc setup | Content OS in Notion (example) |
|---|---|---|
| Workflow visibility | Status lives in scattered messages and docs | One record can show stage, owner, and next action |
| Accountability | Ownership changes informally | Each asset can have a named owner and clear handoff point |
| Approval checkpoints | Review happens in email or comments with no clean trail | Approval can be captured as a defined gate before publish |
| Revenue tracking | Billing sits outside delivery records | Each asset can point to the invoice or billing status |
Use this early checkpoint: pick one recent asset and ask whether you can see the brief, current draft, owner, approval state, publish status, and billing reference without opening five tools. If not, you may not need more reminders. You may need a cleaner operating record.
A frequent failure mode is duplicate status updates. A strategist updates a doc, a writer updates a task board, and an account lead replies in email, leaving multiple versions of the truth. For each asset, keep the evidence pack together: brief link, draft link, latest decision, approval note, and invoice reference.
You do not need to replace every tool your team already likes. Keep your drafting, design, and invoicing tools where they work well. The goal is simpler: make Notion the operational source of truth for execution.
Related: How to Build a Sales Pipeline for Your Freelance Business.
The Foundation: Building Your Content OS Architecture in Notion#
Build the structure first: your Content OS should be the single record where each asset shows status, ownership, client context, and publishing timing. When those details live in one place, you cut version confusion and workflow drift across chat, docs, and email.
Create the Content OS database#
Set up one main database called Content OS as the project hub for your marketing assets. Use it as a connected database system, not a loose collection of pages, so each item can link to related records and key dates in one view.
Start with these four properties:
| Property | If included | If missing |
|---|---|---|
Status | Stages and handoffs are visible, and board views make phase tracking clear | Reviews stall because teams cannot quickly see where work is blocked |
Client | Each asset ties to the correct account record for clean grouping and history | Account ownership gets fuzzy and related work is harder to find |
Publish Date | Calendar views make timing, gaps, and collisions visible early | Planning shifts to memory, chat threads, and last-minute fixes |
Key Stakeholders | The next responsible person is explicit on each record | Feedback and approvals drift because ownership is unclear |
Keep the first schema tight. If the team cannot maintain these four properties consistently, more fields usually add noise, not control.
Link a Clients database#
Create a separate Clients database and relate it to Content OS. This keeps client naming consistent and gives each content record a reliable account link. It also gives you a stable base for filtered client views later.
Standardize the brief template#
Add one reusable brief template inside Content OS so new records start with the same core context. Keep it practical: objective, audience, deliverable, source links, draft link, and approval notes. A standard template reduces setup variance and missing context between contributors.
Readiness check: open one content record and confirm you can see the linked client, current Status, Publish Date, Key Stakeholders, and brief details in that single record. If yes, your architecture is ready for production mapping, with consistent statuses, owners, and publish planning in place.
If you want a deeper dive, read How to Create a Content Calendar for Your Freelance Business.
From Brief to Broadcast: Mapping Your Core Production Engine#
To move a content item from brief to publish without skipped handoffs, use Status as a gate system, not just a label. Each stage should define who owns the item, what must be true to enter, and what proof is required to exit.
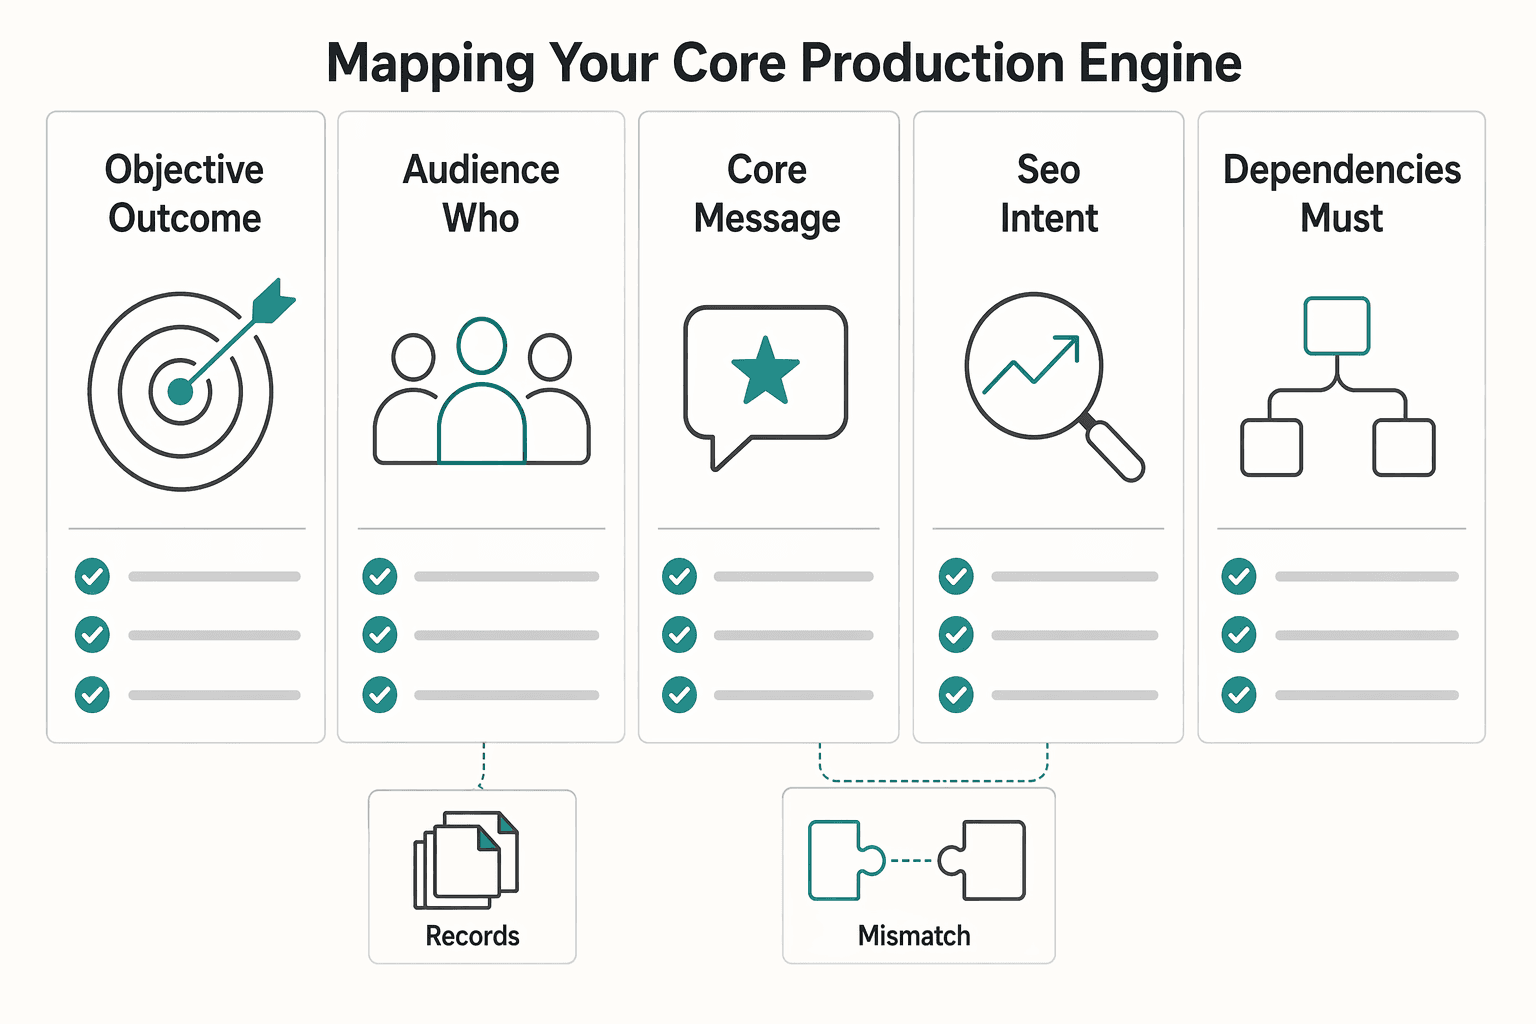
| Brief field | What to capture |
|---|---|
| Objective | what outcome this piece should support |
| Audience | who this piece is for right now |
| Core message | the main takeaway to deliver |
| SEO intent | one primary query plus relevant supporting terms |
| Dependencies | what must arrive from others first |
| Acceptance criteria | what must be true for the piece to be considered done |
Step 1: Define a stage path with gate rules. Keep one clear sequence that your team can enforce: Intake -> Drafting -> Review -> Approved -> Published. This is a practical operating model, not an official Notion standard.
Status stage | Entry condition | Owner | Exit condition |
|---|---|---|---|
Intake | New record exists and brief template is applied | Strategist, account lead, or intake owner | Objective, audience, message, dependencies, and due date are filled |
Drafting | Brief is complete and source links are attached | Writer or creator | Draft link exists and missing info is resolved or clearly flagged |
Review | Draft is ready for editorial or stakeholder review | Editor, client lead, or approver | Feedback is logged in one place and required edits are done |
Approved | Review is complete and no open issues remain | Final approver | Publish date is confirmed and final asset is ready |
Published | Approval is complete and asset is live | Publisher, marketer, or owner | Live URL, publish date, and final notes are saved on the record |
Quick test: try moving one item from Intake to Published. If it can advance without a complete brief, a draft link, or recorded approval notes, your gates are too loose.
Step 2: Use views to make decisions, not just to organize. Each view should answer a different operating question.
| View | Best use | Decision it supports |
|---|---|---|
Kanban grouped by Status | Daily production and handoffs | Where is work stuck, and who owns the next move? |
Calendar based on Publish Date | Editorial calendar and channel timing | Where are gaps, collisions, or deadline risk? |
Filtered My Work | Individual execution | What should I move today? |
Use Kanban for flow, Calendar for timing, and My Work for focus.
Step 3: Turn the brief template into an intake filter. Your New Content Brief should block vague requests before they enter production. Include objective, audience, core message, SEO intent, dependencies, and acceptance criteria.
Keep entries concrete:
- Objective: what outcome this piece should support.
- Audience: who this piece is for right now.
- Core message: the main takeaway to deliver.
- SEO intent: one primary query plus relevant supporting terms.
- Dependencies: what must arrive from others first.
- Acceptance criteria: what must be true for the piece to be considered done.
If intake is harder than drafting, simplify it. Overly nested pages, rigid categories, and intricate tags can slow planning and execution.
Step 4: Add lightweight governance before heavy automation. Pick one feedback channel and enforce it: page comments or a dedicated Feedback Notes property. Mixed channels create missed edits and unclear ownership.
Handle blockers with a Blocked checkbox and short Block Reason. If work must move backward, return it to the earlier Status and log why in the record. You get a usable trail without overcomplicating the system.
You can layer in automation later, including recurring workflow support and external tool integrations, but keep it measured so the workflow stays flexible. The next section adds compliance checkpoints and risk controls.
We covered this in detail in How to Use Notion Synced Blocks for Reusable Content.
The Compliance Firewall: De-Risking Your Workflow with Built-in Checkpoints#
Use hard checkpoints in the same Notion flow you use to ship content: if approval evidence is incomplete, the record does not move to Published.
| Checkpoint | When to use | What to record |
|---|---|---|
Final Client Approval | when an item moves from Approved toward Published | Final Client Approval, Approval Owner, and Approval Timestamp |
Legal Review | for content flagged by the client or team for sensitive review | reviewer assignment, review outcome, and required edits |
Version Log | for version history and filtered checks on Published items | Version, Date, Change Summary, Changed By, and Feedback Artifact |
Set scope first. This workflow supports professional due diligence, but it does not replace legal or compliance judgment. If a client, market, or content type may have extra requirements, add a Requirement Note field and keep each note pending until it is verified against current client, market, content-type, legal, or source records before use.
Step 1: Enforce Final Client Approval before publish. Create Final Client Approval (checkbox) and require Approval Owner plus Approval Timestamp. Trigger: when an item moves from Approved toward Published. Required owner: the named client approver, or a specifically authorized internal approver. Publish block: if the checkbox is unchecked, the owner is blank, or the timestamp is missing, the item does not move to Published.
Step 2: Add a Legal Review stage for sensitive items. Define this stage in your own workflow rules. Trigger: content flagged by the client or team for sensitive review. Required owner: a named legal/compliance reviewer, not a generic team label. Publish block: the item cannot leave Legal Review until reviewer assignment, review outcome, and required edits are all recorded.
Step 3: Keep a version log with linked proof. Add a Version Log table (or inline database) with Version, Date, Change Summary, Changed By, and Feedback Artifact. Keep these fields visible on each content record: Approval Owner, Approval Timestamp, Change Summary, and Linked Feedback Artifact. Run a filtered check for Published items missing any required evidence field. If anything appears, tighten the gate.
| Risk area | With checkpoint | Without checkpoint |
|---|---|---|
| Approval disputes | You can show approver, timestamp, and linked feedback on the record | Approval is split across inboxes/chats and ownership is disputed later |
| Sensitive-topic review | Sensitive items are routed to a dedicated review stage and blocked until cleared | Sensitive items can pass through standard review without an added checkpoint |
| Revision accountability | Version history shows what changed, who changed it, and what feedback triggered it | Teams argue about what was requested, changed, or missed |
This pairs well with our guide on A guide to using Notion 'Databases' for freelance project management.
The Client Portal: Projecting Authority and Control#
If you want fewer missed updates and less feedback drift, give each client one clear portal view and one clear place to respond.
Step 1: Build a client-specific filtered view. Start from your existing Clients and Content OS setup, then create one client-facing view filtered to that client's records only. Share only that main page or view, and keep it focused on what a client can quickly act on: deliverable, status, due date, and where to review. Hide internal process fields that are useful to your team but noisy for client communication.
Use this quick check before sharing: can a client scan it in 30 seconds and know what needs attention?
| Review mode | Traceability in practice | Turnaround clarity | Scope control |
|---|---|---|---|
| Email thread | Context often fragments across inboxes | Next action can get buried in replies | New requests can mix with approvals |
| Shared doc | Feedback for one asset stays together | Clear when one file is under review | Version drift can appear across multiple docs |
| Read-only portal + one linked feedback artifact | Project status stays centralized, with one linked review trail per item | Each deliverable has a visible review location | Easier to keep requests tied to the current deliverable |
Step 2: Set one canonical feedback path per deliverable. Pick one review location for each asset and store it in a field such as Feedback Link. Then require a simple checkpoint before status moves forward: feedback was received, and requested edits were implemented or explicitly resolved.
Step 3: Treat sharing as an access-governance SOP. Define who can view, who can comment, who on your team grants or revokes access, and who owns handoff when client stakeholders change. When ownership changes, update access and internal ownership records immediately so feedback does not split across old and new contacts.
You do not need an expensive template to run this well. Portal template options span free and paid, for example from $0 to $349 USD, but clean filtering, controlled sharing, and a single feedback path usually matter more than price.
For a step-by-step walkthrough, see How to Create a Project Timeline in Notion.
Closing the Loop: Connecting Content Directly to Cash Flow#
After approval, your next control point is billing: if delivered work is not linked to an invoice record, revenue gaps are easy to miss. Set up a separate Invoices database first, then connect it to Content OS and roll results up into Clients with Relations and Rollups.
Set up Invoices first, then connect it#
Keep Invoices separate so billing records can be managed on their own timeline, but link them so every shipped deliverable traces to a billing outcome. If you want a starting structure, Notion's cash-flow template category can help with layout ideas, then you can adapt fields to your workflow.
| Field or link | Required now or later | Operations benefit | Common failure it prevents |
|---|---|---|---|
| Invoice ID | Required now | Traceable record per charge | Duplicate or confused invoice records |
Client relation (Invoices -> Clients) | Required now | Client-level filtering and totals | Invoice with no client anchor |
Content relation (Content OS <-> Invoices) | Required now | Direct link from deliverable to billing | Published work with no billing linkage |
| Amount | Required now | Usable invoiced/collected math | "Sent invoice" with no financial value in system |
| Issue date and due date | Usually required now | Follow-up and aging visibility | Late invoices with no review trigger |
| Collected marker/status | Optional, high value | Separates billed work from cash received | Treating invoiced totals as collected cash |
Quick check: open one invoice and confirm you can click through to the client and related content item.
Link billing at handoff, not later#
Apply the link when work is shipped or approved, not in a later cleanup pass. Your rule can be simple: an item does not reach final shipped status until it has either a linked invoice or a clear non-billable marker.
| Handoff check | Required action |
|---|---|
| Content status | confirm the content item is actually in final shipped/approved state |
| Invoice record | create or attach the invoice record immediately |
| Ownership | set clear ownership for invoice creation and payment follow-up |
| Billing details | confirm client link, amount, and dates are filled |
| Non-billable work | mark it clearly so it does not appear as a missed bill |
If you automate intake, keep source-of-truth limits in mind: Gravity Connect can create Notion pages from form submissions, including order-form handoffs, but updates are one-way into Notion. Edits made in Notion do not sync back to Gravity Forms.
Build rollups you can act on#
In Clients, use rollups that separate invoiced amounts from collected amounts so billed work is not mistaken for cash in hand. Then use linked views for action, not just reporting:
- Unpaid invoices queue for follow-up
- Shipped content with no invoice link
- Client list sorted by collected value
- Clients where invoiced totals rise while collected totals stay flat
Weekly cash-flow review:
- Shipped items missing invoice links
- Invoices sent but not marked collected
- Follow-up items without a clear owner
- Client accounts with widening invoiced-vs-collected gaps
You might also find this useful: How to Build a Content Calendar in Notion That Runs Your Workflow.
Your Command Center Awaits: From Content Creator to Business CEO#
Your command center works when one live content record shows approval status, client visibility, publish state, and invoice linkage in one place. That replaces inbox searches and memory with a single source of truth for what is approved, what the client can see, and what is tied to cash flow.
In weekly operations, three things change:
- Revenue linkage: shipped work is connected to a dedicated
Invoicesdatabase, so billing is traceable from the content record. - Compliance confidence:
Final Client Approvalis a required pre-publish checkpoint, creating an auditable trail. - Client visibility: a filtered, read-only client portal gives clear progress visibility without exposing your full workspace or pushing feedback back into email sprawl.
| Operating area | Reactive workflow | System workflow |
|---|---|---|
| Visibility | Status is split across email, notes, and memory | One record shows approval, client view, publish state, and invoice link |
| Accountability | Approval is implied in comments or messages | Final Client Approval is confirmed on the record before publish |
| Decision speed | You pause to reconstruct what happened | You can quickly spot missing approvals, invoice links, or client-view gaps |
Use a simple command-center cadence:
- Review: records near publish, waiting on approval, or delivered without an invoice link.
- Update: approval status, publish status, and the client-facing view as soon as each change is confirmed.
- Escalate: anything ready to publish without
Final Client Approval, billable work without an invoice relation, or feedback drifting outside the client portal.
Keep iterating the system as your services, support model, or tooling changes. Verify any feature or process change before you rely on it.
Frequently Asked Questions
How do you handle approvals cleanly in Notion?
Start with the content record, not a separate notes page. Keep approval status, approver, and approval date in that record, then only move work into Approved when those fields are complete. The mistake to avoid is treating a comment or email reply as approval without updating the record, because that weakens your audit trail.
Can you connect Notion to invoicing?
You can track billable work in Notion, but invoice sending and payment collection usually require an external accounting or automation tool. Start by making sure each shipped item is tied to a clear billable record before you add outside sync. The common mistake is skipping that internal link and trying to rebuild billing history from status changes later. | Decision factor | Native Notion | External automation | |---|---|---| | Best fit | You want visibility, linked records, and manual control inside one workspace | You need actions to happen across Notion and other tools | | Setup pattern | Clear records plus filtered views | Trigger from a Notion update into another app | | Control | High visibility inside your workspace | Broader reach, but more moving parts | | Maintenance overhead | Lower, especially for small teams | Higher, because you need to watch mapping and sync behavior | | Use with care when | Your process is still changing weekly | You have stable fields, owners, and handoff rules |
How do you track ROI without turning the database into a finance mess?
Keep it simple first. Track effort/cost fields and compare them against billed or collected value in one consistent workflow. The mistake is mixing billed and collected money in the same property, which can blur profitability versus cash reality.
Should you start from a template or build your own?
Use a template for structure, then trim it hard. A good FAQ-style page in Notion keeps distinct categories or sections, supports search, and uses expandable answers so people can find what they need quickly. The mistake is starting with an overly complex or rigid layout that looks polished but becomes annoying to update. If you want a broader workspace baseline, start here: A Guide to Notion for Freelance Business Management.
How do you work with editors, VAs, or clients without exposing the whole workspace?
Share only the specific page or filtered view they need, and give the narrowest access level that still lets them do the job. A practical pattern is one editable production view for internal help and one read-only client view for review, with a clear responsible owner tagged for open questions. The mistake is inviting people into the main workspace without boundaries, which creates clutter and avoidable access risk. Exact permission steps can change, so verify the current sharing options in your workspace before rollout.
What properties matter most in the main content database?
Keep your first version tight: Status, Client, Publish Date, Content Type, URL, and one owner field. Add extra categorization only when you are actively using it to review work each week. The mistake is stuffing in too many properties before your team has a stable review rhythm.
When should you automate, and when should you stop at native setup?
Automate after the handoffs are stable, not before. Native setup is enough for many teams early on. Notion describes Custom Agents as recurring automations that one person sets up for broader team use, and MCP integrations as a way to connect those agents to external tools for end-to-end work across your stack. The mistake is automating a messy process first. If you plan to depend on Custom Agents or MCP, verify current availability and limits in your specific workspace or plan before rollout.
What is the best check before you call the setup done?
Open one live content item and confirm you can trace it end to end: brief, owner, approval, client, publish state, and invoice link if billable. If any one of those needs a side chat, spreadsheet, or memory to explain it, fix that gap before adding more views or automation.
Try a related tool
Researched and edited by the Gruv editorial team. Gruv builds cross-border billing, payouts, and finance-operations software for global businesses.
Sources
Includes 3 external sources outside the trusted-domain allowlist.
- d-scholarship-dev-2.library.pitt.edu/18533/4/neophytou.cwfs.thesis.pdftrusted
- homes.cs.washington.edu/~weld/papers/dai-aij13.pdftrusted
- online.ucpress.edu/collabra/article/11/1/130077/207804/When-Hyp...trusted
- pmc.ncbi.nlm.nih.gov/articles/PMC12226022trusted
- radhikam.web.illinois.edu/perfpred.pdftrusted
- averi.ai/breakdowns/how-to-build-a-content-machine-in...external
- blog.boldtech.dev/notion-basics-build-a-crmexternal
- gravitywiz.com/documentation/gravity-connect-notionexternal
Educational content only. Not legal, tax, or financial advice.
Related Posts

Build a Freelance Content Calendar That Survives Client Work
If your publishing keeps slipping, the problem is often not a lack of ideas. It is that the plan breaks the moment client work shifts. A **freelance content calendar** should give you a usable schedule for what you plan to write, produce, and publish, plus enough structure to decide what moves when the week gets crowded.

How to Build a Sales Pipeline for Your Freelance Business
Before you turn this into a detailed freelance pipeline playbook, pause for a source-quality check. The available evidence here is a [Scribd listing](https://www.scribd.com/document/958783827/The-FP-a-Handbook) for **FP&A Handbook: Financial Planning Guide**, not a verified, fully reviewed operations standard.

A Guide to Notion for Freelance Business Management
If your workspace feels busy but fragile, you do not need more pages. You need one connected system. Treat your freelance business like a business-of-one and use Notion as the control layer that connects client decisions, delivery, and billing in one place.