
Quick Answer
Build your content calendar in notion as one operational database with explicit stages, required ownership fields, and linked review records. Start with production control (`Status`, `Publish Date`, `Content Type`, `Owner`), then layer protection (`Review Status`, `Approved Version URL`, asset source notes), then add performance inputs (`Leads Generated`, `Client Inquiries`, `Estimated Value`). This turns a date tracker into a working system you can plan from, review from, and improve each cycle.
What to Add When Your Calendar Only Tracks Activity#
A Notion content calendar becomes a liability when it only tracks activity. Dates, a publishing view, and a place to park ideas are useful. But they do not tell you what deserves priority, make review context explicit when feedback changes, or connect content work to business results.
That problem gets worse when notes, tasks, drafts, and tracking live in different places. The usual failure mode is simple: you capture an idea somewhere else, forget to move it, and lose it. Notion works best as one workspace, but only if you stop treating it like a nicer document editor. Treat each content item as a record with a job to do.
| Area | Basic Calendar | Command Center |
|---|---|---|
| Production control | Dates and loose status labels | Clear stages such as Idea, Drafting, Review, and Published, plus fields like Platform and Publish Date |
| Risk protection | Scattered comments and version confusion | One record per content item with the working context kept together |
| Performance visibility | "Posted" is the finish line | Published items can be tied to the business measures you choose to track |
Step 1 Build production control#
Start by making the production side explicit. Set up the stages, views, and core properties that show what is planned, what is blocked, and what ships next. You should be able to scan the database and know the next priority without opening five pages.
Step 2 Add protection context#
Once work is moving, keep the brief, draft location, and review history attached to the same item. That does not create automatic compliance or proof on its own, but it does reduce ambiguity and make decisions easier to trace when scope or edit disputes show up.
Step 3 Add performance visibility#
Then add the inputs that let you judge outcomes, not just output. You are not getting revenue proof by default; you are building the structure that makes later measurement possible. Build the production foundation first, then layer protection and performance on top.
Related: How to Create a Content Workflow in Notion for a Marketing Team.
Pillar 1: Building Your Production Engine#
Your production engine works when one Notion database is the single source of truth for planning, drafting, and review. Split that work across pages and tools, and your calendar becomes harder to trust.
Step 1 Create one database, then add only the fields you will actually maintain#
Start from a new page with Table, or use /database inside an existing page. Keep one record per content item so the brief, draft, links, and notes stay attached to the same page.
Use this as a practical baseline:
| Setup level | Properties |
|---|---|
| Required to run weekly | Content Title, Publish Date, Content Type, Status, Owner |
| Optional (add only when consistently used) | Platform, Priority, Draft Link, Reviewer, Campaign or Client, Last Edited |
Checkpoint: from the main table, you should be able to see what is next, who owns it, and what stage it is in without opening the item.
Step 2 Define stage rules so status reflects real progress#
Status should mean something operational, not just a label. A simple starting flow:
| Status | Operational definition |
|---|---|
| Idea | captured, not yet briefed |
| Drafting | brief is complete and one owner is assigned |
| In Review | draft link is present and feedback is requested |
| Scheduled | approved and publish date is set |
| Published | live URL is added |
| Archived | intentionally retired or parked |
Keep Owner required even if you are solo now; it keeps responsibility explicit and makes collaboration easier later. Use one quality rule: if an item is in In Review without a draft link, or in Scheduled without approval context in-page, move it back.
| View | When to use it | Decision it supports | Failure mode it prevents |
|---|---|---|---|
| Table | Daily triage | What needs attention now | Missing core fields hidden in cards/calendars |
| Board (grouped by Status) | Workflow checks | Where work is stuck | Quiet bottlenecks in drafting/review |
| Calendar | Publishing planning | When content ships | Date collisions and uneven spacing |
Step 3 Standardize the brief so handoff is clear before drafting starts#
Use one brief template inside every item. It creates a repeatable handoff and reduces revision loops caused by unclear intent.
Minimum brief fields:
- Goal
- Audience
- Key message
- Format
- Distribution channel
- Source links or references
- Definition of done
Brief quality check before drafting:
- Purpose is clear
- Audience is clear
- "Done" is specific enough to review against
Handoff checklist:
- Brief is complete
- Owner is assigned
- Draft location is named
In practice, this gives you more predictable throughput, faster prioritization, and fewer revisions because scope is clear upfront.
We covered this in detail in How to Create a Content Flywheel for Your Freelance Business.
Pillar 2: Installing Your Protection System#
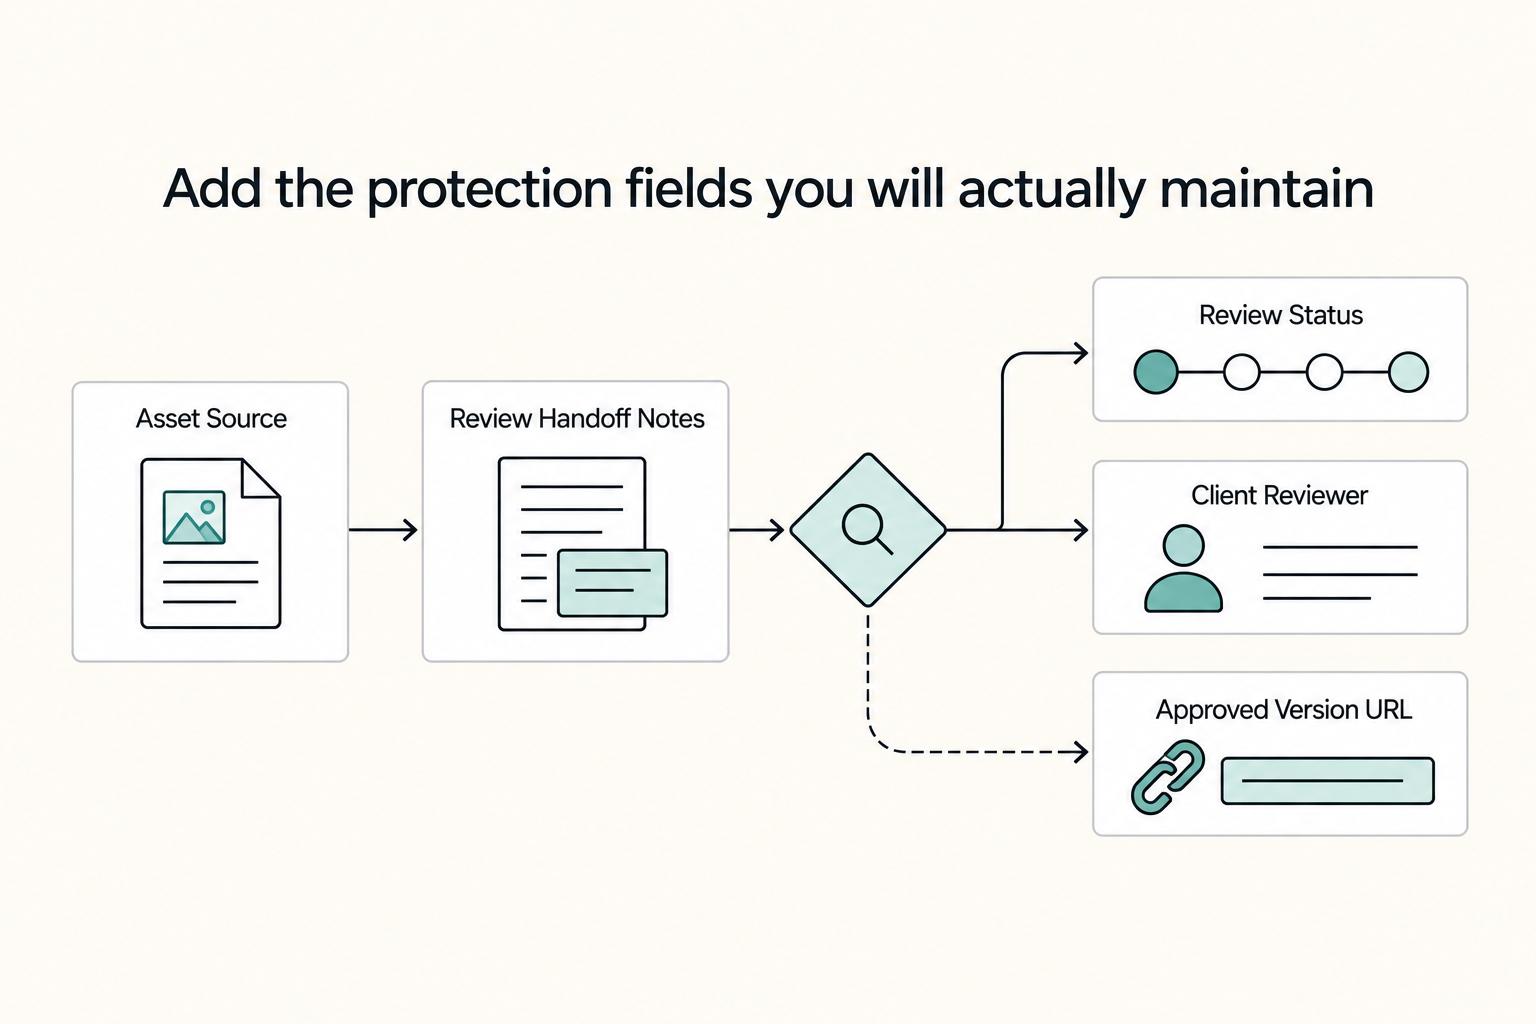
Once your database moves work cleanly, make it defensible with process records you can actually maintain. In Notion, keep three linked parts inside each content item: a Client Approval Circuit, an Asset & IP Ledger, and a Relation to the client or project it belongs to.
Step 1 Add the protection fields you will actually maintain#
Start lean, but make protection fields explicit. Make these mandatory:
| Field | Requirement |
|---|---|
| Review Status | Mandatory |
| Client Reviewer | Mandatory |
| Review Handoff Notes | Mandatory |
| Approved Version URL | Mandatory |
| Asset Source | Mandatory |
| License Type | Mandatory |
| Usage Rights Notes | Mandatory |
| License Evidence Link | Mandatory |
| Relation (to Clients or Projects) | Mandatory |
| Review Due Date | Optional |
| Changes Requested Summary | Optional |
| Approval Date | Optional |
| License Expiry | Optional |
| Territory or Channel | Optional |
| Renewal Reminder | Optional |
| Usage Threshold Check | Optional; confirm the current usage threshold against your policy or source records. |
Only add the optional fields if you will review them consistently. That placeholder matters. Usage limits, expiry rules, and channel restrictions vary by the actual license, so leave a verification marker when details are not yet confirmed.
| Area | No Protection System | Protected Workflow |
|---|---|---|
| Dispute handling | Approval context is scattered across messages and hard to reconstruct. | One record shows reviewer, handoff notes, status, and approved version artifact. |
| Asset rights tracking | Assets get reused without a clear source or permission record. | Each item stores source, license context, and evidence before publish. |
| Client visibility | Work history is buried across inboxes and folders. | Related content stays connected to one client/project record for easier review discussions. |
Minimum viable compliance for a solo operator:
- every item has an owner, reviewer, and status
- every review handoff includes a draft link and what is being approved
- every approved item includes one final approved artifact URL
- every third-party asset has a source and evidence link before publish
Step 2 Run the approval sequence the same way every time#
Use one operating sequence and do not skip gates. At review handoff, capture the draft link, named reviewer, and a short note on what is ready and what feedback is needed.
Before moving to Pending Client Approval, confirm:
- the brief is complete
- the draft link opens the correct version
- the reviewer is assigned
Before moving to Client Approved, confirm one artifact exists: Approved Version URL (the final doc, page, or file that represents what was approved).
If an item is marked approved without that URL, move it back. For any approved item, you should be able to see who approved what version and when, directly in the content record.
Step 3 Track asset rights and connect content to client history#
Your Asset & IP Ledger should be practical, not heavy. Capture enough context to prevent careless reuse: where an asset came from, what license or permission type applies, usage context, and where evidence lives.
Useful context fields:
Used InTerritory or ChannelClient ProvidedUsage Threshold Checkfor usage thresholds you confirm against your policy or source records
Do not treat "client sent it" as proof on its own. If source or evidence is missing, pause publication until permissions are clear.
Keep the Relation field in place. It gives you a cleaner client or project history of what was produced, approved, and published, and makes account reviews, renewal conversations, and portfolio evidence easier to assemble from one record.
For a step-by-step walkthrough, see How to Create an 'Anti-Burnout' System Using Notion and Google Calendar.
Pillar 3: Activating Your Performance Dashboard#
Use this dashboard to make one decision per asset: scale it, revise it, or stop investing in it. To do that consistently, each metric needs a fixed definition, a clear source, and a repeatable review cadence.
Step 1 Define your core KPIs before you track them#
Add three Number properties to your content database: Traffic, Leads Generated, and Client Inquiries. Lock the meaning of each in the property description, or in a short notes block in the record, so you do not redefine them mid-cycle.
| Metric | Definition |
|---|---|
| Traffic | the visits or sessions you choose to attribute to that content item |
| Leads Generated | the lead actions you choose to credit to that item |
| Client Inquiries | qualified inquiries that clearly came from that piece |
Then add support fields: Metric Source, Last Updated, and Attribution Notes. If one shared source field gets messy, split it into Traffic Source, Lead Source, and Inquiry Source only if you will keep them current.
Weak integrations usually mean more manual updates, and manual updates raise error risk. Your checkpoint is simple: another person should be able to open the record and understand what was counted, where the number came from, and when it was last refreshed.
Step 2 Tie each asset to funnel intent and an action trigger#
Add a Select property called Funnel Stage so each piece has a clear job and a default response when results are weak.
| Funnel Stage | Goal | Primary Metric | Action Trigger When Weak |
|---|---|---|---|
| Awareness | Expand reach to new audiences | Traffic | Test headline, angle, distribution channel, or timing before producing more similar content |
| Consideration | Convert attention into identified interest | Leads Generated | Improve CTA, strengthen the offer, or better match the next question the reader has |
| Decision | Drive direct sales conversations | Client Inquiries | Tighten proof, clarify the offer, or remove friction in the inquiry/booking path |
This prevents misreads. A decision-stage asset can perform well with modest traffic if inquiries are strong.
Step 3 Add an ROI layer without hardcoded assumptions#
Create a Number field such as Lead Value Assumption, but verify the current lead value from official finance or source records before using it. Then create a Formula field such as Estimated Value that multiplies your chosen outcome metric by that assumption.
If your business relies more on inquiries than raw leads, base the formula on inquiries or track both separately. The goal is not a perfect finance model; it is to compare assets by outcome, not effort. For pricing context, use Value-Based Pricing: A Freelancer's Guide.
Step 4 Build two views that support different decisions#
Use two operational views:
Weekly Execution Check: filter to recently published or actively promoted items; showStatus,Publish Date,Funnel Stage, KPI fields,Last Updated, andAttribution NotesMonthly Strategy Review: group byFunnel Stageor sort byEstimated ValueandClient Inquiriesto decide where future effort goes
If you use Notion Calendar for either view, your database needs a date property. Connections are set at the user level, and if you use multiple workspaces, connect each one separately and confirm each appears in Notion Calendar settings.
Use this rule at review time: scale when the stage's primary metric is consistently strong, revise when earlier-stage activity exists but next-stage movement is weak, and retire when results stay weak across your chosen review periods with no clear fix worth the effort. For a broader operating setup, see A Guide to Notion for Freelance Business Management.
What the Working System Does, and What to Check Next Cycle#
You now have a working system, not just a date tracker: one database that schedules content, tracks status, and keeps the working record on each item. In day-to-day use, that means clearer weekly planning, cleaner handoffs, and better visibility into what to repeat next cycle.
| Area | Basic content calendar | Your command-center workflow |
|---|---|---|
| Ownership | Titles and due dates | Each item includes status, owner or client relation, and review responsibility |
| Risk control | Comments and assets scattered across tools | Single-spot documentation reduces miscommunication and delays |
| Decision quality | Visibility into what is due | Visibility into what is blocked, reviewed, published, and ready to repeat |
Pillar 1: Production is active when planning runs from one database#
Run your weekly planning from the same database you use to execute. For the next cycle, confirm one view shows Status, Publish Date, Content Type, and the related client or project. If you cannot see all content in one place, fix that first.
Pillar 2: Protection is active when each item closes with a complete record#
When work reaches review or publish, keep comments, Client Reviewer, Approval Date, final URL, and asset source on the same page. This reduces version confusion and handoff gaps. Treat it as operational documentation, and complete the record before marking work done.
Pillar 3: Performance is active when signals change next-cycle choices#
Keep your tracking fields small enough to maintain consistently. If you use fields like Leads Generated, Client Inquiries, or Estimated Value, review them before scheduling the next batch so your plan reflects outcomes, not just output.
Next cycle activation checklist
- Confirm one database still handles scheduling and status together.
- Check every in-flight item has an owner, date, and review state.
- Close missing comments or asset-source notes before publishing.
- Review last cycle's performance fields and decide what to repeat, pause, or drop.
You might also find this useful: How to Create a Content Calendar for Your Freelance Business. Want help adapting this to your setup? Talk to Gruv.
Frequently Asked Questions
What properties do you actually need in a content calendar in notion?
Start with the minimum that lets one database schedule content and track status. Begin with status and publish timing, then add extra properties only when your team will maintain them. Next step: open your content database and confirm status and timing are visible in one place. | Setup level | Use it when | Core checkpoints | |---|---|---| | Basic setup | You need planning and deadlines only | One content database with status tracking and publish timing | | Operational setup | You need tighter collaboration | Basic setup plus documented feedback in one place and calendar-based scheduling |
How should you track ROI in a notion content calendar without faking precision?
Treat value as an estimate, not a fact. The grounded Notion guidance here focuses on planning and collaboration, not a fixed ROI formula. If you track value, keep assumptions explicit until the metric is validated. Next step: add an assumptions note next to any estimated value field.
How do you set up an approval workflow without creating more confusion?
Keep feedback in one place or you will hit the documented failure mode: fragmented comments, miscommunication, and delays. Use a clear review state and one canonical place for discussion on each content item. Next step: run one item end to end and confirm all feedback stays with that item.
What is the cleanest way to manage ideas and the content pipeline?
Use one content database, then create views for different decisions instead of scattered lists. Keep content items in the calendar so schedule and status stay visible together. Next step: create a calendar view that shows each item with its current status.
Can you track asset rights and source details in Notion?
You can track source and review notes for traceability, but this section does not establish legal requirements or compliance thresholds. Keep entries factual and operational so you can revisit decisions later. Next step: add simple source and review-note fields you will actually maintain.
Should your setup differ if you are solo versus running an agency?
The grounded guidance supports one shared database as the base. As more people join, increase clarity with ownership and review states rather than splitting into disconnected systems. Next step: duplicate your main view and filter it for each person’s active work.
How do you connect your calendar to a CRM or client database?
Keep client or project context linked to each content item so schedule, strategy, and assets stay connected in one working system. Use the lightest link structure your team can maintain consistently. Next step: add a client/project link on content items and verify it is used consistently.
Why do setup instructions sometimes look different from your screen?
Because older Notion guides can be out of step with the current interface. Notion notes that databases were redesigned in March 2022, so follow the structure and checkpoints even if the click path has changed. Next step: verify your current view still shows content, status, and timing before copying older tutorial steps exactly.
Try a related tool
Researched and edited by the Gruv editorial team. Gruv builds cross-border billing, payouts, and finance-operations software for global businesses.
Sources
Includes 3 external sources outside the trusted-domain allowlist.
- files.eric.ed.gov/fulltext/ED616742.pdftrusted
- govinfo.gov/content/pkg/CHRG-115hhrg30893/html/CHRG-115h...trusted
- pmc.ncbi.nlm.nih.gov/articles/PMC4538954trusted
- usccr.gov/files/historical/1977/77-041.pdftrusted
- uspto.gov/web/offices/pac/mpep/s2106.htmltrusted
- contensifyhq.com/blog/notion-for-social-media-calendarexternal
- digismart.io/notion-for-small-businessexternal
- launchthedamnthing.com/blog/how-to-create-content-calendar-in-notionexternal
Educational content only. Not legal, tax, or financial advice.
Related Posts
Value-Based Pricing for Freelancers Under Real Payment Risk
Value-based pricing works when you and the client can name the business result before kickoff and agree on how progress will be judged. If that link is weak, use a tighter model first. This is not about defending one pricing philosophy over another. It is about avoiding surprises by keeping pricing, scope, delivery, and payment aligned from day one.

A Guide to Notion for Freelance Business Management
If your workspace feels busy but fragile, you do not need more pages. You need one connected system. Treat your freelance business like a business-of-one and use Notion as the control layer that connects client decisions, delivery, and billing in one place.
How to Create a Content Workflow in Notion for a Marketing Team
If your team is chasing updates across chat, docs, email, and a separate invoice sheet, the issue may be less about effort and more about having no single operating record. Ownership can get fuzzy, approvals can disappear into comments, and it becomes hard to see a clean line from brief to publish to billing.