
Quick Answer
To build a no-code MVP for a client, run it as a client-grade engagement, not a quick build sprint. Lock scope in writing (PoC vs Prototype vs MVP), define must-haves and exclusions, pick tools based on constraints, and ship with acceptance criteria, QA, instrumentation, and a clean handoff. This keeps delivery fast while reducing rework, scope creep, and post-launch confusion.
You're not "building an MVP" - you're running a client-grade MVP engagement#
Treat the work like an engagement with defined scope, acceptance criteria, and decision records. That is how you build a no-code MVP without letting "fast" turn into "fragile."
You are running a business-of-one, and this project stays profitable only if you act like an operator, not a hero builder. That shift reduces rework, protects trust, and leaves you with artifacts you can point to when feedback hits.
What "client-grade" means (and what it prevents)#
A Minimum Viable Product (MVP) exists to test potential with only the core functions needed to satisfy a specific user need. You ship something real, learn fast, and avoid polishing the wrong thing.
The failure mode is usually quiet: a client says "ship it," you move quickly, and the first feedback loop exposes missing decisions about what "done" means, which user you built for, which workflow matters, and which changes count as new scope.
You do not fix that with more no-code development. You fix it with a tighter system.
Use this table to set expectations on day one:
| What you're doing | What you control | What you refuse to leave fuzzy |
|---|---|---|
| Client-grade MVP engagement | Scope, acceptance, decision log, handoff | "Done," success metric, exclusions, tool-fit rationale |
| "Just" request | Screens and workflows | Everything that creates rework later |
The system you'll use (safe defaults)#
Before you start: Set up one shared doc and own it. It holds scope, decisions, and approvals. If you want a deeper tool overview, use A Guide to the Best No-Code Tools for Freelancers.
Step 1: Gate the scope (PoC vs Prototype vs MVP). Write the choice at the top of the doc and list what the client gets at the end.
Step 2: Choose the tool after constraints, not vibes. Decide based on platform needs, data complexity, and integrations. Document unknowns instead of promising timelines or costs.
Step 3: Run the build with acceptance criteria. For each feature, define pass/fail checks. Get the client to approve that list before you call anything "finished."
Step 4: Launch with a handoff you can stand behind. Package access, a short operator guide, and a backlog that clearly separates MVP from Phase 2.
If a founder asks for "one more last admin dashboard" right before launch, you do not argue. You point to the scope gate, tag it Phase 2, and ship the workflow that proves the MVP.
What are you actually shipping: PoC vs Prototype vs MVP?#
Pick one label (PoC, Prototype, or MVP) and lock it in writing before you start building. This is your scope gate. It stops "done" from turning into a debate and keeps you, the client, and any stakeholders aligned on what success means.
Step 1: Set the scope gate with a one-table definition#
Action: Put this table at the top of the shared decision doc and get an explicit "approved" from the client.
| Ship type | Primary purpose | What it proves | What "done" looks like |
|---|---|---|---|
| Proof of Concept (PoC) | Feasibility | "Can this idea work at all?" (technical feasibility). Typically for internal validation (not meant for public release). | The riskiest technical question has a working answer (ex: one API connection works end-to-end). |
| Prototype | Design and usability validation | A user can understand the concept and flow. | The design direction feels right to the client and ideal users. |
| Minimum Viable Product (MVP) | Product-market learning | Businesses use an MVP to test product-market fit. | A usable slice of the product exists so you can measure what you chose to measure and learn. |
Verification: If the client asks for "all three," you respond: "We can do them, but we will ship them as separate milestones with separate acceptance criteria."
Step 2: Define "minimum" with two lists (must include, explicitly excludes)#
Action: Write two bullet lists under the table. Making "not included" visible is what stops scope creep.
To keep an MVP minimal, include:
- 1 primary user (name the role).
- 1 primary workflow (the happy path you want repeated).
- 1 success metric (what you will measure to decide if it worked).
- The minimum UX/UI required to complete that workflow without your live guidance.
MVP explicitly excludes (unless tied to the metric):
- Admin dashboards.
- Edge-case automations.
- Nice-to-have polish that does not move the success metric.
If the client asks for an admin panel "so we can manage everything," you reply, "If admin work does not move the success metric, we backlog it. For the MVP, we ship the user workflow and a bare-minimum way to correct mistakes."
Step 3: Choose your "MVP proof" before you build. Decide which proof the client actually needs, then build toward that.
- If the client needs evidence of demand, prioritize onboarding, activation, and retention instrumentation over extra screens. You still build an MVP. You just optimize for learning.
- If the client needs evidence of feasibility, treat the work like a PoC. Isolate the riskiest API integration and prove it in a narrow flow before you expand the UI.
Prerequisites: the client inputs you must collect before opening Bubble (or anything else)#
Collect the inputs that set scope and launch constraints before you build. Launching an app is not just hitting publish, so get aligned early and write it down.
Step 1: Centralize access + constraints (one doc, one owner)#
Action: Create a single "Inputs & Constraints" doc and assign one owner on the client side who can approve answers.
Collect, at minimum:
- Product constraints: any requirements they consider non-negotiable (what must exist at launch, what can wait, and what "done" means).
- Design/content constraints: any brand or design guidance they already have, plus where launch-critical content will come from and who owns updates.
- Users + access needs: who uses the app, what they should be able do, and what they should not be able to access.
Verification: You should be able to describe the app's screens and key flows without guessing.
Step 2: Lock the data plan before you design screens#
Action: Document where the app's data will live and sketch a first-pass model: the main entities and what you need to store about them.
Then inventory every external service or integration you expect to touch (auth, payments, email, CRM). Confirm who creates accounts, who provides keys, and who owns billing. Put it in writing.
If the client requests "email notifications" late, and you already logged the email provider, account owner, and billing owner, you add the feature. You do not start an ops scavenger hunt.
Step 3: Capture launch constraints (safe defaults)#
Action: Ask the client for constraints, not preferences. Where will the app run (web), who needs access, and what operational limits could affect release?
Step 4: Keep decisions traceable (lightweight, not bureaucratic)#
Action: Agree up front on how scope changes get approved and recorded. Maintain a single decision log that captures changes, approvals, and tradeoffs.
If you need a quick tool-fit refresh after collecting these inputs, use A Guide to the Best No-Code Tools for Freelancers.
Which no-code tool fits this MVP (web vs mobile) - and what's the "low-code escape hatch"?#
Pick the tool based on the MVP's platform and workflow constraints. Once roles, data sources, and integration owners are clear, tool choice becomes an operational decision, not a taste decision.
Step 1: Start with platform reality (web vs mobile)#
Action: Write down the MVP's primary surface as Web-first or Mobile-first, then choose a default tool candidate you can defend.
- Web app MVP with custom workflows: start your evaluation with Bubble when you need a flexible web app builder for workflows, logic, and data.
- Mobile-first MVP (native feel, device features): treat Adalo as a candidate and force clarity on unknowns. If you go mobile, document what can vary: feature complexity, device capabilities, performance constraints. Gate the decision on a small spike, not optimism.
Verification: You can answer, in one sentence, "This MVP ships first on X because Y user workflow happens there."
Step 2: Make tradeoffs explicit (and define the low-code decision gate)#
Action: Show the client a fit matrix that ties tools to the actual build shape, then set a rule for when you switch from no-code to low-code.
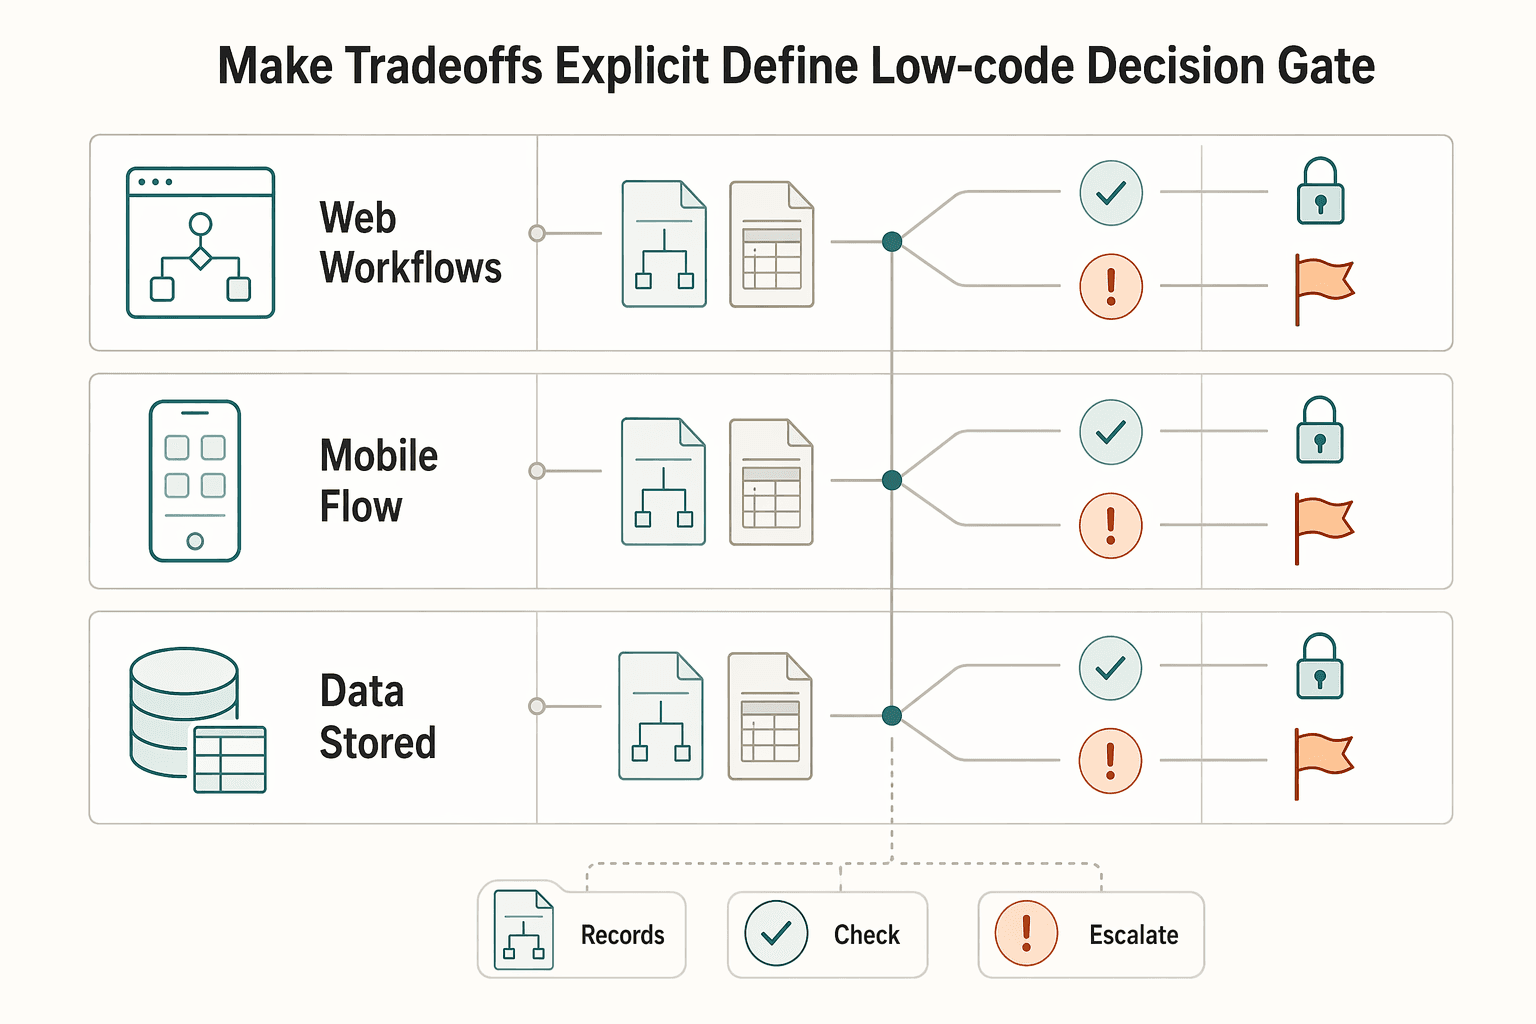
First, align on what you are actually building. A no-code backend can cover the complete server-side of your application: the database, logic, and APIs built visually, including user authentication, data management, and business processes. If your MVP needs that, your tool must support it cleanly.
| MVP need | Tool candidates to evaluate | What you must document up front |
|---|---|---|
| Web workflows with logic + data | Bubble | Data model ownership, key workflows, integration list |
| Mobile UX flow validation | Adalo | Device features required, integration feasibility, test plan |
| Data stored in a visual tool | A no-code database tool | Tables, fields, record ownership, access rules |
Then define your No-Code vs Low-Code gate. If the MVP requires logic or integrations you cannot express reliably in the chosen builder, pause. Write a change note. Propose a low-code component (custom code) with a revised acceptance test.
If the client asks for "a simple approval workflow," then later adds multiple approvers and exceptions, do not promise a timeline. Run a short feasibility check inside the chosen tool. Then confirm whether no-code still holds or you need a low-code extension.
Unknown benchmarks script: "I won't commit to speed, cost, or performance numbers before we confirm scope and integrations. I will commit to a decision gate. Tool choice happens after the workflow list and integration list, with a written fallback plan if we hit platform constraints."
The client-grade delivery plan: milestones, acceptance criteria, and change control you can defend#
Use milestones, acceptance criteria, and change control so "fast" stays controlled. This is what keeps a "small tweak" from becoming a moving target, and it lets you move quickly without betting the relationship on vague progress.
Treat no-code delivery like a short lifecycle: define the business requirements and success criteria, scope the MVP, then build. Do not rush that early work.
Step 1: Lock scope with a written "what we are shipping" decision#
Action: Write a one-page scope lock that explicitly states PoC vs Prototype vs Minimum Viable Product (MVP), then list must-haves and exclusions.
An MVP includes only the essential features needed to make the product functional. It should be large enough to support adoption, satisfaction, and sales, but not so large that it becomes bloated and risky.
Verification: You can point to the agreed success criteria and the primary workflow(s) and say, "This is what the MVP covers."
Step 2: Prioritize features and decisions so scope stays stable#
Action: Put features into a simple priority system and get explicit buy-in before you build.
Use prioritization frameworks like MoSCoW (Must, Should, Could, Won't) and RICE (Reach, Impact, Confidence, Effort) to focus on what matters most. Use them to keep the MVP focused and keep nice-to-haves visible without turning them into surprise work.
Step 3: Define acceptance criteria like a contract, not a vibe#
Action: For each feature, write pass/fail checks in plain language. No fancy format required, just something testable that both sides can agree on.
Include UX acceptance (key screens render, key flows complete) and data acceptance (fields exist, validation rules behave, and writes land where they should).
Step 4: Control scope changes without sounding adversarial#
Action: Use a lightweight change process: capture the request, confirm whether it's in-scope, and if not, decide whether to swap it into the MVP and swap something out, or defer it to a later iteration.
Also put the post-launch plan in writing at a high level, including how fixes and enhancements will be requested and handled. If you want to standardize this delivery into an offer, see How to Create a Productized Service for Your Freelance Business.
Step-by-step build workflow: from UX map to working MVP (with checks at each step)#
Lock the user journey early, then iterate the smallest end-to-end experience. Your approvals and acceptance criteria only matter if your build process forces them into the work, not into a doc that gets ignored.
Before you start (so your build stays lean)#
Treat MVP UX design as discipline, not a label. It is not a generic catch-all for an unfinished prototype. It is a way to shape an early experience that is usable and lean.
No-code makes it easy to ship quickly. It also makes it easy to pile up messy logic quickly.
You will also hear teams lean on "vibe coding" to move faster. Some claims say this can let non-technical founders build functional MVPs in 48 hours, compared to "traditional MVP development" often quoted at $10,000-$100,000 and 6-16 weeks. Those claims do not change the job: you still need scope control, acceptance criteria, and a clean handoff.
The workflow (with a check at each step)#
- Crystallize the user journey (before pixels). Draft a simple flow with beats like entry point → key action → success moment. Annotate friction like "user needs context here" or "decision point needs clarity." Check: Can you describe the full journey as a short screen list that still feels like an MVP, not a full v1 product? If the flow sprawls, cut steps until the success moment feels reachable.
| Step | Build focus | Check |
|---|---|---|
| 1 | Crystallize the user journey before pixels | Can you describe the full journey as a short screen list that still feels like an MVP? |
| 2 | Define what must be true for the UI to be honest | Can you explain, screen by screen, what the product knows, what it does not know, and how a user would recover if something is missing? |
| 3 | Build the primary scenario end-to-end | Can a fresh test user complete the workflow with zero help from you? |
| 4 | Add only what the MVP needs, and make failures visible | When something goes wrong, can the user tell what happened and what to do next? |
| 5 | Run a tight feedback loop that ends in a decision | Does every feedback item tie back to the agreed success metric? |
-
Define what must be true for the UI to be honest. Write down what information you need to capture, display, and update for each screen. Keep labels and states consistent so users are never "seeing" something the product cannot actually support yet. Check: Can you explain, screen by screen, what the product knows, what it does not know, and how a user would recover if something is missing?
-
Build the primary scenario end-to-end (skip edge cases for now). Focus on the core path that proves the value. Add permissions, roles, and admin controls only when they are truly required for the MVP to operate. Check: Can a fresh test user complete the workflow with zero help from you?
-
Add only what the MVP needs, and make failures visible. Integrate tools and services incrementally, and make it obvious when something is pending or failed so you do not ship silent breakage. Check: When something goes wrong, can the user tell what happened and what to do next?
-
Run a tight feedback loop that ends in a decision. Schedule review demos that force a choice: ship / revise / drop. Tag every request as MVP must-have or Phase 2 backlog. Check: Does every feedback item tie back to the agreed success metric?
If a client asks for "one more dashboard," tag it Phase 2 unless it directly affects activation or the success moment. Then keep shipping the core path.
MVP launch checklist: QA, instrumentation, and a clean handoff (so the client can operate without you)#
Launch only when the happy path works, you can see where users fail, and the client can operate without you. A launch is not just "publish." It is QA, basic visibility, and ownership.
Step-by-step launch checklist (operator-grade)#
Step 1: QA the MVP like a first-time user, not the builder. You can build an MVP faster than you can test it. Use a scripted QA pass:
| Step | Focus | What to verify |
|---|---|---|
| 1 | QA the MVP like a first-time user | Test on the devices and browsers users actually use, create a brand-new account, and verify each critical action writes the correct record and shows the correct UI state. |
| 2 | Add post-launch instrumentation you can actually use | Track the key steps in the core workflow, where users drop off before the success moment, and use consistent event names that map to the MVP success metric. |
| 3 | Make the build operable by a non-builder | Confirm admin access works end-to-end and write a one-page operator guide with simple rules: "If X happens, do Y." |
| 4 | Deliver the handoff | Hand off source access, domain ownership, CMS/content access (if used), integration keys, and the architecture map in agreed client-owned locations. |
- Test on the devices and browsers your users actually use, including desktop and mobile.
- Create a brand-new account and complete the core workflow without any admin shortcuts.
- Verify each critical action does two things: (1) writes the correct record in your data source and (2) shows the right UI state (success, error, pending).
Verification rule: After every important click, you can point to the exact record that changed and the screen state the user sees.
Step 2: Add post-launch instrumentation you can actually use. Instrumentation does not need complexity. It needs clarity.
- Track the key steps in your core workflow and where users drop off before the "success" moment.
- Use consistent event names that map to your MVP success metric.
Check: You can answer "where do users fail" without guessing or replaying screenshare videos.
Step 3: Make the build operable by a non-builder. Your client needs operator flows, not editor tours:
- Confirm admin access works end-to-end.
- Write a one-page operator guide with simple rules: "If X happens, do Y."
Step 4: Deliver the handoff package (the ownership kit)#
| Item | What "done" looks like | Where you store it |
|---|---|---|
| Source access | Client owns the core product accounts and admin access | Shared credential manager agreed with client |
| Domain ownership | Client controls DNS and registrar login | Client's registrar account |
| CMS/content access (if used) | Client can edit and publish content | Client-owned workspace/account |
| Integration keys | Client can rotate keys without you | Secure credential store plus a written key list |
| Architecture map | One page: app, data store, and each external connection | Shared doc folder |
If you want this to run like a productized service, standardize this in your offer (How to Create a Productized Service for Your Freelance Business).
How do you avoid rebuilding later - and what do you do when things go wrong?#
Make scale-readiness decisions early and use a clear recovery playbook when problems hit. The goal is validation with real users, not perfection. You are not trying to future-proof everything. You are trying to avoid brittle shortcuts and stay credible when something breaks.
Step 1: Lock five scale-readiness decisions (even when you build a no-code MVP fast)#
1) Design for data portability (lightweight backend today, database later). Treat your early backend (for example, Airtable) as a source of truth, not a UI dependency. Keep your screens bound to internal data types, or a thin internal data layer, where possible, and map backend fields to those types. Verification: You can list the tables, fields, and relationships on one page, independent of any screen.
2) Isolate integration boundaries (so APIs stay swappable). Centralize third-party API calls into a small set of backend workflows or reusable actions. Store raw responses plus a normalized "status" field (success, failed, pending). Verification: You can replace one provider without touching every page.
3) Build auth + roles like you will have a second user type. Do not hardcode "everyone is a user" assumptions. Define roles early, even if you only enable one role in the MVP, and gate workflows accordingly. Verification: Adding an "admin" does not require rewriting core screens.
4) Add performance guardrails (no fake promises). Avoid over-nesting workflows and over-fetching data. Document known limits and hotspots you observe during QA (for example, "search screen slows when the dataset grows"). Verification: You can point to the heaviest queries and the plan to optimize them later.
5) Keep auditability (trust compounds when decisions are traceable). Maintain a change log for scope and releases. Tie each change to acceptance criteria and a reason (bug, compliance, success metric).
| Decision | Safe default | What it prevents |
|---|---|---|
| Data portability | Schema doc + mapping layer | Rebuilding UI when leaving your first backend |
| API boundaries | Centralized calls + status fields | Vendor lock-in and brittle swaps |
| Roles | Role gates from day one | Late-stage auth redesign |
| Performance | Query discipline + limits doc | Surprise slowdowns and blame games |
| Audit log | Release notes + change log | "You never told me" conflicts |
Step 2: Use the trust-recovery playbook when mistakes happen#
Mistake: you built UI before data. Freeze UI changes. Fix the data schema first (tables, required fields, relationships). Then refactor screens using a controlled regression list (signup, core action, error states, admin check).
Mistake: tool mismatch (a no-code tool, then deep custom logic appears). Document the constraint in plain language, then propose a low-code bridge (put the complex logic behind an API) or renegotiate Phase 2 scope.
Mistake: scope creep via "quick tweaks." Start a change log immediately. Re-approve acceptance criteria, then convert requests into backlog tickets labeled MVP vs Phase 2.
Mistake: fragile integrations. Add status surfaces visible to operators, retries, and idempotent patterns (store a unique request key and check it before creating records). Goal: You can safely replay a failed action without duplicating records.
Relationship rule: Communicate in artifacts, not vibes. Label unknowns explicitly. Propose the next test that resolves them: a quick spike, a single API call validation, a role-permission check.
Conclusion: run the MVP like an operator - and ship a version you can stand behind#
Ship a lean MVP you can stand behind by running the engagement with professional control: scope, tool choice, decision trail, launch, and handoff. Speed becomes a byproduct of clarity, not the goal.
A Minimum Viable Product (MVP) is the smallest, leanest version of a product that delivers real user value and produces meaningful learning. That definition drives the posture: ship something real, measure something real, learn fast, and keep the build maintainable.
Building an MVP fast without technical debt is not about cutting corners. Technical debt - the hidden cost of early compromises that slow development, weaken reliability, and make future changes harder - shows up when you skip written scope, choose tools on hype, or ship without an operator-grade handoff.
If your client asks for "one quick change" post-launch that quietly adds a second user type, and you already documented roles, acceptance criteria, and a Phase 2 boundary, you can respond like an operator. Log it, assess it against the success metric, and either ship it as a controlled change or backlog it without drama.
What "professional control" looks like (so you stay credible)#
- Clear MVP scope: Written PoC vs Prototype vs MVP, plus must-haves and explicit exclusions.
- Defensible tool choice: A fit matrix that justifies Bubble vs FlutterFlow vs Adalo vs Glide vs Webflow, plus a documented low-code escape hatch for risky logic or portability.
- Traceable decisions: Release notes and a change log tied to acceptance criteria, not vibes.
- Client independence: A clean launch and handoff that lets them operate without a freelance developer on standby.
If you want to turn this into a repeatable offer, map this workflow directly into a fixed offer using How to Create a Productized Service for Your Freelance Business. Keep your no-code development stack intentional, not expansive.
Copy/paste checklist (client-grade no-code MVP)#
- Confirm PoC vs Prototype vs MVP (written, signed-off)
- Define MVP must-haves + explicit exclusions
- Choose tool with a fit matrix (Bubble/Webflow/FlutterFlow/Adalo/Glide) + document low-code escape hatch
- Collect prerequisites: brand assets, roles, CMS needs, Airtable schema, and API keys
- Set milestones + acceptance criteria (Given/When/Then)
- Build in order: UX flow → data model → happy path → integrations → feedback loop
- QA on real devices + fresh user accounts; verify Airtable/data writes and UI states
- Add instrumentation for the MVP success metric
- Prepare the handoff package: access, CMS ownership, API keys, architecture map, and operator guide
- Record release notes + change log; backlog Phase 2 items with clear boundaries
Frequently Asked Questions
How do I build a no-code MVP for a client step by step?
Run it as an engagement with gates. Define whether you are shipping a PoC, Prototype, or Minimum Viable Product (MVP) in writing, then lock “must include” and “explicitly excludes.” Build in this order: data model first, then the happy path end-to-end, then only the integrations the MVP needs. Verification stays the same: a fresh test user can complete the workflow, and you know what you will measure after launch.
Which no-code tool should I use for a web vs mobile MVP?
Choose based on platform and constraints. Start by writing “Web-first” or “Mobile-first,” then evaluate tools against your workflow complexity, data model, and integrations. Share a fit matrix with the client, and document your “escape hatch” (the point where you pause and propose a low-code component) so tool limits do not become a surprise. If you want a broader overview of options, use A Guide to the Best No-Code Tools for Freelancers.
No-code vs low-code for an MVP: which is better for avoiding rework later?
No-code can improve speed to market and make iteration easier. Low-code can be a better fit when you need custom logic or deeper control. A practical split: use no-code for UI and standard workflows, and use low-code where you need custom behavior or tricky integrations behind an API so you can change providers without rewriting screens.
What should be in an MVP launch checklist (pre-launch and post-launch)?
Pre-launch: QA the core workflow like a first-time user, seed realistic test data, and verify every critical action writes the right record and shows the right UI state. Post-launch: track the success metric, log where users fail, and keep a change log tied to acceptance criteria. Verification: you can answer “what broke, who it affected, and what changed” without guessing.
How do I avoid rebuilding the MVP later when the client wants to scale?
Make portability and boundaries day-one decisions. Keep the data model documented, centralize integrations, and define roles early so you do not hardcode assumptions. Hypothetical scenario: the client asks for a second user type after launch. If roles and workflow gates already exist, you add permissions instead of rewriting the app.
What deliverables should I include in a client MVP project (scope, milestones, acceptance criteria, handoff)?
Ship artifacts, not promises. Include: a written scope gate (PoC vs Prototype vs MVP), a milestone plan tied to outcomes, acceptance criteria (Given/When/Then or equivalent), a basic architecture map (data and integrations), and a handoff kit (accounts, keys, operator guide). Verification: the client can operate the MVP without pinging you for every small task.
How do I set boundaries for changes and maintenance after the MVP ships?
Write the rule, then enforce it calmly. Route requests through a change log, then tag each request as “MVP bug” (fix) or “new scope” (quote and schedule). Keep a Phase 2 backlog visible. A safe default: if a request does not affect the MVP success metric, compliance risk, or a critical blocker, it goes to Phase 2.
Try a related tool
Researched and edited by the Gruv editorial team. Gruv builds cross-border billing, payouts, and finance-operations software for global businesses.
Sources
Includes 8 external sources outside the trusted-domain allowlist.
- agilealliance.org/glossary/mvpexternal
- atlassian.com/agile/product-management/minimum-viable-productexternal
- bubble.io/blog/minimum-viable-productexternal
- impalaintech.com/blog/mvp/no-code-mvpexternal
- mindtheproduct.com/a-no-code-approach-to-building-mvpsexternal
- mltechsoft.com/blog/create-mvp-with-no-code-tool-startupexternal
- railsware.com/blog/nocode-mvpexternal
- raw.studio/blog/top-5-no-code-tools-for-building-your-mvpexternal
Educational content only. Not legal, tax, or financial advice.
Related Posts

How to Create a Productized Service for Your Freelance Business
If your recent client work produces similar results from similar inputs, you may be ready to turn it into a defined offer. The shift is operational, not cosmetic. You are deciding what you sell, what the client gets, what it costs, and how delivery happens, instead of rebuilding every job from scratch.

Best No-Code Tools for Freelancers Who Need Clean Handoffs
Choose for maintainability first. If you do repeat client work, the right no-code tools are the ones you can still explain, hand off, and troubleshoot a year later. A strong demo matters far less once real client data, deadlines, and day-to-day edits show up.

Estate Planning for Digital Nomads: Legal Intent and Cashflow Continuity
Treat estate planning for digital nomads as a two-part continuity system: legal intent plus operational execution, so your business keeps moving when you cannot. The common trap is thinking, "I have a will, so I'm covered." If you run a business-of-one, cashflow, logins, and process often live in your head until you deliberately externalize them.