
Quick Answer
Yes - treat using a step-down transformer as a strict go/no-go decision before power-on. Verify destination mains against the unit input rating, then match secondary output to each device label or power brick. Confirm any selector position from the exact model manual, and check the full connector chain for firm fit. If markings are smudged, ratings are missing, or the path is unclear, keep that device offline and log the exception.
Stop risking your work gear at the wall outlet#
Power mistakes are often avoidable. In many cases, you can reduce risk by making one clear go or no-go call before anything touches the outlet. If you cannot verify the setup quickly, stop and verify it before power-on.
That matters most when you arrive tired, late, or distracted. A rushed plug-in can hide basic setup errors. The fix is simple: run four gates in order and treat any failed gate as a hard stop.
| Gate | What to verify | Go | No-go |
|---|---|---|---|
| Voltage match | The wall supply matches the transformer input rating shown on the exact unit label or manual | You can confirm the local supply and it falls within the transformer's stated input range | The input rating is missing, unreadable, or does not match the wall supply |
| Output fit | The transformer output matches what your device expects on its own label or manual | The device's required input matches the transformer's secondary output | The device requirement conflicts, or the unit is a 1:1 isolation transformer when you need voltage conversion |
| Capacity | Any documented transformer output rating supports the device or devices you plan to connect | The total planned load is documented and within the unit's stated rating | The rating is unknown, the device load is unknown, or you are stacking multiple uncertain loads |
| Physical plug path | The wall to primary path and secondary to device path fit cleanly end to end | Every connector fits firmly without force, wobble, or improvised stacking | Any adapter or connector is loose, forced, unstable, or only half-seated |
Keep the wiring path explicit#
Keep your mental model literal. The primary winding is the input side that connects to wall power. The secondary winding is the output side that feeds your device. If you cannot describe your path as "wall to primary, secondary to device," you are not ready to energize the unit.
| Item | Type | What the article says |
|---|---|---|
| Primary winding | Unit side | Input side that connects to wall power |
| Secondary winding | Unit side | Output side that feeds your device |
| 1:1 isolation transformer | Transformer type | Same-voltage transfer for isolation, not voltage conversion |
This is where confusion often starts. Some step-up or step-down units provide isolation, and some do not. That is not something to assume from the product category. Check the exact device label and manual for your model. If it says 1:1 isolation transformer, that means same-voltage transfer for isolation, not voltage conversion. If you expected the output voltage to change, it is the wrong tool.
If your unit specifically claims isolated output and you want an extra check before trusting it, the cited safety guidance gives one practical test: with power disconnected, an ohm meter should show an open circuit between mains/input and secondary/output. Use that as a verification checkpoint, not as a substitute for the manual.
Isolation is a feature, not a safety halo#
Treat isolation as one verified property of a specific device, not proof that everything downstream is now safe. The guidance is clear on this point: an isolation transformer does not automatically make connected circuitry safe, and always using one can even let dangerous faults pass undetected. That is the right red flag if you catch yourself thinking "isolated" means "no risk."
The practical takeaway is straightforward. If your label or manual is unclear, if the unit type does not match the job, or if the load plan is fuzzy, do not improvise at the outlet. A transformer setup only makes sense when the wall input, transformer behavior, and device requirement all line up on paper first.
Use this every time you arrive:
- Read the transformer label before you unpack cables.
- Confirm wall supply against the transformer's input rating.
- Confirm device requirement against the transformer's secondary output.
- Check any stated capacity rating for the load you plan to connect.
- Test the full plug path for firm fit before you switch anything on.
- Stop on any missing label, conflicting note, or uncertain adapter.
If you want to tighten the rest of your travel setup too, The Best Gear for a Portable Home Office is a useful next read. For a step-by-step walkthrough, see A guide to using 'Plaid' to connect bank accounts to your app.
Build the right mental model before you plug anything in#
Your four-gate check only works if you treat records as decision inputs, not memory aids. Before power-on, rely on the exact unit label, the matching model manual, and a short written connection plan. If any of those are missing or unclear, call it a no-go.
| Decision input | Use before power-on | No-go if |
|---|---|---|
| Exact unit label | Rely on the exact unit label | Missing or unclear |
| Matching model manual | Rely on the matching model manual | Missing or unclear |
| Short written connection plan | Rely on a short written connection plan | Missing or unclear |
Use labels as evidence, not shorthand. A product name can point you in the right direction, but it does not verify your full setup by itself.
Use the labels as operator references, not as marketing shorthand#
| Term or label | What it tells you | What it does not tell you | Go or no-go trigger |
|---|---|---|---|
| Step-down transformer | How the model is categorized on its own documentation | It does not confirm your full input/output setup, capacity plan, connector path, or isolation status | Go only when the model label/manual confirms your planned setup. No-go if you are relying on the product name alone. |
| Step-up/down transformer | The model may support more than one operating configuration | It does not confirm which configuration is active now | Go only when the active configuration is clearly identified for your exact unit. No-go if current state is inferred. |
| Voltage selector switch | A configurable control exists on that unit | It does not prove transformer type, capacity, or isolation | Go only when the present setting is readable and documented against model guidance. No-go if switch labeling or position is unclear. |
| Primary and Secondary | The unit uses named sides/terminals you must map in your connection plan | It does not confirm that every gate has passed | Go only when your written path matches the unit's own markings. No-go if you are guessing path order. |
| VA rating | A published capacity value to include in planning | It does not validate the rest of the setup | Go only when planned load is documented against the published rating. No-go if either value is unknown. |
| Isolation or isolated output | A separate model attribute that may be documented | It does not prove voltage conversion, selector state, or overall setup safety | Go only when isolation is explicitly documented for your exact model and relevant to your plan. No-go if one isolation label is being used as proof of everything else. |
The key distinction is simple: transformer type, selector state, and isolation status are separate checks. No single label answers the whole setup.
Turn Primary, Secondary, and VA into pre-plug actions#
Make each term auditable before you energize anything. Map your exact connection path using the unit's markings, then document planned load against the published VA value. If you cannot verify either step from records, stop.
| Action | What to do |
|---|---|
| Verify | Capture the exact label/manual details you are using |
| Map | Write the connection path from those markings, then tie it to your four gates |
| Log | Record any missing field, conflict, or failed gate |
| Reuse | Start from your last fully verified setup, not memory |
Also treat your checklist as guidance, not a complete substitute for model-specific references. When documentation leaves a gap, pause and get the missing source before you proceed.
Use this operator script every trip:
- Verify: capture the exact label/manual details you are using.
- Map: write the connection path from those markings, then tie it to your four gates.
- Log: record any missing field, conflict, or failed gate.
- Reuse: start from your last fully verified setup, not memory.
If your next decision is really about physical connector fit, use The Best Power Adapters and Converters for Global Travel for that separate plug-path decision.
Do you actually need a step-down transformer for this trip?#
Only for devices that do not already accept the destination input. Use this order every time: verify destination supply from a trusted reference, check each device label/manual, then choose a device-specific power path.
If a device label shows 100-240v, 50/60Hz AC, it may already support broad input without voltage conversion. If a device is 110v-only and your verified destination supply is higher, that is when using a step-down transformer is relevant. If either side is unclear, treat that device as no-go until verified.
| Decision check | What to verify | What this proves | Go | Stop if unclear |
|---|---|---|---|---|
| Destination supply | Destination mains voltage and frequency pending trusted source verification | You know what the wall supply is for this trip | Continue to device check | Do not rely on memory, secondhand advice, or assumptions |
| Device input label | Read the manufacturer label on the device or power brick; use the model manual if needed | You know whether the device accepts broad input or needs conversion | If label/manual clearly supports local supply, use a plug adapter only if needed | Label is smudged, missing, or ambiguous |
| Conversion path | If the device needs 110v and destination supply is higher, verify transformer/converter input-output labeling | You have a documented conversion path (for example, 220v → 110v) | Proceed only when unit label and manual match your setup | Output is inferred from product name or incomplete markings |
| Physical plug fit | Check whether plugs physically mate, or whether an adapter is needed | Physical fit only | Use the correct adapter after voltage is cleared | Plug fit is being treated as proof of voltage safety |
Common confusion: a plug adapter fixes shape, not voltage safety.
Keep verification evidence simple and explicit: photo of the device label, the manual page for that exact model, and your destination supply note. Reported failures include damaged devices from suspected high output and a case where a hair straightener overheated and melted; another comment suggested surge protection might have contributed. Because cause can be uncertain, do not treat partial verification as acceptable.
Pre-power sequence:
- Record destination supply from your trusted reference.
- Check each device label/manual against that supply.
- If the device already accepts it, use only the required plug adapter.
- If it needs conversion, verify transformer/converter labels and manual before connecting.
- If any item is incomplete, mark that device no-go and log the exception.
Related: A Guide to Using Loom for Asynchronous Client Communication.
What should you set first on a step-up/down transformer?#
Set the selector or mode first (if the unit has one), then verify the input/output path, and power on only after both checks pass. Use that sequence as a pre-power control, not as a guess from the product name.
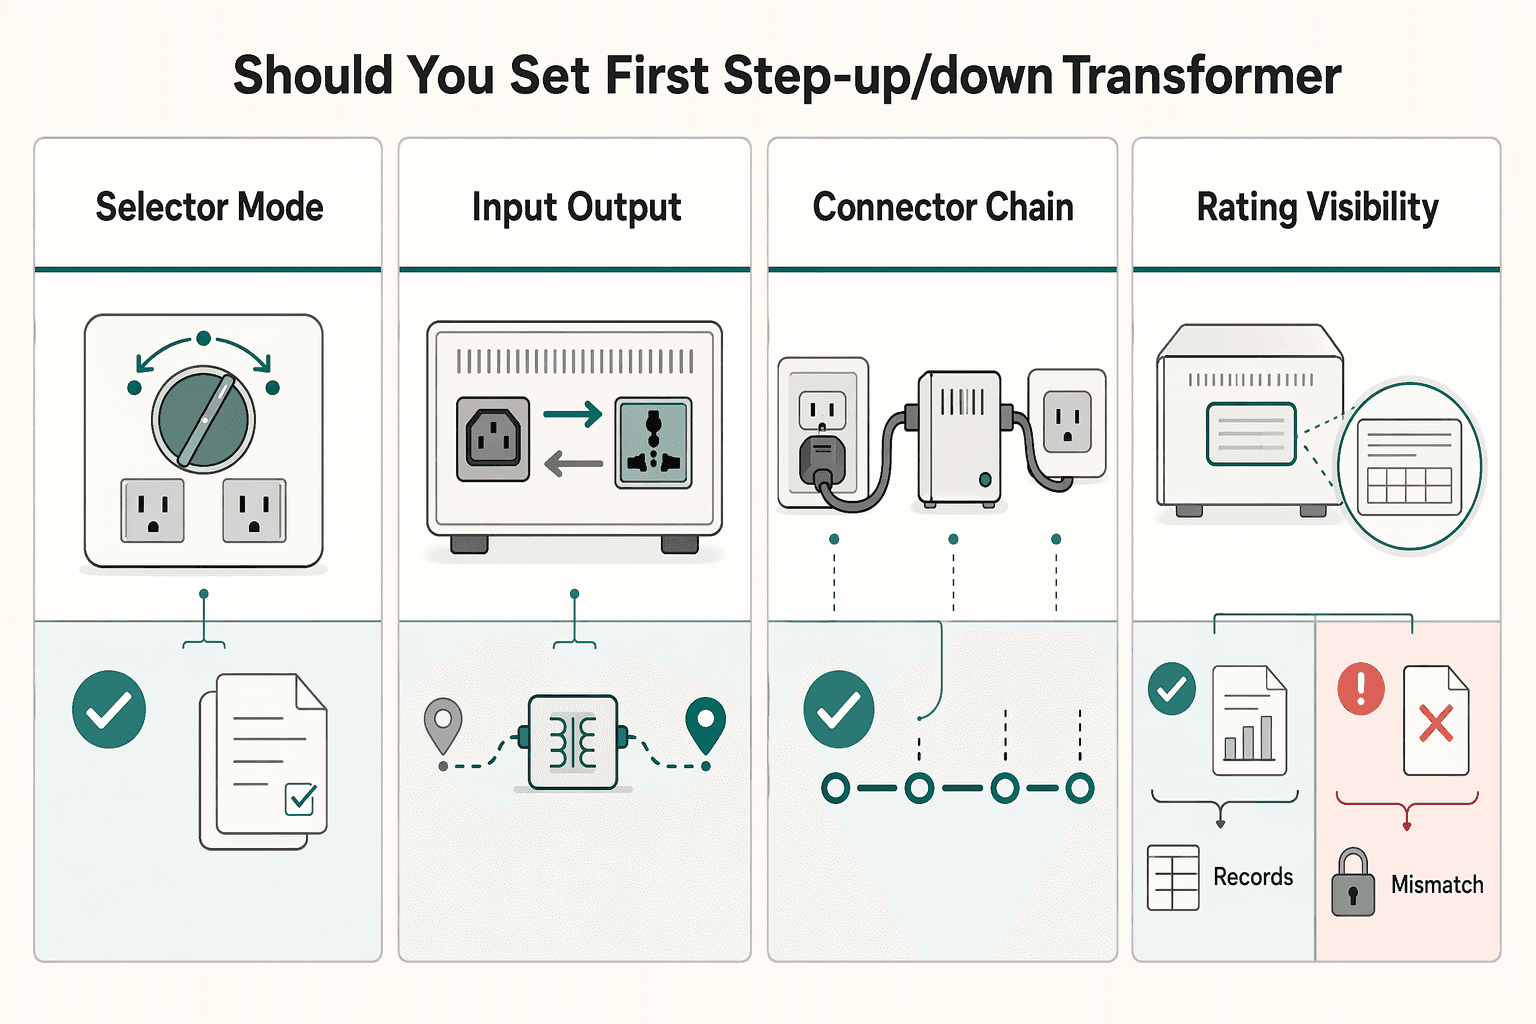
First, confirm the unit's voltage direction from its own labeling: a step-up transformer raises output voltage, and a step-down transformer lowers output voltage. If the front label is unclear, stop and use the nameplate, wiring diagram, or model manual before connecting anything.
Next, run a hands-on Primary/Secondary path check. Wall input should go to Primary, and device output should come from Secondary. If you cannot clearly identify those points on the unit or in its wiring documentation, treat it as no-go.
| Setup gate | Pre-power action | Pass | Stop condition |
|---|---|---|---|
| Selector or mode | Read the selector position and match it to the unit markings and your planned setup | Marking is clear and position is unambiguous | Selector label is unclear, conflicting, or missing |
| Input/output direction | Trace wall input to Primary and device output from Secondary | You can state the full path in one sentence | You cannot confirm which side is input vs output |
| Connector chain | Check each adapter/plug for direct, intentional fit | Every connection is secure and deliberate | Any link is improvised, forced, loose, or stacked without clear verification |
| Rating visibility | Read the transformer nameplate and device label before energizing | Both labels are readable for comparison | Nameplate or device data is missing, smudged, or unreadable |
Keep three checks separate: selector position, conversion need, and plug fit. Passing one does not clear the others.
This matters because community guidance on reverse use is mixed: one comment says reverse connection is possible, while another warns expected output can miss under load. If your exact unit's input/output direction is not clearly documented, do not improvise.
Use this strict pass/fail sequence under travel pressure:
- Confirm the device still needs conversion.
- Verify selector/mode position (if present) and mark pass/fail.
- Trace wall to Primary and Secondary to device; mark pass/fail.
- Inspect the full connector chain; mark pass/fail.
- Read and photograph the rating labels/nameplate for reuse on future trips.
- Power on only if every line passed; any fail remains no-go until verified.
Can your transformer safely handle your device load?#
Capacity is the next gate: do not power on until you verify that the transformer's posted rating covers your device load. If any required rating field is missing or unreadable on either side, treat that setup as no-go.
Start with the device label or manual, then check the transformer nameplate or manual. Match wattage or amperage directly. You may see examples like a 100 W load on a 125 W transformer, but treat that as a heuristic unless your exact unit documentation confirms a specific margin.
Build a verified load list#
Use one trip inventory table and force a verified/unverified decision on every line.
| Field | What to record | Status options | Decision rule |
|---|---|---|---|
| Device load | Exact wattage or amperage from the device label or manual | Verified / Unverified | If missing or unreadable, stop |
| Transformer rating | Posted wattage or amperage from the transformer label or manual | Verified / Unverified | If missing or unreadable, stop |
| Voltage match | Required output and intended transformer output | Verified / Unverified | If unclear, isolate that device |
| Current note | Any current limit stated by the manufacturer | Verified / Unverified | Current threshold pending manufacturer/source verification |
| Use plan | Single device or combined chain | Verified / Unverified | Unverified shared use stays off |
Photograph both labels and store them with your trip note so you can recheck quickly under travel pressure.
Decide on single-device use vs shared load#
Single-device use is easier to verify: one load against one rating, with a clear pass or fail.
Shared-load chains require a separate decision. Do not assume a universal combined-load rule. Only combine devices when each device rating is verified, the combined plan is documented, and your transformer documentation supports that use. Otherwise, keep uncertain gear off that chain.
Use this closing script:
- Record each device load and the transformer rating from labels or manuals.
- Mark every line as verified or unverified.
- Isolate any device with missing, conflicting, or unreadable data.
- Document any exception in writing, including why you proceeded.
- Reuse only configurations you already verified on a prior trip.
Where does guidance vary by country and hardware model?#
Guidance changes every trip, so use this order every time: check the destination mains profile and plug shape, then verify your exact transformer label/manual, then verify each device nameplate before you power anything on.
Country differences and model differences create different risks. Country determines the wall supply; model determines what your unit can accept and deliver. One explicit example from the source material is a 110V/120V device in Kenya's stated 220V/240V supply, where over-voltage damage is a real failure mode if you do not convert correctly.
| What changes by country | What changes by model | Your verification step | No-go trigger |
|---|---|---|---|
| Mains profile (local voltage and whether a 50Hz/60Hz check is needed) | Transformer input/output compatibility for your intended use | Record the destination power profile, then match it against the transformer label and manual | You cannot confirm the local profile, or the transformer documentation is unclear/incompatible |
| Plug type/shape at the outlet | Plug format on your transformer and device cords | Run a separate physical-fit check; treat plug fit as separate from voltage conversion | You are relying on a plug adapter to solve voltage mismatch |
| Frequency environment | Frequency sensitivity called out for the transformer or device | Confirm 50Hz/60Hz compatibility on labels/manuals before use | Frequency details are missing, conflicting, or outside manufacturer instructions |
| Local usage context | Model-specific load behavior, including startup surge on motor/inductive gear | Recheck device nameplate/manual requirements before reuse | Device requirements are unreadable, or planned use differs from manufacturer guidance |
If any check fails, stop before power-on. Photograph the exact label or manual page you used, log what is missing or conflicting, and keep that device out of the setup until you can verify it. When you are using a step-down transformer, do not treat "close enough" as acceptable.
Related reading: A guide to using Notion 'Databases' for freelance project management.
Run this pre-flight checklist before every trip#
Run this checklist before every trip, and treat each gate as mandatory for your setup. If any gate fails, stop and resolve it before you pack. This is a condensed execution aid, not a replacement for your transformer and device manuals.
| Gate | What you verify | Pass if | Stop if | What to log |
|---|---|---|---|---|
| Gate 1 | Your destination power assumptions, including outlet family and grounding expectations, using current official or manufacturer references | You can point to a current reference and restate the setup you are planning for | Your reference is missing, outdated, or unclear | Destination, travel date, and the reference you used |
| Gate 2 | Exact model alignment: transformer label, transformer manual, device label/manual, and any selector/setup details | Labels and manuals match the exact configuration you plan to run | Model mismatch, unreadable markings, conflicting instructions, or missing manual details | Transformer model, device model, label photos, manual pages, selected setup |
| Gate 3 | Physical plug and grounding fit as its own check, separate from voltage setup | Every connection in your chain physically fits the planned outlet/adapter path | You are assuming fit without confirming each connection | Plug/adapter path, outlet family checked, grounding notes |
| Gate 4 | Reuse and exceptions log | You only reuse configurations that fully passed Gates 1-3 | You are reusing a setup that was never fully validated, or anything changed since last trip | Passed configuration, failed checks, changes since last run, do-not-pack list |
For Gate 2, start with a publications check: pull the exact manual for the model in your hand, then match label to manual before you finalize settings. Repeat that for each device you plan to connect.
For Gate 4, keep a small evidence pack from each successful trip and reuse only fully validated configurations. If destination, hardware, labels, or instructions changed, rerun all four gates from Gate 1.
Turn this into your standard operating playbook#
Run this as a one-page, predefined workflow every trip. If any field is blank, memory-based, or conflicts with your label/manual evidence, mark the setup Unresolved and do not reuse it yet.
Use the same sequence each time so decisions are faster and traceable. Record only what you can verify from the device label, transformer label, and exact model manual you checked.
| Playbook block | What you record | Verification source | Go/No-go status |
|---|---|---|---|
| Device/model scope | Every device you plan to power, each transformer/adapter in the chain, exact model names, destination, and date-stamp | Device label, transformer label, packing list, exact model manual | Go only when every item is identified and matches the hardware in hand |
| Configuration | Wall-to-device path, marked input/output sides, and any selector position on your unit | Transformer label, manual page, photo of packed unit | No-go if label mapping and manual instructions do not clearly agree |
| Capacity record | Rating details captured from the device and transformer, plus whether usage is single-device or mixed-load | Device label, transformer label, manual | No-go if rating details are missing, unclear, or copied from memory |
| Plug fit | What connects to what, including each adapter and grounding fit in the exact chain you packed | Visual check, product labeling, manual/packaging | Go only when each physical connection is confirmed |
| Exception log | Unresolved item, fallback used, date opened, date closed, and saved evidence | Trip notes, photos, screenshots, support reply (if used) | Any open exception = No-go for reuse |
Before power-on, do a quick syntax check: say the full connection path out loud using the words printed on the hardware. If you cannot state it cleanly in one sentence, refine the record and re-check.
Reuse protocol: carry forward only fully validated setups, archive failed or partial setups with evidence, and re-verify whenever destination, hardware, or documentation changes. Documentation can age quickly across release cycles, so always rely on current records.
Frequently Asked Questions
How do I use a step-down transformer safely for electronics abroad?
Run the same four checks every time: confirm destination wall power, confirm the transformer setup and wall-to-device path, confirm capacity from the device nameplate and transformer label, then confirm plug fit as a separate check. Back that up with photos of the transformer label, device label, manual page, and any selector position. If one item stays unclear, keep that device off and log the unresolved point instead of guessing.
What should I set first on a step-up/down transformer?
Start with the exact manual for your model and the label on the unit in your hand. Then verify the marked input side, output side, and any selector position before you connect anything to the wall. Confirm it by saying the path out loud in one sentence using the words printed on your unit, such as input to wall and output to device. If the label map, selector marking, or manual wording conflicts, delay power-on until you resolve the mismatch.
Do I need both a plug adapter and a voltage converter?
Treat voltage setup and plug fit as two separate checks. A plug that fits does not, by itself, confirm the voltage setup is correct for your device. Check plug and grounding fit only after you have confirmed the electrical plan from the unit label and manual. If you are expecting one adapter to solve both problems, stop and switch to a verified combination or an alternative device path.
How do I tell if my transformer VA rating is enough for my device?
Compare the device nameplate input with the transformer input/output labeling, then follow the rating guidance in the manufacturer instructions for that specific unit. Do it device by device, not from memory, and keep uncertain or mixed loads off the same unit until you verify them. If the rating basis is missing or unclear, use a better-documented unit or leave that device offline.
What mistakes most often damage electronics when traveling internationally?
Stop as soon as your path, selector choice, or wiring logic starts to feel improvised. In one forum example, a user working with a 120/600 VAC step-up transformer and a 600/120 VAC step-down transformer said they were unsure about neutral handling. A master electrician reply said the shown 120v sections were in series but phased wrong, and gave one specific terminal checkpoint for that case (line A to X1 and X3, line B to X2 and X4). Treat that as an example, not a universal rule, and note that the thread is closed so follow-up validation is limited. If your setup depends on terminal-level interpretation or unwritten assumptions, stop and use the exact manual, local code, or a qualified electrician before you continue.
How do I verify local mains voltage before I plug in?
Use a current official or manufacturer reference you can save, not memory from a past trip or a generic post. Capture that reference in your trip notes and match it against each device requirement before you pack or power on. If your source is old, conflicting, or unclear, delay startup until you have a current reference you trust.
When should I stop and not use a transformer setup?
Stop as soon as any core input stays unknown: destination power reference, transformer label, selector position, device nameplate input, connection path, or plug and grounding fit. Run that no-go list before every trip, especially when reusing an old setup that was never fully documented. If one check fails, log the failed item and use a direct-input device, a dual-voltage alternative, or no power-up until you can verify it.
Try a related tool
Researched and edited by the Gruv editorial team. Gruv builds cross-border billing, payouts, and finance-operations software for global businesses.
Sources
- digital.library.unt.edu/ark:/67531/metadc1070670/m2/1/high_res_d/530...trusted
- energy.gov/sites/default/files/2024-04/dt_ecs_fr.pdftrusted
- federalregister.gov/documents/2024/04/22/2024-07480/energy-conse...trusted
- legislature.vermont.gov/Documents/2026/Workgroups/House%20Energy%20a...trusted
- nist.gov/system/files/documents/pml/div684/All_papers...trusted
- nvlpubs.nist.gov/nistpubs/Legacy/IR/nistir6714-4.pdftrusted
- osha.gov/laws-regs/federalregister/1994-01-31trusted
- pmc.ncbi.nlm.nih.gov/articles/PMC12845672trusted
Educational content only. Not legal, tax, or financial advice.
Related Posts

The Best Power Adapters and Converters for Global Travel
Your goal is simple: leave this section with one primary power path and one backup path for client-critical devices. If any key detail is missing, mark it **Unknown until verified** and do not make that gear part of your default kit.

The Best Gear for a Portable Home Office
The evidence here does not directly test portable-office gear decisions, so use this as a practical framework rather than a proven standard.

The Freelance Payment Penalty: A Modeled Audit of Platform Fees, FX Spreads, and Payout Delays
The money rarely disappears through a single, easy-to-spot fee. The real loss is stacked. A marketplace takes its commission, a processor adds a charge for international cards, a bank or payment company converts the currency at a spread, a platform holds the funds before release, and a wire sheds a little to intermediaries on the way in. Each layer looks defensible on its own, but the worker feels the combined result as a smaller deposit and a later payday.