
Quick Answer
Start by confirming that the thailand o-a visa retiree route matches your case, then follow your embassy or consulate’s live checklist before gathering full paperwork. Keep one visa category, one financial evidence path, and one submission channel. For O-A planning, handle insurance proof as a pass/fail item before filing. Leave travel flexible until your records are complete, and check re-entry handling before any trip out of Thailand.
Choose the visa route before you build the file#
For a retirement move to Thailand, start by choosing the visa route and confirming which issuing-post instructions apply to your case. If you are considering the thailand o-a visa retiree path, first confirm that O-A actually fits your situation before you build the rest of your file.
This guide is a practical sequence for retirees and long-stay planners, not a generic visa summary. In retirement planning, O-A is framed as a 1-year long-stay route, O as a basic retirement route, and O-X as a longer 5-year to 10-year route. Those categories are different, and treating them as interchangeable is an easy way to make early mistakes.
Your first checkpoint is simple: are you applying from outside Thailand or from within Thailand? That can change the process path, the timing, and where you need to verify requirements.
If you are in the typical 50+ applicant group and planning more than a casual stay, keep three decisions in view: the exact category you are pursuing, the evidence bundle for that route, and the point where you stop relying on summaries and verify directly with the issuing post. This is not just a lifestyle decision; the compliance details matter.
When sources do not align, rely on the latest instructions from the embassy or consulate handling your case. If you expect to file through a specific post, confirm its current submission channel and required evidence before you pay fees or lock travel dates.
For a step-by-step walkthrough, see A guide to Thailand's 'Elite Visa' program.
Start with the visa options that actually matter#
Choose your visa category before you build your document file. That choice affects stay conditions, permitted activities, and re-entry flexibility, so category confusion is one of the first places avoidable delays begin.
For retirement planning, you may see a focused comparison of Non-Immigrant Visa Category O, Non-Immigrant Visa Category O-A (Long-Stay), and Non-Immigrant Visa Category O-X in advisory materials. Treat them as separate labels to verify with your issuing post before filing.
| Visa category | What you can use now (advisory) | What must be confirmed before filing (official, issuing post) |
|---|---|---|
| Non-Immigrant Visa Category O | Keep it as a separate route in your shortlist. Do not assume it works the same as other labels. | Eligibility, stay mechanics, extension or renewal process, and required evidence. |
| Non-Immigrant Visa Category O-A (Long-Stay) | Keep it as a separate route in your shortlist. Do not assume it works the same as other labels. | Eligibility, stay mechanics, extension or renewal process, and required evidence. |
| Non-Immigrant Visa Category O-X | Treat it as its own route, not a larger version of O or O-A. | Eligibility, stay mechanics, extension or renewal process, and required evidence. |
Keep one line clear in your notes: what is official and what is advisory. General visa explainers are useful for orientation, but your issuing post's current instructions control your case. Before you go deeper, confirm two practical checkpoints: your passport has at least six months of validity remaining, and any non-Thai or non-English documents are officially translated and certified. Errors in category choice or documentation can lead to delays or refusal, and overstay can lead to fines or deportation.
If you want a deeper dive, read The 2025 Global Digital Nomad Visa Index: 50+ Countries Compared.
Decide if O-A is your best fit before you collect paperwork#
For many retirees, O-A visa can be a sensible first option, but only if you are comfortable with annual upkeep and document requirements. Use this section as an early screen, not a final legal checklist.
| Screening point | O-A | O-X |
|---|---|---|
| Use case | Framed around retirement use | Framed around retirement use |
| Minimum age | 50 at application | 50 at application |
| Qualification framing | Presented as easier to qualify | Presented as tighter eligibility |
| Admin burden | Annual renewal | Less hassle long-term |
| Funds mentioned | ฿800K (~$22K) bank proof | ฿3M (~$85K) |
| Other stated gate | $100,000 USD minimum insurance coverage | Eligibility limited to stated 14 countries |
Before you collect paperwork, check these fit points:
- Retirement intent: This comparison frames both O-A and O-X around retirement use, with a stated minimum age of 50 at application.
- Admin tolerance: O-A is presented as easier to qualify, but it still comes with annual renewal, stated bank proof of ฿800K (~$22K), and $100,000 USD minimum insurance coverage.
- Long-term tradeoff: O-X is presented as less hassle long-term, but with tighter eligibility (stated 14 countries) and higher funds (฿3M (~$85K)).
If your plan is an annual retirement long stay, O-A can fit.
If you may later switch between O-A and O, treat the mechanics as an open question, and note that requirements vary by embassy.
Final checkpoint: this is a commercial comparison guide, so use it to screen options, then verify requirements with your nearest Thai embassy or consulate before applying. For a broader city-planning angle, see London, UK: A Guide for Expats and Remote Workers.
Understand what O-A gives you and what it does not#
Non-Immigrant Visa Category O-A (Long-Stay) is a retirement long-stay route. On the Los Angeles Thai consulate page, it is framed as "Long-stay 1 year." Use that as your planning baseline. It is centered on retirement stay permission, not every other legal or operational question that comes with your move.
In plain terms, keep these labels clear:
- Long-Stay (O-A) visa: a retirement-focused non-immigrant category listed with O and O-X on the same retirement page.
- Re-entry Permit: a travel-related permit referenced for people holding these visa types.
Keep two boundaries clear as well:
- Verify work authorization rules for O-A separately. If work or paid consulting is part of your plan, verify that separately before making business, tax, or travel commitments.
- Travel needs its own admin checks. The same page flags re-entry permit issues, so confirm your re-entry steps before your first departure.
That distinction matters when you move from planning into filing. The LA consulate says that if you do not have a valid visa or re-entry permit, you start at Step 1 - Online e-Visa Application and submit required PDF documents. Check the basic gates early, including passport validity of at least 6 months.
On that consulate site, Visa Exemption and Visa on Arrival sit on a separate track from retirement categories. If your goal is a retirement long stay, plan from the retirement route rather than short-entry options.
You might also find this useful: A Deep Dive into Thailand's Long-Term Resident (LTR) Visa for Tech Professionals.
Build your document pack in the right order#
Build your pack in layers: lock the core application records first, then add supporting evidence in separate bundles so one update does not break everything else.
Start with your passport, photo files, and your visa application records. Treat those as the fixed core, then add supporting documents in modular bundles. If your finance evidence changes close to submission, you can replace that bundle without rebuilding the full file.
| Bundle | What belongs in it | Why keep it separate |
|---|---|---|
| Core application bundle | Passport, application photo files, visa application records | Anchors identity and submission details |
| Identity and civil bundle | Personal ID and other identity-supporting documents listed in your application flow | Usually stable once finalized |
| Finance bundle | Bank and transfer evidence, including Thai bank account records if you are using that route | Most likely to change close to submission |
| Travel and status notes | Admin notes for extension and immigration reporting steps | Keeps process notes from getting mixed into the core pack |
Before upload, run one consistency pass across every file:
- Name spelling and key identity details match across passport, application records, and support files.
- Files are readable and complete.
- Required signatures are present where needed.
- File formats and photo sizing match the current portal requirements.
Then do a final pre-flight check before submission. Use the Thailand Visa Portal for current details, and treat missing documents, photo-size issues, missing signatures, and invalid formats as real delay or rejection risks to catch before you submit. If you want a wider planning comparison, see Digital Nomad Visa Guide for 2026 Moves.
Choose your financial proof route and make it defensible#
Pick one financial route and make every document support that same route. A common avoidable problem is mixed evidence across routes.
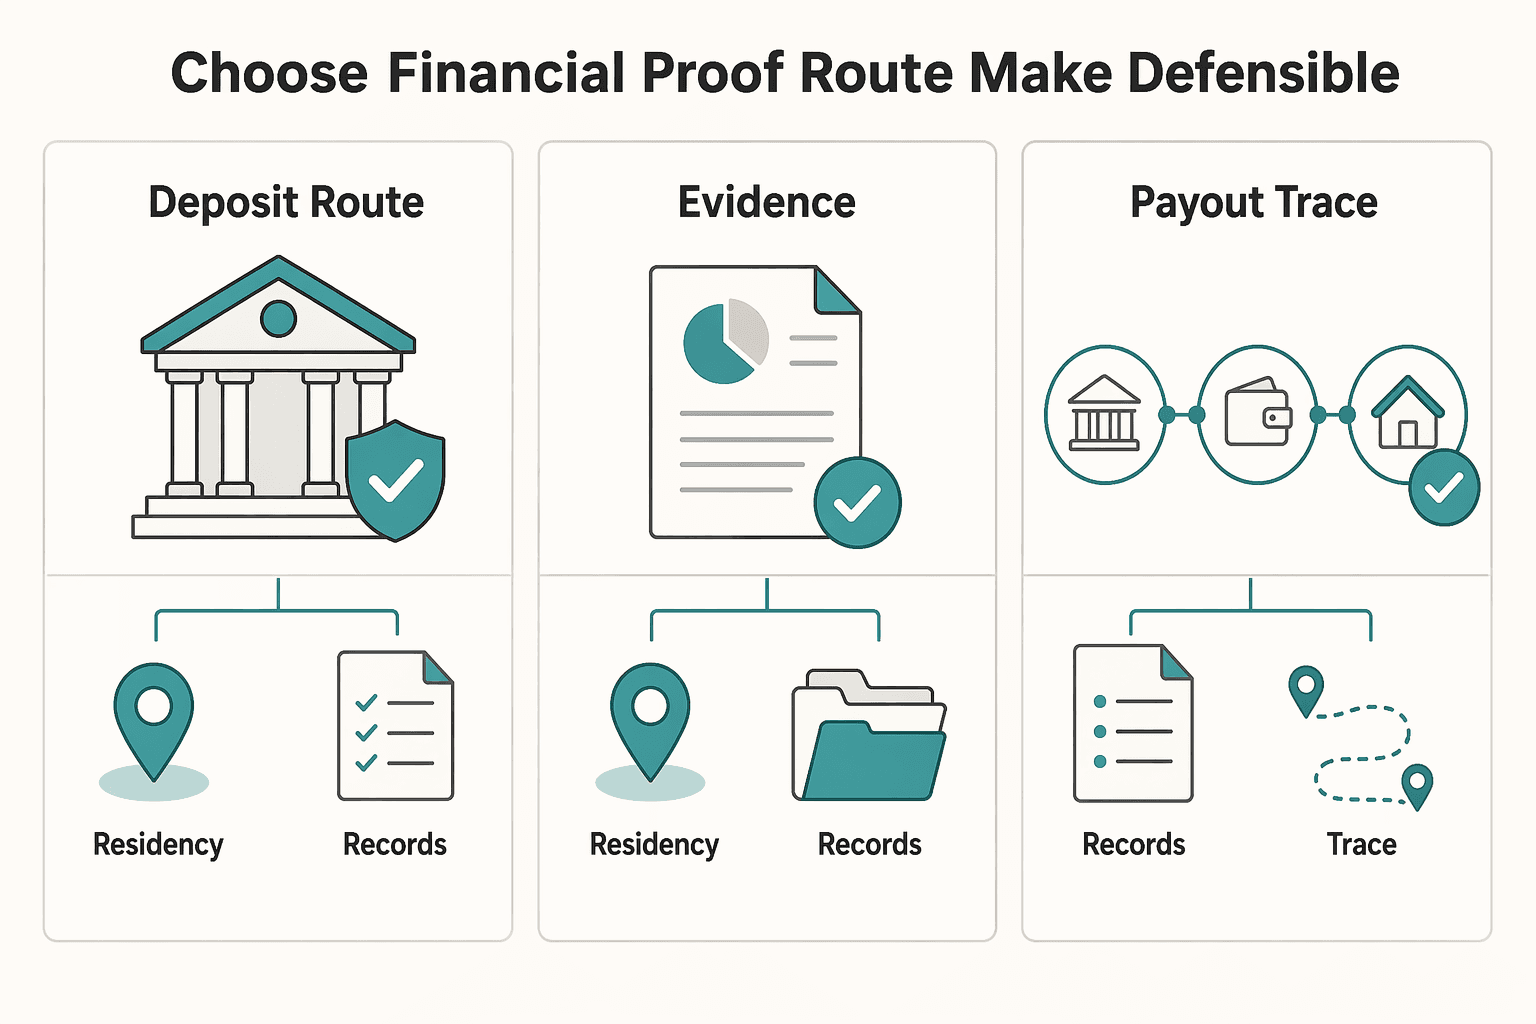
The MFA accepts three routes for a Non-Immigrant Visa Category O-A (Long-Stay) application:
| Route | MFA threshold | What makes it defensible | Common failure mode |
|---|---|---|---|
| Deposit route via bank statement | At least 800,000 Baht | Bank statement plus the required original bank guarantee letter | Submitting statements without the original bank guarantee letter |
| Income route via income certificate | At least 65,000 Baht per month on an original income certificate | Original income document, plus matching incoming-income bank evidence where the post requires it | Claiming monthly income without a formal original income certificate |
| Combined route | Deposit plus monthly income totaling at least 800,000 Baht | Clear calculation and traceable records for both parts | Mixed records that do not clearly show how the total meets the threshold |
A practical decision rule:
- If your monthly income is stable, the income route is often the cleanest to explain.
- If your income is irregular but your balance is strong, the deposit route is often cleaner.
- If you use the combined route, use it only when both sides are easy to trace and reconcile.
Match the route to your profile#
For steady pension-style income, keep the story simple and document both the income proof and account inflow when required. The Los Angeles post asks for at least $2,500 per month and a current bank statement showing incoming income.
For asset-heavy cases, the deposit route can be cleaner, but only if the package is complete. MFA guidance requires an original bank guarantee letter when you use the bank statement route.
For mixed-income cases, be strict about evidence quality. The combined route is valid, but only if your deposit and monthly income records clearly total 800,000 Baht.
Keep the evidence clean and current#
Before you submit, run three checks:
- Source traceability: every amount ties to an identifiable issuer or bank record.
- Document recency and format: local posts may add checks beyond MFA baseline guidance. London states last 3 months for monthly income evidence and says not to rely on screenshots.
- Route consistency: your uploads should match your declared route from start to finish.
This is where jurisdiction matters. MFA states you apply through the Royal Thai Embassy or consulate in your home or residence country, so local evidence formats and currency framing can differ. London frames evidence as 65,000 THB (£1,500) monthly income or 800,000 THB (£18,000) balance. Los Angeles uses $30,000 recent ending balance or $2,500 per month with incoming-income evidence. Do not assume the Royal Thai Embassy, Washington, D.C. uses those same figures. Check that post's O-A page directly, which shows an update date of 5 May 2025.
If you want the cleanest file, choose one route, build one evidence trail, and keep every upload aligned to that choice.
Handle O-A insurance requirements without guesswork#
Treat insurance as a planning gate for an O-A file, and verify current rules before final submission.
The evidence here is a planning signal, not a current legal determination. It comes from a 2019 discussion thread. In that thread, commenters say O-A retirement extensions require health insurance from approved Thai companies, while retirement extensions based on O do not. Use that only as context, then confirm current requirements on the Thai Immigration page referenced in the thread and with the authority handling your case.
Validate the policy in the right order#
- Start with current official requirements
Use the Thai Immigration page referenced in the thread as your first checkpoint, because the thread itself is not an official ruling.
- Check issuer acceptability second
Do not rely on claims that a policy is "visa compliant." The thread mentions "approved Thai companies," but it does not provide an official current list or criteria.
- Match your documents to current instructions
Before filing, confirm the exact insurance documents required by the office handling your application.
What to verify before you click submit#
Before you submit, compare the Thai Immigration requirements page referenced in the thread with your issuing office's current instructions. If they do not align, pause and ask the issuing office first.
Keep a small evidence pack:
- Policy certificate or insurer confirmation
- Policy schedule or summary wording
- Proof the policy is active
- Any written confirmation tied to your filing instructions
Reassess early if insurance looks hard#
If insurance is the weakest part of your file, do not force the O-A route. The same thread frames a tradeoff: O-A is linked to the insurance burden, while retirement based on O is described as shifting the burden toward bank-fund maintenance, including a commenter's example of THB 800,000 deposit and maintaining 400k Baht.
That does not make O automatically better. It does give you a practical checkpoint: if your finances are stronger than your insurability or your insurance-document options, reassess the O route before you file a fragile O-A application.
Follow a date-by-date timeline from planning to arrival#
Use a dependency-based timeline, not a promised calendar. Move to the next step only when the prior gate is clean and current.
| Phase | Decision gate | What to do next |
|---|---|---|
| Planning | You are working from current official guidance | Keep plans flexible until source checks are complete |
| Source check | Any U.S. government page you use is live and trustworthy | Confirm .gov + HTTPS before relying on procedural details |
| Archive check | A page is labeled ARCHIVED CONTENT | Treat it as historical and switch to current State Department pages |
| Timing check | A source references "Processing Time Limits" but provides no values | Treat timing as unspecified and avoid date promises |
| Application prep | Your checklist still traces to current official pages | Remove steps copied from archived or secondary summaries |
| Approval to travel | Your final plan still matches current official guidance | Do one last source-validation pass before travel actions |
If your case drags, use this red-flag order:
- Re-validate that each guidance page is current and official.
- Replace any step that came from archived content with current instructions.
- Re-check your full plan against current official pages before any further decision.
For arrival, keep the handoff simple: build next steps from current official instructions, not archived pages.
Submit through the right channel for your jurisdiction#
Use the filing channel that matches the issuing post for your jurisdiction, then follow the Thailand e-Visa portal steps that post requires. For an O-A case, if your Royal Thai Embassy or consulate tells applicants in its jurisdiction to use the e-Visa Online Application, follow that route. If the same post also publishes its own forms, fees, document list, or local notes, treat those post instructions as your operating rules.
| Source | Order | How to use it |
|---|---|---|
| Issuing post notice | Start with | Use the live embassy or consulate page handling your case, including jurisdiction checks, document lists, and contact routes |
| Thailand e-Visa portal | Then confirm | Use the central portal for the online process and portal-side requirements; do not assume it replaces post-specific instructions |
| Advisory sites | Last | Use third-party explainers as cross-checks, especially when old and new pages create confusion |
A consulate page that shows Jurisdiction, e-Visa Online Application, and Visa Forms and Documents gives you two immediate checks before filing. First, confirm the post covers where you live. Second, confirm your file matches that post's current requirements.
Use this practical check order when pages conflict:
- Start with the issuing post notice
Use the live embassy or consulate page handling your case, including jurisdiction checks, document lists, and contact routes.
- Then confirm details in the Thailand e-Visa portal
Use the central portal for the online process and portal-side requirements, but do not assume it replaces current post-specific instructions.
- Use advisory sites last
Use third-party explainers as cross-checks, especially when old and new pages create confusion.
One channel-mismatch red flag is that "5-year" or "10-year" visa searches can pull you into programs with different issuing channels and stay mechanics. Those may not match an O-A filing path.
Run this checkpoint shortly before submission:
- Re-open the issuing post's Jurisdiction page and confirm it still covers you.
- Confirm the post still directs applicants to the e-Visa Online Application.
- Re-download post-specific forms or checklists instead of relying on saved copies.
- Confirm your selected visa category still matches your intended filing.
- Check the post's Visa Contact Information in case you need clarification.
If any check fails, pause and correct the channel before uploading.
We covered this in detail in How to obtain a police clearance certificate for a long-stay visa application.
Manage year-one compliance after entry#
Year-one success is mostly operational: keep your stay valid, meet recurring obligations, and build renewal evidence continuously. After entry on Non-Immigrant Visa Category O-A (Long-Stay), treat compliance as an ongoing admin job, not a one-time approval.
Track the dates that actually control your stay#
Your extension timeline is the core control point. The annual extension of stay is what supports remaining in Thailand year after year, as long as financial and reporting conditions are still met.
Keep one calendar with reminders for:
- extension expiry, typically tied to a one-year validity cycle
- each 90-day address declaration
- insurance and financial evidence checkpoints you may need again at renewal
Do not rely on memory. Missed 90-day declarations, expired insurance, or broken bank-balance continuity can put residence status at risk.
Plan travel around the Re-entry Permit, not around the ticket price#
Before any trip, verify your Re-entry Permit against your current extension validity. Re-entry validity depends on extension validity, so a permit does not outlast the extension behind it.
Use one pre-booking check:
- planned return date
- extension validity
- re-entry permission validity
If any one of those is weak, fix it before you travel.
If you switch tracks, reset your assumptions#
If you move from O-A to another long-stay route, rebuild your compliance checklist from scratch. Do not assume reporting and travel mechanics transfer unchanged.
LTR is a clear example: annual address reporting replaces the standard 90-day model, and multiple re-entries are included. But a category mismatch can stall processing and waste time and government fees.
Keep immigration and tax planning in separate folders#
A valid stay status is not the same as tax status. If you spend more than 180 days per year in Thailand, tax-residency planning may become relevant even when immigration records are in order.
Keep these as separate workstreams, and escalate tax planning early when your day count is approaching that threshold. For that handoff, see Digital Nomad Tax Residency in Thailand: A 2026 Guide.
Use one yearly folder structure and keep feeding it#
Build renewal continuity as you go, not at deadline time. Use one folder per year with fixed subfolders:
- 01 Status: passport ID page, visa page, latest entry record, extension documents
- 02 Reporting: each 90-day declaration record and next due date log
- 03 Financials: bank evidence, pension or income support, balance-continuity records
- 04 Insurance: current policy and renewal notices
- 05 Travel: Re-entry Permit records, trip dates, return-date checks
- 06 Address: lease and other residence-supporting records
When renewal prep starts, you should be assembling, not reconstructing. This pairs well with our guide on Thailand's Long-Term Resident (LTR) Visa for Professionals.
As you set up your first-year renewal folder, add a simple tax-status timeline. That helps keep immigration steps and tax residency decisions from getting mixed up. The Tax Residency Tracker can give you one place to do that.
Avoid the mistakes that cause preventable refusals or delays#
The sources behind this section do not set out Thailand-specific refusal criteria. Use the guidance below as a practical quality check, and confirm requirements with the issuing post before you submit.
Confirm the visa path before you polish the documents#
Confirm the exact visa category in the issuing post's official instructions, then keep your forms and supporting documents aligned to that one category.
Treat third-party explainers as orientation, not filing instructions. If category wording is unclear, ask the issuing post for written clarification before submission.
Make sure your evidence tells one consistent story#
Use the supporting records the issuing post asks for, and make sure those records match the category shown in your application.
Even when records are valid, weak labeling, missing pages, unclear issuer details, or conflicting dates may slow review. Before filing, check that names, dates, and document purpose are consistent across all materials.
Run a stoplight check before submission#
Use this as an internal quality screen, not official embassy policy.
| Status | When it fits | Action |
|---|---|---|
| Green | Visa category is confirmed in official instructions; documents are complete and readable; names, passport details, and dates align across forms and uploads | Submit |
| Yellow | A key point appears only in third-party summaries; a document's filing purpose is ambiguous; or one unclear item needs direct confirmation | Clarify with issuing post |
| Red | You are still unsure which visa category applies; core documents conflict on identity details, dates, or purpose; or your evidence set does not clearly match the selected route | Pause and rebuild |
Use the table as your last internal screen before you submit.
Self-audit mismatches before you submit#
Check documents side by side, not from memory. Focus on identity details, dates, and purpose labels across all submitted materials.
If a mismatch is legitimate, add a short note and a supporting record that explains it.
Know when to escalate to the issuing post#
Contact the issuing post directly when instructions seem inconsistent, your case sits between categories, or a document's acceptability is unclear.
Keep the request specific: state the visa category, name the exact document, and ask whether that document is acceptable for your filing.
Conclusion#
Start by choosing the right retirement visa path, then build your documents and timing around that path only. Before you pay, file, or book travel, confirm your exact checklist and filing channel with your issuing Royal Thai Embassy or consulate, and use its official Thai e-Visa entry point when provided.
Keep your file focused on one financial route you can prove clearly. If you use the deposit route, make sure the balance evidence and bank documents all point to the same story. If you use the income route, confirm that your income documents match what the issuing post accepts.
For O-A, treat insurance proof as a pass-or-fail gate. Verify that your coverage and supporting documents match current requirements before submission.
Plan travel with the same discipline. Retirement stay is framed as up to 1 year at a time with renewal potential, and if you plan to leave and return, you need re-entry handling in place to protect status continuity.
Use this final pre-filing check:
- Confirm your issuing post and jurisdiction.
- Confirm your visa category for your case.
- Choose one financial proof route and gather only that route's evidence.
- Confirm your O-A insurance proof meets current requirements.
- If you may travel, verify re-entry handling before you finalize plans.
Do those checkpoints early, and you can reduce avoidable delays while starting your first year in Thailand with more control.
If you want a practical next-step pack after this visa plan, visit Gruv's tools hub.
Frequently Asked Questions
What is the practical difference between Non-Immigrant Visa Category O and Non-Immigrant Visa Category O-A (Long-Stay) for retirees?
They are listed as separate pathways, not interchangeable labels. On the Royal Thai Consulate-General, Los Angeles page, O appears as “Non-Immigrant Category O (retirement),” while O-A is explicitly labeled “Long-stay 1 year.” Treat each category as its own filing track and build your documents to the exact category you apply under.
Who is typically eligible for a Long-Stay (O-A) visa, and what should be verified with the issuing post first?
A non-official retirement-visa guide frames eligibility around applicants over 50 years of age. Before collecting documents, confirm with the issuing post that your category is correct, your jurisdiction can file through that post, and your checklist matches that post’s requirements. On the Los Angeles page, applicants without a valid visa or re-entry permit are directed to the online e-Visa application and instructed to upload documents in PDF format.
Is Health insurance for Non-Immigrant O-A visa mandatory, and how does that differ from Non-Immigrant Visa Category O cases?
A non-official guide states O-A requires health insurance that meets Thai criteria, including at least 400,000 THB inpatient and 40,000 THB outpatient coverage. For O-A planning, treat insurance as a core filing item and verify your policy wording before submission. For O, do not assume the same rule applies everywhere. Confirm with the issuing Royal Thai Embassy or consulate.
Which financial proof route is usually cleaner: Thai bank account evidence, an Income verification letter, or a combined approach?
Use the route your issuing post can verify most clearly with your documents. One non-official guide presents alternatives: 800,000 THB in a Thai bank account for at least 2 months, 65,000 THB monthly via an income verification letter, or a combined total of 800,000 THB. Another non-official source phrases deposit and income together, so confirm the accepted route with your issuing post before filing.
When is a Re-entry Permit required, and what can go wrong if you travel without planning for it?
A non-official guide says that if you plan to leave and return without canceling your visa, you need a re-entry permit. The practical risk is losing visa continuity if you travel without handling re-entry correctly. If travel is likely during your stay, confirm re-entry handling with the issuing post in advance.
What parts of the process vary by Royal Thai Embassy or consulate jurisdiction?
Checklist details can vary by issuing post, so use that post’s instructions as your filing standard. A concrete Los Angeles example is the upload checklist format (PDF), passport validity of at least 6 months, and a photo taken within the past six months. If another source conflicts, default to your issuing post’s requirements.
If information conflicts online, which source should you trust and in what order?
Start with the issuing post’s official page, then follow its linked e-Visa instructions, and use private guides only for context. If a private source adds a threshold or document rule you cannot find on the issuing post’s guidance, treat it as a question to verify directly before you submit.
Try a related tool
Researched and edited by the Gruv editorial team. Gruv builds cross-border billing, payouts, and finance-operations software for global businesses.
Sources
- 2009-2017.state.gov/documents/organization/137859.pdftrusted
- 2021-2025.state.gov/report-to-congress-on-proposed-refugee-admis...trusted
- academia.edu/30060943/Entrepreneurship_And_Sustainable_De...trusted
- catalog.cornell.edu/ecornell-catalog-coursestrusted
- college.columbia.edu/cct/archive/sites/cct/files/14spring_cct_sma...trusted
- congress.gov/event/118th-congress/senate-event/LC74357/texttrusted
- congress.gov/bill/119th-congress/house-bill/7006/texttrusted
- govinfo.gov/content/pkg/GAOREPORTS-GAO-06-126/html/GAORE...trusted
Educational content only. Not legal, tax, or financial advice.
Related Posts

The 2026 Global Digital Nomad Visa Index for 50+ Countries
Start with legal fit, not lifestyle filters. The practical order is simple: choose a route you can actually document, then decide where you want to live. That single change cuts a lot of wasted comparison work and stops you from falling in love with places that were never a real filing option.

London, UK: A Guide for Expats and Remote Workers
Get two calls right early and the rest of the move gets easier: how you'll be in the UK, and where you'll work when conditions are less than ideal. Make those decisions before you lock dates or prepay a long stay. If you book first and sort the basics later, admin and work reliability usually collide in your first week.

Digital Nomad Tax Residency in Thailand for 2026
Low-stress compliance in Thailand comes from early decisions and clean records, not last-minute cleanup. Most costly problems start as small assumptions about visas, day counts, and money movement that stack up over time.