
Quick Answer
Choose a risk level first, then run the erase path that matches the storage medium. On Windows, use Recovery > Reset PC > Remove everything, then reboot twice to confirm a fresh setup screen with no old session. If encryption status is unknown, prior use is unclear, or sensitive client data was stored, escalate beyond a basic factory reset. Finish with a one-line note listing device ID, method, date, and verification outcome.
Sell Your Device Without Selling Your Data#
Make one call before you touch the device: choose a wipe level that matches the risk, then document each step you complete. That keeps your decisions consistent when you are under pressure from a buyer, a trade-in deadline, or a handoff date.
This applies to any device you plan to sell, trade in, donate, or recycle. Data can remain recoverable if the cleanup path is too light or gets cut short. CISA warns that deleting data, or even destroying a device, does not always guarantee protection. Consumer Reports also warns against selling, trading in, donating, or recycling before a full wipe.
Speed and assurance pull in different directions. Factory Reset may discourage casual misuse, but it is not a blanket guarantee against targeted recovery. If recovered files or account access would create serious exposure, move beyond basic deletion or reset to a Secure wipe approach and accept that the process may take longer.
| Situation before sale | Practical choice | Tradeoff to accept |
|---|---|---|
| Device held routine personal files and low-stakes material | Factory Reset as a baseline | Lower effort, lower assurance against targeted recovery |
| Device held financial, identity, account, or other sensitive data | Use a Secure wipe approach beyond basic deletion or reset | More effort, stronger protection goal |
| You cannot confirm what was stored, or multiple people used it | Treat as higher risk and use a stronger wipe approach | Extra time now, lower chance of exposure later |
Keep proof lightweight and consistent. One note per device is enough. Include device name, date, method used, and a quick confirmation that old user data is no longer accessible.
If you are handling multiple devices, avoid choosing methods ad hoc. Decide the method category first, then run the same sequence for each matching device type. Consistency is what prevents last-minute shortcuts that are hard to defend later.
Keep the opening checkpoint simple: if you cannot explain why you chose a method in one sentence, do not start the wipe yet. Clarify the risk level first, then proceed. If you are planning a portable setup after the sale, A Guide to Renting vs. Buying a Home for Nomads is a useful companion.
What Secure Wiping Means Before You List a Device#
For resale, secure wiping means reducing how recoverable old data is beyond normal deletion. When recovery risk is less acceptable, use a stricter wipe approach before handoff.
Deletion alone is not erasure. Removing files and emptying trash usually marks storage space for reuse rather than immediately removing old data, whether the device uses an SSD (solid-state drive) or a Magnetic hard disk. For resale decisions, "deleted" and "gone" are not the same outcome.
| Outcome you need | What it means in practice | Common mistake to avoid |
|---|---|---|
| Resale-ready wipe for routine risk | Use a basic reset process matched to your risk level | Assuming deleted files were fully erased |
| Higher-assurance sanitization for sensitive data | Go beyond a basic reset to stronger data-removal methods | Treating Factory Reset as universal proof of clearance |
| Uncertain data history | Default to the higher-assurance path | Choosing convenience because listing is urgent |
One red flag is unknown encryption status, especially on Android devices. On unencrypted Android devices, a standard factory reset may not be enough. If encryption status is unclear, treat that uncertainty as risk and escalate the method choice instead of guessing.
Use precise language in your notes. Replace vague statements like "cleaned device" with specific outcomes such as method used, first-setup state confirmed, and whether a rerun was needed.
Before you list the device, keep a one-line decision record: storage type, encryption status, chosen wipe level, and reason. That line helps lock the outcome target before you execute and document the wipe.
One distinction matters here: resale-ready does not mean unrecoverable under every threat model. If your required outcome is stronger than ordinary resale confidence, set that expectation before erase begins. Unclear outcome targets create avoidable mistakes. If you are also setting up your workspace after handoff, The Best Gear for a Portable Home Office may help.
Choose the Right Method by Device and Storage Type#
Pick the method by storage medium first, then by device type. A single reset path is not equally reliable across every medium, so starting with the medium prevents avoidable errors later.
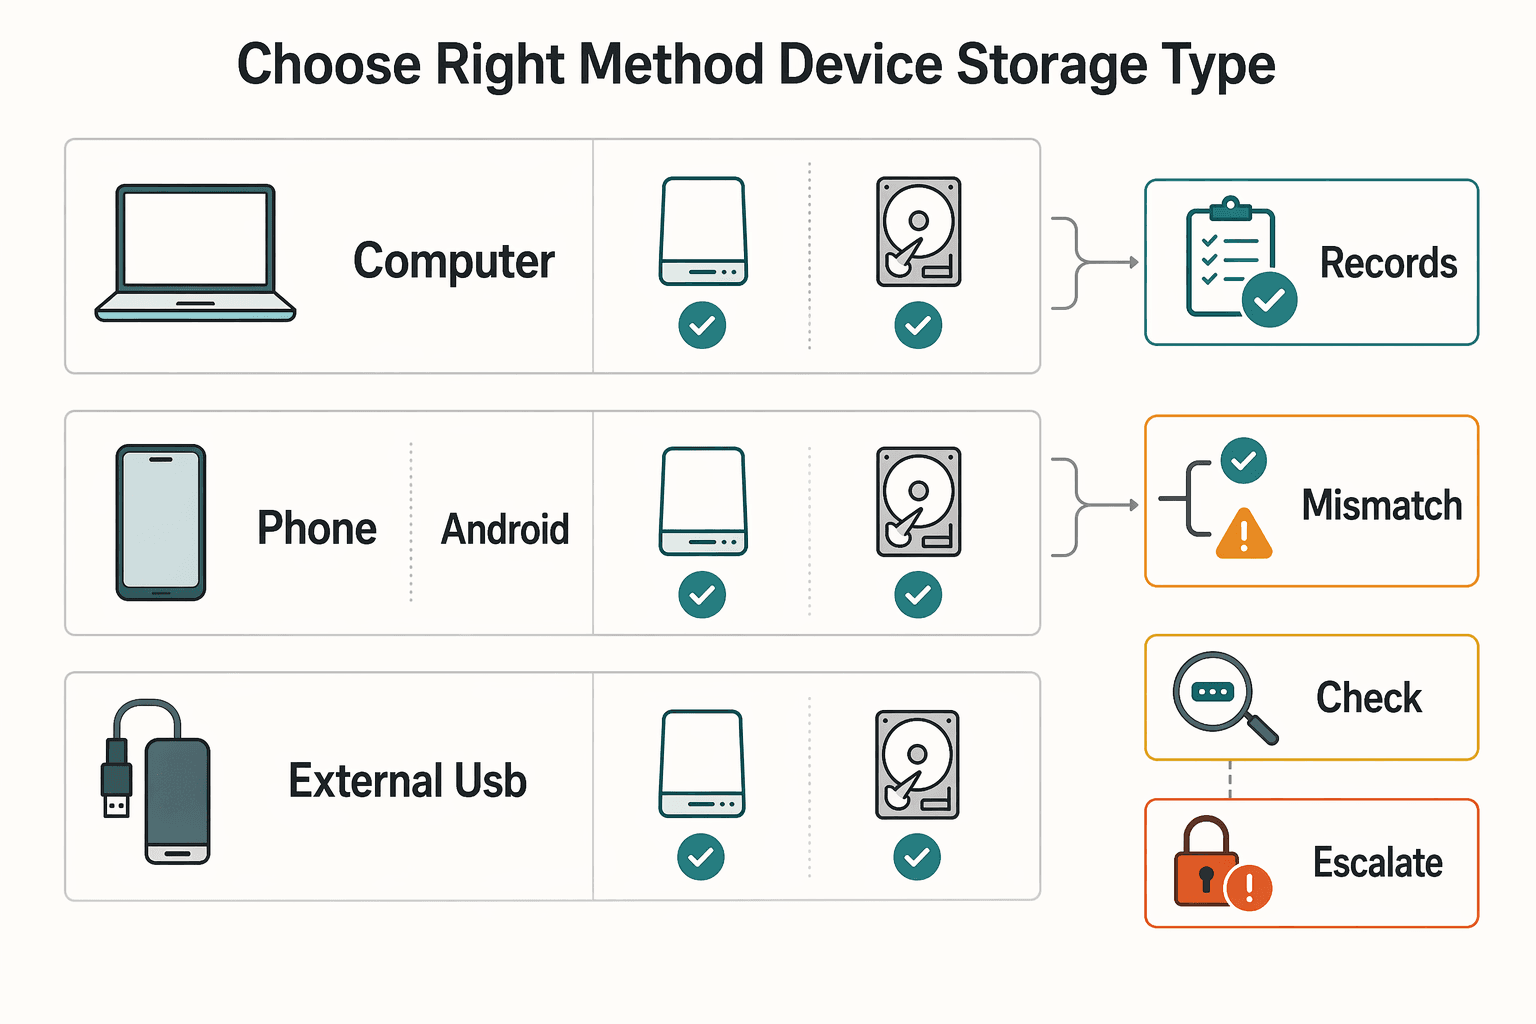
Before you choose a method, confirm both the device class and the actual storage medium. Phones, computers, and portable external hard disks can use either SSD (solid-state drive) or a Magnetic hard disk, so a USB drive label by itself is not enough. If the medium is unclear, treat the case as higher risk and pause until it is confirmed.
| Device and medium | Baseline path | Escalate when |
|---|---|---|
| Computer or phone with confirmed magnetic storage | Use a clearing path and define verification before execution | Data sensitivity is higher, encryption status is unclear, or prior use is uncertain |
| Computer or phone with confirmed solid-state storage | Use a medium-appropriate sanitization path and define verification before execution | Data sensitivity is higher, encryption status is unclear, or prior use is uncertain |
| Android with unknown or unencrypted state | Do not rely on reset alone | There is any chance old files could be recovered |
External USB drive or external disk | Branch by actual medium first (SSD vs magnetic) | Medium is unknown |
Deleting files or emptying trash is not secure erasure. It marks locations as available for rewriting, which means residual data may remain recoverable until overwritten or otherwise sanitized.
For elevated risk, use a stricter sanitization branch and document it in plain terms. The key evidence is method choice, execution result, and post-wipe verification.
Do not treat magnetic media and solid-state media as one interchangeable path. If risk is higher, move to stricter handling and stronger verification notes.
Use ITSP.40.006 language in notes when relevant: clearing is logical sanitization, often overwrite, or factory reset when overwrite is unsupported. If overwrite is unavailable, record that limitation and the reason you stayed on the reset branch.
Before you move to execution, capture four checks:
- Device class and storage medium confirmed.
- Method category selected, with reason.
- Verification checkpoint selected, such as first-setup state with no prior session.
- Any red flag that triggered escalation.
A useful contrast: if two devices look identical but one has uncertain prior use, do not process them as equal risk. The unknown-history device gets the stricter branch and stronger notes. That single split prevents common mix-ups when you are processing batches.
Pre-Wipe Prep That Prevents Expensive Mistakes#
Costly wipe mistakes usually start before the reset does. Treat prep as a hard gate: if the packet is incomplete, do not erase.
| Pre-wipe packet item | Why it matters | Quick verification |
|---|---|---|
| Backup confirmation | Helps prevent permanent data loss before reset or reimaging | Open restored files from backup, not just backup logs |
| Account sign-out list | Helps reduce leftover account access risk after handoff | Confirm sign-out completion for priority accounts before reset |
| Retention set for taxes or contracts | Helps keep required business records out of the wipe path | Move retained records to a separate archive and verify they open |
| Transfer record (serial number, handoff date, included accessories or media) | Helps keep the handoff traceable | Save one dated note per device before listing |
Decide on encryption before reset, not after. If your path uses drive encryption, enable BitLocker first, then erase. Encryption improves protection for lost or stolen devices, but it does not block malware or credential theft by itself.
Do not assume Factory Reset alone delivers unrecoverable outcomes. Reimaging or reset can leave recoverable data, so select stronger clean-data options in reset flows when available and appropriate for your risk target.
Put one stop rule at the top of your note: do not erase until backup readability is verified and, when unrecoverable outcomes are required, the clean-data option is selected.
To avoid rushed mistakes, treat the pre-wipe packet as a checkpoint with clear ownership. Run one pass for backups and retention, then a second pass for account sign-outs and transfer details, even if both passes are done by you at different times.
A practical prep pattern is to test restore with files that matter, not placeholder files. Open one client deliverable and one tax or contract record from backup. If either fails, pause immediately, fix backup coverage, and repeat the test before any wipe action.
This is also where scope errors show up. If accessories, removable media, or secondary drives are included in the sale, add them to the transfer record now. Missing items at handoff can trigger a rushed second wipe cycle and create avoidable confusion.
Wipe Laptops and Desktops in the Right Order#
For laptops and desktops, sequence is the control point. Start with built-in reset paths, verify first-setup behavior, and escalate only when risk and medium justify it.
| Path or tool | Applies to | Key note |
|---|---|---|
| Windows built-in reset | Windows laptops and desktops | Remove everything; if a clean-data option appears, choose it, then confirm fresh setup with no prior local session |
| macOS built-in erase | macOS laptops and desktops | Verify initial setup with no old profile; rerun if it does not return to that state |
DBAN | Standard hard drives | Some SSD scenarios require a different tool (for example, Parted Magic) |
| Multi-pass secure wipe | Higher-assurance cases | Guidance varies by source; one source notes three passes is generally sufficient, and more passes can increase runtime |
On Windows, go to Recovery (Windows) -> Reset PC -> Remove everything instead of Keep my files. If a clean-data option appears, choose it. After the reset, reboot and confirm there is no prior local session and the device opens to fresh setup.
On macOS, use the built-in factory reset or erase path, then verify initial setup behavior with no old profile. If it does not return to that state, pause handoff and rerun the erase path before listing.
Factory Reset is often the simplest path and can be quick, but speed is not high-assurance sanitization. Deleted data can remain accessible until overwritten, so match method strength to data sensitivity and your required assurance level.
Treat multi-pass secure wipe as a narrower option when higher assurance is required. Guidance on exact pass counts varies by source; one source notes that three passes is generally sufficient. Additional passes can increase runtime, so do not default to very high pass counts unless a stricter requirement is clear.
Set a hard boundary for DBAN. It is for standard hard drives; some SSD scenarios require a different tool (for example, Parted Magic). If media type is unclear, stay with built-in methods and log method, date, and first-setup verification.
Execution discipline matters more than tool variety. Run one branch fully, finish verification, then move to the next device. Switching branches mid-process can cause missed checks, especially when dealing with similar hardware in the same batch.
If reset fails partway, record the interruption, do not improvise with ad hoc cleanup, and rerun the selected branch from a known start point. A clean rerun with clear notes is safer than partial retries that leave an uncertain state.
Before handoff, check boot behavior twice. The first boot confirms reset completion. The second confirms the prior session does not reappear and local credentials are no longer active. Two checks take little time and help close a common verification gap.
Wipe Phones and Tablets Before Handoff#
Phones and tablets reset quickly, but account ties are easy to miss. Back up first, remove account ties, erase, then confirm first-setup or activation screens.
| Step | Action | Confirmation |
|---|---|---|
| 1 | Back up data before any wipe action | Backup confirmed |
| 2 | Remove linked accounts, remove the SIM card, and erase memory-card data where applicable | Accounts removed |
| 3 | Run the built-in wipe path: Factory Reset or Erase all content and settings | Erase executed |
| 4 | Reboot and confirm the device shows setup or activation, not your prior session | Activation state verified |
Before you list the device, check that key accounts and cloud sync are no longer tied to it.
Reset is a practical baseline, but it is not a universal answer for every risk level. If a phone held sensitive client material, consider stricter sanitization steps before resale, such as encryption and overwrite workflows.
If a phone is lost or stolen, start with your platform's remote erase controls.
A failure mode here is partial sign-out. The phone looks reset, but account ties can still exist in related services. Reduce that risk by confirming sign-out actions before reset and then validating post-reset behavior from the buyer-facing setup screen.
Use a short phone-specific note so you can track sequence: backup confirmed, accounts removed, erase executed, activation state verified. Keep the note with your sale record.
When multiple mobile devices are involved, run each one to completion before starting the next so verification is less likely to be skipped. For a deeper security pass after resale prep, read The Best Password Managers for Freelancers and Teams.
Handle External Drives and USB Media Properly#
External media should never be wiped with one-size-fits-all logic. Branch by medium first: overwrite-oriented methods for magnetic hard disks, including external USB hard drives, and Cryptographic erasure for SSD-based external media.
Quick delete and quick format are not enough for handoff. They can leave recoverable data behind, so use an erase method intended for sanitization and matched to the medium type.
On Mac magnetic media, Disk Utility with 7-Pass Erase can fit higher-assurance overwrite needs. It writes the full drive seven times and can take a long time depending on disk size and speed.
Do not apply the same path to SSDs. The 7-Pass Erase option does not appear for Mac SSDs, and magnetic-drive methods are not suitable for SSD sanitization. If media type is unclear, pause and verify before wiping.
For mixed fleets, compare options by complexity, speed, and reuse goals.
| Option | Best fit | Main friction point | Practical note |
|---|---|---|---|
Native tools (for example, Disk Utility) | Single-device wipes where built-in paths exist | Deep overwrite modes can take longer | Fewer setup steps |
DBAN | Bootable-media wipe processes | Setup and use are fairly technical | Plan for boot media creation and technical steps |
If a drive cannot be wiped reliably, do not treat it as sanitized. Route it through your organization's disposal or higher-assurance sanitization process rather than reuse.
Verify medium type before selecting a method. The wrong sanitization path can leave data improperly sanitized.
Where audit documentation is required, record the medium type and erase method, and note when a device is removed from reuse.
If a drive disconnects during erase, treat the wipe as incomplete until completion is re-verified or the device is removed from reuse.
Verify the Wipe and Keep a Lightweight Evidence Record#
Verification is what makes a wipe credible. Treat the process as incomplete until post-wipe state is confirmed and recorded in plain language.
| Record item | What to include |
|---|---|
| Device ID | Serial number or asset label |
| Method used | Built-in erase/reset flow or a cryptographic key-reset path |
| Date and time completed | Completion date and time |
| Person who performed the wipe | Who performed the wipe |
| Verification results | First-run screen, no prior session, no residual files |
| Outcome notes | Pass, rerun required, or removed from reuse |
Run repeatable checks before handoff:
- Reboot and confirm first-run setup or activation, not a prior desktop or session.
- Restart again to confirm no previous user session returns.
- Check common local user locations for leftover files.
- Confirm the expected post-wipe state is consistent across checks.
Record what you did in concrete terms. Deleting files, emptying trash, or quick format only removes filesystem pointers, and data can remain until later writes overwrite it.
Keep the record short and structured. Use the same fields each time: device ID, method used, date and time completed, person who performed the wipe, verification results, and outcome notes.
Use proof levels by risk:
- Personal resale: one complete record may be enough.
- Higher-assurance cases: be explicit about method choice and whether verification passed.
If any checkpoint fails, do not hand off the device. Rerun the erase path, log the result, and if checks keep failing, move media to stricter sanitization or destruction.
A practical way to keep records useful is to write them as if someone else must validate your decisions later. "Wiped successfully" is too vague. "Built-in erase complete, first-run setup confirmed, no prior session on second reboot" is specific and auditable.
Verification should also capture failed attempts, not only final pass states. If a first attempt failed and a second attempt passed, record both events. That keeps the timeline clear and reduces confusion if questions arise later.
For handoff confidence, tie verification to custody transfer. The final note should show that wipe checks passed before ownership changed. That sequence helps clarify whether a device left your control in a verified state.
Know When Factory Reset Is Not Enough#
Use this rule: if a device held sensitive business or client data, do not stop at Factory Reset. Escalate to a higher-assurance method and record why.
Factory Reset is a convenience step, not universal proof of secure removal. Some guidance suggests reset can be acceptable on certain encrypted devices in lower-risk handoffs, while other guidance warns reset alone can leave recoverable remnants. In practice, split by risk: a lower-risk handoff can use reset plus verification, and a higher-risk handoff needs a stronger path with a clear record.
Escalate before erase when:
- The device stored sensitive records.
- You cannot confirm encryption state before reset.
- Verification fails or first-boot state cannot be confirmed.
- The device is going to an unknown buyer or recycler.
Where Cryptographic erasure is available, use it for higher-assurance cases. That path depends on key removal being unrecoverable, even if encrypted remnants still physically remain. Record the key-removal checkpoint, date, and result.
In stricter environments, align to Secure sanitisation of storage media and standards-aligned methods, such as NIST SP 800-88-style approaches. For unencrypted media, that can mean overwrite-oriented sanitization. The tradeoff is operational: stronger assurance can take longer.
Treat marketing claims as unverified until your own checks pass. Your evidence record is the proof: method used, encryption state, key-removal or overwrite path, date, person performing the wipe, and post-wipe verification outcome.
Tie the escalation decision to impact. Ask yourself what happens if data is later recovered. If the answer includes client exposure, contract friction, or account compromise risk, move up the assurance ladder before you start.
Escalating too late, after a basic reset has already been run, creates mixed records and uncertain outcomes. Make the call at the beginning, then execute one coherent path to completion.
If stronger methods make reuse uncertain, include that tradeoff in your sale plan. It is better to delay listing than to complete a handoff with unclear sanitization confidence.
Avoid the Most Common Wipe Failures#
Many wipe failures come from overconfidence. Choose your assurance level first, run one method end to end, and record the result.
- Failure 1: treating file deletion as a wipe. Deleting files is often not enough to prevent recovery. Use an erase path designed for sanitization.
- Failure 2: treating
Factory Resetas universal proof. Reset can remove most user data, but it is not a guarantee for every risk level. - Failure 3: claiming total certainty. Standard secure-erase methods can block recovery by most people, but they do not guarantee complete removal against determined specialists.
- Failure 4: escalating too late for strict requirements. If the requirement is no chance of recovery, move to
Secure sanitisation of storage mediaat the decision stage; some stronger methods can be destructive and may make the device unusable afterward.
Keep the execution record simple and complete: method used, date, person performing the wipe, and verification outcome. If the record is incomplete, treat the wipe as incomplete.
These failures are usually process failures: rushed deletion-as-wipe decisions, universal-reset assumptions when the risk target is not written down, and late escalation when verification is unclear.
Reduce those errors with one practical control: define a stop condition for each branch before starting. If that condition fails, pause and rerun the same branch or escalate intentionally, with notes. Do not improvise midstream.
In multi-device batches, watch for record drift. One method label can be copied to several devices even when execution differed. Prevent that by finishing notes device by device, immediately after each verification step.
Finish With a Professional Handoff Checklist#
End with one accountability gate: do not list or hand off the device until every checkpoint is complete and recorded.
Use one final pass to confirm:
- Account deactivation or sign-outs complete.
- Device wipe completed.
- Offboarding actions documented.
- Physical handoff logged, including recipient and date and time.
Keep a short evidence note with the sale record. Include the device identifier, action summary, and handoff timestamp so the transfer is clear and accountable.
If any checkpoint fails, pause the handoff. Re-run the required steps, recheck, and update the note. Listing comes last, after all checkpoints are complete.
This closing gate is what turns good intent into a defensible handoff. The device should leave your control only after access is revoked, the device is wiped, and the handoff is documented in one place.
Use the checklist as a release decision, not a memory aid. If one line is incomplete, the release is incomplete. That rule keeps pressure from buyers or deadlines from weakening your final controls.
For a clear next step, Browse Gruv tools, or Talk to Gruv to confirm what is supported for your country or program.
Frequently Asked Questions
Is `Factory Reset` enough before selling a laptop or phone?
For phones, back up first and remove personal information before you trade in, sell, give away, or recycle the device. On iPhone, go to Settings > General > Transfer or Reset iPhone, then use Erase All Content and Settings (you may be asked for your passcode or Apple Account password). Apple states this erases personal information, content, and settings and returns the iPhone to factory settings. This section does not provide verified laptop-specific wipe steps.
What is the safest approach for an `SSD (solid-state drive)` versus a `Magnetic hard disk`?
This grounding pack does not provide verified wipe procedures for SSD (solid-state drive) versus Magnetic hard disk. Use media-specific sanitization guidance outside this section.
Do I still need `7-Pass Erase` if the device uses modern encryption?
This grounding pack does not verify any 7-Pass Erase requirement or pass-count guidance for encrypted devices. Do not set a specific pass-count rule here without platform-specific authoritative instructions.
What should I do before wiping so I do not lose business files or tax records?
Back up before any erase action so you have a copy of your information. If the backup is incomplete, stop and fix that first.
How do I wipe a lost or stolen device if I cannot physically access it?
This article does not provide verified remote-wipe steps for lost or stolen devices. Use official recovery and security controls from your platform provider, and document what you can verify.
When should I escalate to `Secure sanitisation of storage media` guidance instead of basic reset?
Escalate when your device type or assurance needs are not covered by the verified phone guidance here. In this section, the verified steps are to back up first and, on iPhone, use Erase All Content and Settings through the documented Settings flow.
Try a related tool
A former tech COO turned 'Business-of-One' consultant, Marcus is obsessed with efficiency. He writes about optimizing workflows, leveraging technology, and building resilient systems for solo entrepreneurs.
Sources
Includes 3 external sources outside the trusted-domain allowlist.
- cisa.gov/resources-tools/training/protecting-data-old...trusted
- ncsc.gov.uk/collection/device-security-guidance/managing...trusted
- howtogeek.com/213295/how-to-wipe-securely-erase-your-devic...external
- jetico.com/blog/usb-external-eraser-how-securely-wipe-d...external
- synetictechnologies.com/trends-insights/understanding-data-erasure-h...external
Educational content only. Not legal, tax, or financial advice.
Related Posts

The Best Password Managers for Freelancers and Teams
A client asks for an urgent file, you open their portal, and the login fails. Ten minutes later your invoicing app wants a reset too. That is why your password setup is a business risk, not just a nuisance. Weak credential habits can turn one mistake into wider account access problems, then into delivery delays and cleanup work.

The Best Gear for a Portable Home Office
The evidence here does not directly test portable-office gear decisions, so use this as a practical framework rather than a proven standard.

A Guide to Renting vs. Buying a Home for Nomads
Treat this as a cashflow-posture decision first and a lifestyle decision second. Do not start with neighborhoods, aesthetics, or "settling down." Start with the operator questions that keep your business-of-one alive: how much liquidity you lock up, how fast you can exit, and what happens when a client pays late.