
Quick Answer
To avoid costly rejections when getting a document apostilled or authenticated, first confirm the destination country, the exact document version the receiver will accept, and the authority tied to the document's origin. Then verify any required upstream certification, current packet instructions, fees, payment method, and country of use before submitting. An apostille verifies signatures, capacity, and seals, not the document's content.
What is an Apostille, and Why is it Mission-Critical for Your Global Career?#
If you need a document apostilled for a visa, onboarding file, or foreign registration, the biggest mistake usually happens before you submit anything. Decide the route first by confirming three things: the receiving country, the document version the receiving institution will accept, and the authority that actually issued or can certify the document.
| Checkpoint | Confirm | Impact |
|---|---|---|
| Destination receiver | Which country and which entity will review the document | Sets the country route and the receiver's preferred document version |
| Document version | Original, certified copy, notarized copy, or another specific form | A certificate will not fix a mismatch if the receiver requires a different form |
| Issuing authority | The state, federal office, or other competent authority tied to the document's origin | Route by origin, not where you live now |
Before you start, lock down three points in writing:
- Destination receiver: which country and which entity will review the document.
- Acceptable document version: original, certified copy, notarized copy, or another specific form.
- Issuing authority: the state, federal office, or other competent authority tied to the document's origin, not where you live now.
Decide the route before you file#
Start with the country where the document will be used. For U.S. documents, that determines whether you need an apostille or an authentication certificate. If the destination country is on the 1961 Hague Convention member list, the route is apostille. If not, you may need the longer authentication or legalization chain, which can include the foreign embassy or consulate.
That sounds straightforward, but the receiving entity still matters. A university, employer, bank, registry, or visa office may specify the exact document form it will accept. If it requires a certified vital record and you submit a notarized copy instead, the certificate on top will not fix that mismatch. Your practical checkpoint is simple: confirm both the country route and the receiver's preferred document version before you request any certification.
Confirm what the certificate does and does not prove#
This is the distinction that prevents expensive rework. Under the Convention, an apostille certifies the authenticity of the signature, the capacity of the person who signed, and, where appropriate, the seal or stamp on a public document. It does not certify the content of the document. It also does not decide whether the document is substantively good enough for the school, immigration office, client, or bank reviewing it.
| Step | What it confirms | What it does not confirm | Common rejection trigger |
|---|---|---|---|
| Correct document form | The document is in a form the authority can process, such as an original or certified copy where required | That the receiver abroad will accept that form for its own rules | Sending a photocopy where originals or certified copies are required |
| Any required upstream certification | A prior local or county certification step has been completed when the state requires it | That the document is now ready for foreign use on its own | Skipping a county clerk or similar pre-certification step |
| Apostille or authentication certificate | The official signature, capacity, and seal are authentic for cross-border use | That the document's contents are accurate, lawful, translated, or sufficient for the case | Assuming the certificate fixes a wrong record or incomplete file |
That is why rejections can feel unfair while still being correct. The certifying office checks authenticity at the signature level. The receiving institution may separately check legal sufficiency, content accuracy, issue date, and fitness for purpose.
Verify the issuing authority's live instructions#
Route by origin, not by convenience. For U.S. state-issued records, you generally need the state that issued the document. If your record was issued in New York, verify that the New York Department of State only authenticates public documents issued in New York State. It also must be signed by a New York State official or county clerk. For many New York City records, confirm whether county clerk certification is required before the state step.
| Jurisdiction or office | Grounded rule | Named detail |
|---|---|---|
| New York Department of State | Authenticates public documents issued in New York State | Document must be signed by a New York State official or county clerk; many New York City records may need county clerk certification before the state step; form shows $10.00 per document |
| California | Read the current request form, not a blog summary | A photocopy is not acceptable, and some birth or death records with certain local signatures may need pre-certification before state authentication |
| U.S. Department of State | Federal path document-form controls | Requires an original or certified copy; request packet must list the country where the document will be used; federal requests list $20 per document |
California is a good reminder to read the current form, not a blog summary. Its request form says a photocopy is not acceptable for this process, and some birth or death records with certain local signatures may need pre-certification before state authentication. On the federal path, the U.S. Department of State requires document-form controls such as an original or certified copy, and your request packet must list the country where the document will be used. Current fees and payment rules matter too: New York's form shows $10.00 per document, and outdated or incomplete payment details can trigger rejection and return. Federal requests list $20 per document. Use this pre-submission control list before you mail anything:
- Confirm country route: apostille or authentication or legalization chain.
- Confirm receiver requirement: exact document version and any additional receiver-specific rules.
- Confirm issuing jurisdiction: state or federal authority tied to the document's origin.
- Confirm upstream certifications: county clerk, local registrar, or other required prior step.
- Confirm packet details: country of use, correct fee, payment method, and original or certified document form.
Once those controls are set, you can triage the filing by urgency and error cost instead of guessing. If you want a deeper dive, read The 2025 Global Digital Nomad Visa Index: 50+ Countries Compared. Want a quick next step if you're trying to get a document apostilled? Try the SOW generator.
Step 1: The Strategic Triage - Classify Your Document's Urgency#
Classify urgency with evidence, not stress. Before you pick a filing path, answer these four questions in writing and keep proof for each one.
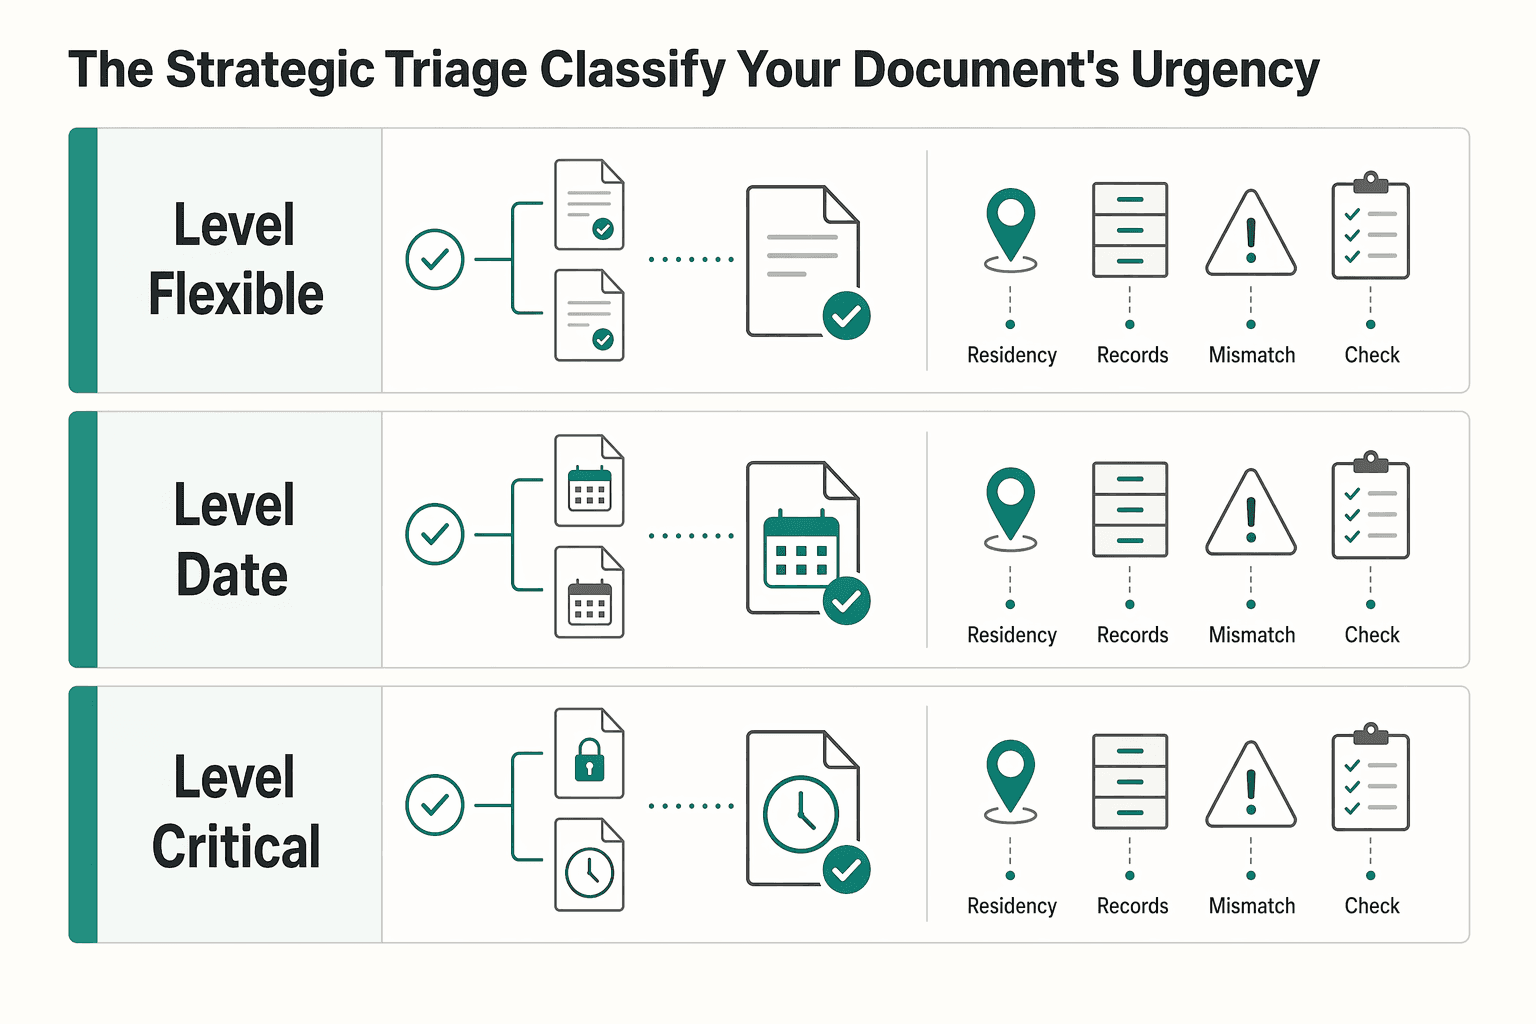
- What trigger document sets your deadline?
A filing notice, appointment notice, contract condition, adviser record, or similar document should define the real date or window. If a live authority rule sets the timing, verify the exact date or window from the official authority source before using it.
- What is the business impact if this is late or rejected?
State the specific consequence: minor admin rework, delayed onboarding, or a blocked visa, contract, or registration step.
- How replaceable is this document or appointment?
Note whether you can reschedule without material loss, or only with extra cost, delay, or a missed opening.
- What downstream steps depend on this submission?
List steps that cannot start without this result, such as translation, notarized translation, or jurisdiction-specific pre-certification in the route you verified.
| Urgency level | When it fits | Required proof before choosing this level | Next action |
|---|---|---|---|
| Level 1 flexible | Delay is inconvenient, not damaging | No fixed external deadline, and route plus document form already verified | Choose DIY. Before filing, confirm country-of-use route, issuing authority match, and original/certified version requirements. |
| Level 2 date-bound | A real date exists, and one rework cycle may still be survivable | Trigger document with deadline and current authority processing guidance saved | Choose assisted. Before filing, run a second-person packet review for route, document version, payment, and return logistics. |
| Level 3 critical chain | Rejection blocks a non-movable next step | Trigger document, dependency proof, and written impact statement | Choose managed. Before filing, prepare a complete decision packet and assign one owner for submission risk. |
Step 1 done checklist:
- Country route is clear (apostille vs authentication under the 1961 Hague Convention test).
- Issuing authority matches the document's origin.
- Receiving side accepts your document version.
- Downstream impact of delay or rejection is explicitly documented.
Once this is complete, Step 2 is straightforward: choose who should own the filing risk. Related: Germany Freelance Visa: A Step-by-Step Application Guide.
Step 2: The Execution Paths - Which Operational Model Fits Your Mission?#
Choose your execution path only after Step 1 is complete and documented: destination-country route, issuing authority, accepted document format, and downstream impact of delay. If any of those is still unclear, stop and verify before you commit.
Your real decision is where to place the filing risk: keep it with you (DIY), shift part of it to a provider (Delegated), or manage it through a remote acceptance chain (Remote). The destination country determines whether you need an apostille certificate or an authentication certificate, and the competent authority is tied to document origin, not where you are now.
| Path | When it fits | Main tradeoff | Evidence required before you commit |
|---|---|---|---|
| DIY | Deadline can absorb one rework cycle and routing details are verified | Most control, most personal error exposure, most time burden | Destination country confirmed; state-issued vs federal origin confirmed; accepted document version confirmed; packet checklist complete (including country of use and return logistics) |
| Delegated | Delay/rejection risk is costly and provider performs real pre-submit review | Less hands-on work, but provider quality becomes a control point | Written review scope; rejection/resubmission ownership terms; fee breakdown (government, shipping, service); written authorization/custody documentation when filing on your behalf |
| Remote | You are abroad and every downstream reviewer confirms format acceptance in writing | Access advantage, but one format rejection can break the chain | Written acceptance from receiving institution, any notary/certifier, competent authority, and any later legalization/authentication authority if apostille is not sufficient |
DIY#
Use DIY only when each pre-submit requirement is verified. For U.S. state-issued records, route to that state authority; for U.S. federal documents, route to the U.S. Department of State.
Pre-submit checklist (hard stop model):
- Confirm destination country and route (apostille vs authentication), and list the exact country of use in your request packet.
- Confirm document origin and competent authority (state-issued to state authority; federal to U.S. Department of State).
- Confirm accepted document format (original, certified copy, notarized copy, or electronic form only where accepted), and remember an apostille does not certify document content.
- Confirm packet completeness for your channel: required request materials, payment method, submission method, and a self-addressed prepaid return envelope for mail submissions.
- Verify the current processing detail from the official authority source before using it.
Stop immediately if any item is unverified. On some federal-document routes, notarizing a document when prohibited can invalidate it, so do not guess format rules from old summaries.
Delegated#
Use delegated handling only when the provider clearly reduces rejection risk, not just transport risk. Intake offices can reject incomplete or noncompliant packets, so provider review depth must be explicit.
| Provider control | What to verify |
|---|---|
| Review depth | What exactly they validate before filing: route, format, authority match, and packet completeness |
| Rejection ownership | Who resolves rejection, who pays re-shipping or resubmission, and whether they recheck before resubmitting |
| Fee transparency | Government fees, shipping, and service fees listed separately |
| Custody chain | Written authorization and named custody handoffs when they submit for you |
If a provider promises "end-to-end handling" but will not show review standards or rejection process, risk is hidden, not reduced.
Remote#
Remote handling works only when acceptance is confirmed in writing at every downstream checkpoint before handoff. Confirm acceptance with the receiving institution, any notary or certifier involved, the competent authority, and any later authority in the chain.
An e-Apostille cannot be refused simply because it is electronic under Convention rules, but downstream institutions may still reject a format they do not actually accept in practice. If any reviewer cannot confirm acceptance, escalate before submission. If the destination is outside the Hague Apostille route, move to the required authentication/legalization chain instead of assuming apostille alone is enough.
Choose one model, assign owner and checkpoint evidence for each handoff, and submit only when the packet and full acceptance chain are fully verified.
For a step-by-step walkthrough, see How to Get a German Tax ID as a Freelancer Without Mix-Ups.
Conclusion: From Bureaucratic Hurdle to Strategic Advantage#
If you are about to send originals, treat this as a strict go/no-go check. Confirm the destination-country route, match the issuing authority, validate the document format, and then file one complete packet.
Step 1: Confirm the route. Start with the country where the document will be used. If that country is on the 1961 Hague Convention member list, you need an apostille. If not, you need an authentication certificate. Expected outcome: you can point to the destination-country rule and, ideally, the receiving institution has confirmed it will accept that route.
Step 2: Match the authority. Route by document origin. U.S. state-issued records typically go to that state's secretary of state. U.S. federal documents go to the U.S. Department of State. Expected outcome: you know the exact issuing authority before you pay, mail, or hand over the document.
Step 3: Validate the document format. Do not assume a copy, scan, or generic notarization will pass. Requirements vary by authority: some require originals or certified copies, and notarized documents may need full notarial wording plus the original signature, stamp, and seal. Expected outcome: your document version matches both the receiver's acceptance rule and the authority's filing rule.
Step 4: Check the packet against live instructions. Before submission, confirm the current page for submission method, fees, and packet contents. At least some official channels require the form, fees, and documents together.
Your final stop sign is this: an apostille verifies signatures, stamps, or seals. It does not certify the content of the document. If you are still hoping the certificate will fix a wrong record, wrong version, or wrong office, do not submit yet.
Go only when all five are true:
- route accepted by destination country and receiver
- authority matches document origin
- document format is acceptable
- packet is complete, including required form, fees, and documents
- live instructions were rechecked right before filing
If your packet includes an FBI record, this may help next. How to Get an FBI Police Clearance Certificate for a Foreign Visa You might also find this useful: How to Get a Foreign TIN Without W-8BEN Filing Mistakes.
Frequently Asked Questions
How do I know which authority should issue the apostille or authentication certificate?
Start with the country where the document will be used. If it is on the 1961 Hague Convention member list, you need an apostille; if it is not, you need an authentication certificate. Then route by document origin: state-issued records go to that state's authority, while federal documents go to the U.S. Department of State.
What version of the document should I submit?
Do not guess the format. Confirm whether the receiving side and the issuing authority require an original, certified copy, notarized copy, or another form before you prepare the packet. The certificate authenticates signatures, stamps, or seals, not the document's content or suitability.
Should you choose DIY or Delegated handling?
Choose DIY only if the route, issuing authority, document version, fees, and submission method are already verified and your deadline can absorb a rework cycle. Choose delegated handling when delay or rejection risk is costly and the provider performs a real pre-submit review. In either model, you still need to confirm the destination-country rule and the correct filing authority.
Can you handle a document from another state while you are elsewhere?
Yes. Your location does not change the competent authority. What matters is where the document was issued and whether it is a state or federal document. Check that authority's current submission methods before you file.
How much will it cost, and how long will it take?
Verify cost and timing right before filing using the authority's current instructions. Official guidance shows current fees and whether the office accepts mail or in-person submissions. If you receive a payment request or solicitation outside official channels, stop and verify it first.
What should your pre-submission control list include?
Before you submit, confirm the destination-country route, the correct filing authority, and the exact document version the receiving institution will accept. Then confirm packet completeness, current fee details, submission method, and any required upstream certification. If any requirement is unclear, stop and verify it with the authority before filing.
Try a related tool
Researched and edited by the Gruv editorial team. Gruv builds cross-border billing, payouts, and finance-operations software for global businesses.
Sources
Includes 1 external source outside the trusted-domain allowlist.
- dos.ny.gov/apostille-or-certificate-authenticationtrusted
- dos.ny.gov/system/files/documents/2024/02/dos-1917-f-ap...trusted
- notary.cdn.sos.ca.gov/forms/apostille-request-form.pdftrusted
- travel.state.gov/content/travel/en/replace-certify-docs/authe...trusted
- travel.state.gov/content/travel/en/replace-certify-docs/authe...trusted
- hcch.net/en/instruments/conventions/specialised-secti...external
Educational content only. Not legal, tax, or financial advice.
Related Posts

The 2026 Global Digital Nomad Visa Index for 50+ Countries
Start with legal fit, not lifestyle filters. The practical order is simple: choose a route you can actually document, then decide where you want to live. That single change cuts a lot of wasted comparison work and stops you from falling in love with places that were never a real filing option.

Germany Freelance Visa Application Path for Freiberufler and Gewerbe
Choose your track before you collect documents. That first decision determines what your file needs to prove and which label should appear everywhere: `Freiberufler` for liberal-profession services, or `Selbständiger/Gewerbetreibender` for business and trade activity.

The Freelance Payment Penalty: A Modeled Audit of Platform Fees, FX Spreads, and Payout Delays
The money rarely disappears through a single, easy-to-spot fee. The real loss is stacked. A marketplace takes its commission, a processor adds a charge for international cards, a bank or payment company converts the currency at a spread, a platform holds the funds before release, and a wire sheds a little to intermediaries on the way in. Each layer looks defensible on its own, but the worker feels the combined result as a smaller deposit and a later payday.