
Quick Answer
Start with a structured altitude sickness guide: plan your sleeping-altitude progression before departure, run consistent symptom checks each day, and descend early if signs worsen. Use written checkpoints like the Lake Louise framework, confirm insurance and escalation contacts in advance, and avoid schedule pressure when your trend is moving the wrong way. The goal is practical control, not pushing through uncertainty.
Plan for High Altitude as an Oxygen-Pressure Problem#
High altitude is manageable when you treat it as an oxygen-pressure problem early, not a toughness test after symptoms start. The main stressor is lower oxygen pressure, which means less oxygen is available to your body with each breath, and that drop can push you into hypoxia.
What matters in practice is exposure, not bravado. Risk rises with how high you go, how fast you get there, and how long you stay. Individual biology still matters. At about 3,050 m, or roughly 10,000 ft, inspired oxygen pressure is only 69% of sea-level conditions, and acute exposure can drop arterial oxygen saturation into the 88 to 91% range. Your body can adapt to moderate hypoxia, even up to about 5,200 m or 17,000 ft, but only if you give it time.
A useful checkpoint is sleeping altitude. Day trips higher up with a return to a lower place to sleep are less stressful than sleeping high, and sleep is exactly when hypoxemia tends to be greatest. That is why your evening location matters more than the highest point on your daytime route.
| Condition | What you feel | What it likely means | What you do now | What you must not do |
|---|---|---|---|---|
| Rapid ascent with symptoms | You feel worse after going higher | Your acclimatization may be lagging behind your ascent | Stop going higher, reduce effort, monitor closely, and keep your next sleep as low as your itinerary allows | Do not continue ascending just because the plan says you should |
| High daytime exposure with lower sleep | You go high during the day but return lower to sleep | This is generally less stressful than sleeping high | Keep using sleeping altitude as your primary control point and reassess daily | Do not treat the daytime high point as your only risk signal |
| Reduced breathing margin at altitude | You use respiratory depressants, or you have reduced lung function | You have less buffer in an oxygen-limited environment | Avoid respiratory depressants and take a more conservative ascent and sleep plan | Do not assume your usual pace at lower elevation is still safe |
Two practical cautions are easy to miss. First, avoid respiratory depressants at altitude, because they can worsen an already oxygen-limited situation. Second, if you have reduced lung function, be more conservative from the start because ventilation is central to how you adapt on ascent.
Use this guide in three passes. Before departure, build an ascent plan that respects sleeping altitude and your personal risk factors. On the ground, check symptoms and sleep exposure daily. If symptoms are escalating or you cannot safely continue your plan, switch from monitoring to urgent medical evaluation.
If you want a deeper dive, read How to Stay Healthy and Fit While Traveling.
Phase 1: Pre-Departure Risk Mitigation#
Most avoidable altitude problems start before you leave. Complete four checks in writing before departure: medical consult, insurance confirmation, acclimatization itinerary, and fitness-for-workload prep.
Use current guidance as your baseline. The CDC Yellow Book 2026 page (updated Apr. 23, 2025) should anchor your plan. At least one widely shared educational source explicitly warns it may be out of date. If you are using saved PDFs or older trek notes, re-verify them before travel.
| Task | Why it matters | How to verify completion | Failure risk |
|---|---|---|---|
| Medical consult | Hypoxic stress depends on altitude, ascent rate, and exposure duration, so your clinician needs your real route details | You have written instructions tied to your exact itinerary, a medication review (including respiratory depressants), and clear symptom escalation steps | You depart with gaps in your treatment plan or unclear escalation triggers |
| Insurance check | You need written confirmation for your exact trip profile before you rely on coverage | You have insurer confirmation in writing for your route and activities, with the altitude limit, evacuation terms, and expected out-of-pocket exposure either documented or explicitly marked unresolved until the insurer confirms them | You face delays or major financial exposure during transport or treatment |
| Acclimatization plan | Your risk profile is driven by altitude, ascent speed, and time at altitude | Your day-by-day route sheet includes start altitude, high point, sleeping altitude, travel method, time at altitude, lower-sleep fallback, and a sleeping-gain limit supplied by your clinician, guide service, or current trip protocol. If that limit is not confirmed, the route sheet marks it unresolved | You compress ascent unintentionally and lose adaptation margin |
| Fitness prep | You still need to execute the physical workload your itinerary requires | You have completed trip-like effort days with your expected load and documented any limits that affect pacing or support needs | You arrive underprepared for the workload and disrupt the route plan |
1) Medical consult (confirm, document, escalate). Confirm a pre-trip visit with a clinician who can review high-altitude travel. Bring your route details: highest planned altitude, sleeping-altitude progression, and how quickly you ascend by road, rail, or air. Document medication review outcomes, especially any sedating drugs or other respiratory depressants to avoid at altitude, and write down what should trigger a stop, a call, or descent. Escalate early if your case is complex or preventive-medication guidance is unclear.
2) Insurance check (confirm, document, escalate). Confirm coverage in writing for your exact itinerary and activity profile, not a generic category answer. Document the policy number, contact path, and offline proof, such as a PDF or screenshot, then fill in any missing limits only once the insurer confirms them. Escalate unresolved wording before departure so you are not interpreting policy language during an emergency.
3) Acclimatization plan (confirm, document, escalate). Confirm your route logic on a daily sheet before you travel. Document, per day, your highest point, sleeping altitude, ascent method, and exposure duration. Then mark days where you can go higher in daytime and return to a lower sleeping altitude, since that pattern is less stressful than sleeping high. Escalate any day with no lower-sleep fallback or tightly stacked ascent days and revise before departure.
4) Fitness prep (confirm, document, escalate). Confirm you can handle the trip workload at controlled effort with your real pack and schedule. Document personal limits that affect pacing, load share, or support decisions. Escalate any itinerary segment that only works if you have to force pace.
With these four checks documented, you can move to daily on-the-ground monitoring with a plan you can actually execute. For related packing prep, see How to Build a Travel First-Aid Kit.
Phase 2: Run the Daily Symptom, Intake, and Ascent Routine#
Your job each day is to make conservative go/no-go calls from what you observe, not from itinerary pressure. Use one repeatable flow: symptom check, intake routine, then ascent decision.
Run the same symptom check every day#
Use the Lake Louise framework as a daily operating checklist, not a score to debate. Assess yourself at least twice each day: before you move and after you reach your next stop, plus any time you feel worse. Log the same domains every time: headache, gastrointestinal symptoms, fatigue or unusual weakness, dizziness or lightheadedness, and prior-night sleep quality as context.
| Log item | How to record |
|---|---|
| Headache | Log it and mark it as new, unchanged, or worsening |
| Gastrointestinal symptoms | Log them and mark them as new, unchanged, or worsening |
| Fatigue or unusual weakness | Log it and mark it as new, unchanged, or worsening |
| Dizziness or lightheadedness | Log it and mark it as new, unchanged, or worsening |
| Prior-night sleep quality | Log it as context |
Record it in writing: date, location, highest altitude reached, sleeping altitude, medications taken, other illness, and whether each symptom is new, unchanged, or worsening. Then decide from trend, not a single data point. If symptoms stack, worsen, or your function drops, treat that as a no-ascent signal even if you can still keep moving.
Do not ignore medication effects. Side effects can impair judgment, memory, alertness, coordination, vision, and calculation ability, and nervous-system-depressant medications can increase susceptibility to hypoxia.
Eat and drink deliberately, not reactively#
Set your hydration and fueling plan before the day gets hard, then stick to it on schedule. Keep any numeric fluid target or sleeping-altitude change limit unresolved until it is confirmed by your clinician, guide service, or current trip protocol.
| Situation | Response |
|---|---|
| Consistency and tolerance | Use steady fluid intake across the day, practical electrolyte/flavor support, and simple foods you can keep down |
| Appetite drops | Switch to smaller, regular eating intervals and keep intake carbohydrate-forward during exertion and after arrival |
| Cannot keep fluids down | Treat it as an operational risk and pause ascent decisions until intake and symptoms stabilize |
| Cannot keep food down | Treat it as an operational risk and pause ascent decisions until intake and symptoms stabilize |
| Intake drops sharply | Treat it as an operational risk and pause ascent decisions until intake and symptoms stabilize |
Focus on consistency and tolerance: steady fluid intake across the day, practical electrolyte or flavor support, and simple foods you can keep down. If appetite drops, switch to smaller, regular eating intervals and keep intake carbohydrate-forward during exertion and after arrival.
If you cannot keep fluids or food down, or intake drops sharply, treat that as an operational risk. Do not make further ascent decisions until intake and symptoms stabilize.
Make ascent decisions from trend, not ego#
Do not push through symptoms to protect the schedule. Compare today's symptom trend with your actual sleeping altitude and real effort, then choose the more conservative action when uncertain.
| Status | What you see | Immediate action | Monitoring cadence | Escalation trigger |
|---|---|---|---|---|
| Stable | No meaningful symptom pattern; intake and function are steady | Continue with planned movement only | Morning and evening, plus any new symptoms | New symptom cluster, worsening trend, or plan drift |
| Caution | New or persistent symptoms, slipping intake, new illness, or medication change | Halt ascent; do not increase sleeping altitude | Recheck later same day and next morning | Symptoms intensify, additional symptoms appear, or function declines |
| Red | Rapid worsening, inability to maintain intake, or clear impairment in alertness, coordination, or judgment | Descend and activate the emergency plan | Continuous observation during descent and handoff | No improvement with descent or rest, or you need help to move safely |
If you are between two rows, act on the higher-risk row. The next section covers emergency execution when caution is no longer enough.
We covered this in detail in How to Train for a High-Altitude Hike.
Phase 3: The Emergency Action Plan#
When red-flag symptoms appear, execute your plan immediately: confirm the trigger, start descent, send one clear update, and hand off to local medical care or evacuation support if you are not clearly stabilizing.
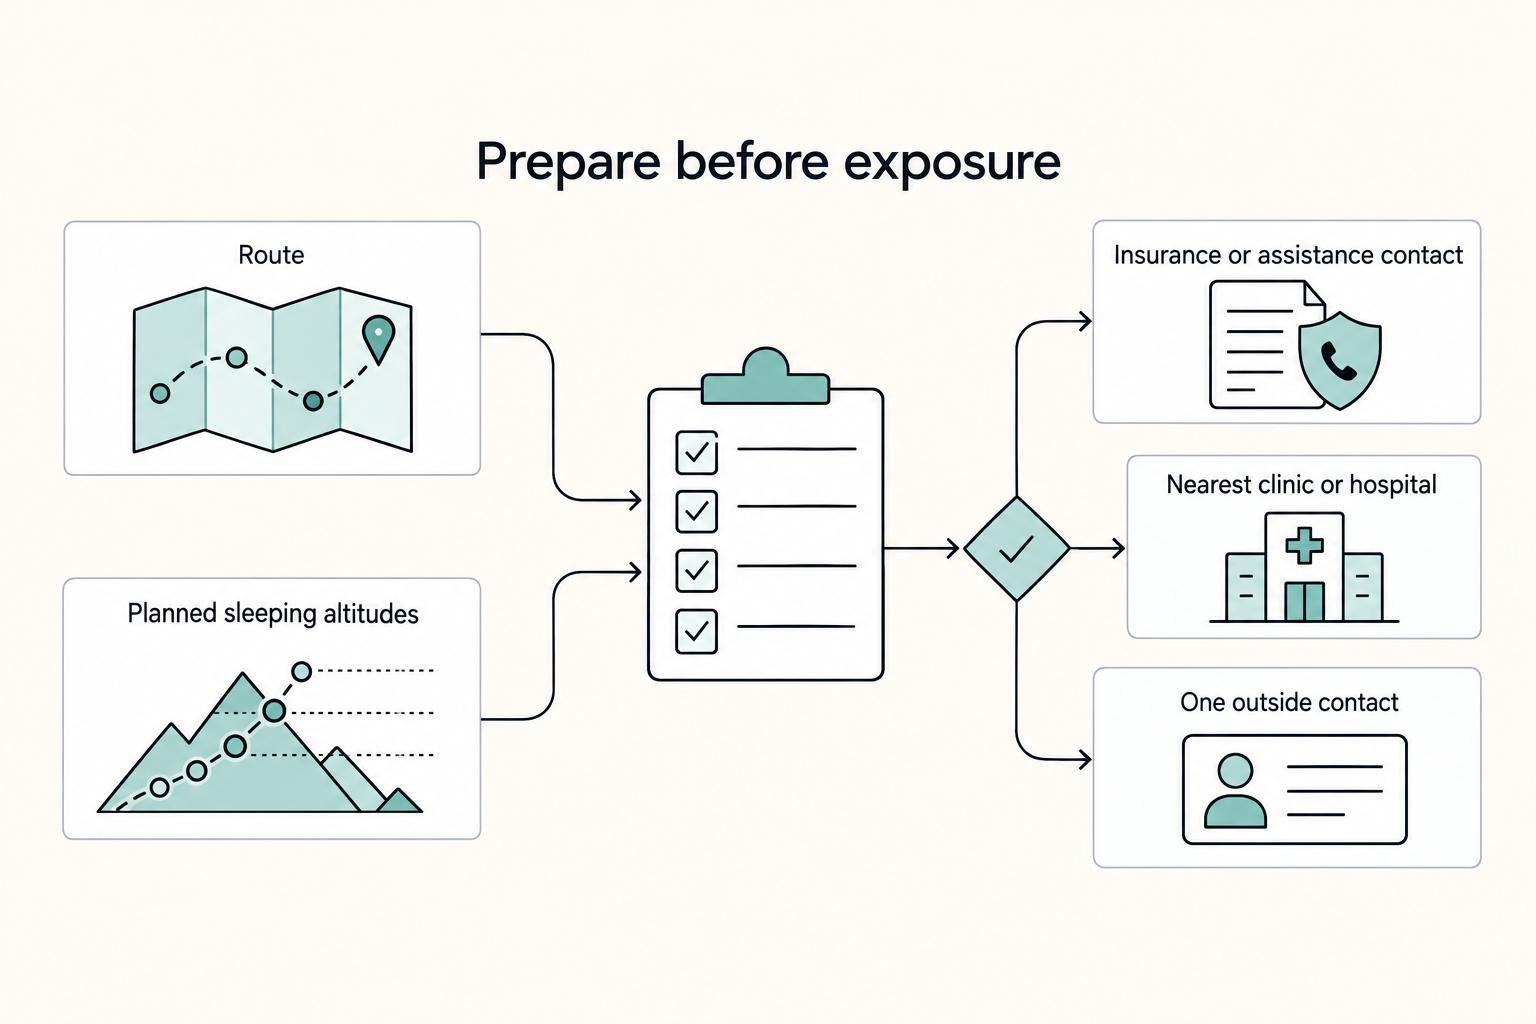
Prepare before exposure#
Use this pre-exposure checklist:
| Packet item | Required detail |
|---|---|
| Route | Include your route in the one-page emergency packet |
| Planned sleeping altitudes | Include planned sleeping altitudes |
| Insurance or assistance contact | Include the contact and verify the number works offline |
| Nearest clinic or hospital | Include it and verify the map pin and place name work offline |
| One outside contact | Include the contact and verify the number works offline |
| First lower location you will move toward | Include the first lower location you will move toward |
| Descent rule | Record the rule once your clinician or expedition protocol has defined it |
| Trigger signs | List them exactly as your clinician or expedition protocol states them |
- Build a one-page emergency packet and keep it both offline on your phone and printed in a waterproof sleeve.
- Include your route, planned sleeping altitudes, insurance or assistance contact, nearest clinic or hospital, one outside contact, and the first lower location you will move toward.
- In the packet, mark your descent rule as unresolved until your clinician or expedition protocol defines it, then record it in plain language.
- List your trigger signs exactly as your clinician or expedition protocol states them. Keep HACE and HAPE named, with plain-language signs you can recognize quickly. If your protocol treats signs such as ataxia or severe breathlessness with a wet cough as automatic descent triggers, mark them as non-negotiable.
- Before you lose signal or road access, open the packet in airplane mode and verify every number, map pin, and place name works offline.
- Have your travel partner review the same packet so execution does not depend on one tired person.
- Do not use an overnight "wait and reassess" delay when serious symptoms are already present, since hypoxemia is often worse during sleep.
Act immediately when red flags appear#
Use this response checklist in order:
- Stop ascent now and reduce exertion.
- Keep the symptomatic person with you; do not leave them alone.
- Match observed signs to your written trigger list, not to your itinerary.
- Begin descent toward your pre-identified lower point, or as far down as conditions safely allow.
- Send your check-in script before signal drops.
- Escalate early if movement is unsafe, symptoms worsen, or your group cannot manage descent safely.
Avoid common failure points: relabeling worsening symptoms as "just dehydration" or "just fatigue," or using respiratory depressants at altitude.
| Trigger sign | Immediate first action | Next escalation step | Handoff point |
|---|---|---|---|
| Severe headache, nausea, weakness, or new difficulty hiking that is worsening | Halt ascent and begin descent | If function keeps dropping or descent is delayed, call for medical guidance | Local clinic, hospital, or evacuation support |
| Suspected HACE sign listed in your plan (for example, ataxia if your protocol uses it) | Treat as emergency; descend now | If coordination makes self-movement unsafe, activate evacuation support early | Local medical care or evacuation support |
| Suspected HAPE sign listed in your plan (for example, severe breathlessness with a wet cough if your protocol uses it) | Stop exertion and start descent without delay | If breathing worsens or safe movement is not possible, call evacuation support | Local medical care or evacuation support |
Use this fill-in script:
"Emergency altitude plan activated. We are at our current GPS pin or landmark near our current altitude. I am seeing the signs listed in our written plan. We are descending to the lower location named in the packet now. Next check-in is at the time already shared. If there is no update, contact the clinic, evacuation support, or emergency number listed in the packet."
For related emergency-readiness context, see A Guide to Wilderness First Aid.
Conclusion: Prepare, Check Yourself Daily, and Act Early#
Real confidence at altitude is simple: prepare before you go, check yourself consistently once you arrive, and act early when something is not improving. That is what turns this from reading material into something you can use.
Your pre-departure job is to remove avoidable guesswork. Build an ascent plan you can stick to, decide how you will record symptoms each day, and define when you will reassess. Once you are on the ground, do not rely on mood or optimism alone. Use the same checkpoints every day.
That consistency matters because high-altitude hypoxia can affect more than how you feel physically. Research describes harmful effects across visual, motor, cognitive, and emotional function, and notes that cognitive ability may be important for safety. One practical risk is explaining away a change in thinking, judgment, or coordination as stress, poor sleep, or a hard travel day. If your symptoms or performance are drifting the wrong way, treat that as a decision point, not background noise.
| Approach | What it gives you |
|---|---|
| Prepared approach | Clearer daily decisions, earlier response to change, better chance of keeping plans intact |
| Improvised approach | More guesswork, slower recognition of problems, more pressure to debate symptoms |
What you do next is simple:
- Plan your ascent before departure, including where you will sleep and when you will reassess.
- Track symptoms the same way each day, ideally with a written log, oxygen saturation, and the Lake Louise score.
- Add a basic performance check if you can, especially if you need to make safety-critical decisions.
- If symptoms or performance are worsening, act early and follow your emergency plan.
For a step-by-step walkthrough, see A Guide to Worldschooling and Unschooling for Nomad Families.
Frequently Asked Questions
What is a safe acclimatization schedule?
Slow your sleeping ascent once you reach the altitude where your plan or clinician guidance says to slow down. Your risk depends on how high you go, how fast you go, and how long you stay, and acclimatization can keep improving over weeks to months. If you can spend the day higher and return lower to sleep, that is less stressful. If your next sleep point is higher and you already feel off, pause ascent.
What are the first signs of altitude sickness?
Treat any new symptoms after gaining altitude as a checkpoint, not as something to push through. Symptoms may begin within 48 hours of arrival. If they are mild and stable, pause ascent and reassess. If they are worsening, descend and seek care.
Should I take Diamox (Acetazolamide)?
Make this a clinician decision, not a guess. Ask whether acetazolamide fits your route, medical history, and planned sleeping altitudes, then follow the written instructions you were given. If you do not have clear medical guidance, get medical advice before using preventive medication, and avoid respiratory depressants at altitude.
What is the difference between AMS, HACE, and HAPE?
Use a simple split: altitude illness can start with milder symptoms, while HACE and HAPE are severe forms linked to fluid in the brain or lungs and can be life-threatening. If symptoms stay mild, you pause ascent. If symptoms are worsening, you descend and get medical help. | Condition | Warning pattern to watch for | Immediate next action | | --- | --- | --- | | AMS | New altitude symptoms that are not clearly improving | Pause ascent and continue only after symptoms settle | | HACE | Brain-related warning signs in your written plan | Descend now and seek urgent medical care | | HAPE | Breathing-related warning signs in your written plan | Stop exertion, descend now, and seek urgent medical care | Do not dismiss worsening altitude symptoms as a routine hard day. If symptoms are getting worse, treat it as a descent decision, not a debate.
Can I fly if I have symptoms of altitude sickness?
Specific post-symptom fly/no-fly thresholds are not confirmed in this guide. If your symptoms are worsening or could be severe altitude illness, descend and get medical advice before you fly.
Try a related tool
Researched and edited by the Gruv editorial team. Gruv builds cross-border billing, payouts, and finance-operations software for global businesses.
Sources
- cdc.gov/yellow-book/hcp/environmental-hazards-risks/...trusted
- des.mt.gov/Preparedness/E0102-SM.pdftrusted
- docs.lib.purdue.edu/cgi/viewcontent.cgitrusted
- epa.gov/sites/default/files/2019-12/documents/apex52...trusted
- faa.gov/air_traffic/publications/atpubs/aim_html/cha...trusted
- faa.gov/air_traffic/publications/media/aim_chg_3_dtd...trusted
- fs.usda.gov/sites/default/files/emergency-medical-servic...trusted
- nrc.gov/docs/ML2507/ML25071A060.pdftrusted
Educational content only. Not legal, tax, or financial advice.
Related Posts

How Remote Professionals Stay Healthy During Long Stays Abroad
Use this sequence before workload, housing, and travel friction make health tasks harder to execute. If you are traveling for months, treat this as four pass-fail gates. A gate is closed only when you have a written output you can verify.

How to Build a Travel First-Aid Kit
**Treat your travel first aid kit like a system for long stays, not a vacation pouch.** If you move city to city, you need repeatable coverage for everyday minor problems and a simple way to keep that coverage current. Build once, review it regularly, and stop re-deciding the basics before every move.
Wilderness First Aid for Remote Professionals
Your business is built on freedom: the freedom to work from anywhere, serve clients globally, and set your own terms. That freedom also removes the layers that usually absorb disruption before it turns into a business crisis. Your office might be a villa in rural Spain, a research site in Costa Rica, or a temporary base in a developing nation. In any of those places, you are also the security lead, risk manager, and first responder.